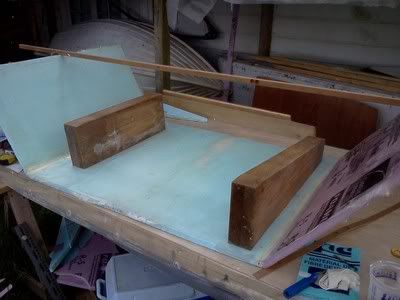
Another foam standie...

Canvas covered foamies (Thrifty Alternatives...)

Moderator: eaglesdare

Re: Another foam standie...

Postby GPW » Tue May 15, 2012 11:34 am

Yes, those words pretty much describe it !!! ;)
There’s no place like Foam !
User avatar
GPW
Gold Donating Member
 
Posts: 14920
Images: 546
Joined: Thu Feb 09, 2006 7:58 pm
Location: New Orleans

Re: Another foam standie...

Postby PcHistorian » Tue May 15, 2012 2:13 pm

sandwich... can you take off the outside piece of "bread" and butter the outside like I do to make a grilled cheese sandwich, then put it back on. that would still give you your glassed outer layer. I would think you would cloth and glass the corners and edges once you got all the pieces back together.

for walls and ceiling, maybe contact cement (or at the really sticky stage for the glass) then have the cloth (precut) rolled up on a broom handle and lay it on by rolling it out over the sticky surface, adjusting it as you lay it on to make contact with the sticky surface. let that harden then just start laying the glass out over the cloth, for the rest of the layers...
no?

otherwise, I'd build it all with screws and just screw the panels after I got all the edges "close enough", screw the panels back on after glassing, and then do the edges and corners.

(can I do vinyl siding over foam? for my next larger "cottage" build.)
Elf Cottage
Image

Build Documentary
https://sites.google.com/site/pchistorian/home/hobby/camping/elf-build
Build Forum
http://www.tnttt.com/viewtopic.php?t=48462
Build Album
http://www.tnttt.com/gallery/album.php?album_id=42

progress is progress. (don't look a gift "progress" in the mouth.)
User avatar
PcHistorian
The 300 Club
 
Posts: 354
Images: 198
Joined: Fri Dec 09, 2011 1:06 pm
Location: S.E. Michigan

Re: Another foam standie...

Postby Wobbly Wheels » Tue May 15, 2012 2:30 pm

PcHistorian wrote:can you take off the outside piece of "bread" and butter the outside


I don't really get what you're asking here. Are you suggesting laying up the glass as a sheet like Filon GRP paneling ?
One certainly could do that, but I've chosen to bond the glass directly to the foam rather than use an intermediate adhesive.
Different strokes and all that.
There are a couple problems with applying the glass just before the resin kicks, the biggest one being that you need the pot life of the resin in order to work it. Secondly, epoxy isn't tacky enough to hold wet glass onto a ceiling. I'm sure there's a way it could be done, but when I've done overhead work I've used a molding board supported from the floor to keep the layup in place. Unless you get the section tightly together, you still have bubbles to deal with. That's one application where I would probably go to the trouble of bagging it.

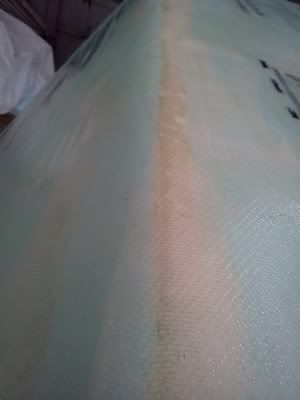
Someone was asking about the clarity of the cured cloth, so I grabbed a quick pic (West 105/205, 6oz cloth):
Image
I wasn't going to bother putting up any pics of the laid up part because, from a distance far enough to get the whole piece in the shot, you can't really tell it's been glassed.

This is funny: after seeing that pic on the monitor, I had to go back and check what looks like wrinkle on the left panel. It's just a color difference in two layers of fairing compound, but it sure looks like wrinkles that magically appeared overnight.
:frightened:
User avatar
Wobbly Wheels
Donating Member
 
Posts: 1080
Joined: Tue Mar 15, 2011 9:51 am
Top

Re: Another foam standie...

Postby eaglesdare » Tue May 15, 2012 2:43 pm

GPW wrote: FYI... canvas overhead is not much easier ... :roll:


no its not easier! :frightened:
Louella
May the foam be with you.
User avatar
eaglesdare
Donating Member
 
Posts: 3168
Images: 13
Joined: Tue Aug 26, 2008 7:06 pm
Top

Re: Another foam standie...

Postby PcHistorian » Wed May 16, 2012 9:01 pm

well someone was talking about "sandwiching" with the foam. I was thinking, 1/4 inch ply in and outside the foam, like a sandwich, then take off just the outer layer of ply to glass and then bolt back into place. but you are going to just glass the foam and paint. (I guess I was thinking, ply, stain, glass for the outer surface. must have been the voyager picture you or someone recently showed me.)
Elf Cottage
Image

Build Documentary
https://sites.google.com/site/pchistorian/home/hobby/camping/elf-build
Build Forum
http://www.tnttt.com/viewtopic.php?t=48462
Build Album
http://www.tnttt.com/gallery/album.php?album_id=42

progress is progress. (don't look a gift "progress" in the mouth.)
User avatar
PcHistorian
The 300 Club
 
Posts: 354
Images: 198
Joined: Fri Dec 09, 2011 1:06 pm
Location: S.E. Michigan
Top

Re: Another foam standie...

Postby Wobbly Wheels » Wed May 16, 2012 9:47 pm

No biggie, mang...it's not as though there's any 'right' way to do it for the most part. That sounds like it would be some extra work but it would give you glass for structure and you could hang some nice cherry or mahogany ply on it afterward...
User avatar
Wobbly Wheels
Donating Member
 
Posts: 1080
Joined: Tue Mar 15, 2011 9:51 am
Top

Re: Another foam standie...

Postby atahoekid » Wed May 16, 2012 11:32 pm

Hey WW, glad to see you're glassing. You are making some nice progress. Like you I am planning to fiberglass my panels in the horizontal and then put them all together. I've got a question about putting the glassed panels together. As a newb to fiberglassing, I'm not sure of the best way to do it. Should I leave a bit of extra cloth hanging off the edges of the panels where they join or glass the panels and add an overlapping strip of fiberglass to make the join? Maybe a strip cut on the bias? Or is there some totally different way of doing it that I don't know about... Thanks for helping out a newb
Mel

"Believe in your abilities... Remember amateurs built the ark, professionals built the Titanic"

"Indecision may or may not be my problem" Jimmy Buffet

Image

The Road Foamie Build Thread: viewtopic.php?t=45698
User avatar
atahoekid
Platinum Donating Member
 
Posts: 1773
Images: 158
Joined: Sat Jul 24, 2010 2:49 am
Location: Incline Village, NV
Top

Re: Another foam standie...

Postby Wobbly Wheels » Thu May 17, 2012 1:00 am

Thx for the boost Mel and, not to worry: we're all newbs at something.

I'm cutting the panels out with a crosscut handsaw. It leaves a wide enough kerf that I can backfill it with foam to join the core to the adjacent edges. Then comes the inevitable filling and sanding to get a smooth plane to lay the glass onto...
I'll be using tape (prob 6") to join the glass together. While I'm laying up the pieces, I'm trimming the glass flush with their edges. If you have a lot of curves, you could use bias cut cloth for the tape. Some folks don't like the hard edge of the tape, but I'm going to be fairing the seam anyway so it's nothing to knock it down with an RO sander.

When you mentioned leaving extra glass over the edge, you certainly could do that as a flange and glue it to the next piece. I've done honeycomb flooring in race boats that way where they meet over the floor timbers. The glass you leave for the flange would of course have to be wet out at the same time as the rest of that piece, which would make corners more difficult to do because that side would need to stay flat on the table till it cured or the flange would distort out of the flat plane of the panel.

For my build, I want a single unified shell of glass rather than a hodgepodge of pieces glued together. That's why I'm going with taped seams and then a final layer of glass over everything. As long as you use a compatible adhesive and get a good clamp, I can't think of any reason it wouldn't work.
User avatar
Wobbly Wheels
Donating Member
 
Posts: 1080
Joined: Tue Mar 15, 2011 9:51 am
Top

Re: Another foam standie...

Postby atahoekid » Thu May 17, 2012 6:17 pm

You gave me a great answer. I will cut the edges of the glass flush with the panel and join the roof panels to the side wall panels with 6" tape after I glue them at the corners(do they make bias tape? :thinking: :thinking: ) and then fair out the edge of the tape. Leaving the flange, wetting it out and getting it to dry flat sounds like a problem waiting to happen. Thanks for the advice. Cheers!! :beer: :beer:
Mel

"Believe in your abilities... Remember amateurs built the ark, professionals built the Titanic"

"Indecision may or may not be my problem" Jimmy Buffet

Image

The Road Foamie Build Thread: viewtopic.php?t=45698
User avatar
atahoekid
Platinum Donating Member
 
Posts: 1773
Images: 158
Joined: Sat Jul 24, 2010 2:49 am
Location: Incline Village, NV
Top

Re: Another foam standie...

Postby Wobbly Wheels » Sat May 19, 2012 2:09 am

atahoekid wrote:do they make bias tape?


Absolutely, but it's element is really in curved surfaces. Were I doing a tear shape, I might use bias tape on the roof/sidewall seam. I would have to cut darts out so the glass laid laid flat onto the sidewall without wrinkling, but the roof side would be a smooth curve. Then again, plain weave (90 degree) tape does that just as well.
Personally, I use bias tape on curved inside corners, but that's about it.
Bias tape for seams really shines when you have a big gap in the fibers from one side to another. The opposition of the 'grain' in that case adds rigidity as long as the core is continuous. For 99% of applications, bias tape isn't really necessary.
That's just IMHO of course, I'm sure you'll find people who prefer it and as long it doesn't actually reduce the integrity of the layup then it's all good.
User avatar
Wobbly Wheels
Donating Member
 
Posts: 1080
Joined: Tue Mar 15, 2011 9:51 am
Top

Re: Another foam standie...

Postby Wobbly Wheels » Sat May 19, 2012 2:54 am

Made a bit of progress tonight, though freshening up my smoker took a bit of priority since I have about 2 lbs of chicken to smoke this weekend. I'm just getting into smoking so if anyone wants to talk smoking, don't feel like you're hijacking....

Anyway...as usual I'm going to make you read through my spiel before giving you pics...


So, not much of a spiel: did some fairing, some glassing, etc. I've been waiting for my West pumps to get here, which they did today.
PICS !!!
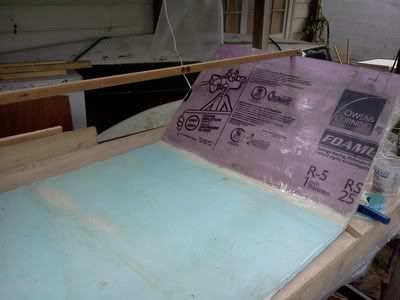
The outside is glassed so I've flipped it over and done the inside face now.
Image

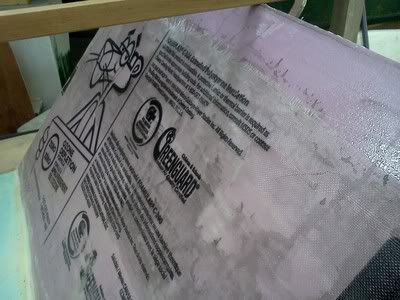
This shows you just how clear the 105/205 resin cures:
Image

This one shows the stay that I've put in place to maintain the right distance between the edges. Because the panel is glass and is going to be mounted vertically, I don't need to allow for any springback so the distance is the same as on the trailer.
The dinghy in the background is the one I'm itching to get on the water this summer - its slated for a purpleheart deck/breasthook and walnut for the gunwhales and bow cleat. I've already got the bronze oarlocks polished up and ready to go onto the oars....
Image

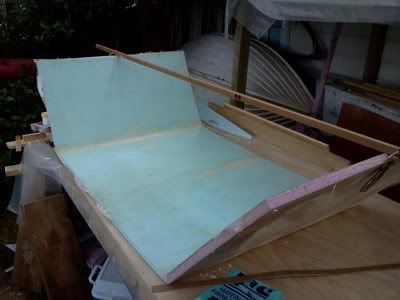
With the stay in place in the pic above, the bottom wanted to lift up at the corners since the outside is already glassed. Fortunately, I rounded up a couple hunks of fir to fix that (part of a future bar top... see 'honey-do list', item #2415....)
A bit of vinyl to keep the glass from sticking to it and Robert is your father's brother (or your mother's, I guess)...
Image


It looks like this panel will be back in place on the trailer this weekend and I'll get one ( both ?) of the corners cut out and onto the bench for fairing.
I have to get some more hours in at work before I can buy more resin and glass so Project Glacier will likely live up to its name for the next little while. This is definitely the priciest part of the build and, despite getting materials at wholesale, it's still money out the door which is a bit tight for 'projects' at the moment. At the very least, I'll drag up the big pieces (fridge, stove, etc) and mock up the interior. And yes, my fellow foamlings...there shall be pictures......because otherwise it didn't happen, lol.
User avatar
Wobbly Wheels
Donating Member
 
Posts: 1080
Joined: Tue Mar 15, 2011 9:51 am
Top

Re: Another foam standie...

Postby loaderman » Sat May 19, 2012 11:40 am

:D Thanks for the updates - and pics
loaderman
The 300 Club
 
Posts: 306
Joined: Fri Jan 27, 2012 12:03 am
Top

Re: Another foam standie...

Postby atahoekid » Sat May 19, 2012 2:50 pm

Wobbly Wheels wrote: Project Glacier will likely live up to its name for the next little while. .


I wish I were moving at such a "glacier" pace. I've spent the last two weekends (re)building two doors. :x :x :x :x Really?? Two whole weekends plus a Friday... Now that's SLOW!!
Mel

"Believe in your abilities... Remember amateurs built the ark, professionals built the Titanic"

"Indecision may or may not be my problem" Jimmy Buffet

Image

The Road Foamie Build Thread: viewtopic.php?t=45698
User avatar
atahoekid
Platinum Donating Member
 
Posts: 1773
Images: 158
Joined: Sat Jul 24, 2010 2:49 am
Location: Incline Village, NV
Top

Re: Another foam standie...

Postby Wobbly Wheels » Sat May 19, 2012 3:14 pm

atahoekid wrote:I've spent the last two weekends (re)building two doors.


How did you make out with your delaminating wall panel ?
I'm having that problem with my floor. I'll do it a bit differently next time, but now the only practical fix is to lay a sheet of 1/4" on top as an underlayment and screw & glue it through to the bottom (3/8") skin. Then my finished floor (probably vinyl tile) will go on top of that.
Live and learn...

In other news...the glassed panel is now hung back on the forms and the build is put to bed for a while.
User avatar
Wobbly Wheels
Donating Member
 
Posts: 1080
Joined: Tue Mar 15, 2011 9:51 am
Top

Re: Another foam standie...

Postby atahoekid » Tue May 22, 2012 7:28 pm

I took a syringe without a needle and inject glue between the panel and the foam. It only seemed to be a problem at the edges. After injecting the glue and clamping them panels back together, the problem was solved. But after solving that issue, I managed to trim the doors down too small, so I've had to rebuild the doors. I sandwiched plywood and foam and the inner luaun. These puppies are heavier than the rest of the side wall. While I think they'll be fine, my perfectionist inner self is nagging me to build them a third time but lighter this time. :NC :NC I worry me sometimes! :lol: :lol:
Mel

"Believe in your abilities... Remember amateurs built the ark, professionals built the Titanic"

"Indecision may or may not be my problem" Jimmy Buffet

Image

The Road Foamie Build Thread: viewtopic.php?t=45698
User avatar
atahoekid
Platinum Donating Member
 
Posts: 1773
Images: 158
Joined: Sat Jul 24, 2010 2:49 am
Location: Incline Village, NV
Top

PreviousNext

Return to Foamies

Who is online

Users browsing this forum: No registered users and 8 guests