The Poet Creek Express - Foamie Hybrid

Canvas covered foamies (Thrifty Alternatives...)

Moderator: eaglesdare

Re: The Poet Creek Express - Foamie Hybrid

Postby KCStudly » Mon Jan 13, 2014 11:13 pm

Thanks for the kind words, Cpine. It does get to be tedious.

Thanks to everyone for the brush pointers.
KC
My Build: The Poet Creek Express Hybrid Foamie

Poet Creek Or Bust
Engineering the TLAR way - "That Looks About Right"
TnTTT ORIGINAL 200A LANTERN CLUB = "The 200A Gang"
Green Lantern Corpsmen
User avatar
KCStudly
Donating Member
 
Posts: 9640
Images: 8169
Joined: Mon Feb 06, 2012 10:18 pm
Location: Southeastern CT, USA

Re: The Poet Creek Express - Foamie Hybrid

Postby GPW » Tue Jan 14, 2014 7:50 am

Ehh!!! Finishing.... " It does get to be tedious.” ... True dat’ !!!
Just like making my guitars, the finish can easily take much longer than the wood cutting/shaping (the Fun part) ... and there’s the endless sanding ... :duh: :frightened: :roll:

There is something to be said for just slapping on a couple coats of Latex, and Bob’s your ... :roll:
There’s no place like Foam !
User avatar
GPW
Gold Donating Member
 
Posts: 14920
Images: 546
Joined: Thu Feb 09, 2006 7:58 pm
Location: New Orleans

Re: The Poet Creek Express - Foamie Hybrid

Postby grantstew8 » Tue Jan 14, 2014 9:50 am

The mirror finishes on this TD are already looking amazing and is an inspiring build....
:thumbsup: :thumbsup:

"Getting my shine on" going to take some time as I'm looking at dust ply in a freezing workshop.
User avatar
grantstew8
The 300 Club
 
Posts: 448
Images: 77
Joined: Tue May 28, 2013 5:26 pm
Location: Dunfermline, Scotland
Top

Re: The Poet Creek Express - Foamie Hybrid

Postby KCStudly » Tue Jan 14, 2014 11:38 am

Pictures add 20 ft to real life perspective.

Thank you for the kind words, Grant. I only hope that when people see it in real life they get the same impression. :worship:

It's all about the time.
KC
My Build: The Poet Creek Express Hybrid Foamie

Poet Creek Or Bust
Engineering the TLAR way - "That Looks About Right"
TnTTT ORIGINAL 200A LANTERN CLUB = "The 200A Gang"
Green Lantern Corpsmen
User avatar
KCStudly
Donating Member
 
Posts: 9640
Images: 8169
Joined: Mon Feb 06, 2012 10:18 pm
Location: Southeastern CT, USA
Top

Re: The Poet Creek Express - Foamie Hybrid

Postby capnTelescope » Tue Jan 14, 2014 7:52 pm

KC, your build is looking g-o-o-d!

Just because someone has to be the oddball, I don't use brushes much at all, unless I'm actually painting. For stain and wipe-on poly, I use a strip of terrycloth towel folded up into a 4-ply square.

For stain, dip a corner of the square into the can. This leaves you with a dry area to wipe off the excess stain.

For the wipe-on poly, I soak the terry from the can for small parts or vertical surfaces. For larger surfaces, I pour it on the wood from the can, and wipe it out with the terry. Let the terry get good and wet, but not dripping. Wear a nitrile exam glove. No shed bristles. Store it overnight in a zip lock sandwich bag. If it dries out and gets hard, no biggie. Just cut another strip. I think it gives great results, especially if you steel wool the finish between coats. Like the directions say.
I'll burn that bridge when I come to it.

Brad
ImageImageImage

Building the Bed & Breakfast
User avatar
capnTelescope
Lifetime member
 
Posts: 1222
Images: 368
Joined: Sun Jun 27, 2004 3:44 pm
Location: Round Rock, TX
Top

Re: The Poet Creek Express - Foamie Hybrid

Postby KCStudly » Tue Jan 14, 2014 8:09 pm

Thanks for the kind words and tips, Capn. :D

Any problems with lint from the terry, and how does it work for details like the inside corners of cabinet frames?
KC
My Build: The Poet Creek Express Hybrid Foamie

Poet Creek Or Bust
Engineering the TLAR way - "That Looks About Right"
TnTTT ORIGINAL 200A LANTERN CLUB = "The 200A Gang"
Green Lantern Corpsmen
User avatar
KCStudly
Donating Member
 
Posts: 9640
Images: 8169
Joined: Mon Feb 06, 2012 10:18 pm
Location: Southeastern CT, USA
Top

Re: The Poet Creek Express - Foamie Hybrid

Postby capnTelescope » Tue Jan 14, 2014 9:54 pm

KCStudly wrote:Any problems with lint from the terry...

No. The towels I get to use have had most of the lint laundered out of them. :lol: Even the ones that have been in the shop for a while and gathered sawdust seem to do fine if you shake them out good. I like to use the folded edge, as opposed to the ripped/scissored edges.

KCStudly wrote:... how does it work for details like the inside corners of cabinet frames?

About as good as a brush. I think you're less prone to getting drips where vertical meets horizontal. The surface of the terry is like a zillion tiny little brushes, so it gets into corners and tight spots pretty good. Like any time you paint into a corner, you have to pay extra attention to brush it out from the corner. Because the terry is soft and conforming, I think it does well.

Try it somewhere it won't show, first. I think you'll like the results. And it's basically a free brush with no clean up.
I'll burn that bridge when I come to it.

Brad
ImageImageImage

Building the Bed & Breakfast
User avatar
capnTelescope
Lifetime member
 
Posts: 1222
Images: 368
Joined: Sun Jun 27, 2004 3:44 pm
Location: Round Rock, TX
Top

Re: The Poet Creek Express - Foamie Hybrid

Postby KCStudly » Tue Jan 14, 2014 11:16 pm

Thanks for the added details. On the advice of the paint guy at the big box I tried one of those lambs wool block applicators, but did not like it at all. The terry sounds like a similar solution, more adaptable, less expensive, and disposable.

I just might give it a try. :thumbsup:
KC
My Build: The Poet Creek Express Hybrid Foamie

Poet Creek Or Bust
Engineering the TLAR way - "That Looks About Right"
TnTTT ORIGINAL 200A LANTERN CLUB = "The 200A Gang"
Green Lantern Corpsmen
User avatar
KCStudly
Donating Member
 
Posts: 9640
Images: 8169
Joined: Mon Feb 06, 2012 10:18 pm
Location: Southeastern CT, USA
Top

Re: The Poet Creek Express - Foamie Hybrid

Postby Mary C » Wed Jan 15, 2014 11:16 am

I use old sheets for applying most finishes, I fold the edges inside and make a pad, works great for me.

Mary C. :lady:
User avatar
Mary C
1000 Club
1000 Club
 
Posts: 1776
Images: 473
Joined: Mon Oct 15, 2012 6:29 pm
Location: Waco, Georgia
Top

Re: The Poet Creek Express - Foamie Hybrid

Postby KCStudly » Fri Jan 17, 2014 12:51 am

Sorry I didn’t make it out to Mecca yesterday. Wednesdays are usually a big day for the build… and it was warm. I got side tracked by forgetfulness and ran around; wasted a warm day.

Anyway, it was only about 43 F when I arrived tonight. I spent some time peeling the last piece of blue tape off of the street side upper rear cabinet frame. There was a bit of glue still squeezing out there when I left it last, so it was a pain to get the tape out of the cranny. An ever so slight lack of tightness between the middle of the frame and the wall (tight top and bottom where the frame screws are, but maybe a scant 32nd inch cupping in the wall in between).

Lesson: it would be better to mask just ever so slightly away from the line, or stay and spend the time wiping the excess glue off of the tape, than it is to try and pick tape out of the corner of a joint when it is buried under anything more than just a very thin (wiped) film of glue. I think I pulled it off, but it was awkward in the poor light, and my old bifocal work/safety glasses seemed to be a hindrance (street glasses have new lenses and are awaiting pickup… work/safety glasses are due next).

After that I decided that oil based finish should be less affected by moderately low temps than water based glue and decided to scuff the dome light trim blocks, then applied a second coat of dilute poly to them, and a first coat to the main switch blocks.
Image
You can see the bug that landed on the one (black smudge on lower edge of center round) that I had to pluck out while it was still soft. (The rounds are actually sitting up on small scraps, even tho it looks like they are sitting directly on the freezer paper.)

I still need to route the wireways in the back of the pillow light trim blocks, and since I had wet poly down, that didn't make sense anymore, so I left those out for now. The wrong 3 p's (piss poor planning).

Next, Karl was there to help me setup and test punch a piece of 16 gage steel (I suppose I could have figured it out for myself, but I like to give him credit whenever I can... he is always a big help!). From the posted panel cutout spec on superbrightleds.com, the metric conversion was very close to 3/4 inch diameter for the nominal hole. The flange on the switch is not very much larger, so accuracy is key. Karl encouraged me, and jumped in and set the iron worker up with a 3/4 inch punch while I picked out a scrap of 16 gage (happened to be mild steel, tho the switch plates are stainless). Punched the hole then used two different width files to stroke keyways for the anti-rotation tab and the keeper clips.
Image

With that method settled, I spent some time laying out the switch locations on the real switch plates. Did some math to figure out the spacing, taking into consideration the orientation of the tabs, the opposite hand orientation of the trim (curb and street side) and the specific orientation of the plates to their hand fit trim blocks. At first I thought that the flag type terminal connectors might crash into each other on the main 3 switch plate near my street side door (where the switches are arrayed horizontally… not an issue for the pillow light switches that are stacked vertically), but the main trims are wider and I was able to increase the switch spacing a bit there. The issue has to do with the location of the electrical terminal tabs on the backs of the switches, and the orientation of the "O/I" (off/on) labels printed on the switch rockers. Details.

Got the loft up to 53 F before shutting down. Tomorrow I get my new glasses fitted so no work. If the weather is fair on Saturday my BIL is loaning me his log splitter and I will split up the wood left from the arborist.

Next up will be installing the red light, dome lights and finishing up the switch plates; then progressing to the front; then the ceiling, etc.
KC
My Build: The Poet Creek Express Hybrid Foamie

Poet Creek Or Bust
Engineering the TLAR way - "That Looks About Right"
TnTTT ORIGINAL 200A LANTERN CLUB = "The 200A Gang"
Green Lantern Corpsmen
User avatar
KCStudly
Donating Member
 
Posts: 9640
Images: 8169
Joined: Mon Feb 06, 2012 10:18 pm
Location: Southeastern CT, USA
Top

Re: The Poet Creek Express - Foamie Hybrid

Postby KCStudly » Sun Jan 19, 2014 12:08 am

Well, it rained a bunch today, so did not split wood; although I did manage to pick up and get the splitter close to where I wanted it last night (in the dark); and then into position today between downpours.

With the rain I managed to sneak off to Mecca and worked on the switch plates some more.

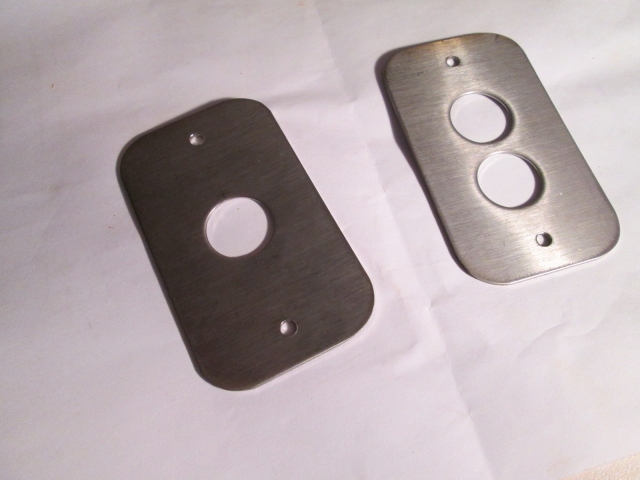
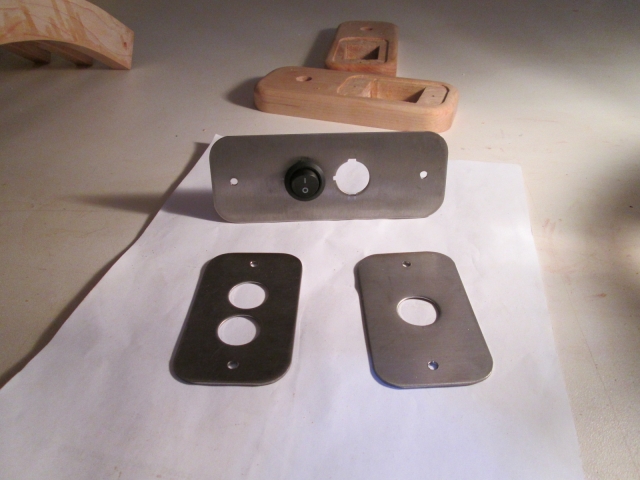
Punched them out on the iron worker. Filed the backs flat a bit (the punching curled them some and raised a small burr), then used a small rat tail file to remove the remainder of the burrs from the back side. These are the pillow light switch plates; one pillow light switch hole for the curb/wife side and two switch holes {pillow light and red night light… (?) ... can’t remember at the moment whether the red light or bulkhead fan switch is at this location} for the street/my side.
Image
Having decided to turn the trim blocks for the pillow lights vertically (so the mounting screws don’t run into the embedded wire ways), the grain in the brushed stainless steel sheet stock no longer runs the right way… so I will have to “re-grain” them ( ...or maybe RO, grit blast to matte, or even engine turn them).

I may have worked out of sequence here, as the punching operation curled the plates a bit, and, while taking two steps forward, I took at least one small step back (more on that in a sec).

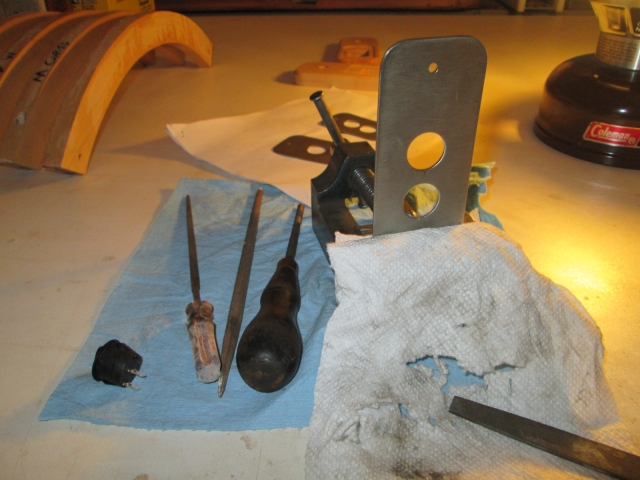
The next step was to file the keyways for the anti-rotation keys, and the springy keeper tabs on the switches. I laid out the centerlines for the keys, paying particular attention to each plate’s orientation to its block, and that the relative position of the ‘O’ (off) mark on the switch was always down. I used Karl’s small machinist’s vice to hold the plates steady while I filed. Also used a piece of paper towel to hold the parts in the vice, minimizing scratches and marks from the vice (soft jaws, if you will).
Image

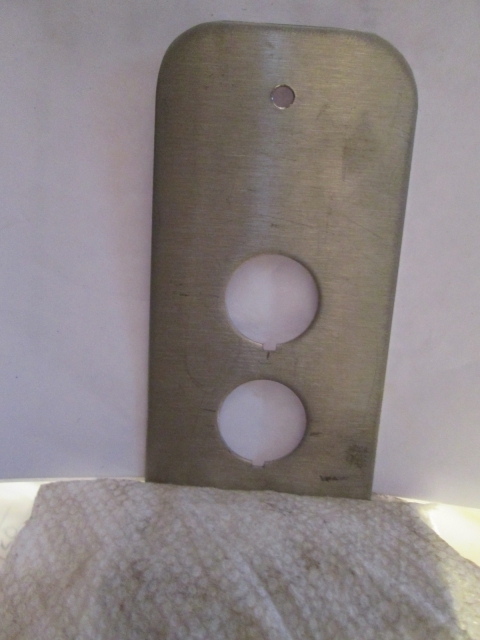
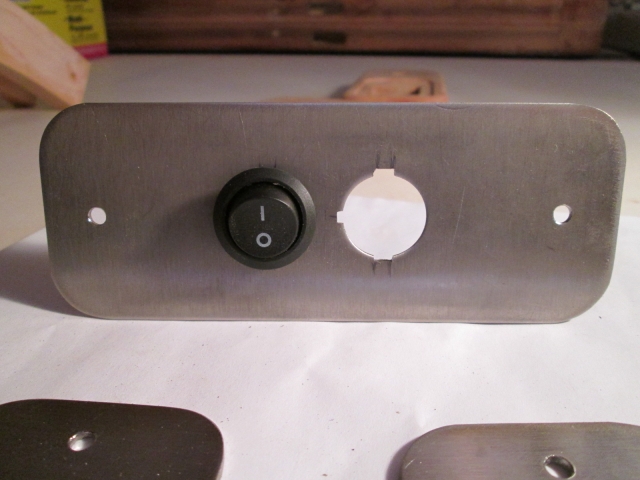
Here I am holding a piece of white paper behind the street side pillow light switch plate to better show the keyways.
Image

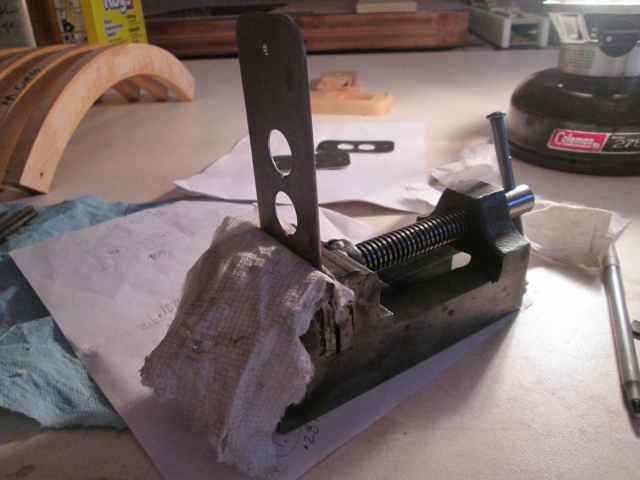
A better look at the machinist’s vice.
Image

Using the same technique and a wider file, I test fit a switch into each hole and transferred marks to delineate the bounds of the keeper tabs. Then I filed each of those starting with the longer horizontal curb side main switch plate (dome and porch lights).
Image
Image

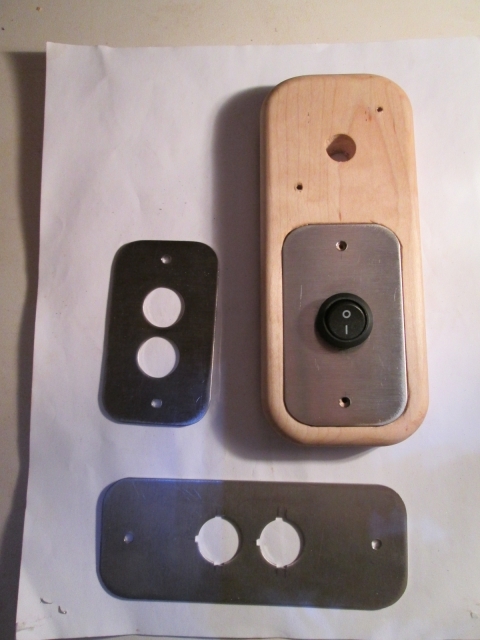
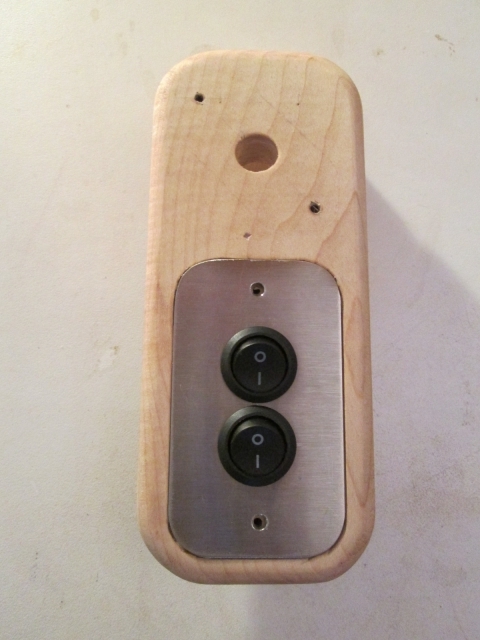
Moved on to the curb side pillow light. Note that the screw holes (over the switch) for the light are on a diagonal facing rearward and downward.
Image

Here was my screw up. After punching the three holes in the street side main switch plate (dome, porch, and red night light… or fan?... the red light is a ‘tell’ of my submarine experience and friend Dale’s astronomy experience rubbing off on me) and noting how much the punching operation had curled the plates, I attempted to press it flat between some heavy steel plates. Despite putting some paper towel on the switch plate to help avoid scratches (a big under estimation) the press “coined” the texture of the steel plates into the switch plate rather aggressively, and made some other kinks.
Image
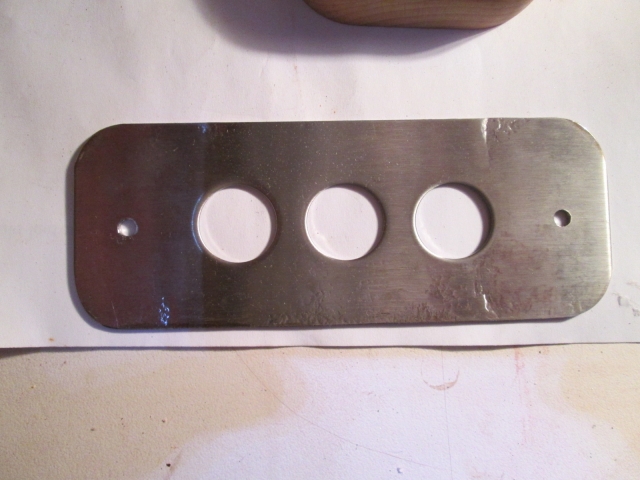
If the texture had been even across the plate I might have gone with it; kind of stone like.

But no, so I’ll have to make this piece over again.

I needn’t have bothered, as the curl in the plates would have easily been pulled flat by the mounting screws, but it will complicate holding these true in the mill to finish the counter sinks for the mounting screws, and the re-graining operation… it would be better if they were still perfectly flat.

Here are the curb side main switches test fit in the plates and blocks. The extra scratches and layout marks will disappear with the re-graining (or optional finishes mentioned above).
Image

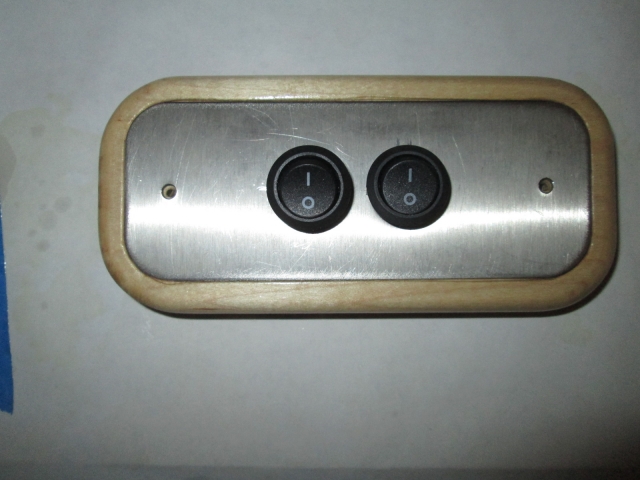
Here is the street side pillow light block with pillow light switch and bulkhead fan switch(?).
Image

Still need to cut the wire way in the backs of the pillow light blocks, and they still need poly. The dome light blocks came out nicely, and the main switch blocks still need another coat.

Tomorrow’s weather should be better for splitting wood; Monday we will see if my back is still with us.
KC
My Build: The Poet Creek Express Hybrid Foamie

Poet Creek Or Bust
Engineering the TLAR way - "That Looks About Right"
TnTTT ORIGINAL 200A LANTERN CLUB = "The 200A Gang"
Green Lantern Corpsmen
User avatar
KCStudly
Donating Member
 
Posts: 9640
Images: 8169
Joined: Mon Feb 06, 2012 10:18 pm
Location: Southeastern CT, USA
Top

Re: The Poet Creek Express - Foamie Hybrid

Postby grantstew8 » Sun Jan 19, 2014 3:38 am

The light switches look great. I like the shape and design and the quality matches the rest of the build! :)
User avatar
grantstew8
The 300 Club
 
Posts: 448
Images: 77
Joined: Tue May 28, 2013 5:26 pm
Location: Dunfermline, Scotland
Top

Re: The Poet Creek Express - Foamie Hybrid

Postby GPW » Sun Jan 19, 2014 9:47 am

KC, you are weighing all these little bits eh ? :roll:
There’s no place like Foam !
User avatar
GPW
Gold Donating Member
 
Posts: 14920
Images: 546
Joined: Thu Feb 09, 2006 7:58 pm
Location: New Orleans
Top

Re: The Poet Creek Express - Foamie Hybrid

Postby KCStudly » Sun Jan 19, 2014 9:50 am

Thank you Grant. I appreciate the kind words. :D
KC
My Build: The Poet Creek Express Hybrid Foamie

Poet Creek Or Bust
Engineering the TLAR way - "That Looks About Right"
TnTTT ORIGINAL 200A LANTERN CLUB = "The 200A Gang"
Green Lantern Corpsmen
User avatar
KCStudly
Donating Member
 
Posts: 9640
Images: 8169
Joined: Mon Feb 06, 2012 10:18 pm
Location: Southeastern CT, USA
Top

Re: The Poet Creek Express - Foamie Hybrid

Postby atahoekid » Sun Jan 19, 2014 9:42 pm

KC,
As with the rest of the build, your attention to detail on the switch plates is astounding. Just to add to the debate about brushes, a few years ago I switched to the disposable foam brushes for poly work. I had my doubts initially but after a couple of test projects, I made the switch for good. I think it leaves a very nice finish...
Mel

"Believe in your abilities... Remember amateurs built the ark, professionals built the Titanic"

"Indecision may or may not be my problem" Jimmy Buffet

Image

The Road Foamie Build Thread: viewtopic.php?t=45698
User avatar
atahoekid
Platinum Donating Member
 
Posts: 1773
Images: 158
Joined: Sat Jul 24, 2010 2:49 am
Location: Incline Village, NV
Top

PreviousNext

Return to Foamies

Who is online

Users browsing this forum: No registered users and 7 guests