The Poet Creek Express - Foamie Hybrid

Canvas covered foamies (Thrifty Alternatives...)

Moderator: eaglesdare

Re: The Poet Creek Express - Foamie Hybrid

Postby KCStudly » Sun Jun 08, 2014 10:00 pm

Before taking the masking off of the glue areas of the front wall skin, I used the little hobby brush and painted the annular for the wire way.
Image

That little pesky spot on the locker sill that pulled up with the first masking pulled up again, to a lesser degree, the second time around, so I hit it again.
Image

In prep for glue, after pulling the masking off of the glue areas of the front wall skin, I sanded some areas on the raw/front side around the locker opening where the stain had wicked around. I didn’t want anything to interfere with the glue bond. The rear/cabin side didn’t need much work at this point, but you can see the raw edges that will get glued to the front edges of the side walls.
Image

Before gluing and screwing the front toe kick spar onto the notch in the base of the locker, I put a little dab of paintable caulk in each corner where there was a little saw undercut; just to make sure this got sealed well.
Image

Then I used TB2 and installed the toe kick spar.
Image
Image

Next I dry fit the skin to the locker and spar again. With all of the paint and poly it had become quite a tight fit, particularly on the street side lower edge, so I scraped that area a little so that it would fit a little easier.
Image

With the lip around the locker case opening I wasn’t too worried about glue dripping down onto the vinyl around the top and sides, and down in the well wouldn’t be overtly visible, but anything dripping off of the sill might land where you could see it so I just put a couple of loose pieces of chip board there, just in case.
Image

Then I used TB2 with pin nails around the perimeter of the locker opening, and 2 on each side in the field along the sides of the case between the toe kick and the sill. I switched to staples along the base of the wall into the toe kick. Where I could, I added spring clamps between the nails.
Image

For the nails in the field I dabbed on some of the colored putty…
Image

… and wiped off the excess.
Image

Fit the short piece of split loom between the toe kick and Sealtite fitting, visible here thru the notch that will be closed off by the front edge of the floor.
Image
Image

Sat back for a minute to take in the big picture.
Image
Image

The corner trim pieces for the Wiremold extend away from the corner a bit allowing the straight pieces to be a little shorter, and the wires to turn with some radius. I mocked this up, allowing for the side wall thickness, to get the cut length for the front piece of Wiremold. Because the pieces overlap, the cut length doesn’t need to be precise, so no worries about exact fit later.
Image

Next I figured where the wires would pass through.
Image

Clamped the Wiremold to a backing block using a couple of spacer blocks that fit down into the open trough, and drilled out the passage using a slightly larger Forstner bit.
Image
Image
Image

And that was another 5 hrs or so of forward progress.
KC
My Build: The Poet Creek Express Hybrid Foamie

Poet Creek Or Bust
Engineering the TLAR way - "That Looks About Right"
TnTTT ORIGINAL 200A LANTERN CLUB = "The 200A Gang"
Green Lantern Corpsmen
User avatar
KCStudly
Donating Member
 
Posts: 9616
Images: 8169
Joined: Mon Feb 06, 2012 10:18 pm
Location: Southeastern CT, USA

Re: The Poet Creek Express - Foamie Hybrid

Postby lfrazer98 » Sun Jun 08, 2014 10:03 pm

My dad and I were just at the store the other day trying to find something to carry my wires from the tongue box through my tear walls that are 1 1/8" thick. Looked at the same things you did. We still haven't made any decisions yet either. Glad I checked in on your page!!
User avatar
lfrazer98
Teardrop Master
 
Posts: 204
Images: 217
Joined: Tue Sep 17, 2013 6:25 pm
Location: New York

Re: The Poet Creek Express - Foamie Hybrid

Postby KCStudly » Sun Jun 08, 2014 10:08 pm

I'm glad I've given you some ideas! That's what the forum is all about! :thumbsup:
KC
My Build: The Poet Creek Express Hybrid Foamie

Poet Creek Or Bust
Engineering the TLAR way - "That Looks About Right"
TnTTT ORIGINAL 200A LANTERN CLUB = "The 200A Gang"
Green Lantern Corpsmen
User avatar
KCStudly
Donating Member
 
Posts: 9616
Images: 8169
Joined: Mon Feb 06, 2012 10:18 pm
Location: Southeastern CT, USA
Top

Re: The Poet Creek Express - Foamie Hybrid

Postby bonnie » Mon Jun 09, 2014 3:13 am

Seeing your execution of the loom and fittings was a real pleasure. I too had thought of those water proof fittings as an ideal electrical junction. Well done! :applause:
Remember, the turtle won. :)
User avatar
bonnie
Donating Member
 
Posts: 1390
Images: 107
Joined: Sun Jul 24, 2011 4:14 pm
Location: Roxana, IL
Top

Re: The Poet Creek Express - Foamie Hybrid

Postby KCStudly » Mon Jun 09, 2014 6:21 am

Thank you Bonnie! I'm happy to see that the little foamie (The Nookery) went to a good home and has stayed "in the family"!
KC
My Build: The Poet Creek Express Hybrid Foamie

Poet Creek Or Bust
Engineering the TLAR way - "That Looks About Right"
TnTTT ORIGINAL 200A LANTERN CLUB = "The 200A Gang"
Green Lantern Corpsmen
User avatar
KCStudly
Donating Member
 
Posts: 9616
Images: 8169
Joined: Mon Feb 06, 2012 10:18 pm
Location: Southeastern CT, USA
Top

Re: The Poet Creek Express - Foamie Hybrid

Postby bonnie » Mon Jun 09, 2014 10:24 am

KCStudly wrote:Thank you Bonnie! I'm happy to see that the little foamie (The Nookery) went to a good home and has stayed "in the family"!

:)
Remember, the turtle won. :)
User avatar
bonnie
Donating Member
 
Posts: 1390
Images: 107
Joined: Sun Jul 24, 2011 4:14 pm
Location: Roxana, IL
Top

Re: The Poet Creek Express - Foamie Hybrid

Postby KCStudly » Mon Jun 09, 2014 4:39 pm

Stayed after work tonight and used the mill there to finish drilling and countersinking the screw holes in the locker edge trim. Sorry, no pics. :NC

I used a slightly different technique that allowed the depth of the counter sinks to be much more uniform. :thumbsup:

Edit: Forgot to mention that Dave Z. (http://www.zzpowdercoating.com/) is going to powder coat the locker trim black for me, so that it matches the black trim paint around the main side door flanges.
KC
My Build: The Poet Creek Express Hybrid Foamie

Poet Creek Or Bust
Engineering the TLAR way - "That Looks About Right"
TnTTT ORIGINAL 200A LANTERN CLUB = "The 200A Gang"
Green Lantern Corpsmen
User avatar
KCStudly
Donating Member
 
Posts: 9616
Images: 8169
Joined: Mon Feb 06, 2012 10:18 pm
Location: Southeastern CT, USA
Top

Re: The Poet Creek Express - Foamie Hybrid

Postby KCStudly » Wed Jun 11, 2014 8:44 pm

Dave Z. turned the locker trim around overnight…
Image
Image

… and I installed it tonight.
Image
Image
Image

Then came the hinges…
Image
Image

… and the latch striker plate.
Image

Karl and I were both digging the black trim, but he thought I should have gone with black treated screws, while I like the fact that the bare stainless steel screws tie in with the light switch plates and add a little “twinkle”.
Image

Couldn’t resist a fit check to see how it looks.
Image

I had marked the location of the key catcher shelf ledger previously...
Image

… and, by shifting the locker/wall assembly from side to side, I was able to transfer the locations of the wall blocking onto the front wall skin so that I will know where I can put screws during the final install.
Image
Image

I guess this is where I kind of got wrapped up in staring and thinking about the next few moves, ‘cuz I forgot to take a pic of the final markings, but I hope you get the idea. Once I had the heights of the blocks marked, I slid the front back into its proper location and transferred the horizontal locations down from the exposed blocks at the upper cabinet shelf ledger.

I also developed a plan for how I am going to clamp the lower panel sections of the wall skin during glue up using the side door jambs and pipe clamps.

I need to go read thru the Foamie glue sticky again and see if PL premium will work between the wall skin and the blue foam. It says on the label that it’s good for foam board, but I’d like to hear it from someone with firsthand experience; or I will need to do a test. I am hoping that the PL will squeeze out less than other glue options.

I’ll leave you with this.
Image
KC
My Build: The Poet Creek Express Hybrid Foamie

Poet Creek Or Bust
Engineering the TLAR way - "That Looks About Right"
TnTTT ORIGINAL 200A LANTERN CLUB = "The 200A Gang"
Green Lantern Corpsmen
User avatar
KCStudly
Donating Member
 
Posts: 9616
Images: 8169
Joined: Mon Feb 06, 2012 10:18 pm
Location: Southeastern CT, USA
Top

Re: The Poet Creek Express - Foamie Hybrid

Postby KCStudly » Thu Jun 12, 2014 11:54 pm

For our anniversary Yvette got me a healthy gift card from the big orange box. I probably should have waited and seen if there was any more materials that I will need for the camper (exterior paint comes to mind now that I think about it), but another thread put it in my mind that I might get a discount on tools because Father’s Day is coming up (even tho I am not a father). So basically, I decided to spoil myself a little and splurge on a tool that I probably don’t need, but that I will probably use and enjoy, and should come in handy.

This trim router.
Image
Image

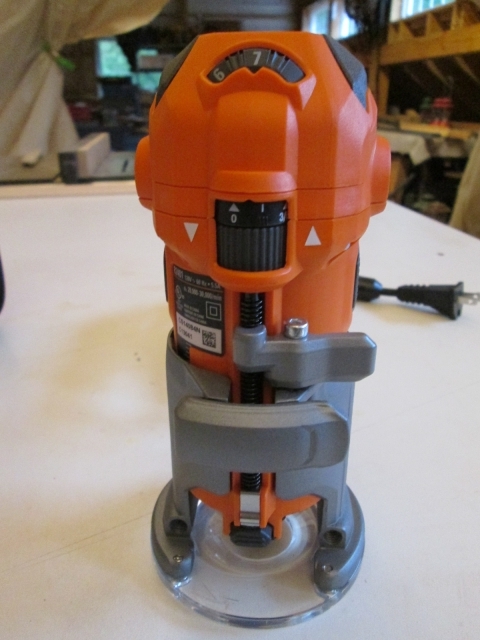
They had the Makita model as well (in the box under the display, but not on display; probably last year’s leftover stock). It was appealing because it had an aluminum motor housing (where the Rigid’s is plastic), and was $10 less, but it didn’t have as many features, didn’t have the LED light, and I didn’t like the depth adjusting mechanism as much (hard to release and sloppy backlash). The specs said the variable speed on the Makita was from 10k to 30k rpm, whereas the Rigid was from 20k to 30k, but when I tested the Rigid it sure seemed to me like the speed went plenty low enough.

The Rigid came with a soft case; both round and square clear plastic bases that key into a concentric alignment feature and accept my standard guide bushings (as demonstrated on the square base in the pic); a guide fence w/ rods; a short 1/2 inch bottom bearing flush cutter; the collet wrench; and the aforementioned LED light. The on/off switch is on top and lifts up for ‘on’, and pushes down for ‘off’, which seems very ergonomic to me. The depth adjustment toggle clamp seems positive, yet is easy to operate, and the fine adjust thread has a quick release lever that makes coarse adjustments very easy; both of which seemed better than the Makita. I’m looking forward to having an excuse to use it!

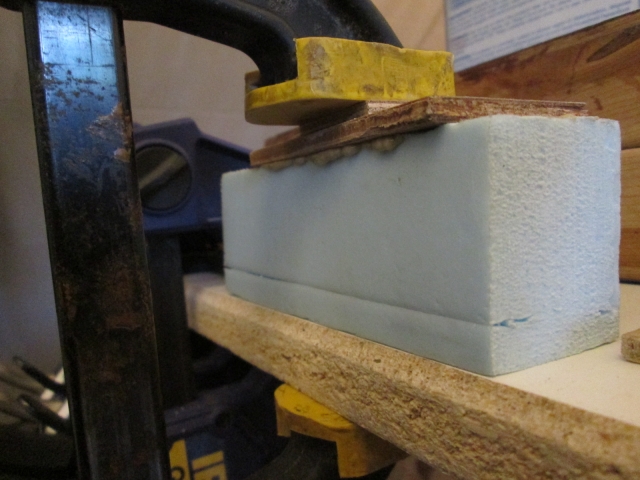
So the rest of tonight was working toward getting set up to do the final install of the front wall assembly. Time to test some PL Premium glue between scraps of blue foam and 5 mm ply. Mostly I’m looking to develop a technique that reduces or eliminates squeeze out, but makes a solid joint at all of the critical junctions. The PL is a good choice for the structural joints between the toe kick spar, locker base and floor, as well as where the front skin meets the side wall edges because these areas all have small irregularities in the fit. However, the PL must be cleaned up with mineral spirits before it starts to kick very much, and I have to believe that quite a bit of time is going to pass as I lay the glue down, get the wall in place, screwed down and clamped before I have a chance to chase the squeeze out.

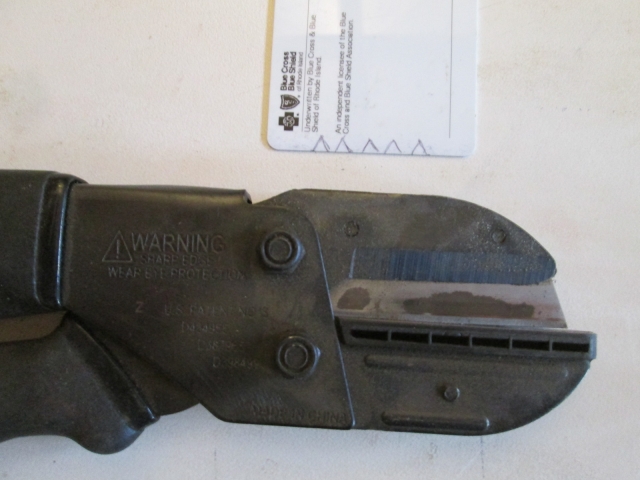
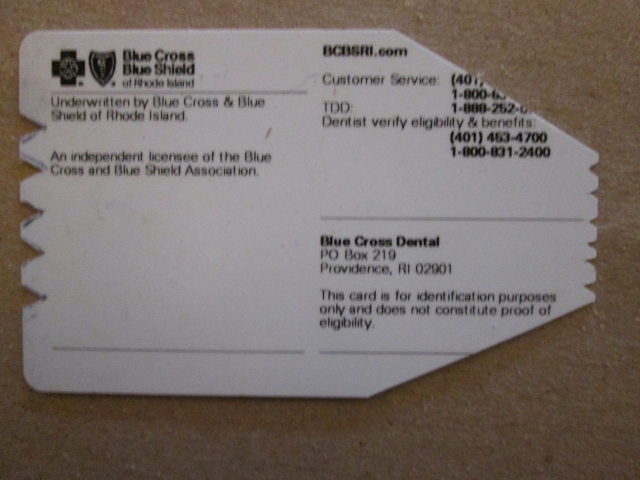
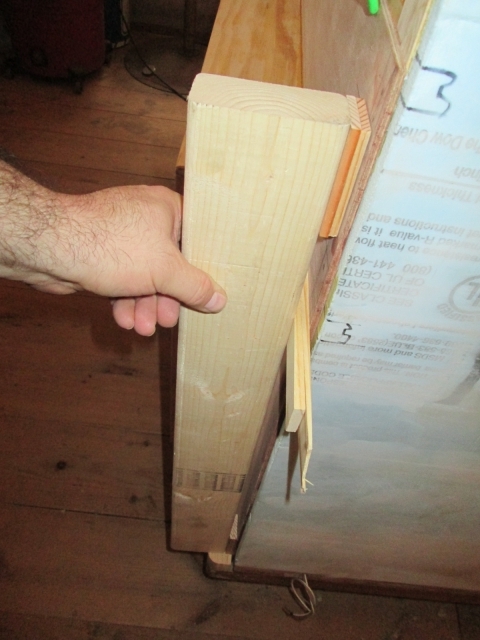
So my thinking is to use a notched applicator and limit where I spread the glue so that it’s not too close to any of the inside surfaces. The front wall skin overlaps the sides by about 1-3/16 inch and the toe kick spar is 1-1/2 inches, so Test #1 was to make a 1/8 inch notch spreader. I figured that if I put the notches only in the center inch or so of the spreader, the outside edges would wipe the excess off. So here’s the first layout shown with the “Bob Villa Cutters” that I used to cut the notches.
Image
Image

It spread the glue pretty nicely, too…
Image

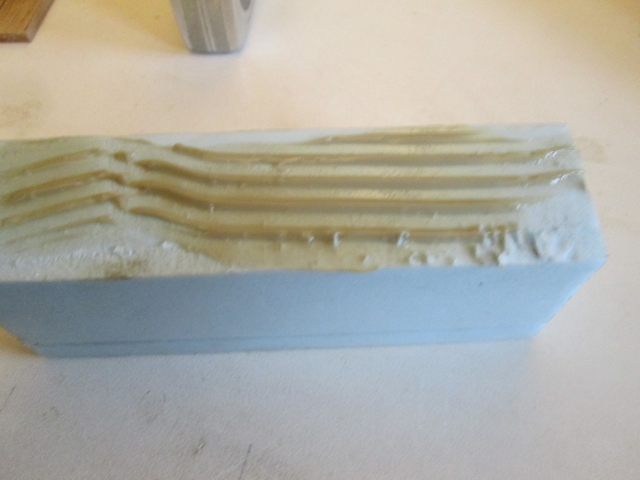
… but by the time the parts were done sliding around there was quite a bit of squeeze out.
Image

I did a second test with smaller notches in a narrower pattern, but the outer portions seemed to bulldoze the excess glue further out to the sides than I wanted, so I trimmed those back at an angle (to help keep some of the stiffness in the card) and it worked much better; giving me the control to put the glue where I wanted it, and the squeeze out was greatly reduced. I might do another test with a larger notch near the center for a positive bead, but keep the smaller notches near the outside edges.
Image

Also, I might use TB2 on the shelf and cabinet ledgers (which can easily be made nice and tight), instead of the PL, but still use the PL around the perimeter and base.

Next I stapled some spacers onto a couple of lengths of 2x4’s to act as strong backs for gluing the front skin edges to the walls without screws. The space will allow me to insert wedged shims and control the amount of squeeze (clamping pressure) everywhere along the 2x's.
Image
Image

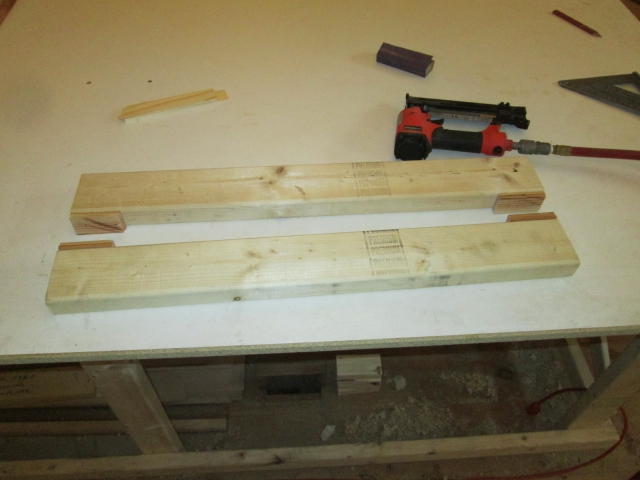
Later I used a piece of double sided tape stuck on the top spacer to hold the strong back in place so there wasn’t so much juggling to get the bar clamps in place.

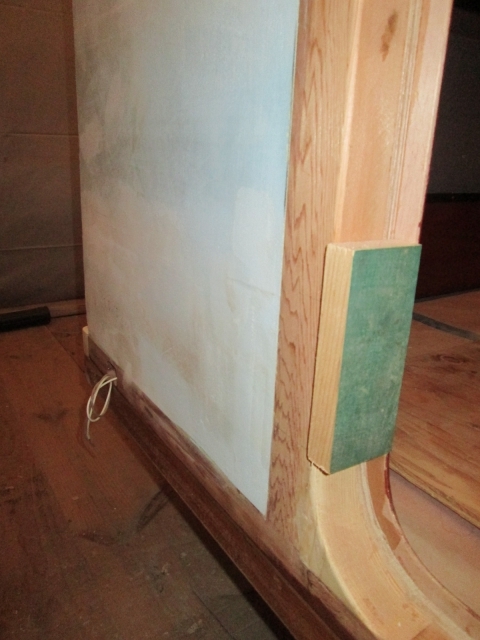
At the door jamb side, on a previous clamp job the clamp made a dent in the soft cedar (just visible here below the gap that needs filling at the radius joint)…
Image

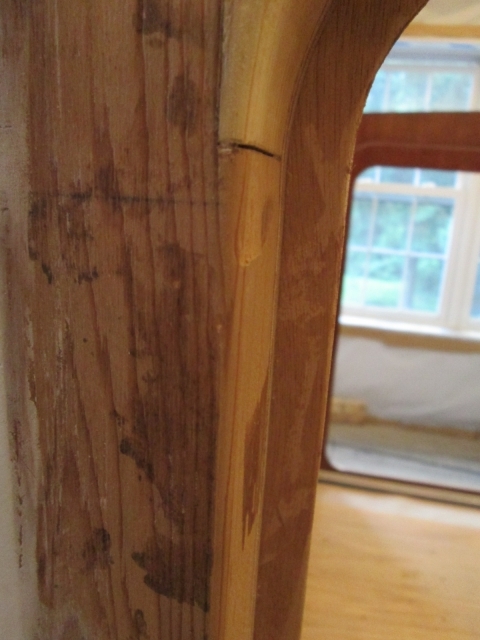
… so to prevent that from happening again I used double sided tape to temporarily hold these clamp blocks in place.
Image

And here’s the complete mock-up of the clamp job.
Image
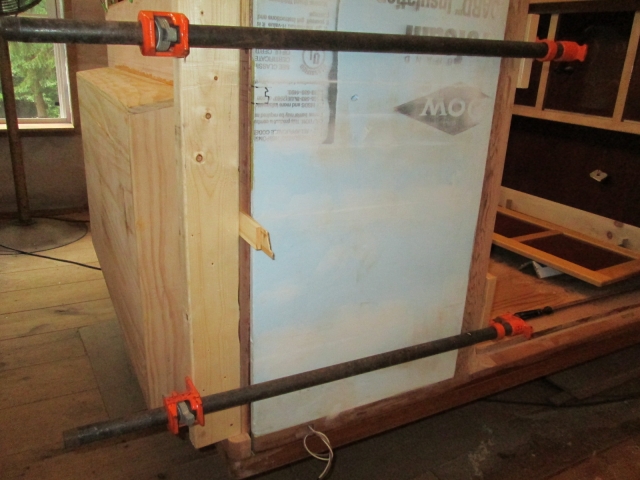
This clamp setup will go on after the screws are run into the bottom of the locker, the toe kick, the joins at the side wall where I can put screws, and along the shelf ledgers. This is going to be a serious glue up with a lot going on all at the same time, which is why I want this all sorted out before I start spreading glue everywhere. I want to be sure it goes well!

I will probably do another full walk thru, and may even pilot drill and run all of the little screws in once before applying the glue.

Next I climbed inside to look closer at that end of things. I decided that the masking job would be extensive, and not easy due to all of the different things going on and the interaction of the joints, plus gravity, so it reconfirmed my efforts to minimize squeeze out. While there I marked along the base of the front where the masking on the floor would need to be trimmed (or redone).

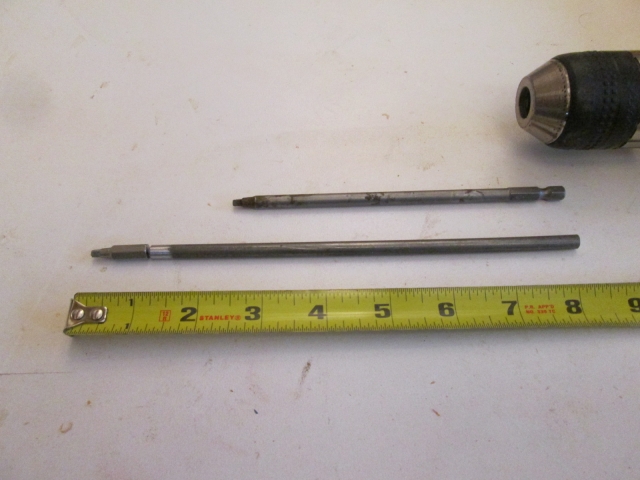
Next I decided to make sure that I can drive the Kregg screws down thru the toe kick in the locker well. Good thing I checked. The chuck of the drill would have hit the sill, and I couldn’t tip the drill far enough to get an angle on it before the back of the drill hit the inside of the locker. I could put the long Kregg square driver bit into my 6-way driver tool and, in theory, hand drive the screws, but it was questionable with the small space and the self-tapping screws not being pilot drilled into the floor (the pilot holes were only drilled into the toe kick).

So I measured what it would take to get the drill up higher into the opening of the locker using a longer driver that would pass by the sill, and came up with this (shown next to the standard Kregg bit). I cut a piece of 1/4 inch pencil rod and will weld the short square drive bit onto the end, perhaps tomorrow.
Image
KC
My Build: The Poet Creek Express Hybrid Foamie

Poet Creek Or Bust
Engineering the TLAR way - "That Looks About Right"
TnTTT ORIGINAL 200A LANTERN CLUB = "The 200A Gang"
Green Lantern Corpsmen
User avatar
KCStudly
Donating Member
 
Posts: 9616
Images: 8169
Joined: Mon Feb 06, 2012 10:18 pm
Location: Southeastern CT, USA
Top

Re: The Poet Creek Express - Foamie Hybrid

Postby Wolffarmer » Fri Jun 13, 2014 8:05 am

Nice tool.

:D :D

Randy
"these guys must be afraid of the dark"
User avatar
Wolffarmer
Donating Member
 
Posts: 4612
Images: 309
Joined: Wed May 02, 2007 1:32 pm
Location: Idaho Rupert
Top

Re: The Poet Creek Express - Foamie Hybrid

Postby BeachBaby » Fri Jun 13, 2014 8:48 am

I like the glue spreader. :thumbsup:
BeachBaby

PhotoBucket album:
User avatar
BeachBaby
Teardrop Inspector
 
Posts: 8
Images: 3
Joined: Fri May 03, 2013 3:28 pm
Location: SC
Top

Re: The Poet Creek Express - Foamie Hybrid

Postby KCStudly » Fri Jun 13, 2014 9:08 am

Thanks guys! :D
KC
My Build: The Poet Creek Express Hybrid Foamie

Poet Creek Or Bust
Engineering the TLAR way - "That Looks About Right"
TnTTT ORIGINAL 200A LANTERN CLUB = "The 200A Gang"
Green Lantern Corpsmen
User avatar
KCStudly
Donating Member
 
Posts: 9616
Images: 8169
Joined: Mon Feb 06, 2012 10:18 pm
Location: Southeastern CT, USA
Top

Re: The Poet Creek Express - Foamie Hybrid

Postby atahoekid » Fri Jun 13, 2014 12:03 pm

Awesome work as always. You should NEVER doubt the purchase of a tool... You can never have too many :D :D
Mel

"Believe in your abilities... Remember amateurs built the ark, professionals built the Titanic"

"Indecision may or may not be my problem" Jimmy Buffet

Image

The Road Foamie Build Thread: viewtopic.php?t=45698
User avatar
atahoekid
Platinum Donating Member
 
Posts: 1773
Images: 158
Joined: Sat Jul 24, 2010 2:49 am
Location: Incline Village, NV
Top

Re: The Poet Creek Express - Foamie Hybrid

Postby KCStudly » Fri Jun 13, 2014 12:33 pm

Thanks for the positive reinforcement, Mel. :thumbsup:
KC
My Build: The Poet Creek Express Hybrid Foamie

Poet Creek Or Bust
Engineering the TLAR way - "That Looks About Right"
TnTTT ORIGINAL 200A LANTERN CLUB = "The 200A Gang"
Green Lantern Corpsmen
User avatar
KCStudly
Donating Member
 
Posts: 9616
Images: 8169
Joined: Mon Feb 06, 2012 10:18 pm
Location: Southeastern CT, USA
Top

Re: The Poet Creek Express - Foamie Hybrid

Postby Mary C » Sat Jun 14, 2014 10:45 pm

I too like the glue spreader. I will remember that one. You are doing WOW work KC. Love it!!!

Mary C.
User avatar
Mary C
1000 Club
1000 Club
 
Posts: 1776
Images: 473
Joined: Mon Oct 15, 2012 6:29 pm
Location: Waco, Georgia
Top

PreviousNext

Return to Foamies

Who is online

Users browsing this forum: No registered users and 4 guests