The Poet Creek Express - Foamie Hybrid

Canvas covered foamies (Thrifty Alternatives...)

Moderator: eaglesdare

Re: The Poet Creek Express - Foamie Hybrid

Postby High Desert » Sat May 25, 2013 12:46 pm

OK, consider yourself shunned ;) :R

just kidding of course. I feel for you, I have some issues that leave me with varying degrees of those symptoms all the time. It's a PITA, literally an figuratively. Hope ya feel better soon. :thumbsup:
Shaun

"it's not the years honey, it's the mileage"
High Desert
Platinum Donating Member
 
Posts: 8780
Images: 27
Joined: Wed Apr 08, 2009 1:46 pm
Location: SW Washington state

Re: The Poet Creek Express - Foamie Hybrid

Postby kudzu » Sat May 25, 2013 1:53 pm

High Desert wrote:I have some issues that leave me with varying degrees of those symptoms all the time. It's a PITA, literally an figuratively. Hope ya feel better soon. :thumbsup:


Yep, a true PITA +. Besides being painful it's just frustrating, infuriating even, to be stuck doing not much of anything. Don't rush it. You'll feel better, longer if you give your body time to heal. I don't do that myself but do as I say, not as I do.
kudzu
Donating Member
 
Posts: 439
Images: 16
Joined: Wed Mar 27, 2013 3:20 pm

Re: The Poet Creek Express - Foamie Hybrid

Postby Mary C » Sat May 25, 2013 2:10 pm

Try sleeping on the other side of the bed. Don't laugh ..... it worked for me. It took about 4 times and I started feeling better. Find a chair, some piece of furniture with the Back hitting just at the top of your hip bones, bend over and let the leg that hurts stay near the chair back and lift the other leg as you bend over the the chair. Then do the reverse holding that position for a slow count of 1 to 5. I have a couple of other positions that I used too. A very smart Chiropractor gave me the exercises and they worked. Hope you get to feeling better.

oh I am watching your build and you are doing a great job. you have more patients than me. :applause:

Mary C. :)
User avatar
Mary C
1000 Club
1000 Club
 
Posts: 1776
Images: 473
Joined: Mon Oct 15, 2012 6:29 pm
Location: Waco, Georgia
Top

Re: The Poet Creek Express - Foamie Hybrid

Postby KCStudly » Sat May 25, 2013 2:50 pm

Thanks everyone for the sympathy and advice, and thank you Mary for the compliment.

I wonder how many bugs got caught in the sealer/glue I applied last time out at the shop(?). :thinking:
KC
My Build: The Poet Creek Express Hybrid Foamie

Poet Creek Or Bust
Engineering the TLAR way - "That Looks About Right"
TnTTT ORIGINAL 200A LANTERN CLUB = "The 200A Gang"
Green Lantern Corpsmen
User avatar
KCStudly
Donating Member
 
Posts: 9615
Images: 8169
Joined: Mon Feb 06, 2012 10:18 pm
Location: Southeastern CT, USA
Top

Re: The Poet Creek Express - Foamie Hybrid

Postby KCStudly » Sat Jun 01, 2013 8:51 pm

I’m back, and so is my back… mostly. After a week of laying on my left side in the fetal position taking prescribed meds, and another week barely making it thru the day at my day job (still popping pills), on Friday (yesterday) I finally started feeling sort of back to normal, making it past the scheduled medication intervals. Finally felt up to going to Mecca and trying to get something done.

I did some detail work on the light switch trim plates and scrounged some aluminum stock for the lower hatch actuator mounting brackets.
Image
The switch plates look black in the pic, but are really No. 4 brushed stainless steel. I’ll have to trim these down some more (I was working from memory and forgot to account for the rolled edge of the wood spacer block).

It was a very warm day for the season. The attic vent fan was running full bore and the first thing I did was to reposition the large floor standing industrial fan, open the windows fully, and rearrange my extension cord so that I could run the fan.

Then I started in scuffing the underside of the floor using 220 grit and the small oak block (previously coated with diluted TB2). Just one stroke back and forth to knock the roller nubs off and give it some tooth.
Image
Image

It seems as though Ben must have reclaimed a cabinet or table that I had some stuff sitting on, as some things had been moved onto the out feed table, so I spent some time reorganizing, taking frequent breaks to sit and rest, and that was about all I had the energy for.

Today (Saturday) I was more ambitious. I got a reasonably early start, picked up some more paper cups (for dye mixing and glue brush pots), and started by sanding and dying the door latch router jig to see if the wood filler putty would take the color. It didn’t. Ran a few new screw holes in, mixed a little color into the putty and applied it to the new holes, and that didn’t work well at all, either. Hmm, maybe the staple holes inside the cabinets aren’t that important after all. I'll have to look into the colored putty sticks.

I threw the bulkhead up on the floor/table, galley side up. At this point I had decided to incorporate the draw latch interlock switches into the hatch actuator circuit. I had ordered and picked up two of the late 80’s Ford Mustang hatchback “ajar” switches (SW 127) that I had hoped to incorporate under the draw latches, so that when either of the latches were made the actuator switch would be defeated. I wouldn’t want to rip the hatch into pieces due to human error. So I needed to create a wire way path from the rear most point on each side to the actuator switch location. I more or less decided to locate the actuator switch on the curb side just under the counter height and just to the rear of the bulkhead. That way I could build a box on the inside up under the counter that could house the relays (the Ford switches are of unknown amperage capacity and the actuators call for a 10 amp fuse, each… although I seriously doubt that they draw 10 amps). The relay box would also act as a junction box for the back side of the switch. I even modeled and “drew” up a recessed trim plate for the switch after work on Friday.

I routed out a wire way between the point where the red cabin light path ended at the center of the rear of the bulkhead (coming from the street side) crossing the wire way where the hatch actuator wires feed up the bulkhead from the curb side, and over to the curbside stile.
Image
It is hard to see here, but the new chase is just below the lowest xmbr, the same one that is just above the bulkhead fan blocking on the left.

I wasn’t sure of the elevation where the red light wires needed to poke thru the bulkhead, but I realized that it didn’t really matter how high the channel ran on the back side so long as it ran high enough to match the underside of the cabinet, or even the top of the cabinet floor (the chase would, after all, be covered with skin). So I extended the center vertical chase up enough to be sure that I can poke thru wherever I need to on the centerline; the light colored tombstone shape in the middle of this pic.
Image

I put that aside and put the curbside wall back up, curbside out. Sanded the last batch of spackle down, vacuumed, and applied another round of spackle to the low spots.

Then I spent some time contemplating the draw latches and the Ford switches. The wire pins I had found weren’t right, and the switches were longer than I had expected, longer than my walls are thick. Not to mention that there is no good way to mount them under the latch so that the latch can actuate them. Pooh, but I have some options.

Then I borrowed a 3/8-16UNC tap, with tap handle, from Karl.
Image

And chased the glue out of the threads of the threaded inserts in the bottom of the floor.
Image

Sat for a while making sure that I was not pushing myself too hard, and contemplating build sequence. Drank a bunch of water throughout; it was, after all, 90 degrees in the loft (not going to wear an apron in this heat, got glue on my shorts and sandaled feet).

Then, finally, worked up the ambition to apply a full strength second coat of TB2 onto the underside and side edges of the floor.
Image
Image

Doubled up on the screw holes, but the full strength glue was too thick to blow thru the holes by breath. Had to poke a screw down thru to clear the holes while the glue was still wet.

It dried almost immediately in the heat and with the fan blowing, by the time I cleaned out the roller and roller tray it was solidly dry.

Got about 4 hrs in before running out of steam.
Last edited by KCStudly on Mon Sep 18, 2017 12:57 pm, edited 2 times in total.
KC
My Build: The Poet Creek Express Hybrid Foamie

Poet Creek Or Bust
Engineering the TLAR way - "That Looks About Right"
TnTTT ORIGINAL 200A LANTERN CLUB = "The 200A Gang"
Green Lantern Corpsmen
User avatar
KCStudly
Donating Member
 
Posts: 9615
Images: 8169
Joined: Mon Feb 06, 2012 10:18 pm
Location: Southeastern CT, USA
Top

Re: The Poet Creek Express - Foamie Hybrid

Postby Wobbly Wheels » Sat Jun 01, 2013 9:55 pm

Got about 4 hrs in before running out of steam.


Even so - if you were blocking and rolling the middle of the floor panel, those must be some wicked pills you're popping !
When my back gets all twisted up I can't stand up straight and I'm not even crippled in the fetal position for a week(not yet at least !). Rolling fiberglass (comparable?) would be out of the question for me: it must be catching up with you about now...
User avatar
Wobbly Wheels
Donating Member
 
Posts: 1080
Joined: Tue Mar 15, 2011 9:51 am
Top

Re: The Poet Creek Express - Foamie Hybrid

Postby KCStudly » Sun Jun 02, 2013 3:38 pm

WW, I don’t know if I was working as hard as it takes to lay and wet out glass. It seemed to me like I was taking it easy, and I have been able to back way off on the meds since Friday. Whatever muscle I had pinching that nerve (or heaven forbid a bulging disc) seems to be playing nice now… mostly.

The full strength coat of TB2 on the underside of the floor (over the previous 2:1 glue-to-water diluted coat) really seemed to do the trick. There were some roller nubs that I knocked down with a quick swipe back and forth with 220 grit, but I wouldn’t have bothered with that if I wasn’t still using the floor as a work table. Also ran around with the tap chasing the threads again.

Next I put the curbside wall up on the table, lightly sanded the last batch of spackle (it may want a couple of small dabs more here and there), vacuumed the dust, and flopped it over so the inside face was up. Then I double checked my wall skin inventory.

Remember me saying that I thought Rover Mike had shorted me a couple panels by not following the cut list? Well I may have been mistaking. It turns out that I had mis-named the middle inside wall panels and the front inside wall panels (swapping their designations). So when Karl and I first did the receiving inventory we thought we had both of the shorter front panels but only one of the taller middle panels; and that meant that I would not be able to get both remaining missing pieces out of the remaining sheet of ply. Well, I’m happy to report that the mistake was mine, and now that I know about the mix up, I should be able to get the required parts out of the remaining sheet! Huzzah! :thumbsup:

Funny thing is that I had it in my mind that I was missing one of the galley inside wall skins, and those are both present and accounted for. :?

With that settled, I picked the front and middle wall skins out of the pile, set them up on the wall and started transferring the wire way holes and the dome light hole so that I can pre-drill those.
Image
Image
Image

You can see that I positioned and squared up the panels, then shifted one panel up along the reference side of the other, in turn, so that I could transfer the hole location up accurately using the quick square and tape measure, referencing off of the bottom of the wall. I thought I took some more pics with the holes drilled and lined up, but apparently not.

Next, at Karl’s suggestion, I lined the panels up again and transferred the rough cut of the wall curves onto the backs of the panels so that I could rough cut those to match. The logic is that when we vacuum bag the skins on, we don’t want the sharp corner of the ply to tear the bag. Made sense to me. (The final profile cut using the CNC templates and router will be done all in one operation after the skins are laminated onto the walls.)

For the middle panel there was only about 1/4 inch overhang on the two top corners, so I just used the small Surform rasp and hand worked them in. For the tight radius of the front panel I used Karl’s nice jigsaw to get close to the line, then the rasp to tune them in a little closer. Cleaned up the edges just a touch with the 220 grit and small block. I know it seems silly to do this just for a rough cut, but I wanted to see how good of an edge I can expect, and how badly the Okoume might behave to the jigsaw. Came out nice. I’m sure I took a couple of pictures of this, but they did not come out. :cry:

That was it for today; about 3 hrs. of work.

Next time I will take the foam plug that had been cut out of the doorway of one of the wall blanks and pair that down so that it fills the door opening. That will back up the parts of the panels that overlap the door during the bagging process (no glue here, just a backing for compression).

Trying to decide whether to continue using the 30NF for these panels, or to switch to TB2. My small test, and GPW’s rib work show that TB2 works well between wood and foam (if allowed to dry). I’m just not sure it will work on a larger panel. Not sure that I have a big enough scrap to do a valid test. :thinking:
KC
My Build: The Poet Creek Express Hybrid Foamie

Poet Creek Or Bust
Engineering the TLAR way - "That Looks About Right"
TnTTT ORIGINAL 200A LANTERN CLUB = "The 200A Gang"
Green Lantern Corpsmen
User avatar
KCStudly
Donating Member
 
Posts: 9615
Images: 8169
Joined: Mon Feb 06, 2012 10:18 pm
Location: Southeastern CT, USA
Top

Re: The Poet Creek Express - Foamie Hybrid

Postby KCStudly » Thu Jun 06, 2013 3:04 pm

Just wanted to cross post this link to discussions on Foamie Hybrid roof construction, including some descriptions of my design and the test panel that I vacuum bagged last night. I'll get it all together with pics here later on, or at least some time this weekend.
KC
My Build: The Poet Creek Express Hybrid Foamie

Poet Creek Or Bust
Engineering the TLAR way - "That Looks About Right"
TnTTT ORIGINAL 200A LANTERN CLUB = "The 200A Gang"
Green Lantern Corpsmen
User avatar
KCStudly
Donating Member
 
Posts: 9615
Images: 8169
Joined: Mon Feb 06, 2012 10:18 pm
Location: Southeastern CT, USA
Top

Re: The Poet Creek Express - Foamie Hybrid

Postby KCStudly » Fri Jun 07, 2013 12:36 am

Holly C%#P, August is just 2 months away! (boggle) My second annual deadline is upon me! Man, it’s not like I’m laying down on the job here, though I haven’t been killing myself hours wise… and there was that little deal with the bad back… not quite behind me yet. :roll:

I’ve been keeping at it so let’s get caught up.

In trying to decide between using the expensive 3M 30NF water based contact adhesive or regular TB2 to laminate my inner wall skins to the hybrid foam wall assemblies I wanted to do a test using a slightly larger than small scale vacuum bag test. Karl’s prior experience bagging composite layups at Calloway was indispensable.

Let me back up a bit for any new comers and those of us with memory compromise. :?

For my floor and bulkhead torsion box panels I used a combination of 30NF on the foam to skin, TB2 on the sub-frame to skin, and random weights to press it all together. When I was routing out some foam from the bulkhead for some secondary blocking I noticed that the 30NF was showing signs of lack of “grab”. I suspected that the random weight technique and perhaps a lack of total fairness between foam and frame had kept some areas of the surfaces from pressing together optimally. Mind you that I am not so concerned as to condemn my prior work, yet I am willing to strive for constant improvement.

Since I am running out of the rather expensive 30NF and am still working on my second gallon of the more reasonably priced TB2, I decided to test for myself if you can successfully glue large wood panels to foam using TB2. People have reported that the wood glue does not cure well when glued to foam, but my prior attempts (albeit on small scale where the glued areas were all reasonably close to an edge) seem to result in very strong bonds.

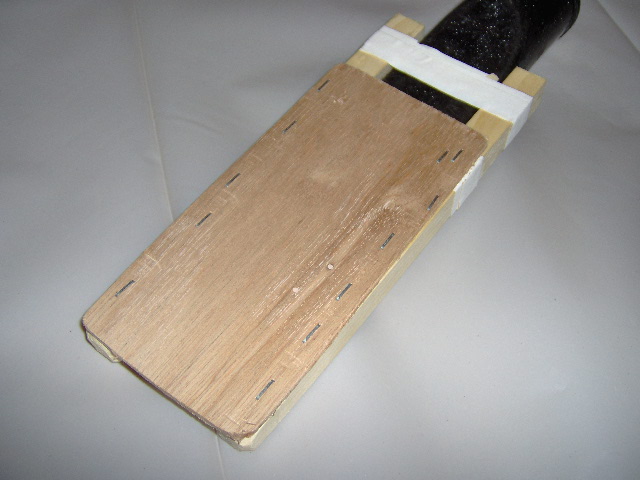
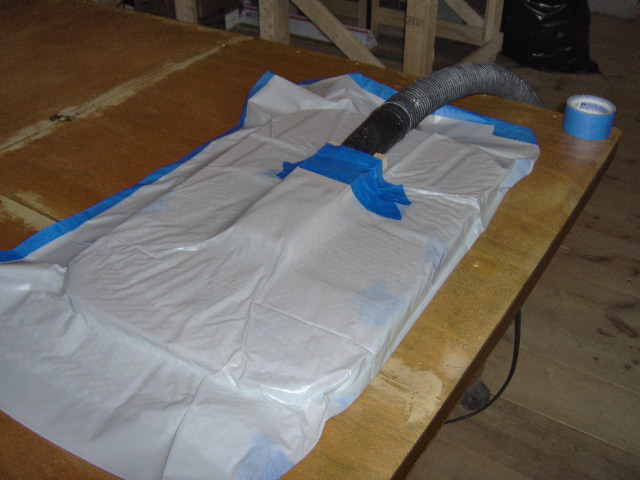
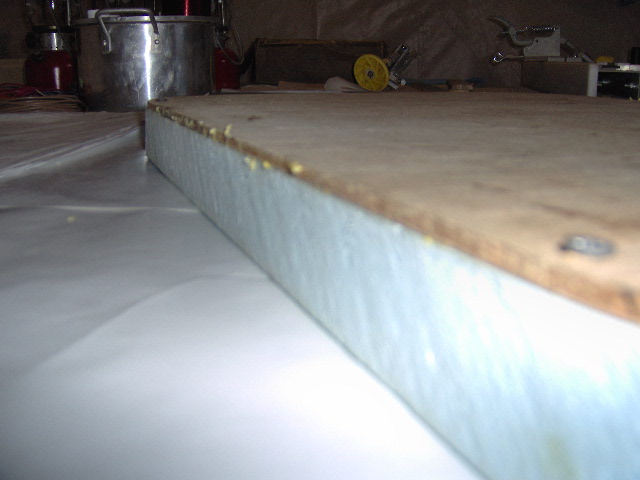
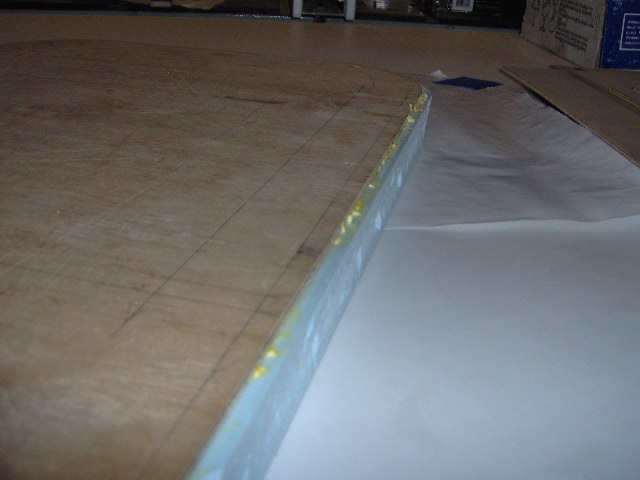
So I decided to do a larger glue up using the scrap of luan underlay that I have been using for a cutting blotter, and a section of scrap foam. Here is the blotter (1/4 nominal, 5 mm actual x 16 x 24 with rounded corners, and 1-1/2 thk blue foam board cut to match fairly closely).
Image

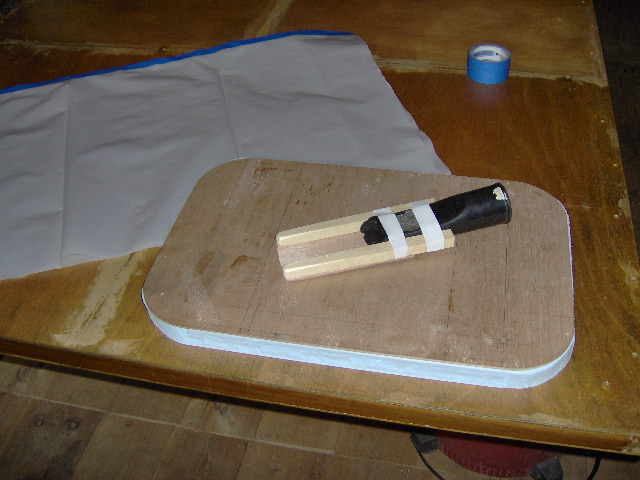
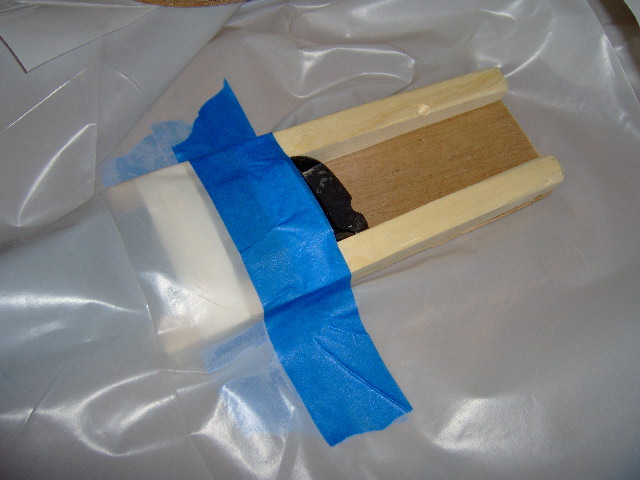
Sitting on top is the shop vac snorkel with the start of a diffuser (also built from scraps) that is intended to keep the bubble wrap and plastic bag from sucking up and blocking the vacuum hose.

In the background is the start of the vacuum bag “bag” or plastic envelope, made out of the same 6 mil plastic sheet that I used to drape off the loft.

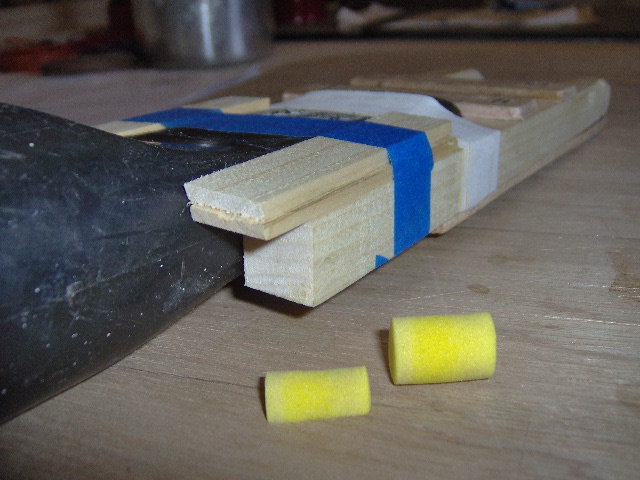
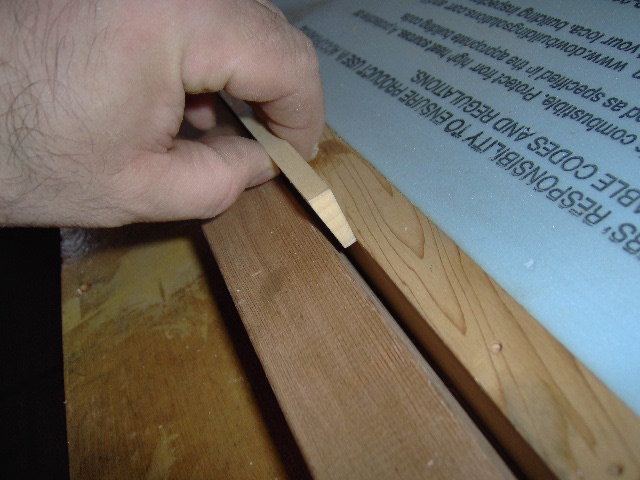
Here are some better close ups. The side rails are the same pine that I used as router shims while routing out the fender and side table blocking, and the paddle panel is just scrap Okoume. The rails were just a little thinner than the vacuum wand, which would prove to be a slight problem later.
Image
Image

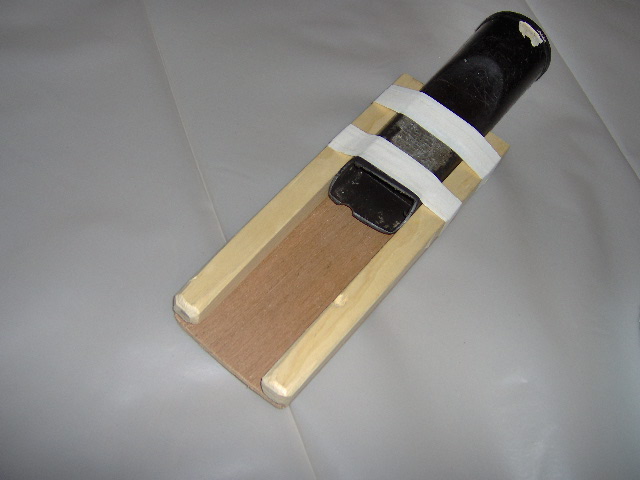
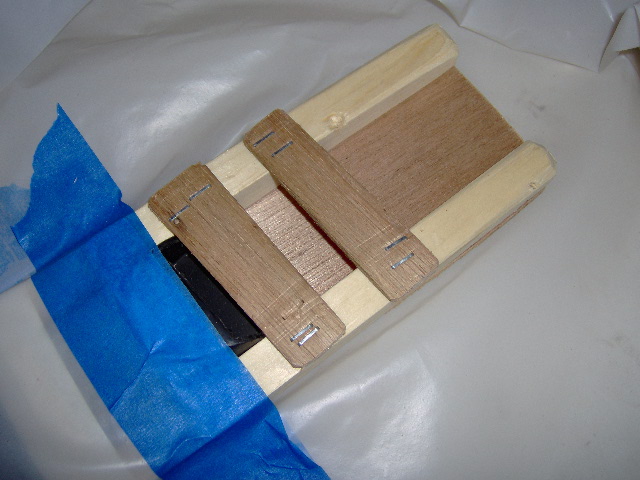
I just used my staple tacker to assemble.
Image

Cut a slit in the top middle of the bag and started to tape the diffuser into the bag, both inside and out.
Image

I decided to add a couple more baffles.
Image

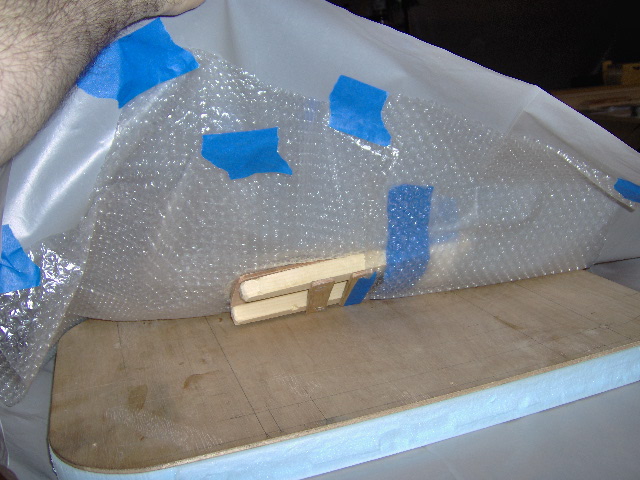
Tucked some bubble wrap up over the diffuser paddle, and some more under the wand, and just a few tabs of tape to hold the bubble wrap to the top of the bag so that when I opened the bag to stuff the panel in, the bubble wrap wouldn’t flop all over the place.
Image

Someone here said that they just folded the bag under without bothering to tape the open edge, so on my dry run I tried it.
Image

There was quite a bit of leakage around the diffuser where the rectangular shape didn’t transition well with the plastic.

That was… well the days are running together in my head, but it must have been Monday.

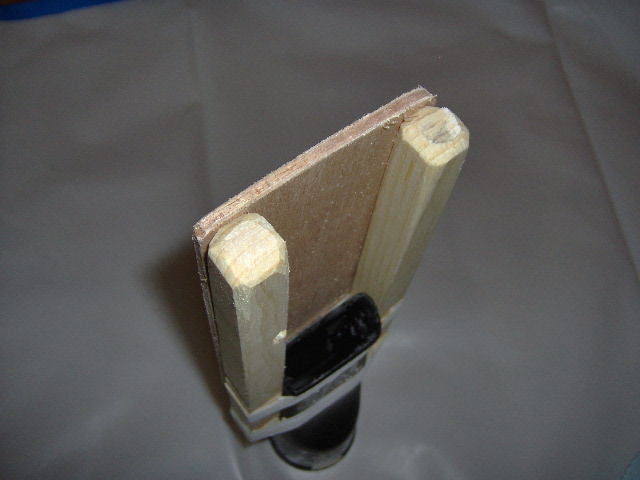
Last night I improved the vacuum diffuser by adding some shims so that the rails were much closer in height to the wand, and used tape and pieces of cut foam ear plug to fill in some of the gaps.
Image
Image
Image

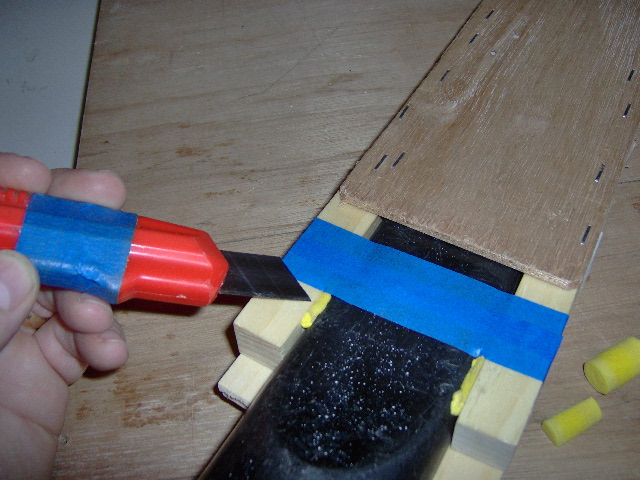
Not shown are a bunch more wraps of tape to cover and seal this area and improve fit to the bag.

Decided to hedge my bet on the test glue up and taped the “open” side of the bag. I masked along one edge of the skin (note blue tint showing thru left side of bag along the hard line formed by the vacuum). For this test I just squeezed out a zig zag pattern of glue from the small glue bottle and spread it as evenly as I could with a used credit card… didn’t want to mess with cleaning a roller just for this small test. I was worried that a lot of glue would squeeze out, but that never happened. Note the minimal amount of glue squeezed out inside of the bag around the edges. We could see a little here and there but nowhere near what Karl had led me to believe might be the case.
Image

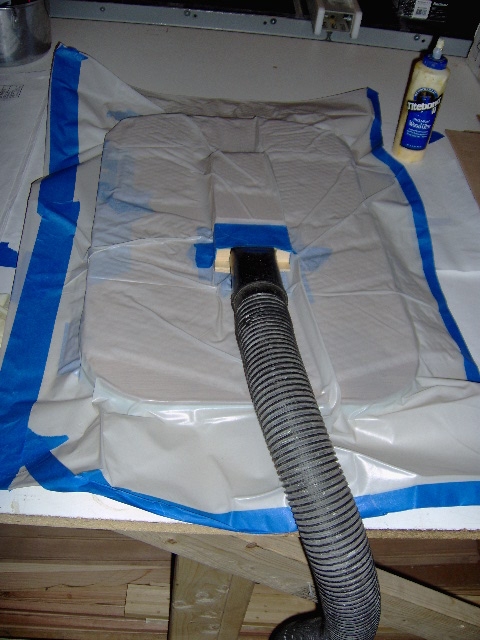
The TB2 calls for 30 min of clamp time and 24 hrs of unstressed drying time. However, based on other peoples experience here, I was leery that that would be enough time with the non-absorbent foam. So I left the vac on for 1-1/2 hrs, kept my ear plugs in (the vac is annoyingly loud), and continued to prep the curbside wall for inner skin application.

I was concerned about glue squeeze out and that it might clog my wire grooves in the foam, so I laid blue tape over the grooves. Rather than running my hand over the tape to stick it down (which tended to press the tape down into the groove) I used another of the faux credit cards to lay the tape down flat. Also trimmed the tape down close on the wood areas, around the holes, and around the graceful corners.
Image

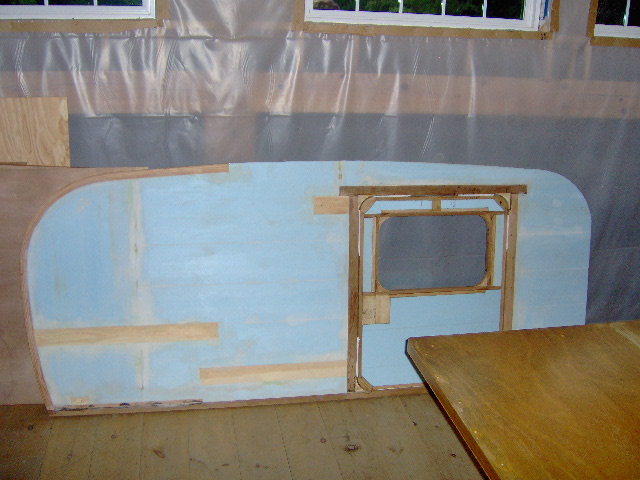
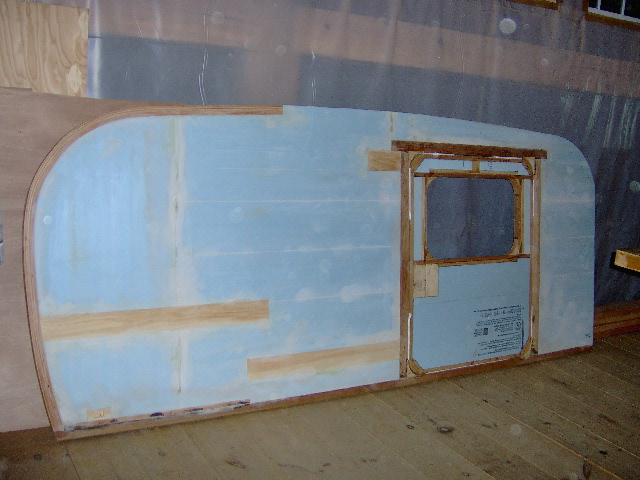
It occurred to me that I didn’t need to use a filler block of foam to fill the doorway, I could just use the door! (Doh) However, I am still not sure that I want to glue the wall panels to the door. The front and mid wall panels butt together over the door leaving a seam right thru the not quite middle of the door. A compromise trying to reduce the number of pieces of ply that I had to buy while keeping the wall grain vertical. I can just use the door as filler and not glue the skins to it during the lay up; or I can go ahead and glue them and do something else to try and hide the seam (filler and paint instead of stain), but the seam may also add a weak point, and why would I want my open door to show a painted interior when I hope to have beautifully stained/dyed and finished inner panels? I don’t have enough big pieces to skin the doors in a full piece, but I might be able to do some sort of star burst pattern from smaller drops that would have more strength and is a popular theme with the wife. :thinking: But that will take lots of time. I need to decide.

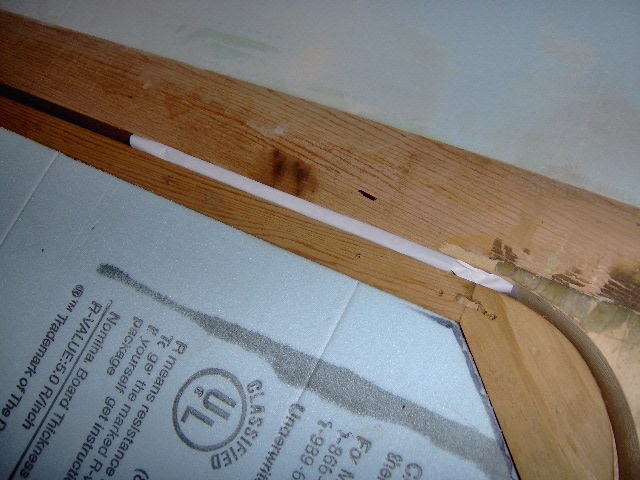
Anyway, from there, with ear plugs, I fit the door, set the shims, and cut a wedge shaped shim to tap in between the bottom of the door and the tapered door sill.
Image

The shims and wedge will all get wrapped in freezer paper to keep any glue squeeze out from the vacuum bagging from gluing in the shims, or the door to the wall.

After 1-1/2 hrs I pulled the test panel out of the bag. The little bit of glue squeeze out was of no consequence, I could not separate the parts at the edge, and a little gentle flexing showed great promise.

Couldn’t help taking a pic or two of the profile with door installed. She’s looking quite refined, if I do say so myself.
Image
Image

Now Thursday, after 24 hrs the test panel seems good and solid.
Image
Image

I set a couple of pieces of 2x lumber flat on the floor under the test panel (about 20 inch span) ply side down, and stood on the center on one foot.
Image

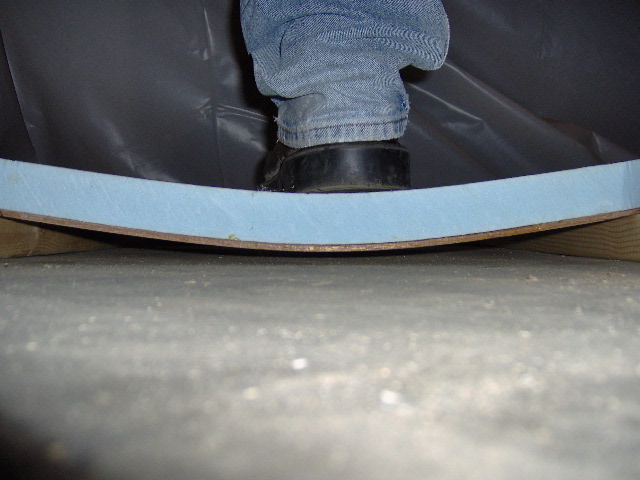
Mind you that this is just one skin, and underlay at that, plus I weigh 265 lbs. It didn’t break and did not touch the floor… maybe 1/4 or 3/8 clearance… kind of had to hurry to frame the shot with the camera sitting on the floor, get up off of my hands and knees setting the camera on timer, balance on one foot and try to stay still in 10 seconds while the camera timer took the pic. No way to measure the actual deflection accurately by myself.

Came back basically flat when unloaded, too, so, technically I could walk on my camper roof if I wanted to, but no. Mostly I am happy that I far exceed any possible snow load that might get me before she gets under cover. She will only get stronger as the “composite structure” continues to come together.

I didn't want to cut the test piece in half because it is still a useful work mat size, so instead I chiseled out about a 4x4 section of foam from the middle. There was a small area that was still gooey, and a percentage that was tacky, but it was all hard to pry up and a large percentage of the area had a thin film of foam still attached where the bond had not failed. (Not sure if it is a fair comparison with the 30NF as I did not bag that). My theory is that the gooey spot was an area where the glue was not spread as well, and that if I use a roller to apply on the big real deal panels that the wood will have no problem absorbing all of the moisture from the glue.

Pulled the door shims and wrapped them with freezer paper.
Image

Reinstalled door shims with wrap.
Image

And wrapped up the evening with a couple more profile pic’s. I had a hard time getting a straight on full frame shot. This one looks a little slanted in the front due to the perspective angle.
Image

This one is more straight on, but is cut off by the floor/table. :snappy: :duh:
Image
KC
My Build: The Poet Creek Express Hybrid Foamie

Poet Creek Or Bust
Engineering the TLAR way - "That Looks About Right"
TnTTT ORIGINAL 200A LANTERN CLUB = "The 200A Gang"
Green Lantern Corpsmen
User avatar
KCStudly
Donating Member
 
Posts: 9615
Images: 8169
Joined: Mon Feb 06, 2012 10:18 pm
Location: Southeastern CT, USA
Top

Re: The Poet Creek Express - Foamie Hybrid

Postby GPW » Fri Jun 07, 2013 5:54 am

Looks SUPER KC !!! :applause: :applause: :applause:

265# :o :roll: Livin’ Large KC .. Time for bird food ... :R
There’s no place like Foam !
User avatar
GPW
Gold Donating Member
 
Posts: 14912
Images: 546
Joined: Thu Feb 09, 2006 7:58 pm
Location: New Orleans
Top

Re: The Poet Creek Express - Foamie Hybrid

Postby kudzu » Fri Jun 07, 2013 6:33 am

Wow! That's looking great.

Thank you for such a good description of your vacuum set up. Already have all the supplies I need for that.
kudzu
Donating Member
 
Posts: 439
Images: 16
Joined: Wed Mar 27, 2013 3:20 pm
Top

Re: The Poet Creek Express - Foamie Hybrid

Postby bonnie » Fri Jun 07, 2013 6:59 am

Looking great. I love it. :thumbsup:
Remember, the turtle won. :)
User avatar
bonnie
Donating Member
 
Posts: 1390
Images: 107
Joined: Sun Jul 24, 2011 4:14 pm
Location: Roxana, IL
Top

Re: The Poet Creek Express - Foamie Hybrid

Postby RandyG » Fri Jun 07, 2013 12:21 pm

Kc, although it has been a while since I have done a vacuum bag, I would use some sort of breather material between your diffuser and the work piece. It can be some gauze like material that helps spread the suction. You may also want to put some wax paper over the work piece so the squeezed out glue doesn't sick to your vacuum bag or the breather.
Just a couple of tips you may find useful.
Randy
Aircraft fabricator, novice carpenter, electrical apprentice, audio engineer dropout.
Build thread - http://www.tnttt.com/viewtopic.php?f=50&t=54126
User avatar
RandyG
500 Club
 
Posts: 695
Images: 115
Joined: Thu May 10, 2012 6:52 pm
Top

Re: The Poet Creek Express - Foamie Hybrid

Postby KCStudly » Fri Jun 07, 2013 2:49 pm

Thanks RandyG. The bubble wrap seemed to do fine on the small scale, but I will consider the felt idea for the full scale... maybe a stop at GoodWill for a blanket, or something, but then again, won't the fabric be more likely to stick to any glue squeeze out? Actually, there really wasn't much.

The plastic sheet seemed to do fine as a peel ply all by itself. Not too worried about damaging the bag; I have about 60x24 ft of the plastic leftover.

Thanks GPW, Kudzu, and Bonnie for the nice comments, and to everyone else for watching. :thumbsup: :D
KC
My Build: The Poet Creek Express Hybrid Foamie

Poet Creek Or Bust
Engineering the TLAR way - "That Looks About Right"
TnTTT ORIGINAL 200A LANTERN CLUB = "The 200A Gang"
Green Lantern Corpsmen
User avatar
KCStudly
Donating Member
 
Posts: 9615
Images: 8169
Joined: Mon Feb 06, 2012 10:18 pm
Location: Southeastern CT, USA
Top

Re: The Poet Creek Express - Foamie Hybrid

Postby RandyG » Fri Jun 07, 2013 5:29 pm

A big fluffy blanket would be good or just the filling from a comforter.
Randy
Aircraft fabricator, novice carpenter, electrical apprentice, audio engineer dropout.
Build thread - http://www.tnttt.com/viewtopic.php?f=50&t=54126
User avatar
RandyG
500 Club
 
Posts: 695
Images: 115
Joined: Thu May 10, 2012 6:52 pm
Top

PreviousNext

Return to Foamies

Who is online

Users browsing this forum: No registered users and 14 guests