Here's Humphrey..Now a trolly top..Finished!!

...ask your questions in the appropriate forums BUT document your build here...preferably in a single thread...dates for updates, are appreciated....

Re: Here's Humphrey..Now a trolly top

Postby 3nero » Sun Jul 07, 2013 4:56 pm

More progress today but not many pics.
First thing i did today was dumpster hunting... Found a real nice one with lots of ply wood going begging :D

So i was able to rebuild the storage box. then i did a few hours sanding where the shims overhung the edge of the profiles. after all that i decided it was time to do a quick mock up.

Both walls up for the first time...just held with clamps.

Image

Image

Starting to look like something now....kinda like an AT-AT walker :lol:
Measure once, cut twice....throw away and repeat.
Image Image

http://www.tnttt.com/viewtopic.php?t=55971
3nero
Teardrop Master
 
Posts: 129
Joined: Mon May 13, 2013 3:40 pm
Location: Co.Wicklow Ireland

Re: Here's Humphrey..Now a trolly top

Postby 3nero » Mon Jul 08, 2013 5:45 pm

Another good building day today.. Got lots done.

Finished off the new box managed to salvage the bottom of the old one. The new one is 10mm smaller length and widthways.

Image

Sorry about the pic quality...the brightness is caused by something called solar radiation...In the last few days a large ball of fire has appeared in the sky.. the scientists say it it something called the son or sol or something like that. Everyone here is freaking out and setting fire to sausages in their yards and the women folk have taken to wearing less clothes....strange times :frightened:

Anyway back on topic. Added 10mm shims to the old boxes opening to accept the new small size...

Image

Then i coated it in 6 coats of seal... it dries really fast with all this radiation around..

Next i added the top corners of the door opening.

Image

And then came the most satisfying part of the day...I dragged the floor out and put it on the frame...and it fell into place with a loud clunk...Not like the other day with all the scraping sounds and cursing.

Image

Then it was finally time to start putting bits together.

Getting ready to start....
Image

I've screwed the trestles to the floor and I'm using them to keep things steady for now.

and about an hour later....

Image

Image

Image

Image

Then i moved it to a more level spot .

Image

and after all that i wrapped it up for the night and then sat inside it for a while....roomy 8)

Image
Measure once, cut twice....throw away and repeat.
Image Image

http://www.tnttt.com/viewtopic.php?t=55971
3nero
Teardrop Master
 
Posts: 129
Joined: Mon May 13, 2013 3:40 pm
Location: Co.Wicklow Ireland

Re: Here's Humphrey..Now a trolly top

Postby pchast » Mon Jul 08, 2013 9:18 pm

Hi, looking good...

I've been wondering about those port hole windows.
Are any of them to open for ventilation? Will you
have enough inlet air for the power vent?
:thinking:
pchast
Platinum Donating Member
 
Posts: 2065
Images: 97
Joined: Mon Jan 28, 2013 5:47 pm
Location: Athens, NY
Top

Re: Here's Humphrey..Now a trolly top

Postby 3nero » Tue Jul 09, 2013 1:53 pm

pchast wrote:Hi, looking good...

I've been wondering about those port hole windows.
Are any of them to open for ventilation? Will you
have enough inlet air for the power vent?
:thinking:


None will be open-able and i'm not having a power vent either. There will be 2 permanently open vents near the floor and one in the roof. then maybe a manual vent in the door. Here in Ireland air flow is not a problem...it's wet and windy most of the time.
Measure once, cut twice....throw away and repeat.
Image Image

http://www.tnttt.com/viewtopic.php?t=55971
3nero
Teardrop Master
 
Posts: 129
Joined: Mon May 13, 2013 3:40 pm
Location: Co.Wicklow Ireland
Top

Re: Here's Humphrey..Now a trolly top

Postby 3nero » Fri Jul 12, 2013 5:21 pm

Got a few bits done today despite the heat.

First thing i did was score some melemine (sp?) sheets from a dumpster 8)

Image

Then i made a start on framing the front headboard cupboards...

Image

Image

..It's 10 degrees off vertical so it will be more comfy to lean against. i won't be skinning it until the tongue box is done. I want to keep access for attaching the roof and box later on.

The new boards came in handy very quick... chopped one and used it for the lower bulkhead..

Image

I've made it detachable just in case i need to remove it later for any reason.

Then i attached the crossbar that the hinges for the hatch go on to. Hope this will be strong enough.

Image

the cross bar will also be supported by a wall under it later on.

Then i made the template for the trolly top sides...

Image

hoping to make a start on the roof tommorow 8)
Measure once, cut twice....throw away and repeat.
Image Image

http://www.tnttt.com/viewtopic.php?t=55971
3nero
Teardrop Master
 
Posts: 129
Joined: Mon May 13, 2013 3:40 pm
Location: Co.Wicklow Ireland
Top

Re: Here's Humphrey..Now a trolly top

Postby 3nero » Sat Jul 13, 2013 6:56 pm

Another bit done today.

Stuck the template on so i could make any adjustments needed...

Image

just needed a small bit trimming off the end..

Image

transferred the template to the plywood.

Image

then corrected any wobbly bits

Image

Then i hit a weird air pocket in the sheet of ply that caused the layers to de laminate when the jigsaw went through it :(

Image

so i filled it full off glue and clamped it while i worked on the other side.

other side cut and plonked in place to see how it looked...the jigsaw couldn't cut the smallest window so i'll have to do it later with a hole saw.

Image

then i cut and drilled all the outer spars...

Image

then attached them in place on the trolly side.
Image

then tried it on for size..

Image

Image

then i got the side all done..

Image

Here they are just cable tied in place for now.

Image

Image

I can't attach them yet because i need to cut the inner roof first and attach it to the underside of the spars.
Hopefully i'll get that done tomorrow.
Measure once, cut twice....throw away and repeat.
Image Image

http://www.tnttt.com/viewtopic.php?t=55971
3nero
Teardrop Master
 
Posts: 129
Joined: Mon May 13, 2013 3:40 pm
Location: Co.Wicklow Ireland
Top

Re: Here's Humphrey..Now a trolly top

Postby rowerwet » Sat Jul 13, 2013 8:50 pm

probably this is too late, but, I had small round windows that opened in my TD to start with, I built it as a mobile bedroom to crash in at work, I didn't want big windows for people to stare in at me. 90571
they are just screw-in deck hatches, http://www.westmarine.com/webapp/wcs/st ... eIBFKyk_NA
you can find them at marine supply houses over here, I put the threaded ring on the inside of the wall 97089
so I could screw in the deck hatch when I wanted the "glass" in, without having to go outside the TD, I cut round pieces out of an old window screen and bedded them in with Silicone sealant. I also kept the hole saw angled up as I drilled from the outside to help them shed water. They keep water out so well I leave them open for towing and haven't had a drop come in that I know of.
I still like them even though they are small, I've kept the two ahead of the doors, they come in more than one size and the screw in part is clear plastic. I've also found larger diameter ones that were pop out (they have a small cam latch instead of threads) I like your washer door glass idea.
you could also make them open-able using this idea. viewtopic.php?f=2&t=51721&p=953326&hilit=sailboat+window#p953326 depending on how many windows you want to be open-able you could use a square of plexiglass as the window, it wouldn't matter that the widow hole was round on the outside.
User avatar
rowerwet
Gold Donating Member
 
Posts: 2075
Images: 521
Joined: Mon Apr 20, 2009 12:52 am
Location: Merrimack River Valley
Top

Re: Here's Humphrey..Now a trolly top

Postby 3nero » Sun Jul 14, 2013 4:59 pm

rowerwet wrote:probably this is too late, but, I had small round windows that opened in my TD to start with, I built it as a mobile bedroom to crash in at work, I didn't want big windows for people to stare in at me. 90571
they are just screw-in deck hatches, http://www.westmarine.com/webapp/wcs/st ... eIBFKyk_NA
you can find them at marine supply houses over here, I put the threaded ring on the inside of the wall 97089
so I could screw in the deck hatch when I wanted the "glass" in, without having to go outside the TD, I cut round pieces out of an old window screen and bedded them in with Silicone sealant. I also kept the hole saw angled up as I drilled from the outside to help them shed water. They keep water out so well I leave them open for towing and haven't had a drop come in that I know of.
I still like them even though they are small, I've kept the two ahead of the doors, they come in more than one size and the screw in part is clear plastic. I've also found larger diameter ones that were pop out (they have a small cam latch instead of threads) I like your washer door glass idea.
you could also make them open-able using this idea. viewtopic.php?f=2&t=51721&p=953326&hilit=sailboat+window#p953326 depending on how many windows you want to be open-able you could use a square of plexiglass as the window, it wouldn't matter that the widow hole was round on the outside.


They look perfect, but i'm kind of committed now to the way i'm going. I'm sandwiching one large piece of perspex inside the wall to glaze all the windows at once. If i really have to in the future i could cut one out and try the tilt in kind of window, the trouble with that design is all the circles are so close together so it might be a bit awkward trying to find room for the brackets.

Anyway heres todays little bit of progress. I'm all alone at the moment so things are taking a bit longer.

I had to cut 16 inch wide strips for the inner roof but my cheap ass saw only cuts a max of 9 inches. so i had to improvise by adding my own fence...
Image

I hate cutting 8x4 sheets on my own. with no one to help drive them through the saw the cuts ended up a bit wobbly..They did the job ok though..

started the long process of screwing and glueing them on.

Image

Then i realised i had to make 2 uprights for inside the headboard cupboard to support the inner skin..

Image

Image

then it was time to attach the top..

Image

Image

Image

remember the wobbly bits i corrected in the template earlier? turns out they where wobbly for a reason...

Image

back when humphrey was just starting out he had a flat top to allow for a roof vent. i forgot all about it until now :cry:

Image
It's the same both sides. Looks like i have two new vents now :roll:
Measure once, cut twice....throw away and repeat.
Image Image

http://www.tnttt.com/viewtopic.php?t=55971
3nero
Teardrop Master
 
Posts: 129
Joined: Mon May 13, 2013 3:40 pm
Location: Co.Wicklow Ireland
Top

Re: Here's Humphrey..Now a trolly top

Postby stonykill » Sun Jul 14, 2013 5:36 pm

coming along nicely
User avatar
stonykill
Teardrop Master
 
Posts: 173
Joined: Mon Sep 05, 2011 12:28 pm
Location: Canaan NY
Top

Re: Here's Humphrey..Now a trolly top

Postby rebapuck » Sun Jul 14, 2013 11:38 pm

You'll figure something out.
Judy
1966 VW camper
1967 VW singlecab
Image
User avatar
rebapuck
.
 
Posts: 2243
Images: 1
Joined: Thu May 14, 2009 1:55 pm
Location: Chapel Hill NC
Top

Re: Here's Humphrey..Now a trolly top

Postby 3nero » Mon Jul 15, 2013 4:34 pm

Not much progress today but i have a good excuse :D

I finally bit the bullet and bought my first router and a 20 piece bit set.
So of course i had to play with my new toy for a while. After lots of experiments on bits of scrap wood i remembered i was supposed to be building something.

So first i attacked the trolley windows with the rebate bit...

Image

..i might be able to make one or two of them open now :thinking:

Then i went crazy with the flush trim bit... thats my sander gone into retirement.
The main bit i used the flush trim for was to get the crazy windows to match up

Image

I used a found bit of 18mm ply rough cut out the circles and then hit it with the router.

Planning on rounding them over after the outside skin goes on.

then i had to make two ...emm... curvy bits.. each side of the front box opening that the outer skin can attach to later.

Image

And now that i have a new toy, the plan to correct the two holes in the roof is to make some kind of fancy moulding to hide them :thumbsup:
Measure once, cut twice....throw away and repeat.
Image Image

http://www.tnttt.com/viewtopic.php?t=55971
3nero
Teardrop Master
 
Posts: 129
Joined: Mon May 13, 2013 3:40 pm
Location: Co.Wicklow Ireland
Top

Re: Here's Humphrey..Now a trolly top

Postby 3nero » Fri Jul 19, 2013 6:16 pm

So back to work again...

I filled the two voids caused by someone else's fault :roll:

Image

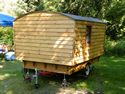
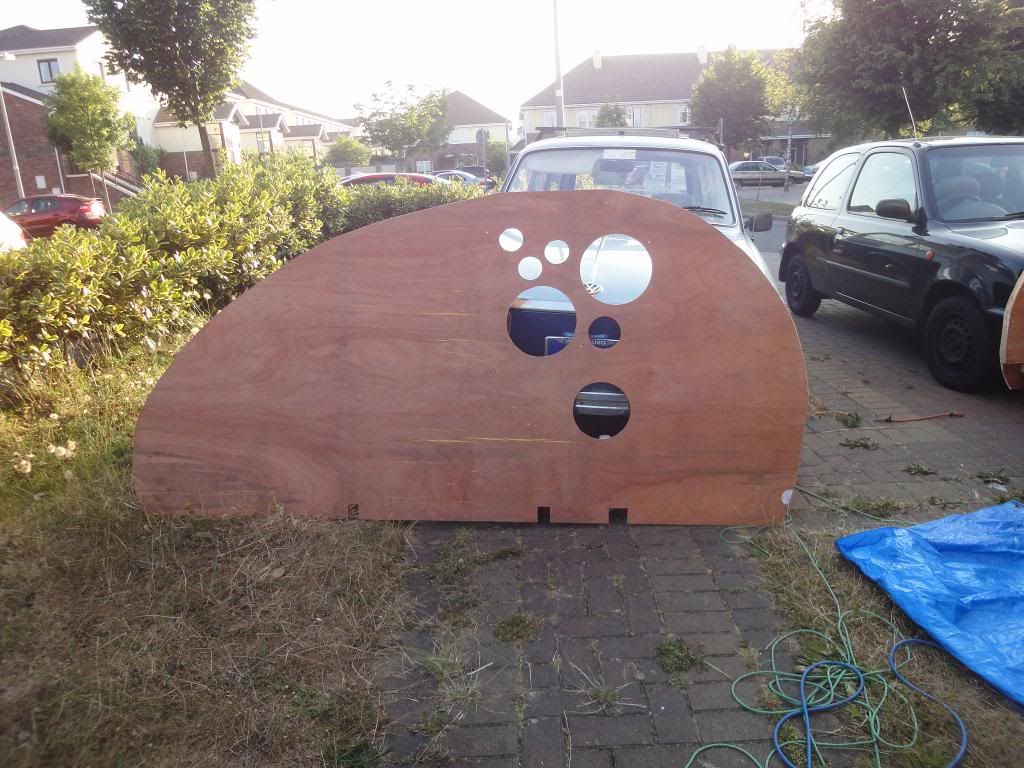
Next i had to get the outer skin ready to attach. it just needed 4 notches cut out to let it sit down over the trailer frame.

Image

Image

then i coated the whole inside of the skin in glue...

Image

i also brushed glue on the inner frame work and screwed the skin on.

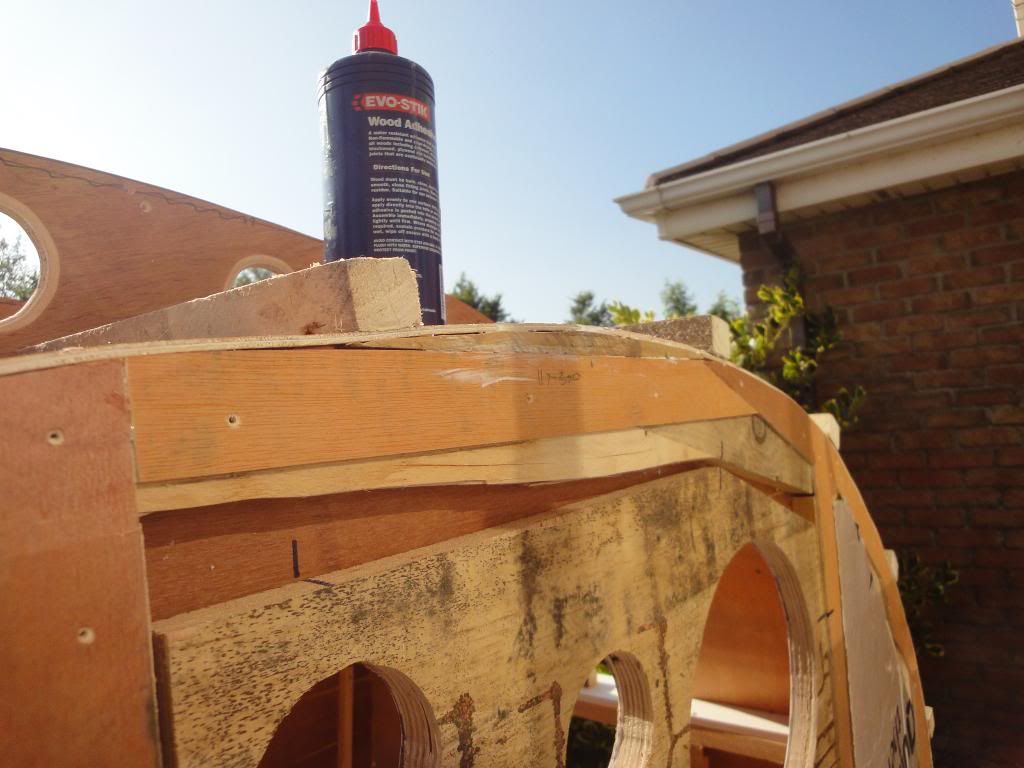
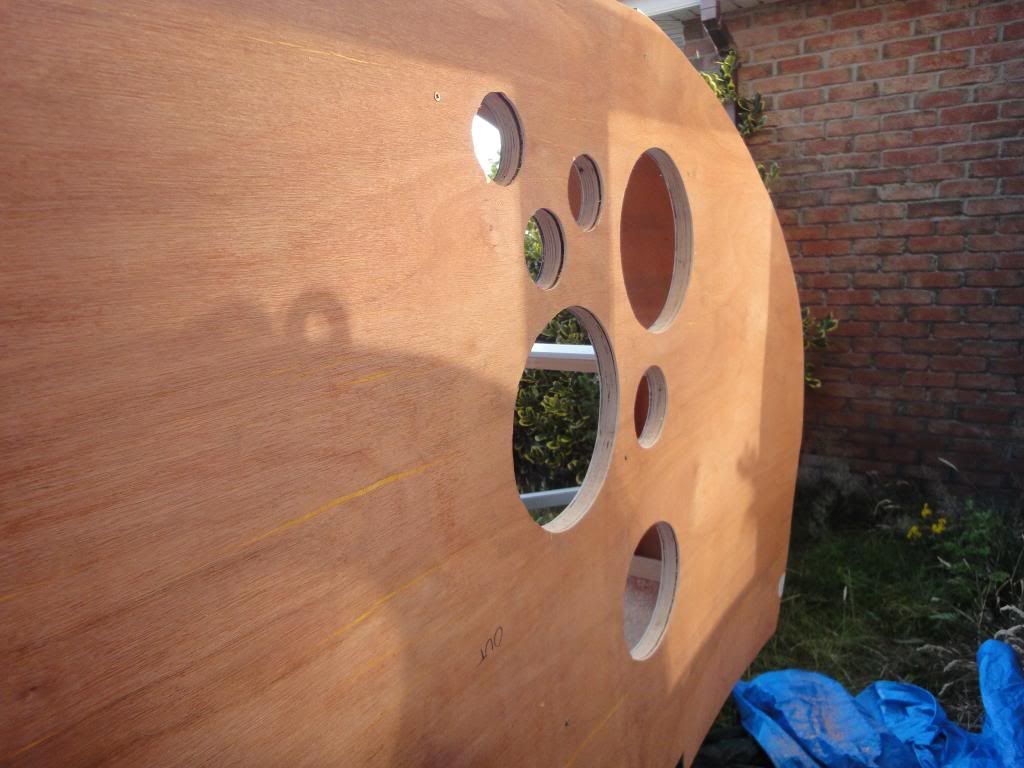
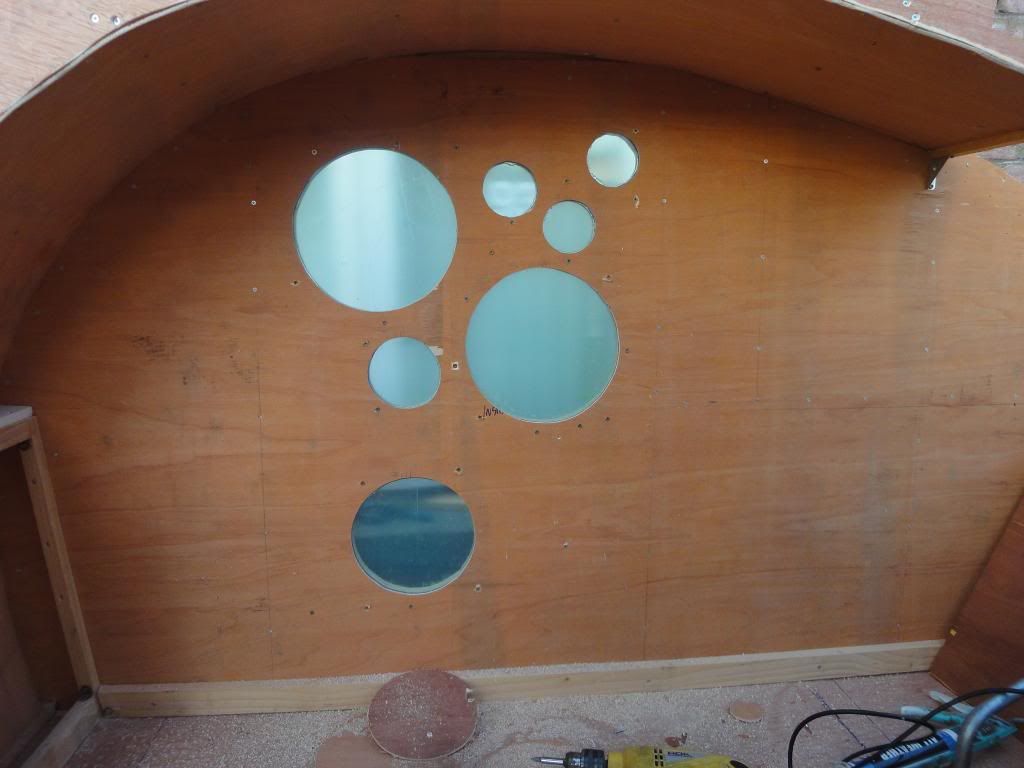
Next thing up was the crazy windows... Here's how i dealt with them.

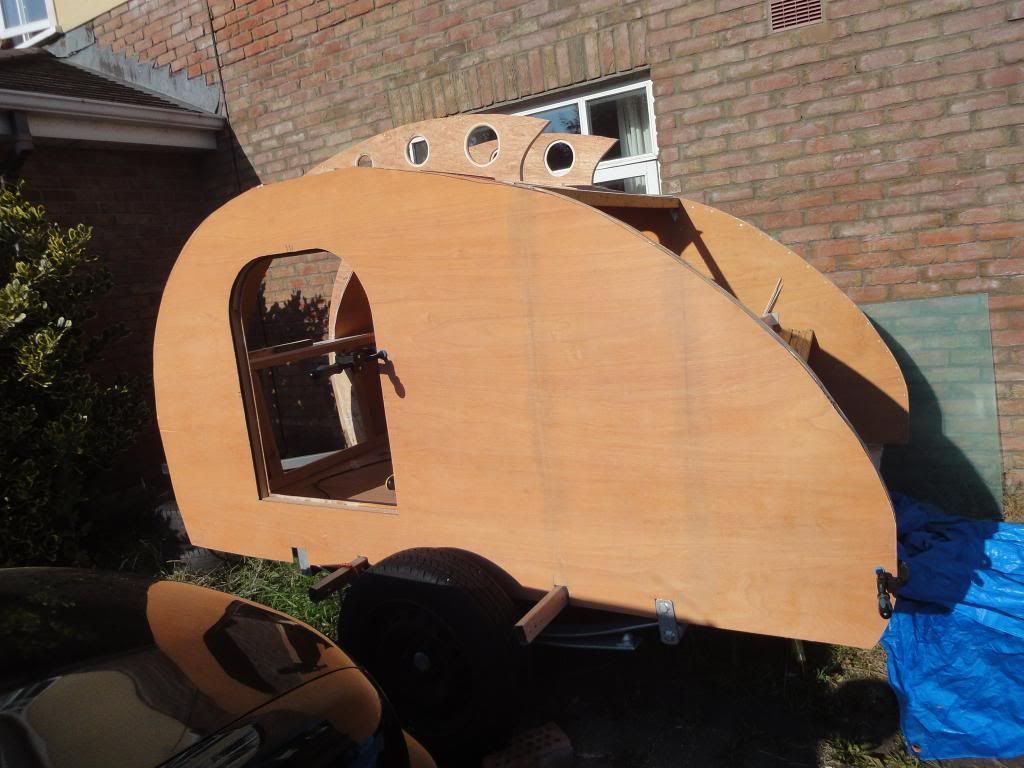
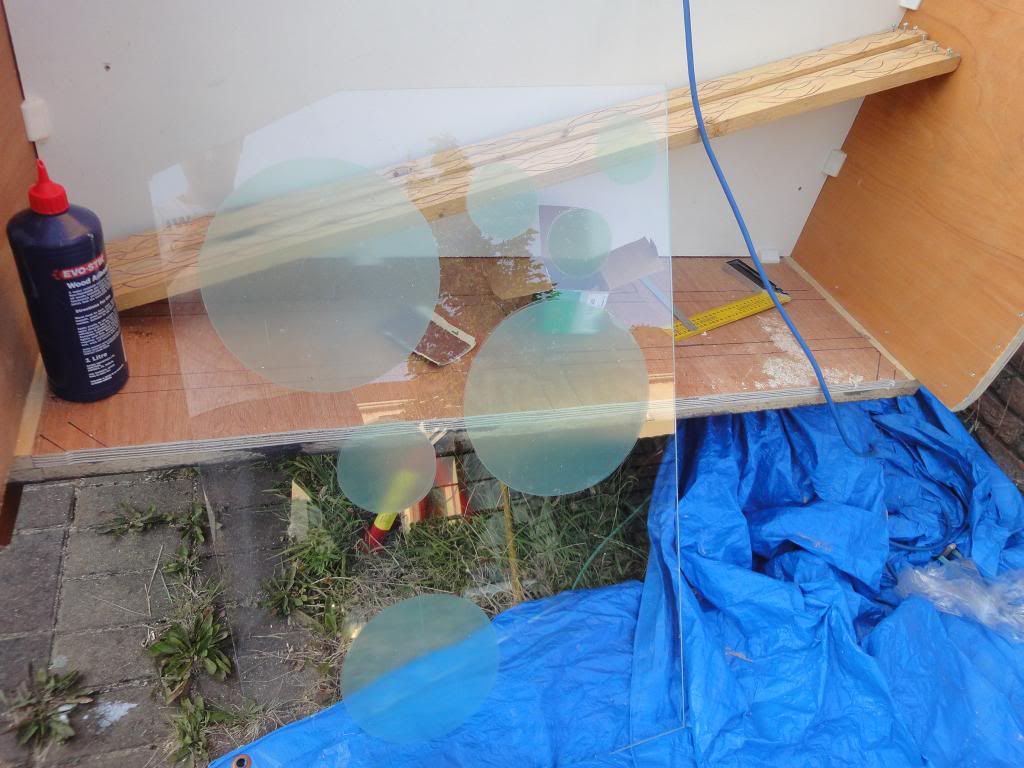
First i grabbed a large piece of 5mm thick perspex from work and trimmed it to fit in the gap between the frame.

Image

then i lined up the outer skin and used the router to cut the holes to match..Love my new router 8)

Image

Image

Next i held the perspex in the gap and ran a scalpel round both sides of all the windows so i could remove the unwanted layers of masking plastic..

Image

then i applied a tonnage of silicone sealant around all the windows

Image

then squished in the perspex, added yet more silicone and squished in the 18mm ply

Image

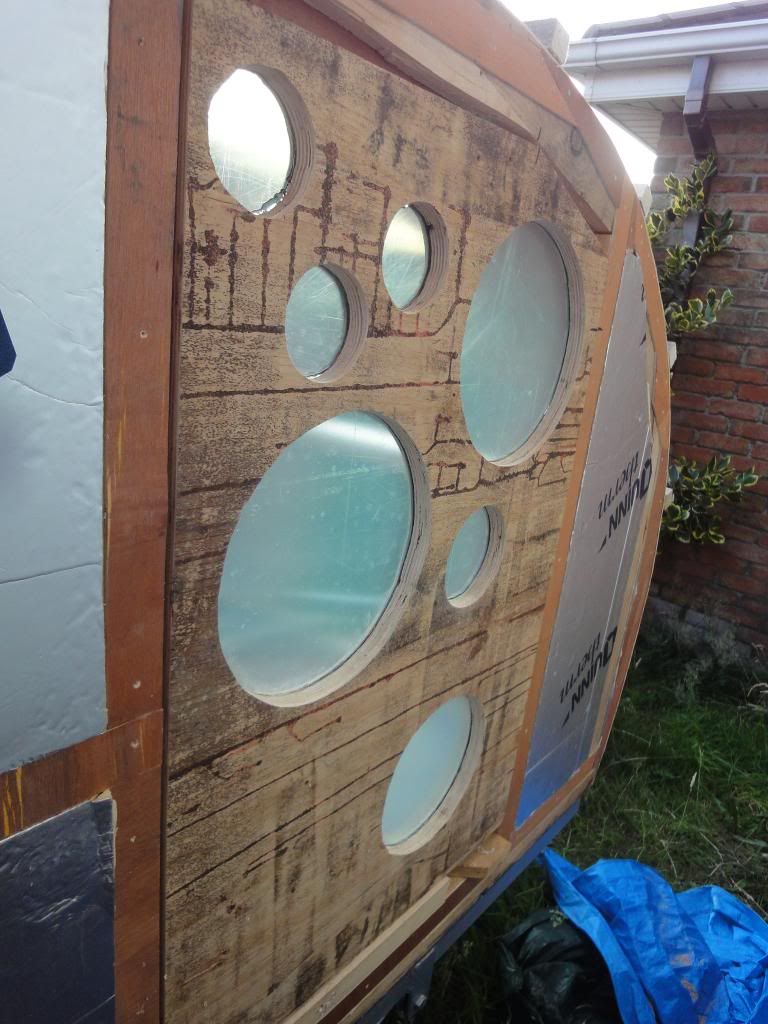
and screwed the whole sandwich together from the inside

Image

most of the screws will be removed and filled later, but i needed to do it this way to get the silicone to squish as much as possible.

That's mostly it for todays work except i also got 2 layers of watered down PVA glue on all the outer surfaces. hoping to get lots more layers on before the rain returns.
Measure once, cut twice....throw away and repeat.
Image Image

http://www.tnttt.com/viewtopic.php?t=55971
3nero
Teardrop Master
 
Posts: 129
Joined: Mon May 13, 2013 3:40 pm
Location: Co.Wicklow Ireland
Top

Re: Here's Humphrey..Now a trolly top

Postby stonykill » Fri Jul 19, 2013 8:18 pm

nice way to deal with the windows. Looks like the same way I would go about it.
User avatar
stonykill
Teardrop Master
 
Posts: 173
Joined: Mon Sep 05, 2011 12:28 pm
Location: Canaan NY
Top

Re: Here's Humphrey..Now a trolly top

Postby 3nero » Sat Jul 20, 2013 4:21 pm

Well not much to report today. Got the the windows skinned and rounded them over.

Image

Image

then the rest of the day was spent rolling on layer after layer of watered down PVA glue to every surface. 6 coats so far and it looks like it could still suck up another few layers.
Measure once, cut twice....throw away and repeat.
Image Image

http://www.tnttt.com/viewtopic.php?t=55971
3nero
Teardrop Master
 
Posts: 129
Joined: Mon May 13, 2013 3:40 pm
Location: Co.Wicklow Ireland
Top

Re: Here's Humphrey..Now a trolly top

Postby S. Heisley » Sat Jul 20, 2013 5:17 pm

Your build is very interesting. Thanks for sharing! :applause:
User avatar
S. Heisley
Super Lifetime Member
 
Posts: 8865
Images: 495
Joined: Mon Sep 17, 2007 10:02 am
Location: No. California
Top

PreviousNext

Return to Build Journals

Who is online

Users browsing this forum: No registered users and 18 guests