Help me deside on a side profile shape

General Discussion about almost anything Teardrop or camping related

Help me deside on a side profile shape

Postby kd5edj63 » Sat Oct 12, 2013 4:41 pm

I was at the lumber yard today (Home depot) looking at plywood and such. Spesifically I wanted to see the thin stuff. The stuff that flexes and allowes one to make a traditional tear drop shape. In birch, the thinist they had was quarter inch. I found some other thinner underlayment (2.7mm I think) that was very flexible but very thin. I also saw 5mm stuff that was of course less flexible. I an leaning heavily on a boxy type shape for simplicity reasons both in design and construction. Particularly in simplifying the hatch design. I think, I THINK I can at least make the front end rounded somewhat, but I think being my 1st build, I would want to go with a flat hatch. Flat as in not curved. Not flat as in perfectly verticle. I need persuasion in going with a rounded front end. I think by next weekend (mid-late October) I will be ready to get after doing the sides and making some good progress. Any advice would be helpful. I hope to test out my 1st build by winter :)
I am almost positive I will paint my trailer rather than skin it. So that is not something to consider at this point
kd5edj63
Teardrop Master
 
Posts: 130
Joined: Fri Oct 04, 2013 3:17 pm

Re: Help me deside on a side profile shape

Postby grantstew8 » Sat Oct 12, 2013 7:18 pm

By making it 8x4 you use a lot less timber than if it's 5' wide. If you have lots of woodworking tools then make it any shape you want. If not keep it geometric. 1/8 is really flexible.

Good luck!


User avatar
grantstew8
The 300 Club
 
Posts: 448
Images: 77
Joined: Tue May 28, 2013 5:26 pm
Location: Dunfermline, Scotland

Re: Help me deside on a side profile shape

Postby les45 » Sat Oct 12, 2013 8:16 pm

How about a weekender? Totally angular.
User avatar
les45
500 Club
 
Posts: 974
Images: 605
Joined: Sat Feb 25, 2012 8:57 am
Location: Aiken, South Carolina
Top

Re: Help me deside on a side profile shape

Postby working on it » Sat Oct 12, 2013 9:53 pm

kd5edj63 wrote:I was at the lumber yard today (Home depot) looking at plywood and such. Spesifically I wanted to see the thin stuff. The stuff that flexes and allowes one to make a traditional tear drop shape. In birch, the thinist they had was quarter inch. I found some other thinner underlayment (2.7mm I think) that was very flexible but very thin. I also saw 5mm stuff that was of course less flexible. I an leaning heavily on a boxy type shape for simplicity reasons both in design and construction. Particularly in simplifying the hatch design. I think, I THINK I can at least make the front end rounded somewhat, but I think being my 1st build, I would want to go with a flat hatch. Flat as in not curved. Not flat as in perfectly verticle. I need persuasion in going with a rounded front end. I think by next weekend (mid-late October) I will be ready to get after doing the sides and making some good progress. Any advice would be helpful. I hope to test out my 1st build by winter :)
I am almost positive I will paint my trailer rather than skin it. So that is not something to consider at this point

les45 wrote: How about a weekender? Totally angular.
Flat, angular ? Where have I seen that combination ? Before you decide, ask yourself " Do I want a Teardrop? or do I want to repeat (over and over) "It's like a Teardrop, but, it's not ....". For heavens' sake, make at least one part curved, or you'll get no understanding or comfort.
2013 HHRv "squareback/squaredrop", rugged, 4x8 TTT, 2225 lbs
  • *3500 lb Dexter EZ-Lube braked axle, 3000 lb.springs, active-progressive bumpstop suspension
  • *27 x 8.5-14LT AT tires (x 3) *Weight Distribution system for single-beam tongue
  • *100% LED's & GFCI outlets, 3x fans, AM/FM/CD/Aux. *A/C & heat, Optima AGM, inverter & charger(s)
  • *extended-run, on-board, 2500w generator *Coleman dual-fuel stove & lantern, Ikea grill, vintage skillet
  • *zinc/stainless front & side racks *98"L x 6" diameter rod & reel carrier tube on roof
173193172890148599
User avatar
working on it
2000 Club
2000 Club
 
Posts: 2189
Images: 457
Joined: Tue Oct 04, 2011 9:05 pm
Location: DFW Texas
Top

Re: Help me deside on a side profile shape

Postby tony.latham » Sat Oct 12, 2013 10:12 pm

I used Steve Fredrick's Teardrop Shop Manual and found his build method for the hatch, disturbingly simple.

Also, I live three hours from the nearest Home Depot or Lowe's. That didn't stop me from making the drive and checking out the plywood selection at the nearest box stores in Missoula –and ditto– nothing by 1/4" stuff. However, my itsy-bitsy local-yocal lumber yard manager made a phone call and had several 5x5 sheets of 1/8" baltic birch in a week here in the middle of nowhere. It's sweet to work with.

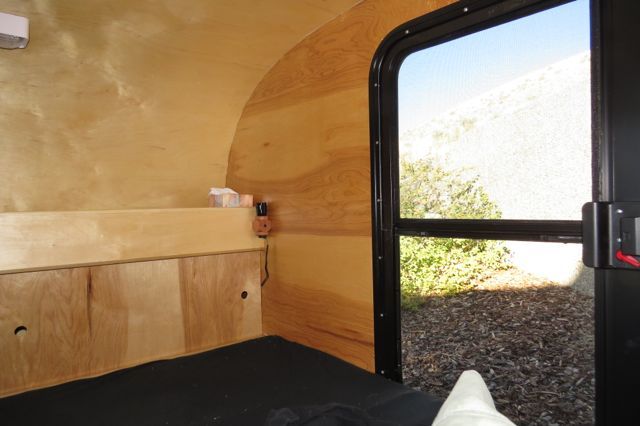
I did use 1/4" floor underlayment for the walls (sandwich style). The stuff I found was cheaper, more solid than AC fir, and much better looking –plus it's rated for "moist envioroments." No delamination after soaking a week in a bucket of water.

Here's what it looks like inside. That's 1/4" underlayment on the walls/sliders and 1/8" baltic on the ceiling.
Image

Now doesn't that just make you want to crawl in there and take a nap on that 5" foam mattress?

Tony
User avatar
tony.latham
Gold Donating Member
 
Posts: 7080
Images: 17
Joined: Mon Jul 08, 2013 4:03 pm
Location: Middle of Idaho on the edge of nowhere
Top

Re: Help me deside on a side profile shape

Postby KennethW » Sat Oct 12, 2013 10:56 pm

I had know problem with bending 1/4 luan . I made my wall with the inside profile laid the the ceiling over the sides with glue then screwed and glued the rafted 1by 2 to the walls thru the ceiling luan.
110014
110015
Put the insulation between the rafters. then I glued on the roof and screwed the outer edges.
Then used a router( a saw would work) with a end bearing bit with a 1/4 inch shim to cut the outer wall .
110013
Lastly I cut out the doors out and cut the hatch off the back.with a router(or saw). It made making the hatch so easy. Just get your hinge support in the right place. It took the fear out of making a hatch that will fit.
KennethW
1000 Club
1000 Club
 
Posts: 1188
Images: 82
Joined: Wed Feb 20, 2013 8:01 pm
Top

Re: Help me deside on a side profile shape

Postby RandyG » Sun Oct 13, 2013 12:48 am

How many campers do you want to build? Might as well make the first one something you will want to keep for a long time and make it to last. I barely convinced my wife to go along with one, forget any more. But with some time, you can get 1/4" to bend into some tight bends. 18" diameter into a U shape is my record, for another project not tear related.
Randy
Aircraft fabricator, novice carpenter, electrical apprentice, audio engineer dropout.
Build thread - http://www.tnttt.com/viewtopic.php?f=50&t=54126
User avatar
RandyG
500 Club
 
Posts: 695
Images: 115
Joined: Thu May 10, 2012 6:52 pm
Top

Re: Help me deside on a side profile shape

Postby PKCSPT » Sun Oct 13, 2013 1:54 am

While I like the traditional tear shape (and have one) I also like the weekender shape as well. I am very tempted to try building one myself and the weekender is the route I will go,
121172 116946 159644
PKCSPT
Silver Donating Member
 
Posts: 1515
Images: 61
Joined: Wed Mar 31, 2010 11:27 pm
Location: Minnesota
Top

Re: Help me deside on a side profile shape

Postby kd5edj63 » Sun Oct 13, 2013 9:05 am

Thanks for all the help guys. The videos make me feel a bit more at ease about a curvy design. I will look into a weekender. If thats a weekender in your avatar Les45, thats the shape I like for boxy. :thumbsup:
kd5edj63
Teardrop Master
 
Posts: 130
Joined: Fri Oct 04, 2013 3:17 pm
Top

Re: Help me deside on a side profile shape

Postby halfdome, Danny » Sun Oct 13, 2013 11:05 am

The method used in the second video is way too labor intensive and having the grain going in different directions will show, even when painted.

Remember, you'll be looking at the ceiling while laying in bed, so make it as nice as possible.
I use my router with a wood fence clamped to the base and route a 1/4" deep rabbit along the 3/4" thick roof profile to the depth of the spars and ceiling profile.
After the walls and bulkheads are attached to the floor I drop the pre finished 1/8" Baltic Birch ceiling down on the lightly glued 1/4" rabbit edge and staple it down.
I then glue & install the roof spars.
Where there is a joint on a spar I use lath screws to temporarily pull it up tight.
I don't have a seam going the length of the ceiling as shown in the video.
After the screws are removed I put a 1/4" x 3/4" piece of matching trim over that joint and one in the same spot at the other end to give it some visual balance.
I use prop sticks to hold the rest of the roof while the glue dries to the spars.
This produces a nice looking ceiling even where the walls and the ceiling meet.
:D Danny
ImageImage
"Conditions are never just right. People who delay action until all factors are favorable do nothing". William Feather
Don't accept "It's Good Enough" build to the best of your abilities.
Image
Teardroppers Of Oregon & WashingtonImage
User avatar
halfdome, Danny
*Happy Camper
 
Posts: 5894
Images: 252
Joined: Sun Aug 14, 2005 11:02 pm
Location: Washington , Pew-al-up
Top

Re: Help me deside on a side profile shape

Postby kd5edj63 » Sun Oct 13, 2013 11:38 am

my trailer is 4 feet wide so I wont have the problem of the grain going in different dirrections
kd5edj63
Teardrop Master
 
Posts: 130
Joined: Fri Oct 04, 2013 3:17 pm
Top

Re: Help me deside on a side profile shape

Postby eamarquardt » Sun Oct 13, 2013 12:37 pm

halfdome, Danny wrote:The method used in the second video is way too labor intensive and having the grain going in different directions will show, even when painted.

Remember, you'll be looking at the ceiling while laying in bed, so make it as nice as possible.
I use my router with a wood fence clamped to the base and route a 1/4" deep rabbit along the 3/4" thick roof profile to the depth of the spars and ceiling profile.
After the walls and bulkheads are attached to the floor I drop the pre finished 1/8" Baltic Birch ceiling down on the lightly glued 1/4" rabbit edge and staple it down.
I then glue & install the roof spars.
Where there is a joint on a spar I use lath screws to temporarily pull it up tight.
I don't have a seam going the length of the ceiling as shown in the video.
After the screws are removed I put a 1/4" x 3/4" piece of matching trim over that joint and one in the same spot at the other end to give it some visual balance.
I use prop sticks to hold the rest of the roof while the glue dries to the spars.
This produces a nice looking ceiling even where the walls and the ceiling meet.
:D Danny


Great technique and explanation. Danny is a master.
The opinions in this post are my own. My comments are directed to those that might like an alternative approach to those already espoused.There is the right way,the wrong way,the USMC way, your way, my way, and the highway.
"I'm impatient with stupidity. My people have learned to live without it." Klaatu-"The Day the Earth Stood Still"
"You can't handle the truth!"-Jack Nicholson "A Few Good Men"
"Some people spend an entire lifetime wondering if they made a difference in the world. The Marines don't have that problem"-Ronald Reagan
User avatar
eamarquardt
Silver Donating Member
 
Posts: 3179
Images: 150
Joined: Sat Nov 11, 2006 11:00 pm
Location: Simi Valley, State of Euphoria (Ca)
Top

Re: Help me deside on a side profile shape

Postby kd5edj63 » Sun Oct 13, 2013 1:05 pm

halfdome, Danny wrote:I use my router with a wood fence clamped to the base and route a 1/4" deep rabbit along the 3/4" thick roof profile to the depth of the spars and ceiling profile.
After the walls and bulkheads are attached to the floor I drop the pre finished 1/8" Baltic Birch ceiling down on the lightly glued 1/4" rabbit edge and staple it down.
:D Danny

can you explain that better. Whats a rabbit and what kind of stapler do you use
kd5edj63
Teardrop Master
 
Posts: 130
Joined: Fri Oct 04, 2013 3:17 pm
Top

Re: Help me deside on a side profile shape

Postby halfdome, Danny » Sun Oct 13, 2013 2:06 pm

kd5edj63 wrote:
halfdome, Danny wrote:I use my router with a wood fence clamped to the base and route a 1/4" deep rabbit along the 3/4" thick roof profile to the depth of the spars and ceiling profile.
After the walls and bulkheads are attached to the floor I drop the pre finished 1/8" Baltic Birch ceiling down on the lightly glued 1/4" rabbit edge and staple it down.
:D Danny

can you explain that better. Whats a rabbit and what kind of stapler do you use

Don't know how to explain it any simpler.
This is what a rabbet looks like on the left.
Image
I use a [Pneumatic 1/4" narrow crown stapler.
:D Danny
ImageImage
"Conditions are never just right. People who delay action until all factors are favorable do nothing". William Feather
Don't accept "It's Good Enough" build to the best of your abilities.
Image
Teardroppers Of Oregon & WashingtonImage
User avatar
halfdome, Danny
*Happy Camper
 
Posts: 5894
Images: 252
Joined: Sun Aug 14, 2005 11:02 pm
Location: Washington , Pew-al-up
Top

Re: Help me deside on a side profile shape

Postby kd5edj63 » Sun Oct 13, 2013 2:35 pm

I guess I would need to see the side wall with the rabbet cut into it to make any sense of it. I'll look into an air stapler. Thanks
Edit. I take it the bulkhead is the gally area, correct
kd5edj63
Teardrop Master
 
Posts: 130
Joined: Fri Oct 04, 2013 3:17 pm
Top

Next

Return to General Discussion

Who is online

Users browsing this forum: No registered users and 4 guests