The Poet Creek Express - Foamie Hybrid

Canvas covered foamies (Thrifty Alternatives...)

Moderator: eaglesdare

Re: The Poet Creek Express - Foamie Hybrid

Postby KCStudly » Fri Apr 04, 2014 11:13 am

Its an old security clearance joke, "I could tell you, but then I would have to kill you." :lol: :lol: :lol:

Food? In a camper in the mountains? That's bear country cardinal sin No. 1. The wife had a very poor reaction when I told her that we would be using biodegradable soap and that she would have to limit the amount of cosmetics that she brings with her (defiant stare). Me, "It will attract the bears." Her, "Yes, but I have to bring a certain amount of... (stuff)." Me, "I'm not stringing 3 cases of cosmetics up in a tree every night, and besides, we'll be in the woods camping in "nowhere's land", no one will see you." Her, "Yes, but...". Me, "You get toothpaste, biodegradable soap and a few basics." Her, (defiant pout).
KC
My Build: The Poet Creek Express Hybrid Foamie

Poet Creek Or Bust
Engineering the TLAR way - "That Looks About Right"
TnTTT ORIGINAL 200A LANTERN CLUB = "The 200A Gang"
Green Lantern Corpsmen
User avatar
KCStudly
Donating Member
 
Posts: 9640
Images: 8169
Joined: Mon Feb 06, 2012 10:18 pm
Location: Southeastern CT, USA

Re: The Poet Creek Express - Foamie Hybrid

Postby GPW » Fri Apr 04, 2014 3:29 pm

Yes , it is an OLD joke ... :roll: KC, similar problem , usually half of what the wife takes is “things she needs” , not clothes , but ALL that other stuff... :frightened: Me, I can travel with a gym bag , "Her Worship” needs an entourage ... :designing:
There’s no place like Foam !
User avatar
GPW
Gold Donating Member
 
Posts: 14920
Images: 546
Joined: Thu Feb 09, 2006 7:58 pm
Location: New Orleans

Re: The Poet Creek Express - Foamie Hybrid

Postby KCStudly » Fri Apr 04, 2014 8:42 pm

At work I've been designing/building a load cell frame to mount a 300 gal steam kettle, and I managed to get the welding done today, so I was able to bug out on time.

My plan was to prep the loft to move the table saw up tomorrow, but then I was asked to go in tomorrow and install the load cell frame. Well Karl was ambitious and eager to help, so we went for it and got the saw upstairs tonight.
Image

That included everything we did before; getting the cabin up on dollies; rolling up the plastic drape wall; moving the heaters and panel cart; moving the small table saw; lifting the floorboards, insulation and joists up; hoisting the saw; pulling one of the dollies back out from under the cabin to move the saw into position; and then restoring everything back the way it was.

We also took the time to shim the saw up to match the work/out feed table, and screwed the cabinet to the floor. Now all I need to do is string a cord from the 3 phase inverter hot leads to a new fused breaker box (the existing one is full up), run the lead under the floor to the saw, and install a remote switch to start the inverter so that I don't have to go downstairs every time I need to start or stop the inverter.

Still not there yet, but getting closer.
KC
My Build: The Poet Creek Express Hybrid Foamie

Poet Creek Or Bust
Engineering the TLAR way - "That Looks About Right"
TnTTT ORIGINAL 200A LANTERN CLUB = "The 200A Gang"
Green Lantern Corpsmen
User avatar
KCStudly
Donating Member
 
Posts: 9640
Images: 8169
Joined: Mon Feb 06, 2012 10:18 pm
Location: Southeastern CT, USA
Top

Re: The Poet Creek Express - Foamie Hybrid

Postby Wolffarmer » Fri Apr 04, 2014 9:58 pm

Looking like a nice shop, waiting to be used and cluttered up. I have my saw on casters. If I have a long piece to cut I aim the saw one way. Wide piece. Aim it another. Before using saw make sure there is nothing of the floor to cause troubles. Operator excepted.

Randy
"these guys must be afraid of the dark"
User avatar
Wolffarmer
Donating Member
 
Posts: 4612
Images: 309
Joined: Wed May 02, 2007 1:32 pm
Location: Idaho Rupert
Top

Re: The Poet Creek Express - Foamie Hybrid

Postby GPW » Sat Apr 05, 2014 5:21 am

Looks warmer too , about time eh ? :thumbsup: That’s such a nice saw , and workplace !!! 8)
There’s no place like Foam !
User avatar
GPW
Gold Donating Member
 
Posts: 14920
Images: 546
Joined: Thu Feb 09, 2006 7:58 pm
Location: New Orleans
Top

Re: The Poet Creek Express - Foamie Hybrid

Postby KCStudly » Sat Apr 05, 2014 10:47 pm

Today was a beautiful spring day. The rain missed us. There is still a little chill in the air, but that suits me fine. Maybe it just looks warmer because I had set the heaters aside to move the cabin by during the move?

Gee, here I was thinking that there was an awful lot of stuff piled up on the work table that needs to get work done to it.

Full day today at the grind; kettle hoisted up and mounted on load cell frame. I made the frame so that it would accept a pallet jack, so it was easy to move it into position once the two were joined.

Anyway, after a quick stop at the big box for some cable staples and box connectors, it was out to Mecca to string power to the saw. I managed to get the wires to fit in the lugs of the existing fuse box after all, so a secondary box was not needed. Then it was a messy job at the top of an old 14 ft wooden step ladder hanging cable along the joist line nestled up between the fiberglass bat insulation. Lots of fiber dust and fine fabrication dust. I felt and looked like I had been in a coal mine for days! And while the ladder was in solid shape, it felt like I was riding a flag pole; that thing would sway a good 6 inches at the top with every move! The ladder is so big and space is limited between the lathe and press brake, so I had to move the firewood rack and several other pieces of equipment just to be able to stand the ladder up. Worked until after 8pm and still didn't get done, but close.

Man, the hot shower felt good when I got home!
Last edited by KCStudly on Sun Apr 06, 2014 8:59 am, edited 1 time in total.
KC
My Build: The Poet Creek Express Hybrid Foamie

Poet Creek Or Bust
Engineering the TLAR way - "That Looks About Right"
TnTTT ORIGINAL 200A LANTERN CLUB = "The 200A Gang"
Green Lantern Corpsmen
User avatar
KCStudly
Donating Member
 
Posts: 9640
Images: 8169
Joined: Mon Feb 06, 2012 10:18 pm
Location: Southeastern CT, USA
Top

Re: The Poet Creek Express - Foamie Hybrid

Postby GPW » Sun Apr 06, 2014 4:36 am

Glad youze’ guys are finally warming up :thumbsup: ... It was a Long winter eh !!! :frightened:

“ The night is dark and filled with trailers “ :lol:
There’s no place like Foam !
User avatar
GPW
Gold Donating Member
 
Posts: 14920
Images: 546
Joined: Thu Feb 09, 2006 7:58 pm
Location: New Orleans
Top

Re: The Poet Creek Express - Foamie Hybrid

Postby KCStudly » Mon Apr 07, 2014 7:17 am

Yesterday I finished wiring the saw and started using it to modify the locker parts I had prefabbed earlier. What a joy the saw is to use! The weather was so nice that, despite still being cool out, I had one of the windows open for most of the afternoon.

A more detailed post with pics will follow when I get a chance. :D
KC
My Build: The Poet Creek Express Hybrid Foamie

Poet Creek Or Bust
Engineering the TLAR way - "That Looks About Right"
TnTTT ORIGINAL 200A LANTERN CLUB = "The 200A Gang"
Green Lantern Corpsmen
User avatar
KCStudly
Donating Member
 
Posts: 9640
Images: 8169
Joined: Mon Feb 06, 2012 10:18 pm
Location: Southeastern CT, USA
Top

Re: The Poet Creek Express - Foamie Hybrid

Postby KCStudly » Tue Apr 08, 2014 12:38 am

Let’s see if I can remember what I have done since my last update.

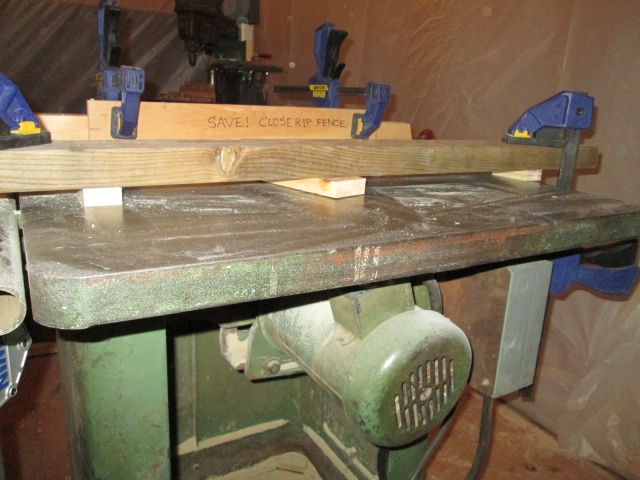
Once the saw had power I used it to cut a waster/sacrificial fence to screw to the cast iron fence. That way if the fence gets too close to the blade neither will be damaged. (Not surprising, many of the old fences I have seen recently have blade scars on them!)

Next I made a piece to attach to the miter gauge, making it wider and easier to clamp the work pieces to. By making it a little long and then passing it through the blade, it also gives me an alignment reference to the blade.

Here you can see me using these new additions to notch out the bottom of one of the locker side pieces. In the pic I had already run the cuts and have just mocked the cut out piece back into place to show it better.
Image

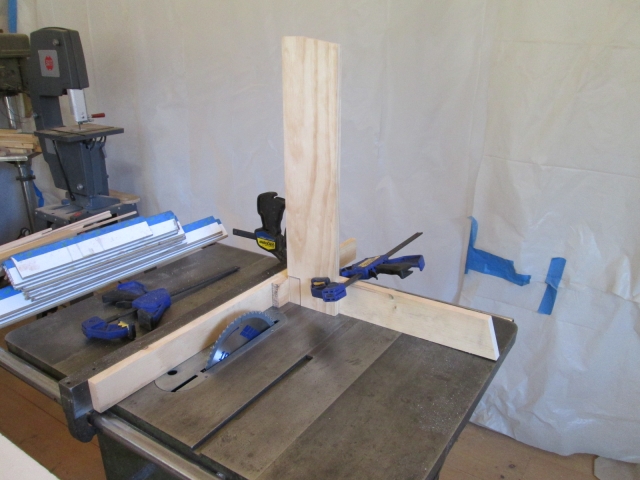
You don’t want to ride the rip fence for cross cuts, so the shorter block is clamped on well ahead of where the work piece enters the blade and is just used as a reference stop to locate the work on the miter gauge for clamping.
Image
Image

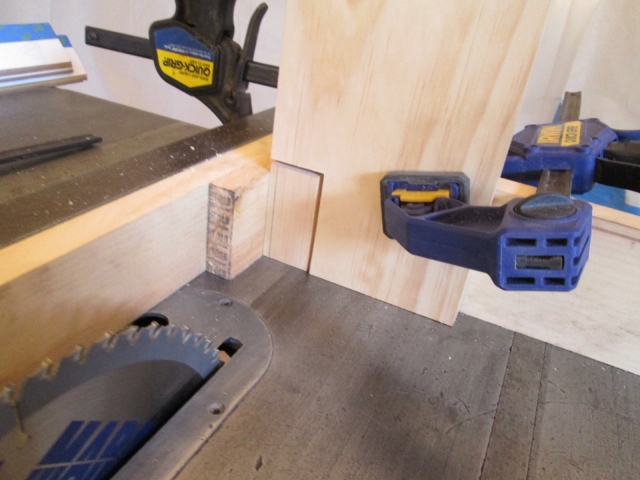
You can see how the part leaves the block before reaching the blade. Also note how the miter gage extension can be used to align the edge of the cut. Just need to remember to make your pencil marks on the back side of the work.
Image

This is kind of rudimentary for experienced wood workers, but having just read thru the owner’s manual for the Powermatic 66, I was reminded about some of the basics that some may not be aware of, so I thought I would share.

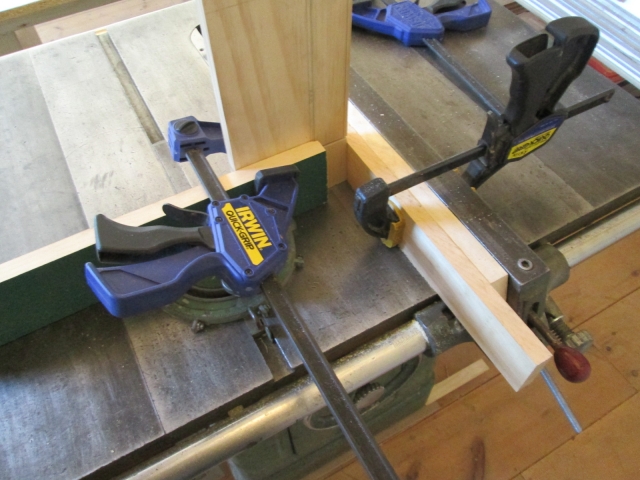
The next accessory I made was a low rip fence extension for thin rips. I think this is more important for allowing a guard to be used when ripping something narrower than the guard is wide, but it helps make room for a push stick between the blade and main fence, so it is useful all the same. I need to come up with a better clamping arrangement to keep the clamps from extending out so far. In future I might just screw it directly to the waster fence when needed.
Image

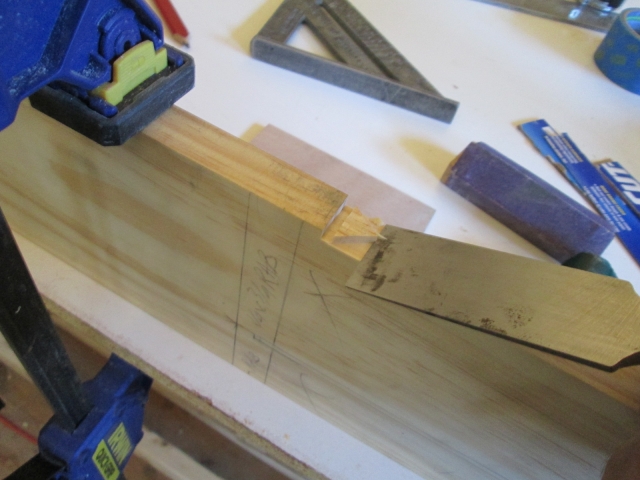
Where the inner wall skin near our pillows nests into the fronts of the locker side panels under the locker opening, I needed to trim the side panels by the thickness of the front wall inner plywood (5mm or 3/16 inch). First I set the blade to 3/16 deep then cross cut the sides to define the end of the step. Then I raised the blade and used the rip setup above to trim up to the slot. I put a piece of blue tape down on the table and marked a line to reference the end of the cut, ran one side, shut the saw off, then flipped the board and ran another cut from the back side. This left me just a little delta shape to deal with (disregard all of the excess pencil marks; those were part of the abandoned design development process).
Image

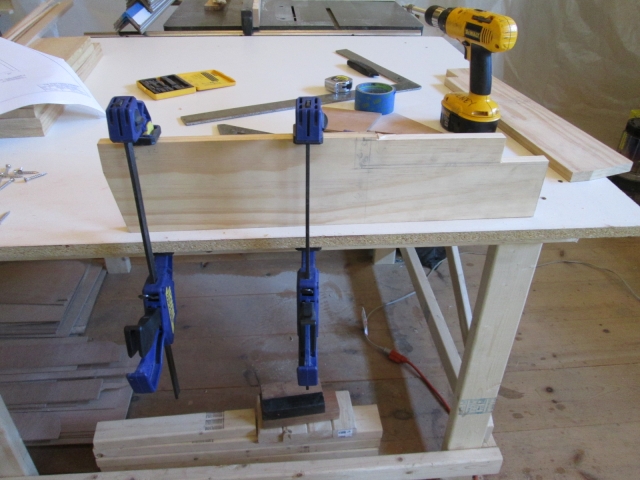
Clamped them to the edge of the bench and used a chisel to clean it off.
Image
Image

In this pic I’m holding one of the locker sides out near the side wall to check progress by dry fitting to the front profile. In reality the part is set in away from the side wall some. The open inward face of the locker is flush to the inside of the front wall skin (same as the front edge of the raw side wall). The wall skin in front of our pillows fits into the narrow cut under the locker opening, and the notch fits over the toe kick spar.
Image
Image

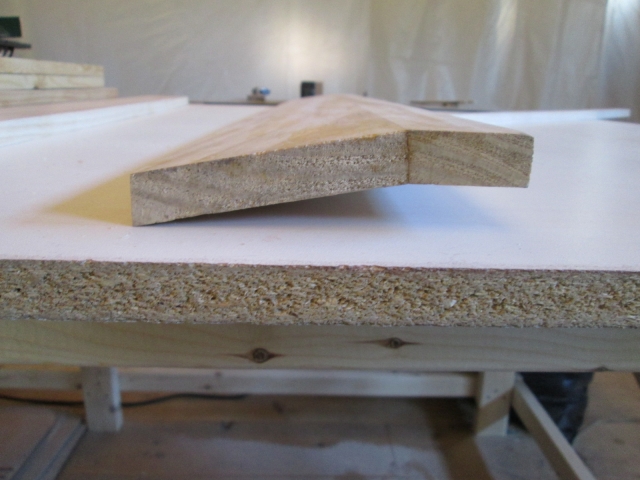
When I made the beveled top of the locker the front edge was also going to be the hinge mount for the TB lid, so the leading edge was left perpendicular to the slope. Now the front edge will be flush to the vertical face of the locker, so I dialed in a 10 deg bevel on the saw and ripped the edge accordingly.
Image

Shown upside down.
Image

Upside up.
Image

Laying on the rear (opening side) dry fit to one of the locker sides.
Image

That brings us to Monday night.

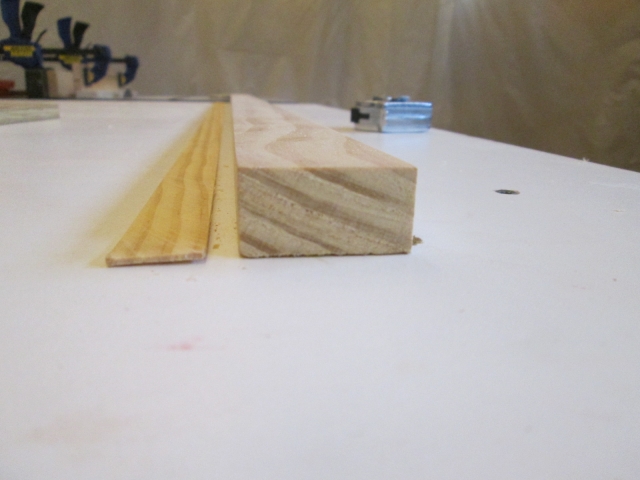
Originally the floor of the locker was going to be above pillow height and the sides of the locker were going to extend down to the floor of the TB. Now there will be a narrow sill across the bottom of the opening (still above pillow height) and the front edge of the main floor plus a narrow board about 3-1/2 inches wide will make up the floor of the locker well. So I took the wider piece that would have been the floor of the locker and ripped off the new floor of the well, then made another narrow rip to set the width of the sill piece at 1-1/2 inch. The thin little sliver that came off of the second rip was impressive in its uniformity… impossible with the crap saw… I love this saw.
Image

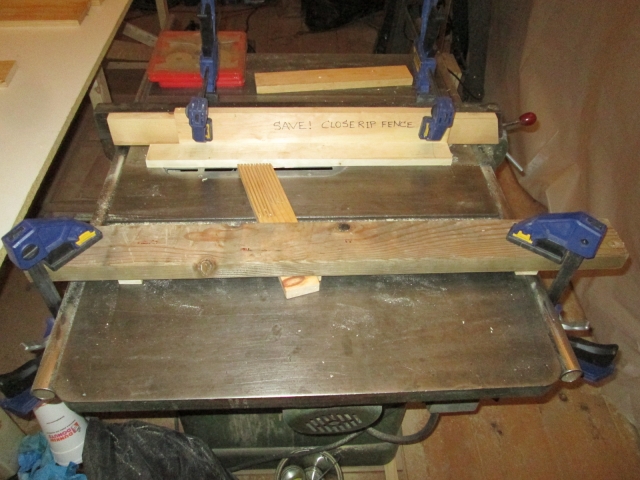
For the next couple of operations I needed a way to anchor the feather board. Crude but affective, I used 3 screws to attach it to the underside of a 2x4 that was long enough to span the saw table. Also screwed a couple of matching spacer blocks to the ends so that it would clamp level.
Image
Image

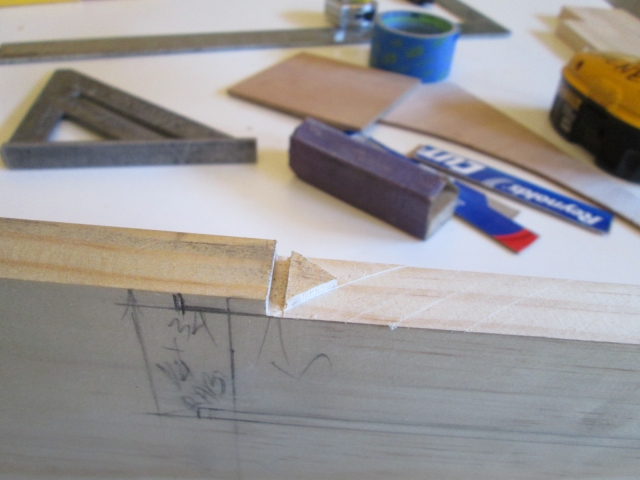
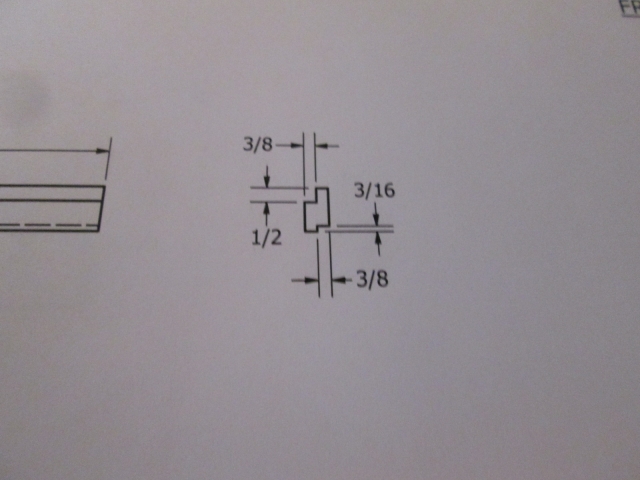
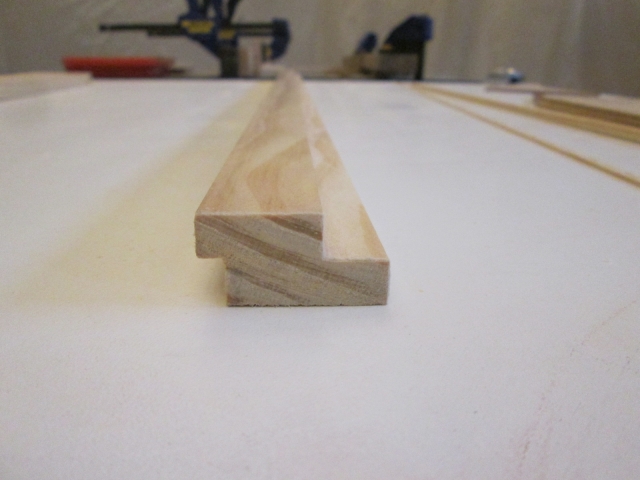
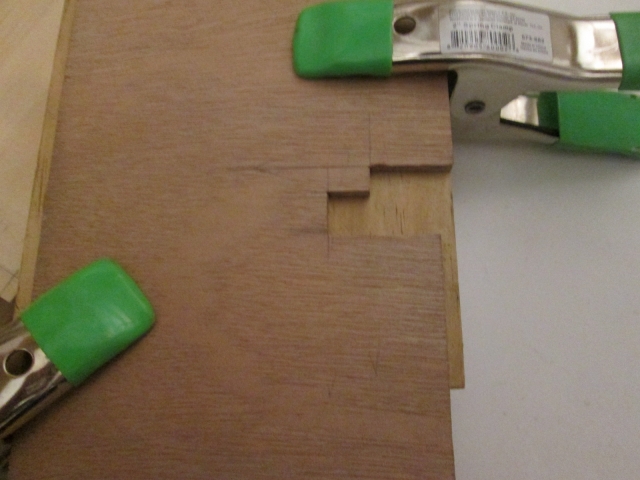
Here’s what I’m working toward. The top of the sill is on the left. The small 3/16 inch wide notch will receive the front wall skin, and the 1/2 wide notch is a half lap to support a drop in cover that will fit over the well in the locker.
Image

Two rips each notch (shown upside up).
Image

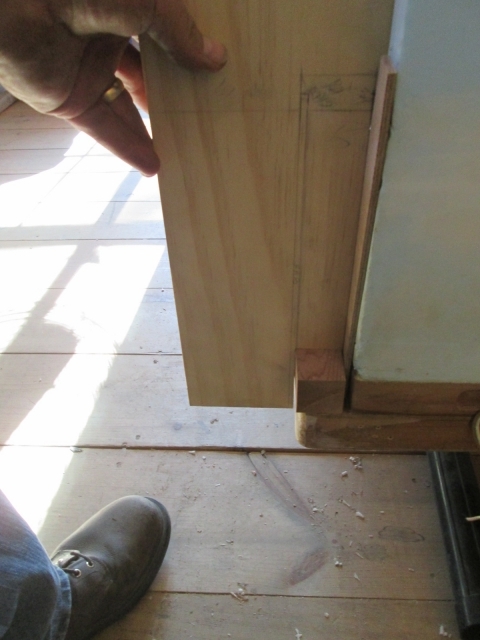
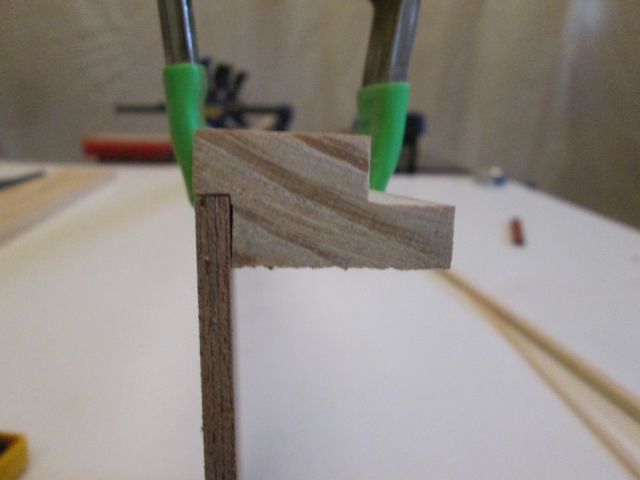
Mockup of inner wall skin fit to locker sill.
Image

On one of the cuts you can see how the piece rolled out the back of the blade once it left the feather board, leaving a little more material than the depth of the other kerf. I used the little matchbox plane to true this up (held funny for the pic).
Image
Image

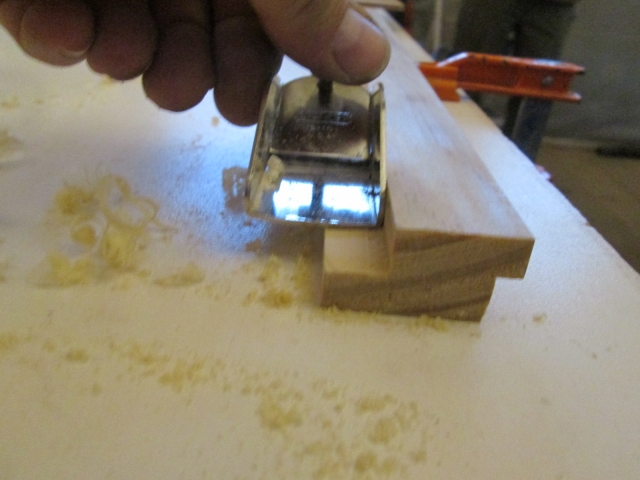
The sill will fit into blind dados in the side pieces of the locker. To cut theses dadoes to match the profile of the sill I will make a router template. I traced the profile onto a scrap of the 5mm ply, stepped it off by the guide collar thickness, scored it with the utility knife using the back of my hand saw as a straight edge, chiseled out a couple of plies, then finished it on the band saw.
Image
Image
The offset on the right matches the inner wall panel recess cut in the side piece.

I will have to turn the brass collar for the 1/4 inch straight cutting bit down to work with the template thickness and will do a test cut on a scrap to verify a good fit before committing to the real parts.

And that took me past 7:30pm for another 2-1/4 hrs of build time.
KC
My Build: The Poet Creek Express Hybrid Foamie

Poet Creek Or Bust
Engineering the TLAR way - "That Looks About Right"
TnTTT ORIGINAL 200A LANTERN CLUB = "The 200A Gang"
Green Lantern Corpsmen
User avatar
KCStudly
Donating Member
 
Posts: 9640
Images: 8169
Joined: Mon Feb 06, 2012 10:18 pm
Location: Southeastern CT, USA
Top

Re: The Poet Creek Express - Foamie Hybrid

Postby GPW » Tue Apr 08, 2014 6:21 am

NICE to have to have the right tools to make those exotic cuts !!!... Very COOL KC !!! 8)
There’s no place like Foam !
User avatar
GPW
Gold Donating Member
 
Posts: 14920
Images: 546
Joined: Thu Feb 09, 2006 7:58 pm
Location: New Orleans
Top

Re: The Poet Creek Express - Foamie Hybrid

Postby KCStudly » Tue Apr 08, 2014 7:00 am

GPW wrote:NICE to have to have the right tools to make those exotic cuts !!!... Very COOL KC !!! 8)

Yes. Yes it is. :yes:

Thanks for checking it out!
KC
My Build: The Poet Creek Express Hybrid Foamie

Poet Creek Or Bust
Engineering the TLAR way - "That Looks About Right"
TnTTT ORIGINAL 200A LANTERN CLUB = "The 200A Gang"
Green Lantern Corpsmen
User avatar
KCStudly
Donating Member
 
Posts: 9640
Images: 8169
Joined: Mon Feb 06, 2012 10:18 pm
Location: Southeastern CT, USA
Top

Re: The Poet Creek Express - Foamie Hybrid

Postby KCStudly » Tue Apr 08, 2014 10:09 pm

Worked over again but managed to get out to Mecca for a Tuesday.

I started by turning down the small router guide collar for the 1/4 inch cutter. Almost wrecked it. To hold it true in the lathe I wrapped the fine threads in electrical tape and grabbed it there with the chuck. I started to make the cut with a parting tool, which was a mistake. Bit in and tore the collar out of the chuck, chipped a chunk out of the cylindrical sleeve and warped it out of round. Chucked it back up, faced it off like I should have originally, and tweaked it back round again (more or less) by squeezing it gently with pliers. Here you can see how the collar will ride on the 5 mm ply template while cutting to a depth of 3/16 inch (or 5 mm… the ply scraps I was using as a gauge sprang back a little when I let go of them to take the pic… the cutter was flush to the top when they were held down gently).
Image

Working on cutting the blind dadoes in the locker side panels for the sill piece. Here’s the template I made last night held to a scrap with double sided tape for a test run. The scrap was a little too small to clamp, so I double sided taped it to the work bench to hold it in place.
Image

Ran the router…
Image

… and cleaned up the corners with the 3/8 inch chisel.
Image

Take one resulted in a loose fit.
Image

I figured that when I traced the sill profile the outline grew a little, so I made another template by laying out the cuts using the drawing dimensions plus the collar offset. Take two was also loose.

So I made another template undersize, ran the router, compared that to the profile of the sill, and then shaved the template here and there until I could creep up on a nice snug fit. Third test was the charm.
Image
Image
Note how the sill lines up to the pencil mark, not the edge cut. That edge of the template is for alignment to the side panel, and is not offset for the collar.

Ready for the real deal cuts on the locker side panels. More double sided tape.
Image

Not sure what happened but I had a little more gap at the back than I wanted. Maybe I didn’t have the template flush to the edge, or the tape shifted. The end of the sill stock has a little taper where it rolled out of the saw, so when I cut it to final length this should get better.
Image

For the second side, which is opposite hand, I flipped the template over and compensated the edge alignment to tighten this up. Ended up having to shave about the same amount back off using the chisel, but it came out nice and tight. In this pic the top of the sill is to the right.
Image

And here is the same joint shown from the bottom.
Image

Here’s an overall shot showing the opposite hand (mirror image) progress on the locker side panels.
Image

And a close up showing the alignment of the dadoes.
Image

Couple more hours down. I enjoyed the sense of accomplishment working up to achieve a good tight fit.
KC
My Build: The Poet Creek Express Hybrid Foamie

Poet Creek Or Bust
Engineering the TLAR way - "That Looks About Right"
TnTTT ORIGINAL 200A LANTERN CLUB = "The 200A Gang"
Green Lantern Corpsmen
User avatar
KCStudly
Donating Member
 
Posts: 9640
Images: 8169
Joined: Mon Feb 06, 2012 10:18 pm
Location: Southeastern CT, USA
Top

Re: The Poet Creek Express - Foamie Hybrid

Postby lthomas987 » Wed Apr 09, 2014 10:32 am

Your woodworking skills leave me in awe. :applause:
Laura
Bike-Drop a Micro-Foamy Build Journal http://www.tnttt.com/viewtopic.php?f=50&t=59274
My first Superlegarra-ish Foamy build http://www.tnttt.com/viewtopic.php?f=55&t=59049
User avatar
lthomas987
Donating Member
 
Posts: 357
Images: 204
Joined: Sun Feb 02, 2014 2:41 pm
Location: Minneapolis, MN, USA
Top

Re: The Poet Creek Express - Foamie Hybrid

Postby KCStudly » Wed Apr 09, 2014 11:07 am

Why thank you Laura. I guess I just put my mind to it and try to use good tools and techniques. No real prior wood working experience, although this project is over two years old now, so I guess I have a couple of years experience working wood. :lol:
KC
My Build: The Poet Creek Express Hybrid Foamie

Poet Creek Or Bust
Engineering the TLAR way - "That Looks About Right"
TnTTT ORIGINAL 200A LANTERN CLUB = "The 200A Gang"
Green Lantern Corpsmen
User avatar
KCStudly
Donating Member
 
Posts: 9640
Images: 8169
Joined: Mon Feb 06, 2012 10:18 pm
Location: Southeastern CT, USA
Top

Re: The Poet Creek Express - Foamie Hybrid

Postby bonnie » Wed Apr 09, 2014 11:44 am

This last update really reminds me of quilting. KC, you have an artist's eye. :thumbsup:
Remember, the turtle won. :)
User avatar
bonnie
Donating Member
 
Posts: 1390
Images: 107
Joined: Sun Jul 24, 2011 4:14 pm
Location: Roxana, IL
Top

PreviousNext

Return to Foamies

Who is online

Users browsing this forum: No registered users and 6 guests