Wild Idahos Compact Build

...ask your questions in the appropriate forums BUT document your build here...preferably in a single thread...dates for updates, are appreciated....

Re: Wild Idahos Compact Build

Postby Junkboy999 » Wed Nov 27, 2013 11:09 pm

Somewhere in the forums threads is a camper that has ramps on the back if it. The guy drives his ATV up to it and pops a Wheelie, and then hoist the atv on the the back. it is tied down on the back at an upwards facing angle. Picture might be in the hall of fame.
User avatar
Junkboy999
1000 Club
1000 Club
 
Posts: 1259
Images: 52
Joined: Fri Jul 06, 2012 9:18 pm
Location: Wichita, KS

Re: Wild Idahos Compact Build

Postby Wild Idaho » Fri Dec 13, 2013 10:16 pm

Thanks Junkboy999, I think I’ve decided not to go that route but it’s always cool to find out how others are doing it.

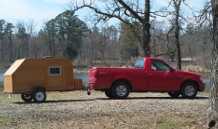
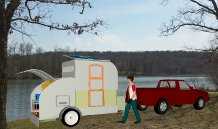
Here’s another update on some of the progress. I’ve been putting off doing the electrical. Not for any real reason other than I didn’t want to drill through the floor or cut into any of the wood I’ve finished …but it had to be done.
115194115191
115193115192
In this last picture, you see that the light actually works…..and no flames!!!!
115195
You’ll also see some of the moldings I’ve made, finished and installed. I have a few more pieces to make and stain and will post once I’m done with it.
User avatar
Wild Idaho
Teardrop Builder
 
Posts: 39
Images: 97
Joined: Sat Jan 05, 2013 7:25 am

Re: Wild Idahos Compact Build

Postby rand_98201 » Sat Dec 14, 2013 2:49 am

youre coming right along.Nice work and keep it up.
rand_98201
Teardrop Advisor
 
Posts: 88
Joined: Sun Dec 18, 2011 3:04 am
Location: Western Washington
Top

Re: Wild Idahos Compact Build

Postby Wild Idaho » Wed Jan 22, 2014 6:18 pm

Progress on the build is coming along slow and steady. What I thought would take only a few months has now exceeded the 1 year mark. I did take a month off from building in September though so does that count as only 11 months??? Probably not. The weather is really cold up here in Boise so I don't spend a lot of time out in the garage but every little bit helps toward completion. Here are a few pictures of the progress. This first picture is of the moldings that I made and installed. There are a few pieces that I'll wait to install after my windows are installed.
116087
This next view is of the driver side and back fold down walls in the folded position.
116086
Here's a view of the drivers side wall in the up position.
116085
I'd really like to show a picture of the back wall in the up position but as you can see in the picture below, I have a little trimming to do on the wall in order to get past the hinge.
116084
I'm now trying to read everything I can on fiber glassing so once the weather warms up I can jump right on that.

Jeff
User avatar
Wild Idaho
Teardrop Builder
 
Posts: 39
Images: 97
Joined: Sat Jan 05, 2013 7:25 am
Top

Re: Wild Idahos Compact Build

Postby KCStudly » Wed Jan 22, 2014 6:58 pm

Looking good. :thumbsup:
KC
My Build: The Poet Creek Express Hybrid Foamie

Poet Creek Or Bust
Engineering the TLAR way - "That Looks About Right"
TnTTT ORIGINAL 200A LANTERN CLUB = "The 200A Gang"
Green Lantern Corpsmen
User avatar
KCStudly
Donating Member
 
Posts: 9640
Images: 8169
Joined: Mon Feb 06, 2012 10:18 pm
Location: Southeastern CT, USA
Top

Re: Wild Idahos Compact Build

Postby Wild Idaho » Thu Feb 27, 2014 9:46 pm

Hi All, time for another update. I’ve been busy working on the roof trying to dry fit it all before gluing it all up. I’ve had the roof on and off a couple of times making sure I trim a little here and add a little more wood there. I eventually got it all to fit. You’ll notice some rounding of the corners on my side panels. I don’t think I would have to do that if I actually had the trailer outside (or more ceiling clearance in my garage). Funny how the trailer keeps growing in height. I’m starting to get a little nervous about getting it out of the garage. At this point, I don’t think I’ll be able to install a roof vent and still make it out of the garage…even with letting some air out of my tires.

Completion seems to be in sight now and I can’t wait. I still have to build the door and waterproof the trailer. When I purchased my epoxy from Raka, they suggested that I would need about a gallon and a half of resin and hardener. I’m interested in knowing if others think this will be enough or if I should order more. I hope you enjoy the pictures and always appreciate any feedback, tips or tricks that anyone has. Here’s my tip to people building a trailer….have pencils all over the place. I can’t tell you how many times I’m in the trailer needing a pencil only to find that it’s outside the trailer or vice versa.
117227117224117223117226117225117222117221117220117218117217
User avatar
Wild Idaho
Teardrop Builder
 
Posts: 39
Images: 97
Joined: Sat Jan 05, 2013 7:25 am
Top

Re: Wild Idahos Compact Build

Postby Wolffarmer » Thu Feb 27, 2014 10:16 pm

Looking good. I used just under a gallon of Raka on my smaller TD.

Randy
"these guys must be afraid of the dark"
User avatar
Wolffarmer
Donating Member
 
Posts: 4612
Images: 309
Joined: Wed May 02, 2007 1:32 pm
Location: Idaho Rupert
Top

Re: Wild Idahos Compact Build

Postby S. Heisley » Thu Feb 27, 2014 10:41 pm

You're getting close and that's exciting! I hope I can see your trailer at a gathering, sometime.
It would be fun to be parked near each other in a campground, my little trailer and your big trailer! (Mine's only about 5'x8.5'x4.3' high, roof down.)
User avatar
S. Heisley
Super Lifetime Member
 
Posts: 8865
Images: 495
Joined: Mon Sep 17, 2007 10:02 am
Location: No. California
Top

Re: Wild Idahos Compact Build

Postby Wild Idaho » Thu Feb 27, 2014 11:27 pm

S. Heisley wrote:You're getting close and that's exciting! I hope I can see your trailer at a gathering, sometime.
It would be fun to be parked near each other in a campground, my little trailer and your big trailer! (Mine's only about 5'x8.5'x4.3' high, roof down.)

Thanks Sharon. I can't tell you how much I've appreciated all your posts and the build journals you've pulled together with lifting roofs. They were all the inspiration behind my build. I'd really like to attend a gathering and see all the trailers in person.
User avatar
Wild Idaho
Teardrop Builder
 
Posts: 39
Images: 97
Joined: Sat Jan 05, 2013 7:25 am
Top

Re: Wild Idahos Compact Build

Postby Wild Idaho » Sat Apr 05, 2014 9:15 pm

Just a quick update. Here are a couple pictures of me taping the seams. I’ve sanded about 2/3rds of the trailer and getting ready to fair in the edges of the tape. 118620118621
The weather this week is supposed to be nice so I'm hoping to make some more progress each evening.
User avatar
Wild Idaho
Teardrop Builder
 
Posts: 39
Images: 97
Joined: Sat Jan 05, 2013 7:25 am
Top

Re: Wild Idahos Compact Build

Postby Wild Idaho » Tue Apr 15, 2014 6:52 pm

Here's another update on my progress. Since my last post, I had Ken (I believe his forum name is Watercamper) stop by and check out my build. It was fun to discuss all the possibilities that one has for building a trailer. I also want to thank Sharon H. for sharing with me the type of latch she used on her build to hold the roof down.
This past weekend I was able to sand down all the fairing material I had on the trailer. My wife said I put in 15 hours that day working it. I think she's right.
119105119106
After I cleaned up all the dust and wiped everything down, it was time for my first coat of epoxy.
119107119108
Since I didn't want to do anymore sanding, I made sure that I was up early in the morning to apply a second coat of epoxy. I don't have any pictures of the second coat but it looks pretty much like the first. I'm letting the epoxy cure at the moment. Next step I guess is to sand it with 240 grit prior to applying my paint.
I'm really pushing to get this done (or at least camp-able) by the end of the month.

Hopefully this weekend I can paint! :worship:

Jeff
User avatar
Wild Idaho
Teardrop Builder
 
Posts: 39
Images: 97
Joined: Sat Jan 05, 2013 7:25 am
Top

Re: Wild Idahos Compact Build - Paint is on

Postby Wild Idaho » Sun Apr 27, 2014 8:00 am

Hello from Idaho. Here's another update on my progress. Since my last post, I sanded the epoxy to give the paint something to adhere too after contacting the paint manufacturer and put on 3 coats of the Mega Gloss Super White. I'd like to say the painting went smooth, but it didn't. :( The first hurdle was to find a paint roller that the manufacturer recommended. I was finally able to find one at a Kelly Moore paint store for $13 ouch! The first coat went on great. It looked nice and smooth. The temperature was 75 degrees and based on the paint can, I would need to wait 4 hours for it to dry. Well, I waited the 4 hours and felt the paint. It felt pretty dry so I decided to put on a second coat. That's when disaster struck. The second coat of paint started wrinkling (I believe the paint manufacture refers to is as Lifting) all over. So, now what do I do? I decided to let the paint sit for a few days and think about the issue. I also contacted the manufacturer. They suggested I sand down the high spots and paint again. Well, I tried sanding and the sandpaper clogs up pretty fast. Instead, I scraped down the all the high spots an reapplied a 3rd coat with a roller from HD that only coast $5 and did just as good a job as the $13 dollar roller from Kelly Moore paint. Here are some pictures
119482119481119480

I've also been building my door and a storage container to hold my battery and a few supplies. Here's the storage container.
119483

Getting closer to being done....can't wait!

Jeff
User avatar
Wild Idaho
Teardrop Builder
 
Posts: 39
Images: 97
Joined: Sat Jan 05, 2013 7:25 am
Top

Re: Wild Idahos Compact Build

Postby tony.latham » Sun Apr 27, 2014 9:23 am

I think that thing is looking great. 8)

Tony
User avatar
tony.latham
Gold Donating Member
 
Posts: 7073
Images: 17
Joined: Mon Jul 08, 2013 4:03 pm
Location: Middle of Idaho on the edge of nowhere
Top

Re: Wild Idahos Compact Build

Postby dano » Sun Apr 27, 2014 10:14 am

Wow I just caught your build and read it all. Great job
Dano
[email protected]
Morgan Hill Ca.
User avatar
dano
Donating Member
 
Posts: 280
Images: 0
Joined: Fri Aug 19, 2005 11:09 pm
Top

Re: Wild Idahos Compact Build

Postby 3nero » Sun Apr 27, 2014 12:26 pm

We had the same problem on Humphrey. We got the high gloss out door paint and the first layer was lovely and smooth but a bit see through. It felt totally dry and the second coat was put on, all looked good until about an hour later and the wrinkles showed up. we waited for the paint to dry enough to sand but it seemed to stay soft for weeks. so we gave up and put on a third coat after about 5 weeks and it wrinkled even more :x The trailer has been 5 months in storage and we pulled it out a month ago to finish it off and i'm still finding soft spots in the corners. The paint was expensive and the worst stuff i've ever used. it feels hard enough to sand now but the whole roof needs doing so not looking forward to doing that job. But its seems less wrinkled on the vertical sides. In future i'll be using the cheap paint :roll:
Measure once, cut twice....throw away and repeat.
Image Image

http://www.tnttt.com/viewtopic.php?t=55971
3nero
Teardrop Master
 
Posts: 129
Joined: Mon May 13, 2013 3:40 pm
Location: Co.Wicklow Ireland
Top

PreviousNext

Return to Build Journals

Who is online

Users browsing this forum: No registered users and 16 guests