Ok, since I am not planning to go into more detail on my blog about this, here is a basic summary of how I pressed my panels. Keep in mind that there is more than one way to skin a cat, this is just the way I do it. . .
First, you need a vacuum pressing system. I use a industrial hiflo from
http://www.vacupress.com They make the best vacuum pressing systems, a basic model and bag will set you back more than $1000. I know there are other options out there, including home-made, but I don't know much about them.
Next, I made a 24" wide form with the radius I wanted. It is made from styrofoam and 2 layers of 1/8" birchply. I cut the styrofoam to shape with a bandsaw and belt sander. I used ordinary yellow wood glue and clamps to glue them together. Once it is totally cured, I used a small foam roller and more yellow glue to completely cover one side of each of the two layers of birchply with glue - a nice even layer of glue. The right birchply can be hard to source - I use 5x5 baltic birch. The important thing is that it is flexible in one direction. You could also use rubberply/bendyply/squiggle board. I use packing tape to hold the birchply onto the mould while the whole thing is loaded into the vacuum bag. Vacuum is applied, and it is left for several hours while it cures.

- DSC_0613.JPG (90.5 KiB) Viewed 3187 times
Now that I have my basic mould, I make 3 identical components that I will stitch together later. They are made from 3 layers of 1/8" baltic birch - again you could use rubber ply. They are made the same way as the form - cut the plywood to fit the mould, spread a layer of glue on each one, tape it to the form, stick it in the bag for several hours. Next, I stitched these three forms together from behind, and added one more layer of birchply to the front that holds the whole thing together, and stuck it in the press again for several hours. All that work, now I have my giant 1/4 circle mould.
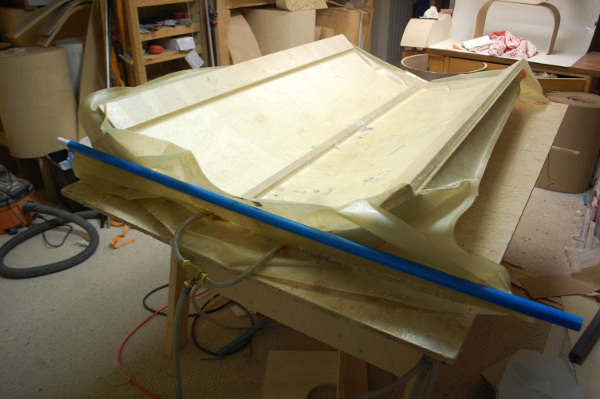
So, now it gets interesting. I cut two pieces of 1/8" plywood and 1/2" foam to fit in the mould (dense insulation from HD). The insulation had to be taped together to make it large enough. Spread glue on one piece of wood, put the foam on top, spread glue on the second piece of wood and put that on the foam. I used extend formula type 2 adhesive. It gives you a little more time to work, and provides some water resistance. I used about 1.5 litres of glue for each sandwich. Since I use the same glue to glue down the canvas later, I bought a 5 gallon pail of it (about $120 I think).
With the clock ticking, the sandwich has to be moved onto the form, taped in place with packing tape, then wrangled into the vacuum bag. Once everything looks lined up, the bag can be closed, and vacuum applied. Then you can exhale, wipe the sweat off your brow and relax for 6 hours or more while it cures. After so much investment of time and materials, I like to be really sure it is cured before I take it out of the bag. You can see the back side of the mould in the picture, the component is facing down. Making the form this way really keeps the weight, and size down, and makes it much easier to get it into the bag.
- DSC_0649.JPG (157.77 KiB) Viewed 3187 times
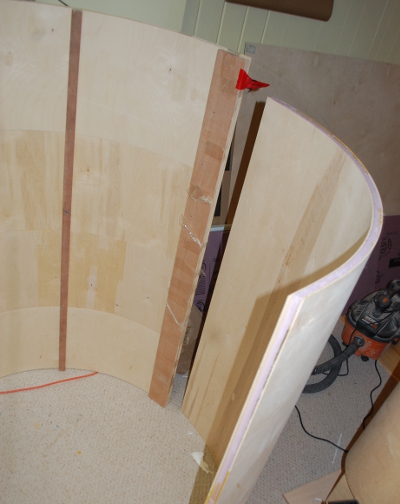
The mould and form out of the press, ready to press part 2.
- DSC_0701.JPG (108.33 KiB) Viewed 3187 times
I glued the two halves together with construction adhesive, and fibre-glassed the seam. This is the only place on the whole build that I used fibre glass - and I think next time I might come up with a different technique. I used the now finished front curve to transfer the profile to my sides and glued the three main components together. I trimmed everything up and it looked like this: See the next post . . . . .


 I'm sure there are others besides me that would like to see more about your vacuum forming. Can you show us the molds? Pretty please? Plus what the steps are. I wanna know more!

 That way, you don't have to wrestle that mountain of styrofoam into the vacuum bag.


