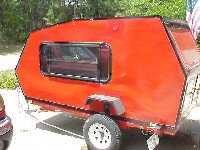
Curved Structural Insulated Panel Build.

...ask your questions in the appropriate forums BUT document your build here...preferably in a single thread...dates for updates, are appreciated....

Curved Structural Insulated Panel Build.

Postby coquitlamglenn » Sun Aug 10, 2014 12:11 pm

IMG_5634.JPG
IMG_5634.JPG (38.69 KiB) Viewed 3416 times
So, I am well into the build of my 5 x 8 canvas and paint over structural insulated panel teardrop. It has all the strength of a traditional build, the light weight of a foamy, and the impact resistance of plywood. I made the curved panels using a vacuum press, 1/8" plywood, 1/2" foam, and type 2 yellow glue. I am retrospectively going back and documenting the interesting parts of the build - starting with the fabrication of the panels. I am publishing it on my own blog, but I will link each new post here for easy access.
So, here is the link to take you to the first two posts:
http://hipstercamping.blogspot.ca/2014/08/i-can-make-teardrop-trailer.html

And thank you TNTTT community for inspiring me to take this project on!
parts.JPG
parts.JPG (139.39 KiB) Viewed 3416 times
User avatar
coquitlamglenn
Teardrop Builder
 
Posts: 37
Images: 4
Joined: Thu Feb 11, 2010 5:47 pm
Location: Coquitlam, B.C. Canada

Re: Curved Structural Insulated Panel Build.

Postby 123jay » Sun Aug 10, 2014 1:13 pm

Did you make your bags? If so how?
401/2"X 48" open tailgate bolt together army kit around $450.00
If the world did not suck ,you fall off!
User avatar
123jay
Teardrop Master
 
Posts: 102
Images: 17
Joined: Sun Oct 20, 2013 6:01 am
Location: Stockton

Re: Curved Structural Insulated Panel Build.

Postby KennethW » Sun Aug 10, 2014 2:40 pm

Why not build all the roof panels like you did the hatch? I was thinking along the same lines with FRP on the outside. How did you fasten the doors and hatch hinges? More details Please !! Thank you For posting.
KennethW
1000 Club
1000 Club
 
Posts: 1188
Images: 82
Joined: Wed Feb 20, 2013 8:01 pm
Top

Re: Curved Structural Insulated Panel Build.

Postby coquitlamglenn » Mon Aug 11, 2014 9:46 am

@ 123jay - no, they are from http://www.vacupress.com I've had mine for 15 years now - it fits a 4x8 sheet of plywood, it's been well worth the investment, I use it nearly every day. Vacupress makes the best systems.

@Kennith W - The external clamping technique is limited to certain situations. The front curve has a tighter radius and while it might be possible, it is much more predictable to build a form and press it in the bag. Once you start spreading the glue, the clock is ticking. Trying to get everything into the bag, then wrestle it on to the trailer shell, then apply the strap clamps and other clamps to keep everything in place and straight seemed too challenging to me. Plus, I built the front curve first, and attached the sides to it, so I didn't have a shell to bend the bag around.

As far as more details, they are coming. My next post will be on the chassis, but I will get into more details about my doors, hatch, vent, etc later.
User avatar
coquitlamglenn
Teardrop Builder
 
Posts: 37
Images: 4
Joined: Thu Feb 11, 2010 5:47 pm
Location: Coquitlam, B.C. Canada
Top

The Chassis

Postby coquitlamglenn » Mon Aug 11, 2014 11:24 am

The next instalment of my build is up - click on the link to see the post:

http://hipstercamping.blogspot.ca/2014/08/the-chassis-recycled-1968-imperial-tent.html

IMG_5131.JPG
IMG_5131.JPG (123.08 KiB) Viewed 3294 times
IMG_5147.JPG
IMG_5147.JPG (83.32 KiB) Viewed 3294 times
User avatar
coquitlamglenn
Teardrop Builder
 
Posts: 37
Images: 4
Joined: Thu Feb 11, 2010 5:47 pm
Location: Coquitlam, B.C. Canada
Top

Re: Curved Structural Insulated Panel Build.

Postby capnTelescope » Tue Aug 12, 2014 7:08 pm

This is a very cool building technique, Glenn! 8) I'm sure there are others besides me that would like to see more about your vacuum forming. Can you show us the molds? Pretty please? Plus what the steps are. I wanna know more! :baby:
I'll burn that bridge when I come to it.

Brad
ImageImageImage

Building the Bed & Breakfast
User avatar
capnTelescope
Lifetime member
 
Posts: 1222
Images: 368
Joined: Sun Jun 27, 2004 3:44 pm
Location: Round Rock, TX
Top

how to vacuum press panels

Postby coquitlamglenn » Wed Aug 13, 2014 10:44 am

Ok, since I am not planning to go into more detail on my blog about this, here is a basic summary of how I pressed my panels. Keep in mind that there is more than one way to skin a cat, this is just the way I do it. . .
First, you need a vacuum pressing system. I use a industrial hiflo from http://www.vacupress.com They make the best vacuum pressing systems, a basic model and bag will set you back more than $1000. I know there are other options out there, including home-made, but I don't know much about them.

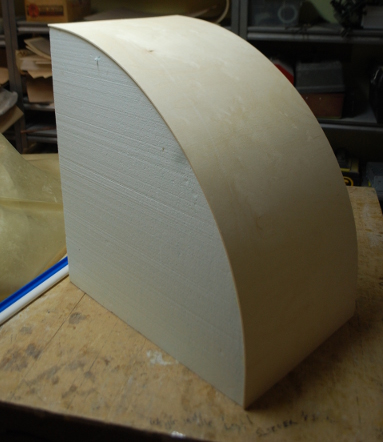
Next, I made a 24" wide form with the radius I wanted. It is made from styrofoam and 2 layers of 1/8" birchply. I cut the styrofoam to shape with a bandsaw and belt sander. I used ordinary yellow wood glue and clamps to glue them together. Once it is totally cured, I used a small foam roller and more yellow glue to completely cover one side of each of the two layers of birchply with glue - a nice even layer of glue. The right birchply can be hard to source - I use 5x5 baltic birch. The important thing is that it is flexible in one direction. You could also use rubberply/bendyply/squiggle board. I use packing tape to hold the birchply onto the mould while the whole thing is loaded into the vacuum bag. Vacuum is applied, and it is left for several hours while it cures.
DSC_0613.JPG
DSC_0613.JPG (90.5 KiB) Viewed 3180 times


Now that I have my basic mould, I make 3 identical components that I will stitch together later. They are made from 3 layers of 1/8" baltic birch - again you could use rubber ply. They are made the same way as the form - cut the plywood to fit the mould, spread a layer of glue on each one, tape it to the form, stick it in the bag for several hours. Next, I stitched these three forms together from behind, and added one more layer of birchply to the front that holds the whole thing together, and stuck it in the press again for several hours. All that work, now I have my giant 1/4 circle mould.

So, now it gets interesting. I cut two pieces of 1/8" plywood and 1/2" foam to fit in the mould (dense insulation from HD). The insulation had to be taped together to make it large enough. Spread glue on one piece of wood, put the foam on top, spread glue on the second piece of wood and put that on the foam. I used extend formula type 2 adhesive. It gives you a little more time to work, and provides some water resistance. I used about 1.5 litres of glue for each sandwich. Since I use the same glue to glue down the canvas later, I bought a 5 gallon pail of it (about $120 I think).

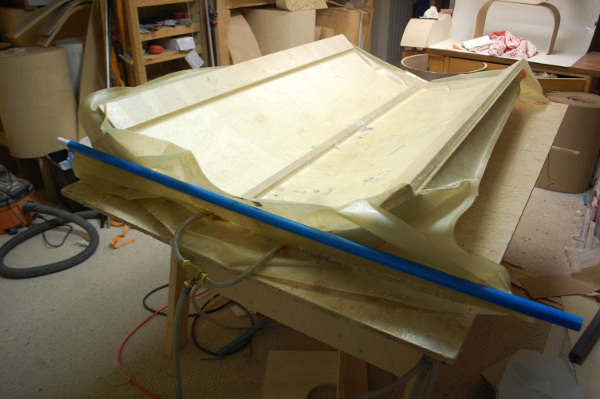
With the clock ticking, the sandwich has to be moved onto the form, taped in place with packing tape, then wrangled into the vacuum bag. Once everything looks lined up, the bag can be closed, and vacuum applied. Then you can exhale, wipe the sweat off your brow and relax for 6 hours or more while it cures. After so much investment of time and materials, I like to be really sure it is cured before I take it out of the bag. You can see the back side of the mould in the picture, the component is facing down. Making the form this way really keeps the weight, and size down, and makes it much easier to get it into the bag.
DSC_0649.JPG
DSC_0649.JPG (157.77 KiB) Viewed 3180 times


The mould and form out of the press, ready to press part 2.
DSC_0701.JPG
DSC_0701.JPG (108.33 KiB) Viewed 3180 times


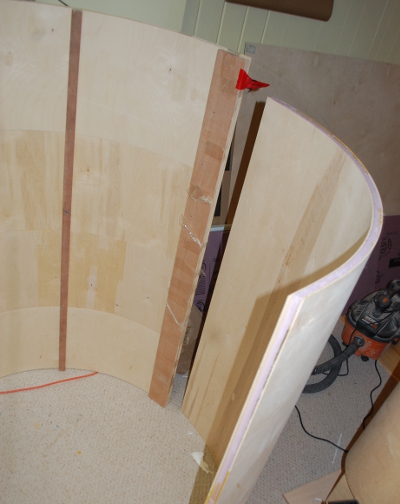
I glued the two halves together with construction adhesive, and fibre-glassed the seam. This is the only place on the whole build that I used fibre glass - and I think next time I might come up with a different technique. I used the now finished front curve to transfer the profile to my sides and glued the three main components together. I trimmed everything up and it looked like this: See the next post . . . . .

User avatar
coquitlamglenn
Teardrop Builder
 
Posts: 37
Images: 4
Joined: Thu Feb 11, 2010 5:47 pm
Location: Coquitlam, B.C. Canada
Top

how to vacuum press panels - part 2

Postby coquitlamglenn » Wed Aug 13, 2014 11:03 am

DSC_0006.JPG
DSC_0006.JPG (123.02 KiB) Viewed 3177 times
DSC_0007.JPG
DSC_0007.JPG (113.87 KiB) Viewed 3177 times


As you can see, the edge of foam is exposed at the joint. I rounded this edge over completely because in the future it will be covered with canvas and paint. The canvas and paint actually provides a significant amount of structure and strength to the overall shell. I love that there are no open seams in the shell - no use of silicon, tapes, or sealants of any kind to fail over time. It is one continuous membrane.

That's basically it. But, be warned, it looks easier than it is. I have been using a vacuum press almost daily for 13 years. I do think most people are capable of doing this, but don't do it as a first project. Another note - I used 3/8" plywood on the flat exterior sides of the trailer, not 1/8". This adds a little more tooth for my hinges, etc. I also added 1/2' plywood strips at the end of some of my panels (sandwiched with the foam) to provide structure for the hatch hinge, etc.

Now that I have may giant form, it will be much easier to produce another trailer - but I better finish this one first.
User avatar
coquitlamglenn
Teardrop Builder
 
Posts: 37
Images: 4
Joined: Thu Feb 11, 2010 5:47 pm
Location: Coquitlam, B.C. Canada
Top

Re: Curved Structural Insulated Panel Build.

Postby capnTelescope » Wed Aug 13, 2014 9:15 pm

So let me see if I got this straight. You made the first mold, seen in picture DSC_0613, to make parts for the production mold, seen in DSC_0649, and the second mold, molded on the first mold, makes the part. :? That way, you don't have to wrestle that mountain of styrofoam into the vacuum bag.

Sometimes you have to make a tool in order to make a tool. :thumbsup:

I've done some vac bag work on flat parts, but your curved stuff is way cool.

Glenn, thank you for the explanation. :applause:
I'll burn that bridge when I come to it.

Brad
ImageImageImage

Building the Bed & Breakfast
User avatar
capnTelescope
Lifetime member
 
Posts: 1222
Images: 368
Joined: Sun Jun 27, 2004 3:44 pm
Location: Round Rock, TX
Top

Re: Curved Structural Insulated Panel Build.

Postby coquitlamglenn » Wed Aug 13, 2014 11:42 pm

capnT - exactly! - and I just started using foam for my forms, my previous forms were made out of plywood or mdf, imagine trying to wrestle that into the bag!
Once I have a new form, I think of other ways to use it. I'm sure you will see the radius of my trailer poping up in my other work. Thanks for the compliment!
User avatar
coquitlamglenn
Teardrop Builder
 
Posts: 37
Images: 4
Joined: Thu Feb 11, 2010 5:47 pm
Location: Coquitlam, B.C. Canada
Top

Re: Curved Structural Insulated Panel Build.

Postby noseoil » Thu Aug 14, 2014 6:43 am

Do you know the rolling weight on this build, tongue weight & axle at each wheel? It looks to be plenty light & strong with the laminated panels, basically bullet-proof. With the springs under that frame, it might be a bit too bouncy and firm without lots of stuff in it. Does it tend to hop around on a washboard road, or is it pretty soft to tow?

Great idea for a build, I can see you setting up tooling for a run with cabinets, stringers for the deck, & selling it as a "package" for an existing frame type. Why not? I'm sure there's a demand for something like this. Looks a lot less labor-intensive than a conventional frame & panel type, & with better structural integrity. Great job on the build!
Build log: viewtopic.php?f=50&t=60248
The time you spend planning is more important than the time you spend building.........

137905
User avatar
noseoil
1000 Club
1000 Club
 
Posts: 1822
Images: 670
Joined: Sun Apr 27, 2014 8:46 am
Location: Raton, New Mexico, living the good life!
Top

Re: Curved Structural Insulated Panel Build.

Postby coquitlamglenn » Fri Aug 15, 2014 9:59 am

noseoil: Unfortunately, I don't have any of that info. The trailer hasn't left pavement yet since I rebuilt it. But, as a tent trailer it had very good road manners, except that it was too short and very difficult to back up. I put a longer tongue on it and now it's a breeze. It didn't bounce around badly offroad before, and I'm guessing that won't change much. As I suspect is the case with most teardrops, if it wasn't for the admiring paparazzi, I would forget it was behind me. I did make the choice to situate the axle near the middle of the trailer, not at the back. It makes it so much easier to roll it around by hand when the tongue weight is lower. There is no chance of negative tongue weight, especially once I get the box on.

And we'll see where I go with this. I definitely have had fun building it so far - and now I'm just getting to the best part - all the interior details. I don't have space to produce components for sale at the moment, and the shipping logistics could take a huge bit out of the affordability. I'm leaning more towards the high performance, sport sedan driving, high modern design market. A way to bring comfortable road trips to the non-SUV driving enthusiasts. But, I am open to whatever opportunities may arise. Honestly though - I did this for me. I love designing and making things, and this has been very satisfying so far.
User avatar
coquitlamglenn
Teardrop Builder
 
Posts: 37
Images: 4
Joined: Thu Feb 11, 2010 5:47 pm
Location: Coquitlam, B.C. Canada
Top

Re: Curved Structural Insulated Panel Build.

Postby coquitlamglenn » Sat Sep 06, 2014 2:08 pm

IMG_4997.JPG
IMG_4997.JPG (98.91 KiB) Viewed 2806 times
I have just posted the next instalment of my build. Now that camping season is finished for me, I hope to be more regular with my journal.

http://hipstercamping.blogspot.ca/
User avatar
coquitlamglenn
Teardrop Builder
 
Posts: 37
Images: 4
Joined: Thu Feb 11, 2010 5:47 pm
Location: Coquitlam, B.C. Canada
Top

hatch details

Postby coquitlamglenn » Fri Jun 19, 2015 8:50 am

http://hipstercamping.blogspot.ca/

I have a new post up on my trailer build. I go into a little detail about making a water tight hatch. Hurricane hinges are great, but we should always build as if they will fail - although it's usually not the hinge, but the rest of the design details that are the problem.


This image shows the importance of drip edges. The inset image shows the solution
IMG_5240.JPG
IMG_5240.JPG (57.21 KiB) Viewed 2438 times
User avatar
coquitlamglenn
Teardrop Builder
 
Posts: 37
Images: 4
Joined: Thu Feb 11, 2010 5:47 pm
Location: Coquitlam, B.C. Canada
Top

Re: Curved Structural Insulated Panel Build.

Postby capnTelescope » Fri Jun 19, 2015 10:30 am

Hi Glenn,

Read your blog post with great interest. Your commentary on water exclusion makes many good points.

coquitlamglenn wrote:This image shows the importance of drip edges. The inset image shows the solution.
IMG_5240.JPG


I'm not sure what I'm seeing here. Is the large pic a side view of the top edge of the open hatch? Please explain what the inset shows.

I'm waiting for my "Ah-ha!" moment. :D
I'll burn that bridge when I come to it.

Brad
ImageImageImage

Building the Bed & Breakfast
User avatar
capnTelescope
Lifetime member
 
Posts: 1222
Images: 368
Joined: Sun Jun 27, 2004 3:44 pm
Location: Round Rock, TX
Top

Next

Return to Build Journals

Who is online

Users browsing this forum: No registered users and 5 guests