Professors 7x14 Toy Hauler

Converting Cargo Trailers into TTTs

Re: Professors 7x14 Toy Hauler

Postby professorkx » Fri Nov 21, 2014 1:34 pm

After researching what folks have used, I ordered the Progressive Dynamics PD4045 Power Panel. Need to get parts coming so they are waiting on me, not the other way around since Thanksgiving weekend will give me a lot of time to finish wiring and insulation.
User avatar
professorkx
Teardrop Master
 
Posts: 140
Joined: Wed Nov 12, 2014 4:54 pm

Re: Professors 7x14 Toy Hauler

Postby professorkx » Sat Nov 22, 2014 9:07 pm

Started with this today:

Image

Three hours later I had this:

Image

Electrical starts tomorrow...
User avatar
professorkx
Teardrop Master
 
Posts: 140
Joined: Wed Nov 12, 2014 4:54 pm

Re: Professors 7x14 Toy Hauler

Postby professorkx » Sat Nov 22, 2014 9:46 pm

With the help of folks who posted here, just ordered two windows with screens and trim ring. When I pulled the first plywood panel off today, I measured my finished wall thickness at 1 5/8", and found these windows on ebay for that finished width.

http://www.ebay.com/itm/371154884951?_t ... EBIDX%3AIT

Thanks for the window buying education...
User avatar
professorkx
Teardrop Master
 
Posts: 140
Joined: Wed Nov 12, 2014 4:54 pm
Top

Re: Professors 7x14 Toy Hauler

Postby professorkx » Sat Nov 22, 2014 10:10 pm

Has anyone used one of these for shore power connection?

http://www.ebay.com/itm/181481605648?_t ... EBIDX%3AIT

This won't handle an AC unit, but had to eliminate the AC because of weight, so not a problem. Power needs will be the small dorm refrigerator, the 400 watt heater and the power panel. I also plan on using 10 or 12 gauge power cord, as well as the same gauge running from the inlet power plug to power panel. The other option is the standard AC power inlet with the L5 twist plug.

I've never liked the cord curling up under the cabinet as it takes too much room.

Thoughts?
User avatar
professorkx
Teardrop Master
 
Posts: 140
Joined: Wed Nov 12, 2014 4:54 pm
Top

Re: Professors 7x14 Toy Hauler

Postby hankaye » Sat Nov 22, 2014 11:06 pm

professorkx, Howdy;

I used one of these to bring 12vac into mine;
http://www.amazon.com/ParkPower-150BBIW ... WRCZBPDZEQ
Then I cut the Male end off of one of these (only a 4 outlet model),
http://www.homedepot.com/p/Woods-6-ft-8 ... 5yc1vZc4o9
and wired it to the Marinco Plug. Works fine for me for the moment, and will be handy for
I'm sure the Minn-Kota will work just as well.

hank
Striving for a less complicated life since 1949 ...
Every day I beat my own previous record for number of consecutive days I've stayed alive.
hankaye
2000 Club
2000 Club
 
Posts: 2567
Images: 1
Joined: Thu Dec 06, 2012 5:35 pm
Location: S.W. New Mexico
Top

Re: Professors 7x14 Toy Hauler

Postby professorkx » Tue Nov 25, 2014 2:22 pm

A few more pictures of the interior design. I used blue tape so my wife could visualize and approve the design.

Windows are 30x22, upper cabinet and lower cabinet/counter. The small stove will go in the corner and the sink towards the end.

Image

This one is a little fuzzy, so apologize. Shows the tall cabinet that will hold the refrigerator and storage. This also makes the wall for the portable toilet that will have a curtain for privacy. Toilet area is actually a little larger and the cabinet a little smaller. I bought the refrigerator Saturday, and it's not even 20" wide, so don't need a 24" cabinet.

Image

Window that will be above the folding dining table.

Image

All cabinets will be built in place to save weight. I am also painting the walls white on the sections inside the cabinets to add brightness inside the cabinets, and its easier to paint them in the garage than once installed. Will have some touch up, but not much. I think the floor will be light gray with non skid additive, as well as decorative flakes to hide imperfections in the floor as well as scuff marks over time. Will have to use a small rubber mat under the bike during transport to save the floor. Full rubber mat is too heavy for my weight limit...

Electrical this weekend and get ready for window installation the following weekend. All parts are on order and will arrive by December 9th. Everything that remains (wood, paint, etc) is sources locally, so no wait time.
User avatar
professorkx
Teardrop Master
 
Posts: 140
Joined: Wed Nov 12, 2014 4:54 pm
Top

Re: Professors 7x14 Toy Hauler

Postby chiefb711 » Tue Nov 25, 2014 7:26 pm

Looking good! Keep at it! I'd have more pictures and progress, but I got stuck in a hospital for two months with my son looking out a window wasting away all the good weather. And now it's rainy season for the next 6 months. Going to take it camping here soon though! Good luck on yours!

Ryan
chiefb711
Teardrop Advisor
 
Posts: 78
Images: 62
Joined: Thu Jun 19, 2014 5:20 pm
Top

Re: Professors 7x14 Toy Hauler

Postby jwhite » Tue Nov 25, 2014 10:57 pm

84669
this is what I used and works great very heavy duty with a 15ft cord that I ran down the wall inside and down through the floor and out onto the v frame.
bought it from lowes for around 50.00 I tried others that would trip off but this one doesn't, it also has lighted switches.
simple old school electric solution.
jwhite
The 300 Club
 
Posts: 479
Images: 46
Joined: Wed Mar 24, 2010 10:11 am
Location: South GA
Top

Re: Professors 7x14 Toy Hauler

Postby 2500HHP » Thu Nov 27, 2014 8:31 am

Coming along Professor! Looking good!
2500HHP
Teardrop Builder
 
Posts: 42
Joined: Tue Nov 18, 2014 4:30 pm
Top

Re: Professors 7x14 Toy Hauler

Postby professorkx » Fri Nov 28, 2014 8:33 pm

More progress in the last couple of days one the electrical, and it's done. To start, I thought I would show a few tricks for others.

1. When you drill through steel with a large bit, the bit can grab the steel at the end of the hole and pull the drill bit into the hole up to the end of the flutes. To prevent this, I wrapped duct tape around the shaft about 1 inch down from the end. The tape will stop the drill bit from getting sucked too far into the hole damaging the roof of the trailer. Here is a picture.

Image

2. You will notice in the picture above that I have a piece of plywood between the drill itself and the side of the trailer. With such thin aluminum skin, I was concerned that the drill might twist and damage the trailer skin from the inside. So, while drilling the hole, I rested the drill flat against the wood. Sorry, don't have a separate picture, so you have to use your imagination.

3. I used the wires to the lights that were installed when the trailer was built, and while some holes had snap inserts to protect the wire, not all holes where filled. So, I used a small piece of plastic wire loom, put it over the wire and wiggled it into the hole. Here is a picture:

Image

4. I also used this to fill the holes that I drilled to install new wire. Another picture:

Image

Final wiring picture. Wires from both sides come down the right corner and along the bottom rail. I will drill a hole in the front wall at the bottom inside the refrigerator cabinet, as the power panel will be installed below the refrigerator.

Image

Next up, insulation...
User avatar
professorkx
Teardrop Master
 
Posts: 140
Joined: Wed Nov 12, 2014 4:54 pm
Top

Re: Professors 7x14 Toy Hauler

Postby Spotman » Sat Nov 29, 2014 8:39 am

:thumbsup: Good progress on the wiring, following your build.


Bob
2018 Heartland Terry Classic V21
2018 Toyota Tundra DC
User avatar
Spotman
500 Club
 
Posts: 677
Images: 241
Joined: Thu Jul 27, 2006 4:16 pm
Location: Virginia Beach, VA.
Top

Re: Professors 7x14 Toy Hauler

Postby professorkx » Sat Nov 29, 2014 9:54 pm

More progress today, so here are a few pictures. My windows will not arrive until Tuesday, so I could not insulate everything. I decided to focus on those sections that are not near the window areas were I will be welding.

I started with the front of the trailer, and in order to get the Styrofoam to follow the contour of the trailer, I used contact cement. Contact cement will just hold everything in place until I attach the plywood to the metal supports.

Image

On the wall to the left of the front, I will install shore power through the wall, as well as water inlet for the water tank. To provide a secure mounting surface, I glued a piece of plywood to the inside skin, and then added a piece to each side that I trimmed to fit that would lock the plywood in place using the hat channel. Now, when I drill the holes for the inlets, I won't flex the outer skin, and can screw to the plywood. A few pictures

Image

Image

I could not go any further because of the yet to be installed windows, so switched to the back behind the sections where I will install windows. Here is a picture of each side.

Image

Image

Tomorrow I will tackle the ceiling insulation, but before I start, I needed to provide a mounting spot for the ceiling panels after I install the insulation. So, I glued 6 blocks to the inside corner at the top in the back. I won't need these until next weekend, but once the construction adhesive dries, they will be ready for the ceiling.

Image

The blue tape is so I will know the location of the blocks so I can hit with screws once the panel is in place.
Last edited by professorkx on Mon Mar 02, 2015 6:28 pm, edited 1 time in total.
User avatar
professorkx
Teardrop Master
 
Posts: 140
Joined: Wed Nov 12, 2014 4:54 pm
Top

Re: Professors 7x14 Toy Hauler

Postby professorkx » Sun Nov 30, 2014 9:19 pm

More progress today on the trailer. The last thing I did last night was to glue the wood blocks in place to provide a location to screw the ceiling in place at the rear of the trailer.

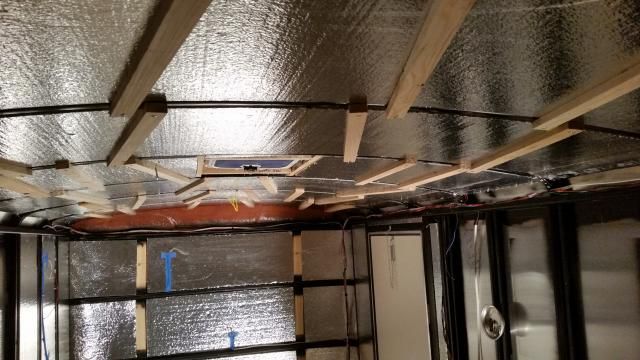
You will notice in the second picture below that my trailer has a round top, and there is a 1x3 piece of wood glued at the corner along the edges from front to back. Using a table saw, I cut my Styrofoam panels just a little longer than the distance between the right and left hand pieces of wood between the metal ceiling ribs. To install, I place each end of the panel on the wood, which cause the panel to curve in a downward arc. I simply pushed the middle up and the arc reversed, holding the panel in place.

To secure to the ceiling, I ran several lines of Foam Adhesive on the back of the panel. The information I found on the internet suggested 10" apart for each line of adhesive, but I decided to go with 6 inches apart for no special reason. After test fitting, I laid the panel on the floor of the trailer to apply the adhesive then snapped in place.

Image

Image

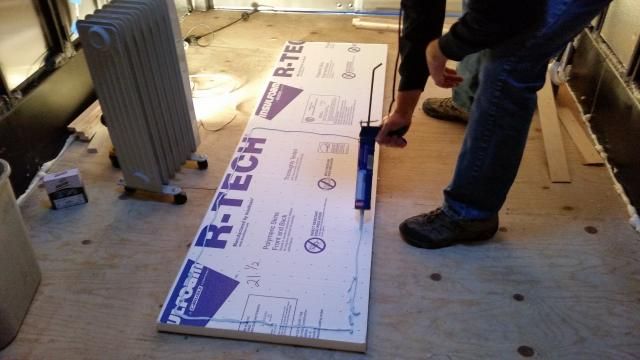
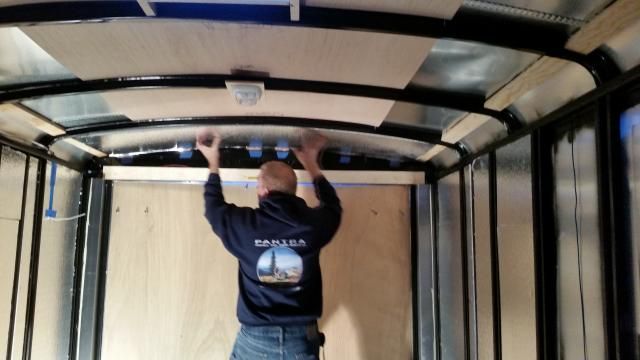
The adhesive instructions suggested clamping while the glue dried, about 24 hours. I had previously cut 1x2 pine into 26 inch lengths, and predrilled holes on 24 inch centers. After a panel snapped in place, I simple attached 4 boards using self tapping screws into the metal ceiling ribs.

Image

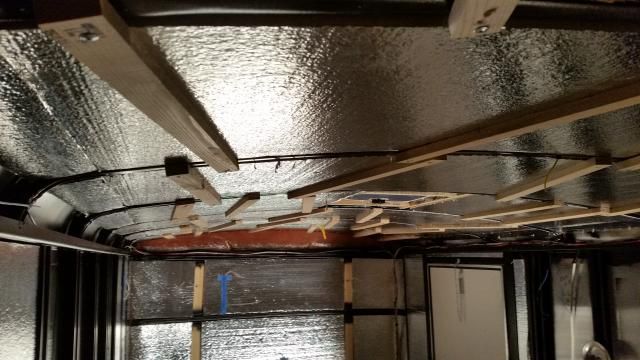
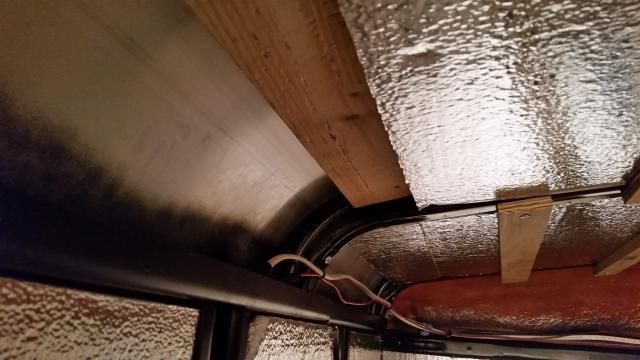
Once all of the Styrofoam panels were in place, I surmised that the edge of each wood ceiling panel was not going to be supported over each 1x3. So, I cut pieces of Styrofoam down to 5/8" thick by 4 inches wide, then glued to the top of each board. Here is a picture of one 5/8" piece in place next to one that has yet to be installed.

Image

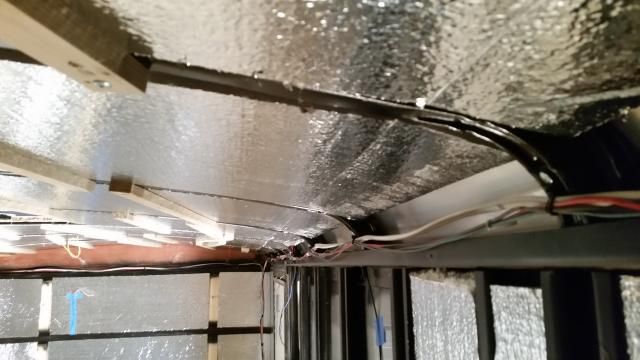
The finished ceiling insulation.

Image


Image

Now, I just need the windows to arrive so I can button up the walls and start the kitchen. While at Home Depot two days after Thanksgiving, we found 7.5x14 garage mat on sale for $100, so grabbed a roll for the floor. My wife and I are having a lot of fun with this build, and it's keeping us busy while it's cold.
User avatar
professorkx
Teardrop Master
 
Posts: 140
Joined: Wed Nov 12, 2014 4:54 pm
Top

Re: Professors 7x14 Toy Hauler

Postby 2500HHP » Sun Nov 30, 2014 10:04 pm

Looks good Professor! I like the idea of isolating the skin using wood for the bulkheads. :thumbsup:
2500HHP
Teardrop Builder
 
Posts: 42
Joined: Tue Nov 18, 2014 4:30 pm
Top

Re: Professors 7x14 Toy Hauler

Postby aggie79 » Mon Dec 01, 2014 1:02 pm

Very nice! :applause: :thumbsup: :applause:

Thank you for the detailed "how-to" photos.
Tom (& Linda)
For build info on our former Silver Beatle teardrop:
Build Thread

93503
User avatar
aggie79
Super Duper Lifetime Member
 
Posts: 5405
Images: 686
Joined: Tue Aug 07, 2007 5:42 pm
Location: Watauga, Texas
Top

PreviousNext

Return to Cargo Trailer Conversions

Who is online

Users browsing this forum: No registered users and 3 guests