The Poet Creek Express - Foamie Hybrid

Canvas covered foamies (Thrifty Alternatives...)

Moderator: eaglesdare

Re: The Poet Creek Express - Foamie Hybrid

Postby KCStudly » Sat Nov 29, 2014 7:40 pm

Thanks Chas, and welcome to my madness. :thumbsup:
KC
My Build: The Poet Creek Express Hybrid Foamie

Poet Creek Or Bust
Engineering the TLAR way - "That Looks About Right"
TnTTT ORIGINAL 200A LANTERN CLUB = "The 200A Gang"
Green Lantern Corpsmen
User avatar
KCStudly
Donating Member
 
Posts: 9640
Images: 8169
Joined: Mon Feb 06, 2012 10:18 pm
Location: Southeastern CT, USA

Re: The Poet Creek Express - Foamie Hybrid

Postby KCStudly » Sat Nov 29, 2014 11:59 pm

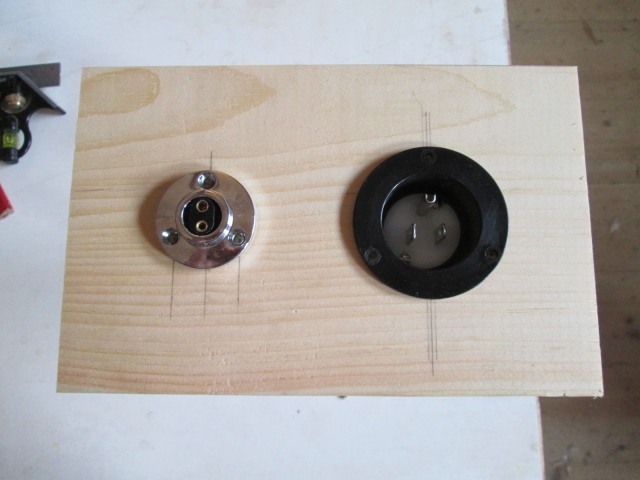
Taking a close look at the Marinco 15A battery charger connection it had two options for mounting thru what I am now calling the “power bulkhead”. The shaft of the housing had molded threads with a large gland nut like most electrical connectors, or you could use the three provided screws through the holes in the flange. I preferred the screws for several reasons: the nut could loosen allowing the connector to spin; the power bulkhead is 3/4 inch thick and I would have to counterbore the back of it to suit the short length of the threads, whereas with the screws all I needed was a clean hole; and I would want to fill the screw holes anyway, rather than leave them exposed and empty. Now, the thing is that the screw holes were practically on top of the threads. If I had just cut the hole to the size that it would take for the threads to fit thru, the screws would be busting out thru the edge of the hole. So I sanded the threads off using the Bader and cleaned it up some with the hand block. This would allow me to make the thru hole smaller and leave a little extra margin for the screws.
Image
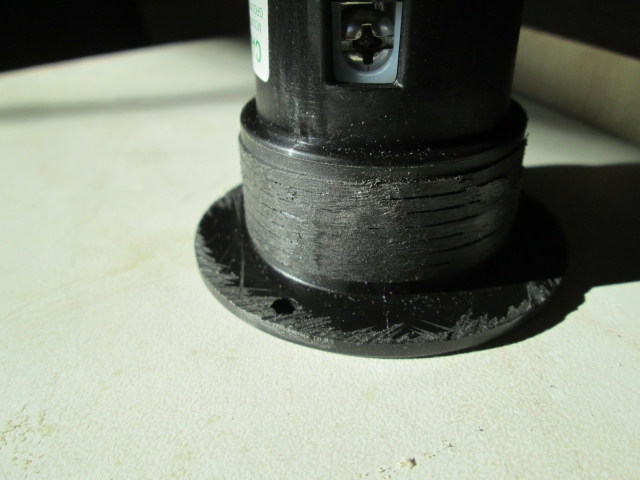
It scuffed the back of the flange up a little, but the gasket that is part of the rubber cap lanyard will handle this easily.

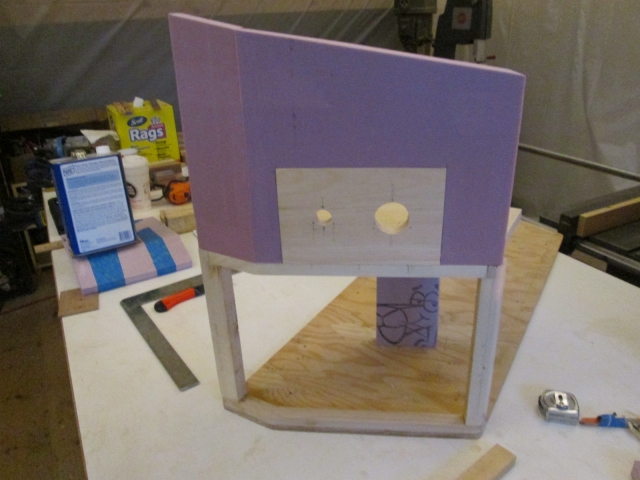
Rather than doing a setup on the mill, I decided to just cut the hole with the little jig saw. Laid the pattern out, drilled a pilot hole, threaded the blade and cut it out.
Image
Image
Image

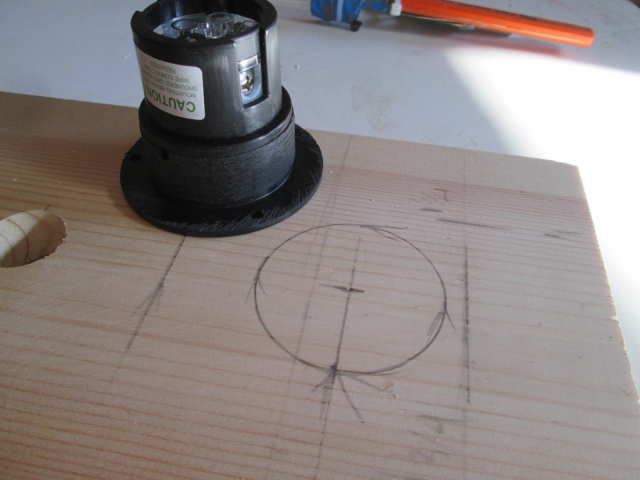
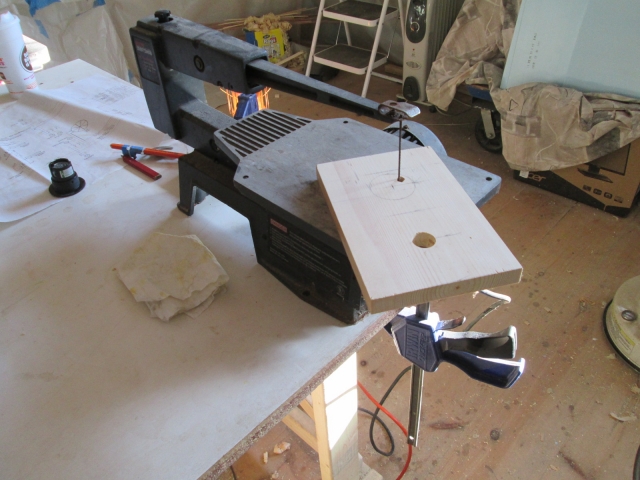
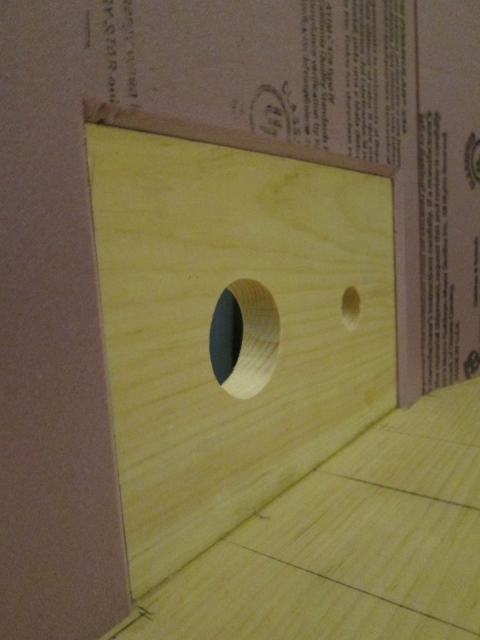
You can also see that I had already drilled the smaller hole for the Perko connector for the solar panel connection.

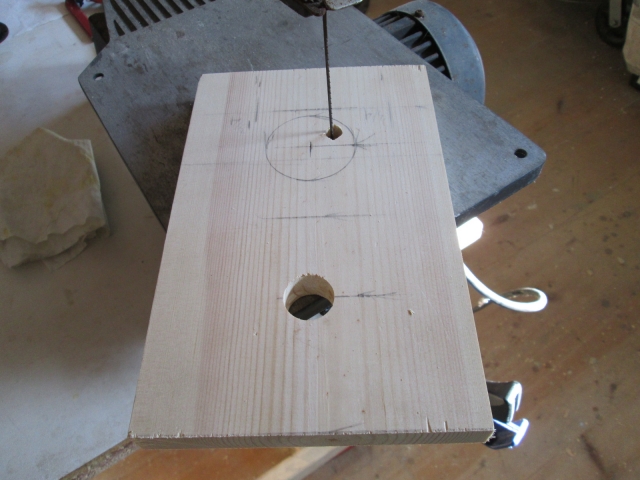
Unfortunately, the larger hole came out bigger than I wanted resulting in a sloppy fit and less margin for the screws. So I made the piece over again. This time the hole was a little too small. It was a little more off than what I could sand out easily, but not enough to make another cut on the saw; so I used the same technique to make a 5mm thk router template, just a little bigger, and opened up the thicker material using the flush cutting bit.

Here is the result.
Image
Image

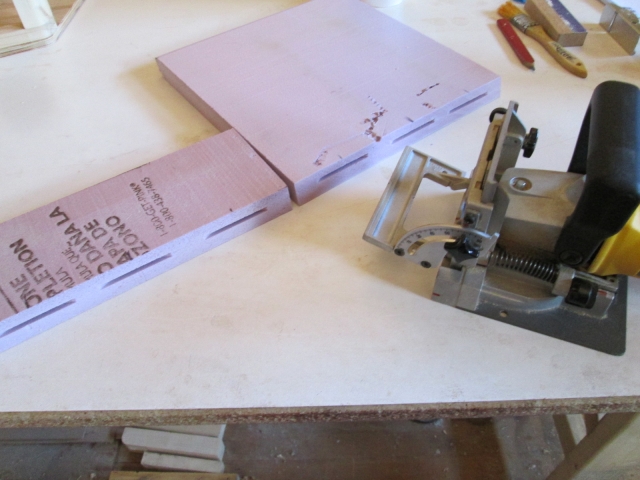
I biscuit joined the lower edge of this “power bulkhead” on to the top edge of the ledge piece and glued it up (which you can see in the pics further down).

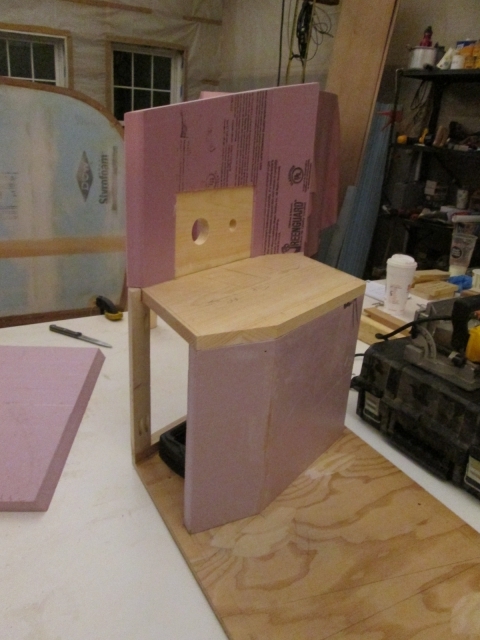
Next up was making the divider bulkhead between the battery compartment and the main section of the tongue box; another mitered joint shown here in the dry fitting stage. This will also support the inner edge of the ledge (the “electronics mezzanine”).
Image

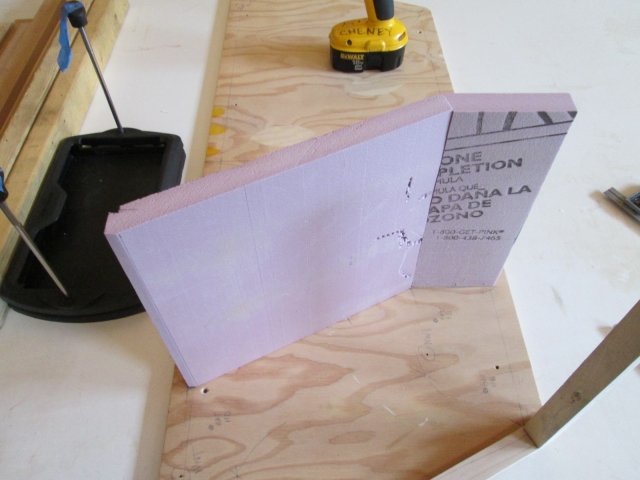
Here you can start to see it coming together, dry fitting the ledge and inner bulkhead.
Image
Image

Rather than trying to make an angled dado in the rear panel of the TB, I made a couple of detail cuts to square off the back edge of the inner bulkhead. This included a little matching nip in the corner of the ledge.
Image

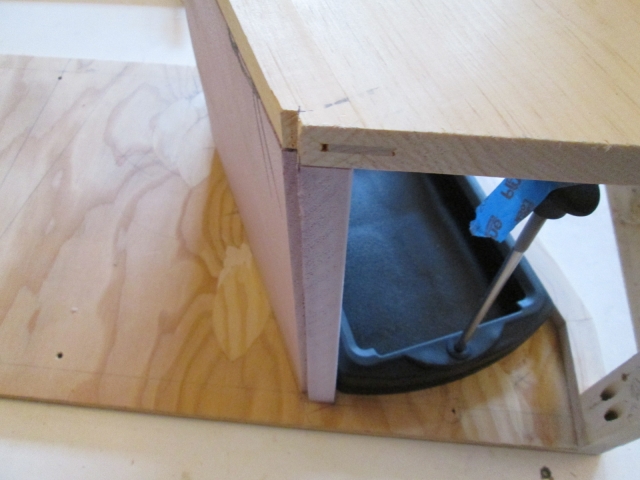
I was pretty sure that I brought bamboo skewers to the shop, but couldn’t find them despite some rudimentary searching, so what the heck, why not use the biscuit joiner to align the edges of the inner bulkhead?
Image
Image

I used blue tape to clamp it. The tape on the inside had more pull than the outside so I used a gallon can of spirits to weigh it down and press the outside edges back together. The spike form the compass made a good pin to hold that outer edge in alignment.
Image

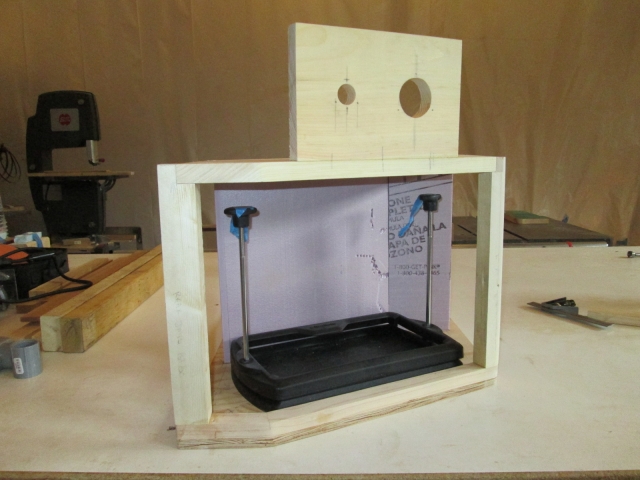
Next I worked on trimming the side panels of the TB down to fit around the new stuff. Although the Kregg screws are dry fit to hold the ledge in place, it isn’t glued yet, and the pink panther looking out from under is just a temporary spacer to support the inner edge while the other piece was curing.
Image

The inner bulkhead had time to set up so I doubled checked that.
Image

Since the power bulkhead is only 3/4 inch thk and the foam is 1 inch thk I beveled the edges of the foam around the bulkhead so that the skin will have an easier time conforming.
Image

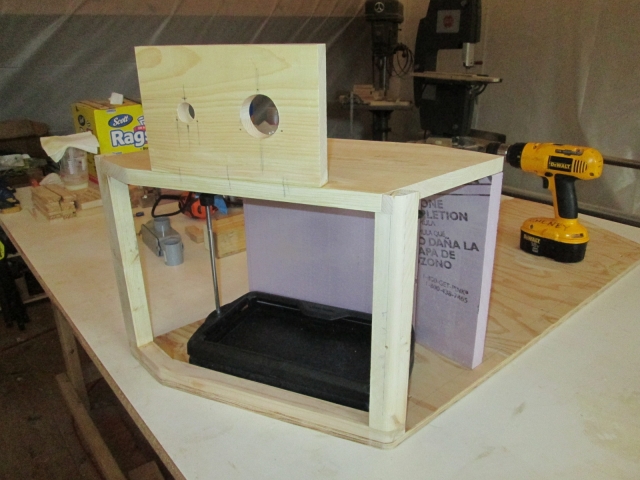
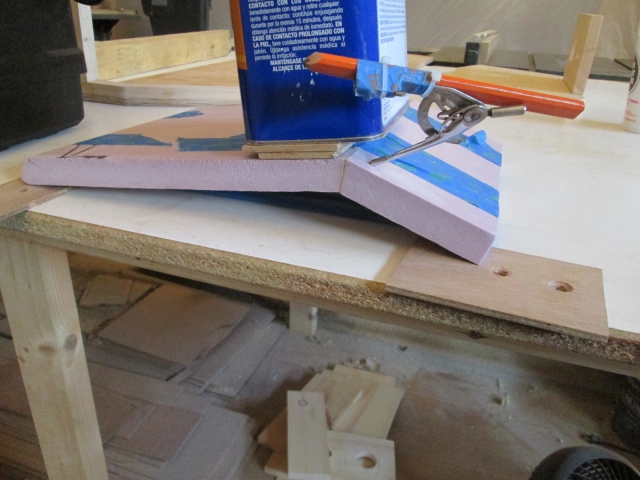
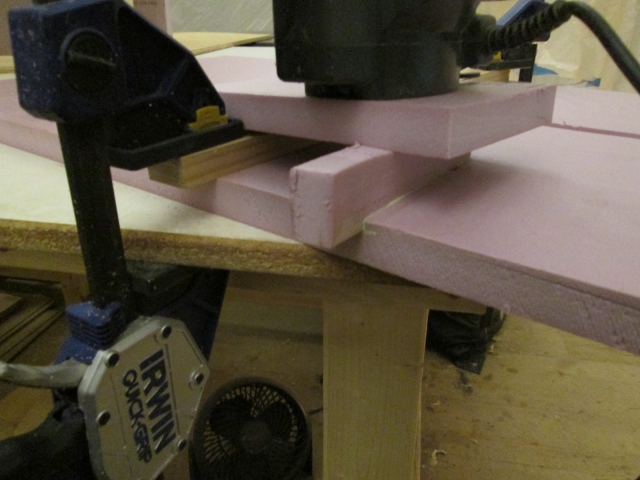
In the meantime I had been trimming the front panel of the TB to fit around the front door jamb of the battery compartment, and routing the dadoes for the ledge and inner bulkhead. Haven’t made a panel sled for the table saw yet and had a little false cut on one corner, then made a stupid mistake with the router resulting in another false cut. No problem; we have lots of bits and pieces of foam; I’ll just glue a piece back in there and cut it again. Here the panel is laying flat on the bench, the router guide (strip of wood) is clamped next to the chunk being glued in, and the router is sitting upside down on another piece of foam as a gravity clamp.
Image

I really wanted to get a pic of the front panel in place, but when things start to go wrong in sets, it’s time to quit for the day. Still, the train kept a rollin’.
Last edited by KCStudly on Mon Jan 05, 2015 2:23 pm, edited 1 time in total.
KC
My Build: The Poet Creek Express Hybrid Foamie

Poet Creek Or Bust
Engineering the TLAR way - "That Looks About Right"
TnTTT ORIGINAL 200A LANTERN CLUB = "The 200A Gang"
Green Lantern Corpsmen
User avatar
KCStudly
Donating Member
 
Posts: 9640
Images: 8169
Joined: Mon Feb 06, 2012 10:18 pm
Location: Southeastern CT, USA

Re: The Poet Creek Express - Foamie Hybrid

Postby KCStudly » Sun Nov 30, 2014 11:41 pm

This is that dado patch from yesterday. When I went to slice the excess off it broke free. Apparently I had used too much TB2 and it did not cure. So I shaved the filler piece down and reglued it using a lot less glue and blue tape to hold it in place. Didn’t bother waiting for it to cure; just went right on my way finishing the dado and continuing to refit the foam around the tongue box.
Image

Here’s the front panel with the dado dry fit to the ledge and battery compartment bulkhead.
Image

The dadoes in the rear panel went without a struggle and I was able to get the foam shell all dry fit again. I may still tweak the front panel a bit, as it needed a little coaxing to get it to conform.
Image

I’ll round the exposed edge of the ledge off with a radius bit before doing the glue up.
Image

Before getting this far I had positioned the floor of the TB on the front of the trailer in its proper position (3/4 inch in front of where the locker kick out will be) and traced the holes in the mounting tabs onto the bottom of the board. From there I pilot drilled thru the centers of the tracings to locate the mounting holes on the top of the board. Now I used a 1 inch Forstner bit to counterbore the 3/8-16UNC threaded T-nuts.
Image

Checking the depth of the counterbore by inverting a T-nut.
Image

In the first of the two pictures, above, you can see how the rear T-nuts are located partially inside of the line of the rear foam on the box. This is a compromise from when I changed the plan to separate the TB from the locker but didn’t change where the mounting tabs had been welded onto the tongue. Setting the T-nuts flush gives me the option of running the foam right over the nuts, but I may scallop out some of the foam to keep the threads clear.

Here you can see how at least one of the T-nuts will be under the battery tray, so even though there are some voids under the tray, it seemed prudent to sink them flush.
Image
Image

The rubber mounts for the TB have studs on one end that will screw up into these T-nuts, and threaded holes on the other that will receive bolts up through the mounting tabs on the trailer tongue; whereas the bolts for the battery tray will go down thru the floor of the TB. So I installed the smaller 1/4-20UNC T-nuts for the battery tray on the underside of the floor.
Image

As mentioned previously, the floor piece for the TB has a little bow in it, so I thought I might put some stiffening ribs on the bottom. Two things needed to be considered and compromised about. First, the rubber mounts are only about 1 inch tall, so the ribs either need to be shorter in height than this (reducing their effectiveness in rigidity), or they need to be shorter in length to fit down between the tongue rails (reducing the effectiveness at the sides of the box). The second thing to consider is that the ribs would interfere with the routing of the electrical pass thru from the cabin and trailer cord from the tongue connection.

Using the top of the TB floor as a layout pattern, despite the fact that these components will be mounted under the box (i.e. plan view looking down), I played around with some options. Unfortunately the wiring can’t go up into the corner of the battery compartment and still be on the inside of the tongue frame, and the rear corner between the inner bulkhead and back of the box is too close to the Sealtite fitting under the locker, so the next best place for the wires to come up to the ledge is the inside front corner about where the pull box is shown here. That means that there will be plenty of flex conduit between the locker fitting and the pull box location that it can snake under a lower profile rib that extends out further past the rubber mounts; also shown here.
Image

I had picked up some two hole PVC saddle clamps to mount the pull box, but their foot print would push the pull box away from the frame and thus away from the corner, so I decided to use round head bolts up thru from the inside of the pull box to mount it. Careful layout was needed to keep the location of these out from under the foam while still having some decent spread to keep the pull box mounting stable.
Image
Image

I rounded the ends of the rib and used PL to glue it down. The clamp set up was a bit convoluted with backers because of the reach from the edge of the bench inboard to where the rib was.
Image
Image

One last thing, to get the vertical socket neck on the pull box flush with the top of the TB floor, and provide a little space for the connecting fittings I figured I would need to shim the pull box down about 3/8 inch, so I cut and glued up a couple of pieces of 5 mm ply (3/16 inch thk).
Image

This shim may also allow me to add another rib closer to the front of the TB without blocking the access cover on the pull box.

Details, details.
KC
My Build: The Poet Creek Express Hybrid Foamie

Poet Creek Or Bust
Engineering the TLAR way - "That Looks About Right"
TnTTT ORIGINAL 200A LANTERN CLUB = "The 200A Gang"
Green Lantern Corpsmen
User avatar
KCStudly
Donating Member
 
Posts: 9640
Images: 8169
Joined: Mon Feb 06, 2012 10:18 pm
Location: Southeastern CT, USA
Top

Re: The Poet Creek Express - Foamie Hybrid

Postby GPW » Wed Dec 03, 2014 7:52 am

Darn NICE !!! That box is a Build unto itself eh !!! :o Looking GOOD !!! :beer:
There’s no place like Foam !
User avatar
GPW
Gold Donating Member
 
Posts: 14920
Images: 546
Joined: Thu Feb 09, 2006 7:58 pm
Location: New Orleans
Top

Re: The Poet Creek Express - Foamie Hybrid

Postby KCStudly » Wed Dec 03, 2014 8:29 am

Thank you GPW, it has become quite the project. A camel, not a horse, designed by a committee of one. :lol: :lol: :lol: :D

On Monday I did some errands and yesterday we celebrated Yvette's B-day. I plan to get back out there and hit it some more tonight. :thumbsup:

Weather here has been all over the map. End of last week was down around freezing, Saturday afternoon into Sunday was near 60 F and t-shirt weather, Monday was back cold again, and yesterday was raw with a "wintery mix". A little warmer today, but not much. <end weather report>
Last edited by KCStudly on Wed Dec 03, 2014 12:26 pm, edited 1 time in total.
KC
My Build: The Poet Creek Express Hybrid Foamie

Poet Creek Or Bust
Engineering the TLAR way - "That Looks About Right"
TnTTT ORIGINAL 200A LANTERN CLUB = "The 200A Gang"
Green Lantern Corpsmen
User avatar
KCStudly
Donating Member
 
Posts: 9640
Images: 8169
Joined: Mon Feb 06, 2012 10:18 pm
Location: Southeastern CT, USA
Top

Re: The Poet Creek Express - Foamie Hybrid

Postby Wobbly Wheels » Wed Dec 03, 2014 10:00 am

Hey KC, that box looks great !

Having installed those shorepower inlets on boats, I can tell you that the secret is - lots of sealant ! The screws become little more than clamps to hold it till the sealant dries, backed up by the packing nut. That said, I usually go for the ones with the square base where I can for that very reason.
I like your solution: K.I.S.S.
That style of Perko fitting is a bit notorious for the chrome plating bubbling in the saltwater environment after a few seasons. Unless you're driving on salted roads a lot though, I wouldn't think you'll see that. Marinco does make a black plastic one for use with downriggers (fishing) that will match your shorepower fitting. It's good to about 20A and Scotty has actually started supplying them instead of their own proprietary plug with their electric downriggers.

I'm starting the framing on my tongue box as well and, though I've got a dual battery setup, the end goal is the same so I've been enjoying watching yours come together.
Something tells me yours is going to come looking a whole lot more polished though 8)

Why the battery hold down rather than a box ?
I can't imagine battery acid would be too kind to foam. Is the plan to paint that compartment ?


Even on the wet coast, I'm waiting for it to warm up enough for PL to set up...it's not 'supposed' to go below freezing here....it's crazy everywhere.
User avatar
Wobbly Wheels
Donating Member
 
Posts: 1080
Joined: Tue Mar 15, 2011 9:51 am
Top

Re: The Poet Creek Express - Foamie Hybrid

Postby KCStudly » Wed Dec 03, 2014 12:52 pm

Thanks for the info and admiration WW. I think I'm going to glass the inside of the battery box, mostly to waterproof it so that I don't have to worry so much about water coming in thru the vents and also because I have some 6 oz cloth left over from the front radius reinforcement on the cabin.

Message received re: sealant. :thumbsup:

I like the trays because they are sturdy and provide good access, and there are no nylon straps to get soiled. I have a battery box from another project, but it is oversize and not of the sealed type, and it just seemed prudent to keep the battery fully separate from the electronics (circuit panel, trickle charger, and solar controller). As mentioned previously, I also want to be able to mount the electronics horizontally over the battery in a permanent fashion, so this just seemed to be the best solution for me.
:D

On the Perko, I chose it based on the recommendation of others who have used them for this purpose, but once I took it out of the package I wasn't really too impressed. The binding set screws are tiny, and the contact studs have little slits in the ends, presumably to allow them to spread for better contact. I suspect that they will be a bit fragile. The twist lock trolling motor connectors were more money, but would probably be a better solution; if the Perko doesn't work to my liking I will upgrade.
KC
My Build: The Poet Creek Express Hybrid Foamie

Poet Creek Or Bust
Engineering the TLAR way - "That Looks About Right"
TnTTT ORIGINAL 200A LANTERN CLUB = "The 200A Gang"
Green Lantern Corpsmen
User avatar
KCStudly
Donating Member
 
Posts: 9640
Images: 8169
Joined: Mon Feb 06, 2012 10:18 pm
Location: Southeastern CT, USA
Top

Re: The Poet Creek Express - Foamie Hybrid

Postby KCStudly » Fri Dec 05, 2014 10:05 pm

I keep thinking way back to when Sharon recommended that I consider a battery compartment (IIRC), and me sort of shying away from that idea. Well, here we are. It was a good idea and it must have stuck on the back burner in there somewhere. Thanks Sharon. :thumbsup:

Not much to show for this week. Wednesday I got stuck at work and tonight I had a task to do at the house before more bad weather set in.

Not much to show for last night’s efforts either, but progress is progress, so here we go.

I broke down the clamp setup for the stiffening rib under the tongue box, scraped the excess PL, and rounded the edges over with a radius bit in the trim router.
Image
Image

Cut the hole for the JB-type conduit body (the pull box that I am using to bring in the seven pin trailer cord from the tongue, and the wiring harness from the cabin) with a 1-5/8 hole saw.
Image

Again doing some layout and fitting above the floor for stuff that will go under the floor (…after years of design work I think better in plan view…), I started fitting the 3/8 shim that will hold the JB off of the bottom of the TB floor.
Image

Had to narrow the shim up to avoid it interfering with the cover gasket.
Image

Drilled for the bolting.
Image

Working on the bottom now, mocked up the bolts (they are too short, so will have to source longer ones).
Image

The plan was to use round head screws, but the only ones on hand where Philips head, which would be difficult to hold inside of the JB. I don’t like having the hex heads inside the wire way because even though they are finished, the corners of the hex could potentially chafe a wire. I think I’ll switch to cylindrical socket heads so there are no edges and I can hold them with a hex key while securing the self-locking nuts on the top.

I used the bolts to ensure alignment while gluing and clamping the shim. You can see that I also rounded the corners over a tad with the hand block.
Image

Finally, I rounded over the edge of the electronics ledge.
Image
Image

I must have some sort of obsessive compulsive disorder to spend as much time making and installing this shim… that is under the TB… hidden by the JB… never to be seen again, but I find myself compelled. Besides, it is a therapeutic mental and physical exercise.

Next time I suppose I should add a couple of drain/vent holes in the bottom of the battery compartment and add a block for the upper rear vent, then I can start assembling the box and make the rim for the hatch seal.

I also need to think about how I am going to route the brake wires back out from the battery to the breakaway switch and axle.
KC
My Build: The Poet Creek Express Hybrid Foamie

Poet Creek Or Bust
Engineering the TLAR way - "That Looks About Right"
TnTTT ORIGINAL 200A LANTERN CLUB = "The 200A Gang"
Green Lantern Corpsmen
User avatar
KCStudly
Donating Member
 
Posts: 9640
Images: 8169
Joined: Mon Feb 06, 2012 10:18 pm
Location: Southeastern CT, USA
Top

Re: The Poet Creek Express - Foamie Hybrid

Postby KCStudly » Sun Dec 07, 2014 10:57 pm

Yesterday I made the block for the battery compartment upper rear vent. I decided to make it the full width of the ledge just to make things a little easier when it comes time to join it all together.
Image

I biscuit joined this to the rear edge of the ledge and did a dry fit to see where I would have to trim the foam.
Image

Before going too far and making it harder to drill, I used a 1 inch Forstner bit and drilled a couple of vent/drain holes in the corners at the front and rear of the battery.
Image
Image

Looking at the front of the rear panel (inside the box), I cut the area where the vent blocking is and did another dry fit by sliding the two together like Tetris.
Image
Image
Image

With no way to include biscuits, and thus making it harder to align edges during glue up, I decided to cut the rear foam so that the battery compartment could be assembled first, then the rear panel (shown here with the box laying on its back, then showing the biscuit slots closer up).
Image
Image

Today I finally started gluing the pieces together, but, unfortunately, after getting that first little piece in place I couldn’t go any further until it cured.
Image

So to keep myself busy I started on a needed accessory, building a lantern case for the turd. I’m going to wait and post pictures of that process when it is all complete. Eventually I will build cases for the big hat and the redheads, but the turd is my most reliable two mantle, so it seemed logical to prioritize.

Shop update: Karl’s 1/4x10 Cincinnati shear arrived. As the name implies, it can cut a 10 ft sheet of 1/4 inch thick steel in one fell swoop, kachunk. He got it leveled and the running clearances checked today, worked thru some kinks, got the wiring done and actually did a little test cut on some scrap sheet metal (shown here with the finger guard off because he was checking clearances, per the manual).
Image
Image

That, combined with the break, will make the custom tongue box lid and battery compartment door slam dunks; and the option to make my fenders fit the way I want just got a whole lot easier.
KC
My Build: The Poet Creek Express Hybrid Foamie

Poet Creek Or Bust
Engineering the TLAR way - "That Looks About Right"
TnTTT ORIGINAL 200A LANTERN CLUB = "The 200A Gang"
Green Lantern Corpsmen
User avatar
KCStudly
Donating Member
 
Posts: 9640
Images: 8169
Joined: Mon Feb 06, 2012 10:18 pm
Location: Southeastern CT, USA
Top

Re: The Poet Creek Express - Foamie Hybrid

Postby Wobbly Wheels » Mon Dec 08, 2014 12:26 am

Man, it sure is nice of Karl to buy the tools you need, when you need them.
He is definitely the unsung hero of this thread :thumbsup:
Last edited by Wobbly Wheels on Mon Dec 08, 2014 9:07 am, edited 1 time in total.
User avatar
Wobbly Wheels
Donating Member
 
Posts: 1080
Joined: Tue Mar 15, 2011 9:51 am
Top

Re: The Poet Creek Express - Foamie Hybrid

Postby dales133 » Mon Dec 08, 2014 2:38 am

Nice work kc I'm waiting to see you start canvas so I can make a decision![WHITE SMILING FACE]
I cut my sidewalls today
User avatar
dales133
4000 Club
4000 Club
 
Posts: 4605
Images: 1
Joined: Mon Oct 13, 2014 5:26 pm
Top

Re: The Poet Creek Express - Foamie Hybrid

Postby GPW » Mon Dec 08, 2014 6:53 am

NICE metal working TOOL .... :o Now we can start designing the Bear -Proof Foamie ‘ ... ;) :laughter:

Fortunate to have access to such a Wonderful shop !!! Hats off to Karl !!! :beer: 8)
There’s no place like Foam !
User avatar
GPW
Gold Donating Member
 
Posts: 14920
Images: 546
Joined: Thu Feb 09, 2006 7:58 pm
Location: New Orleans
Top

Re: The Poet Creek Express - Foamie Hybrid

Postby KCStudly » Mon Dec 08, 2014 7:35 am

Karl is the best kind of friend. No matter what we do for each other, we both feel like we are getting the better return on our generosity.

Except I know that I am getting more than I am giving (see what I mean?). :D
KC
My Build: The Poet Creek Express Hybrid Foamie

Poet Creek Or Bust
Engineering the TLAR way - "That Looks About Right"
TnTTT ORIGINAL 200A LANTERN CLUB = "The 200A Gang"
Green Lantern Corpsmen
User avatar
KCStudly
Donating Member
 
Posts: 9640
Images: 8169
Joined: Mon Feb 06, 2012 10:18 pm
Location: Southeastern CT, USA
Top

Re: The Poet Creek Express - Foamie Hybrid

Postby kudzu » Wed Dec 10, 2014 9:26 am

Wow, just wow. Who knew it took such large machines to make a foamie! :shock: :lol:

Your build looks so fantastic. Am not rushing you but am really looking forward to the day we see it being lowered down to earth & onto wheels.
kudzu
Donating Member
 
Posts: 439
Images: 16
Joined: Wed Mar 27, 2013 3:20 pm
Top

Re: The Poet Creek Express - Foamie Hybrid

Postby KCStudly » Wed Dec 10, 2014 4:16 pm

Truth be told, I could get my small jobs done on the equipment available to me at my day job, but it sure will be a lot more convenient to be able to work on it in the shop close to "home".

I am happy that Karl has been able to reinvest into his business and know that he will be putting this new/old equipment to good use. I'll try to get a pic of the 3-phz 45kw generator (350 SBC on propane) that he installed to run it all... if it isn't too dark by the time I get there.

I hear you Kudzu. It sure does seem as tho things have slowed down a bunch here; winter doldrums setting in and other hang ups getting in the way of my TD time. :roll:
KC
My Build: The Poet Creek Express Hybrid Foamie

Poet Creek Or Bust
Engineering the TLAR way - "That Looks About Right"
TnTTT ORIGINAL 200A LANTERN CLUB = "The 200A Gang"
Green Lantern Corpsmen
User avatar
KCStudly
Donating Member
 
Posts: 9640
Images: 8169
Joined: Mon Feb 06, 2012 10:18 pm
Location: Southeastern CT, USA
Top

PreviousNext

Return to Foamies

Who is online

Users browsing this forum: No registered users and 0 guests