The Poet Creek Express - Foamie Hybrid

Canvas covered foamies (Thrifty Alternatives...)

Moderator: eaglesdare

Re: The Poet Creek Express - Foamie Hybrid

Postby OP827 » Fri Jun 26, 2015 11:47 pm

Nice sanding work :thumbsup: !
User avatar
OP827
Donating Member
 
Posts: 1596
Images: 414
Joined: Fri Apr 25, 2014 7:27 pm
Location: Bruce County Ontario

Re: The Poet Creek Express - Foamie Hybrid

Postby KCStudly » Sat Jun 27, 2015 7:32 am

Thanks OP. It's getting there.
KC
My Build: The Poet Creek Express Hybrid Foamie

Poet Creek Or Bust
Engineering the TLAR way - "That Looks About Right"
TnTTT ORIGINAL 200A LANTERN CLUB = "The 200A Gang"
Green Lantern Corpsmen
User avatar
KCStudly
Donating Member
 
Posts: 9640
Images: 8169
Joined: Mon Feb 06, 2012 10:18 pm
Location: Southeastern CT, USA

Re: The Poet Creek Express - Foamie Hybrid

Postby Fred Trout » Sat Jun 27, 2015 10:49 am

Looking better all the time.

It sounded like the jack incident was much worse than it appears in that pic. Foam sure is forgiving when you need to fix gouges, dents, mis-cuts and poor fit when you have Great Stuff handy ! :FNP
User avatar
Fred Trout
The 300 Club
 
Posts: 396
Joined: Fri May 08, 2015 4:30 pm
Location: SW Montana
Top

Re: The Poet Creek Express - Foamie Hybrid

Postby KCStudly » Sat Jun 27, 2015 11:05 pm

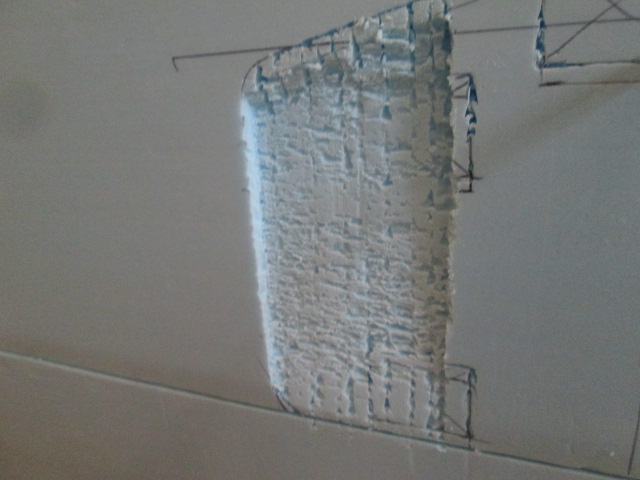
Yeah, it was probably more exciting than damaging, but those torn serrations are like fish scales or shingles. The rips go up inside like layers so I'm not sure if I'm just going to butter it up with some GS and sand it back, or if I'm going to pocket out the damaged area and glue in a foam Dutchman/patch.

Today was a bit overcast and cool, so a great day to be building, despite the rain that came later in the afternoon.

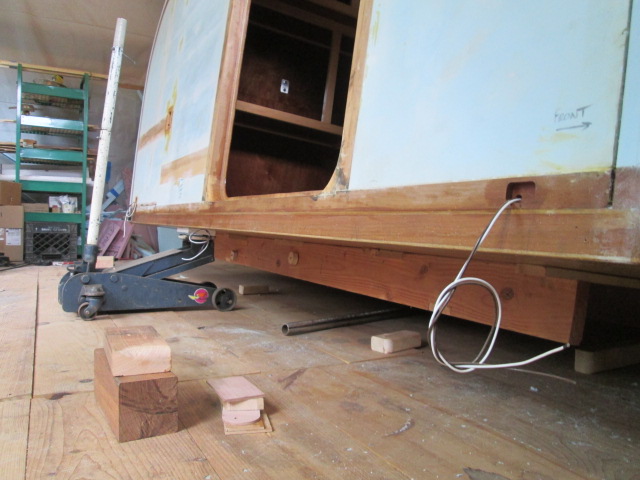
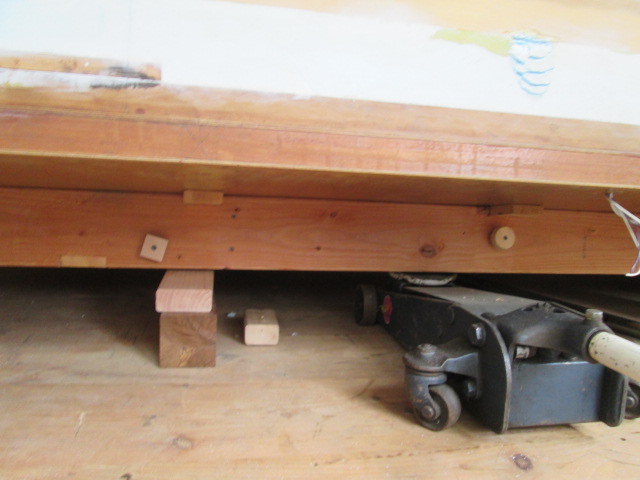
Started by doing a little touchup 100 grit sanding on the side portions of the roof top, then used an improved technique to keel the cabin back over and get the middle part with the same grit. Rather than trying to lift from the edge of the floor the whole way, and have the angle between the floor and jack pad change, I just lifted enough in the first pick to get enough blocking under the rail of the build cradle to where I could reposition the jack pad under the cradle rail. Here you can see the white vinyl piece between the floor and jack pad lifting on the underside of the floor.
Image

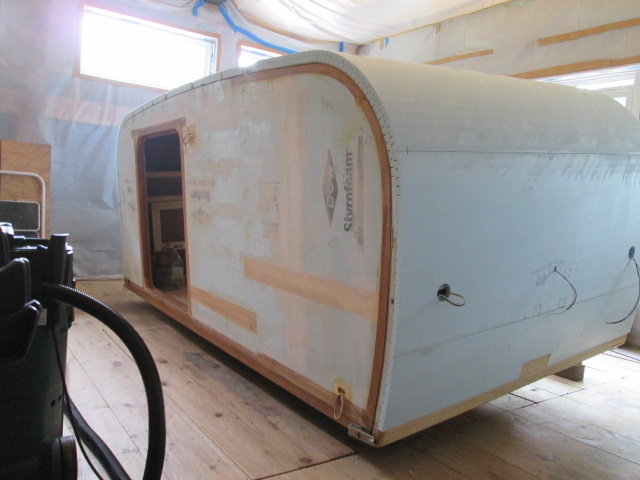
Street side view as she starts to keel.
Image

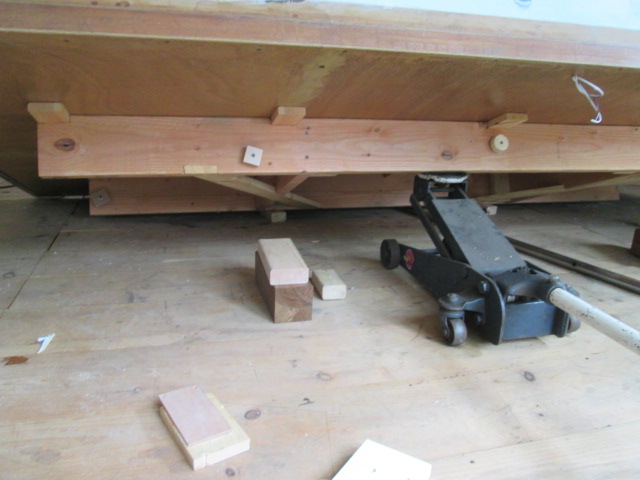
After stacking the 4x4 Ipe and 2x4 blocks under the rail, lowering, and repositioning the jack pad under the edge of the rail, the vinyl pad was no longer required and the rail nestled down in between the lugs on the jack pad. This made a much better grab for the jack and I could safely lift the rest of the way.
Image

You can just see daylight under the far edge of the floor.
Image

In this position I could just reach what I needed to sand the middle of the roof without totally wrecking my back while standing on the relatively generous top step of my folding step stool.
Image

I could probably figure out the vertical CG of the cabin using this technique and some math. When lowering the jack there was a very distinct point when the weight came back onto the jack and I had to quickly turn the handle back to slow down the rate of drop.

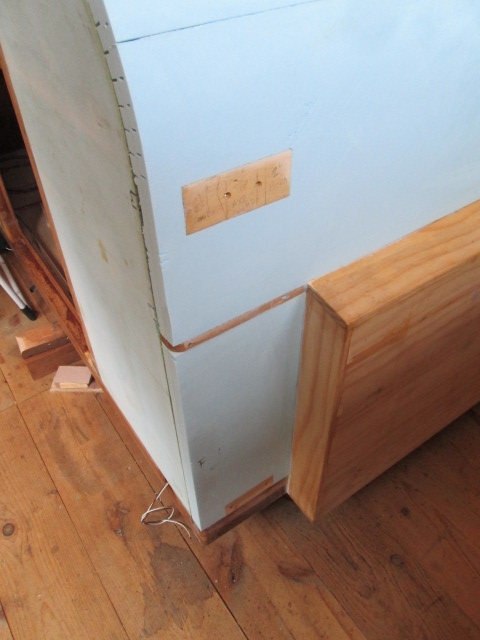
Next I tried to start knocking off other areas of the foam that need to be faired before I start doing some filler work. I faired the foam on the curb side of the front wall flush to the axe mount blocking, rock guard sparette, and front floor edge. Rather than knock the whole panel above the locker down, I just feathered it in above the corner.
Image

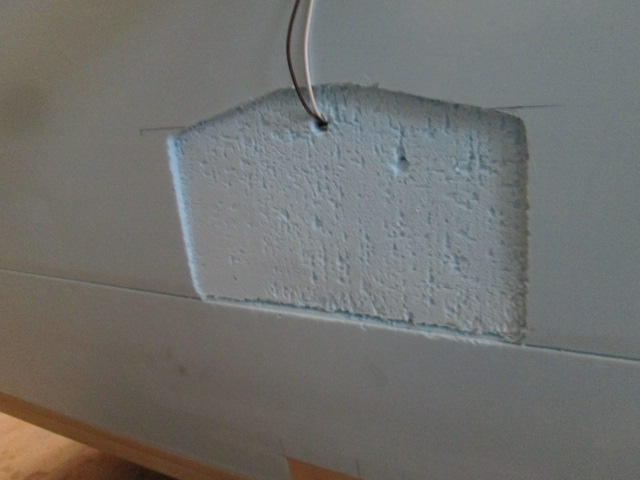
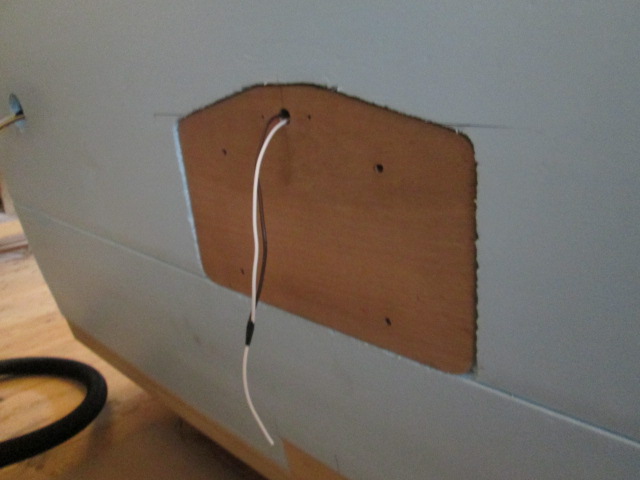
I decided that I was over complicating my approach to recessing the license plate mounting pad. I didn’t like my chances with the router template I had started as I was afraid that I would end up cutting the buried electrical wires. I decided that I could carve this out by hand if I could control the depth of my cuts. My cheap utility knife only has a couple of detents on the blade depth, and none of them hold securely, so I set the depth to match the thick end of a wedge shim plus a piece of the 5mm ply matching the thickness of the plate holder.
Image

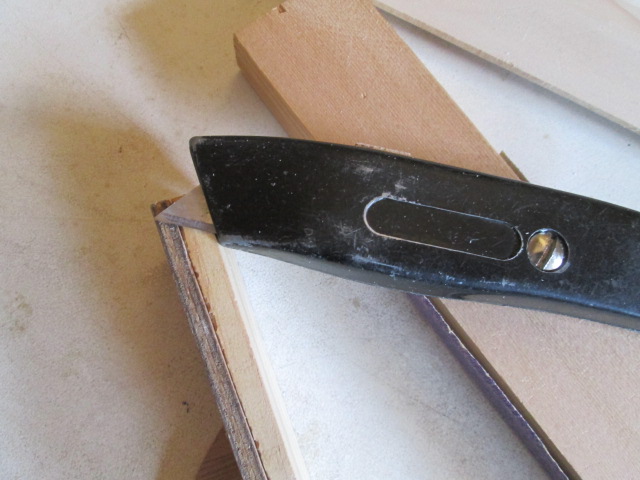
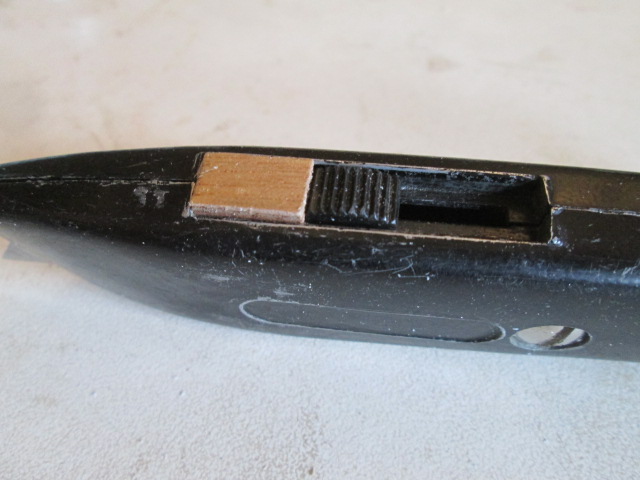
From there I cut a little piece of 5mm scrap that fit snuggly into the recess of the blade adjuster, preventing the blade from extending any further.
Image

Using a wedge shim as a guide for the nose of the knife handle I was able to make scores with reasonably controlled depth starting out deeper at the top and moving out shallower at the bottom. The angle of the blade was kind of steep, so it tended to chunk rather than cut, but by making a few light cuts instead of one big gouge it seemed to go okay… good enough.
Image

By using the edge of the shim as a scrapper and dragging it over the scores to knock out the crumbled up bits, then sanding a little, I could see that I was headed in the right direction.
Image
Image

36 grit then 100 grit on small blocks.
Image
Image

Flipped the plate holder around backwards to test fit.
Image

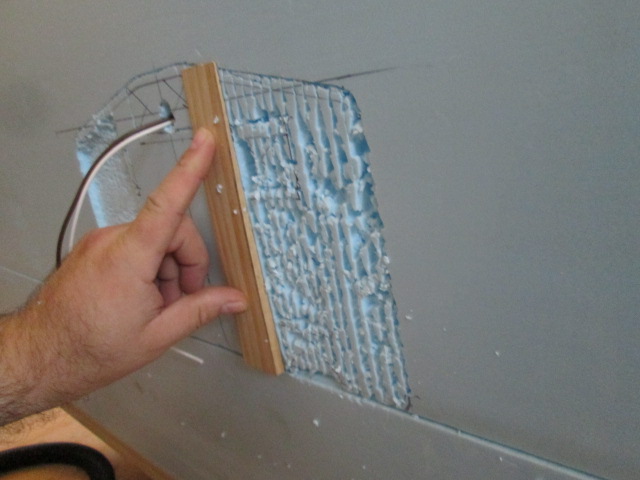
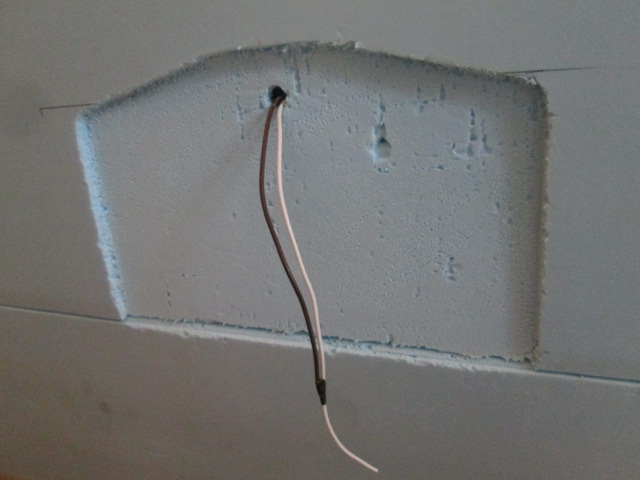
Next I cut down the piece I had intended to be a router template for the blocking on the rear of the mount so that it would fit into the recess, and just used that to trace the location of the blocking. Used the utility knife to cut out the rest of the outer layer of foam. For the top holes I had to go back and score into the inner layer of foam to account for the taper (after this pic was taken).
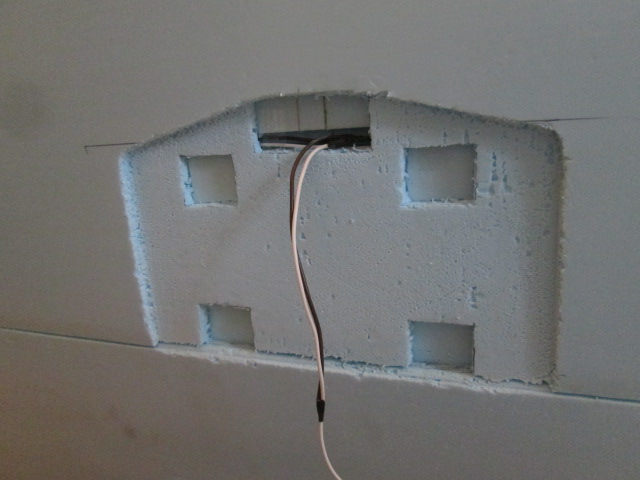
Image

Test fit.
Image

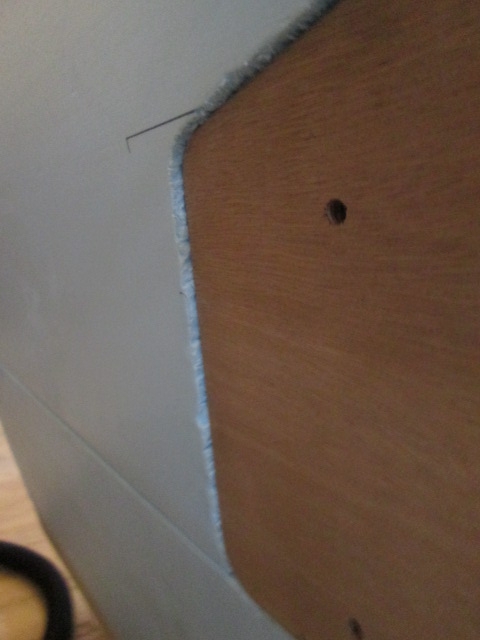
In the close up of the left side you can start to see the taper to the recess. Unfortunately, when I put my little layout square level up on it to check for plumb I could see that I am quite a way off, needing to bury the top of the plate a bunch more. At least the floor of the cabin is sitting flat now so checking for plumb was much easier than before.
Image
KC
My Build: The Poet Creek Express Hybrid Foamie

Poet Creek Or Bust
Engineering the TLAR way - "That Looks About Right"
TnTTT ORIGINAL 200A LANTERN CLUB = "The 200A Gang"
Green Lantern Corpsmen
User avatar
KCStudly
Donating Member
 
Posts: 9640
Images: 8169
Joined: Mon Feb 06, 2012 10:18 pm
Location: Southeastern CT, USA
Top

Re: The Poet Creek Express - Foamie Hybrid

Postby Fred Trout » Sat Jun 27, 2015 11:31 pm

GS is terrific for patching if you massage it into a peanut butter consistency before application but you still need to block & clamp any possible expansion that will deform the foam in undesirable directions - like the other side of that foam panel if the foaming can push in that direction. The nylon-dry-wall screws I did the test with work very well as long as the foam has someplace else to go.

Also, if you cover much of the GS joint like with packing tape, it will come bubbling out even a day later when you remove the tape. That was a trip !
User avatar
Fred Trout
The 300 Club
 
Posts: 396
Joined: Fri May 08, 2015 4:30 pm
Location: SW Montana
Top

Re: The Poet Creek Express - Foamie Hybrid

Postby KCStudly » Sat Jun 27, 2015 11:58 pm

The inside of my walls are laminated with 5mm ply, so bulging inside is not a concern. I would be more concerned with the disparity between how the hardened GS and blue foam sand. I hate how the blue gets eaten up trying to get the GS flat. Seems to me that the GS compresses into the blue below, so you are only sanding the blue around it; then it springs back and you have a high area of GS surrounded by low areas of blue. I hate that.

I am much more likely to router the whole area out in a rectangular shape (like I did for sinking my blocking), then fitting and gluing in a piece of blue, leaving it just a tad high. Last step would be to sand the plug back fair to the rest.
KC
My Build: The Poet Creek Express Hybrid Foamie

Poet Creek Or Bust
Engineering the TLAR way - "That Looks About Right"
TnTTT ORIGINAL 200A LANTERN CLUB = "The 200A Gang"
Green Lantern Corpsmen
User avatar
KCStudly
Donating Member
 
Posts: 9640
Images: 8169
Joined: Mon Feb 06, 2012 10:18 pm
Location: Southeastern CT, USA
Top

Re: The Poet Creek Express - Foamie Hybrid

Postby Fred Trout » Sun Jun 28, 2015 7:08 pm

There is very little problem with a sanding difference unlike with caulk, Gripper, or Gorilla Glue.

They sand almost the same and you can make sure you do not sand too much foam in error by painting the entire patch area with gripper which will act as a indicator like litmus paper, changing color and letting the foam color show if you go too far (suggested by ghcoe) and it works like a charm. GS is a better patch than anything else I have used so far and is easy to work with and other than pushing & dislodging by foam action, is noobie proof.

'Massaging' it to a paste makes the bubbles smaller & the only issue is that it IS open cell foam, unlike extruded Styro.
User avatar
Fred Trout
The 300 Club
 
Posts: 396
Joined: Fri May 08, 2015 4:30 pm
Location: SW Montana
Top

Re: The Poet Creek Express - Foamie Hybrid

Postby Wolffarmer » Tue Jun 30, 2015 6:59 pm

I just sold two of my damaged motorcycles. The reason I am saying this here is that they are going to Connecticut.

The guy is driving here this week to pick them up on the 4th.

Would you happen to know Gordon Roberts?

He is in International Brotherhood of Motorcycle Campers. And now runs the web sight. I have been a member since 1979.

Such a small state maybe you can visit them sometime. :lol: :lol:
"these guys must be afraid of the dark"
User avatar
Wolffarmer
Donating Member
 
Posts: 4612
Images: 309
Joined: Wed May 02, 2007 1:32 pm
Location: Idaho Rupert
Top

Re: The Poet Creek Express - Foamie Hybrid

Postby KCStudly » Tue Jun 30, 2015 8:26 pm

It is always fun to be reminded of what a small world it is. I can't say that I know him. The population here is somewhere north of 3.5M, so...

Reminds me of a guy my NZ host brother and I stayed with in Rotorua while traveling from Auckland. He had a parachute that was made in Danbury, CT.

I decided to go deeper at the top of the license plate recess, closer to plumb. I didn’t get very far before I was reminded of a few things. First, I hit kerfs. Second, I hadn’t adhered the second layer of foam fully to the first, just bands of the PL300, so some areas where the first layer started getting thin became unstable when attempting to sand. Third, the reason I had originally settled on the depth that I had was due to the fastener allowance and depth of the blocking; I could only go so far without getting to the inner hatch skin and leaving no room for the wires to enter the back of the marker light block.

What you see here is the end result (for now?). Behind the top three blocks I went all the way to the inner skin. Then I cut the loose part above the exposed kerf away, plus the area under the wire trough, plus a little more to allow the wires to run between the blocks. I had to dig a little more out from the lower block locations, too. Also note that I pulled the right hand taillight wires back and taped them out of the way while doing all of this cutting.
Image

To make room for the wires again I carved out the underside of the marker light block and knocked the corners off of the upper plate bolt blocks.
Image

I like how it is fitting better now, but will have to be careful not to pinch the wires or glue them in when placing the mount permanently. The wires will be harder to snake if the need should arise, and I’m not thrilled about the fasteners leading straight to the inner skin, so will have to waterproof very thoroughly.
Image

Here’s how the wires need to run to avoid the blocks. I’ll have to fix them in place somehow, either with a few pieces of tape, some hot glue (but not so much that they can’t be pulled away), or… ? I would like to GG the mount in place but don’t want to stick the wires hard.
Image

It's not bad, but I have half a mind to cut the rest away, or even a bigger area, and go the other way with a raised blister to mount the plate on, similar to how I am doing the taillights.
KC
My Build: The Poet Creek Express Hybrid Foamie

Poet Creek Or Bust
Engineering the TLAR way - "That Looks About Right"
TnTTT ORIGINAL 200A LANTERN CLUB = "The 200A Gang"
Green Lantern Corpsmen
User avatar
KCStudly
Donating Member
 
Posts: 9640
Images: 8169
Joined: Mon Feb 06, 2012 10:18 pm
Location: Southeastern CT, USA
Top

Re: The Poet Creek Express - Foamie Hybrid

Postby Fred Trout » Wed Jul 01, 2015 9:22 am

They handed me a motorcycle size license plate when I registered the trailer but the old one was car sized. :o Surprise !!
User avatar
Fred Trout
The 300 Club
 
Posts: 396
Joined: Fri May 08, 2015 4:30 pm
Location: SW Montana
Top

Re: The Poet Creek Express - Foamie Hybrid

Postby KCStudly » Wed Jul 01, 2015 10:03 am

Better that than the other way around. :R
KC
My Build: The Poet Creek Express Hybrid Foamie

Poet Creek Or Bust
Engineering the TLAR way - "That Looks About Right"
TnTTT ORIGINAL 200A LANTERN CLUB = "The 200A Gang"
Green Lantern Corpsmen
User avatar
KCStudly
Donating Member
 
Posts: 9640
Images: 8169
Joined: Mon Feb 06, 2012 10:18 pm
Location: Southeastern CT, USA
Top

Re: The Poet Creek Express - Foamie Hybrid

Postby Fred Trout » Wed Jul 01, 2015 7:15 pm

Found out yesterday that you can let the TB II canvas edges dry out when you put canvas on and then use an iron to get them pliable so they turn the corner and sit flat. It's fast and pretty easy; just low heat, wet towel, and keep the iron moving. Edges are still a tad stiff but nothing a staple gun can't fix & the staples can be removed if you want to bother. The heated TB II does stick but adding more doesn't hurt. Used push pins or staples to hold the wet towel in place otherwise you need 4 hands.
User avatar
Fred Trout
The 300 Club
 
Posts: 396
Joined: Fri May 08, 2015 4:30 pm
Location: SW Montana
Top

Re: The Poet Creek Express - Foamie Hybrid

Postby tony.latham » Wed Jul 01, 2015 11:48 pm

Keep your eye on the ball. A couple of pics from this week:

Image

Image

Somwhere deep in NW Montana.

T
User avatar
tony.latham
Gold Donating Member
 
Posts: 7073
Images: 17
Joined: Mon Jul 08, 2013 4:03 pm
Location: Middle of Idaho on the edge of nowhere
Top

Re: The Poet Creek Express - Foamie Hybrid

Postby KCStudly » Thu Jul 02, 2015 9:53 am

Tony, what? Do you have a crystal ball? :lol: I was just thinking yesterday that I didn't get much done. I sanded around the license plate recess to lay the edge back a little, put a round over on it by hand (not perfect but good enough to GG or GS the plate mount in), brushed some of the mix onto the plate mount, and dabbed a little TB2 in between the loose foam layers... but the rest of the time was spent gabbing with Karl. (He is a very patient listener, so that can be therapeutic at times, like after a :? day at work.)

You're a good man. Dangle that carrot, crack that whip! :bowdown: :hammer:

Reminder to self: pick up some more spackle on the way to Mecca. :?
KC
My Build: The Poet Creek Express Hybrid Foamie

Poet Creek Or Bust
Engineering the TLAR way - "That Looks About Right"
TnTTT ORIGINAL 200A LANTERN CLUB = "The 200A Gang"
Green Lantern Corpsmen
User avatar
KCStudly
Donating Member
 
Posts: 9640
Images: 8169
Joined: Mon Feb 06, 2012 10:18 pm
Location: Southeastern CT, USA
Top

Re: The Poet Creek Express - Foamie Hybrid

Postby KCStudly » Fri Jul 03, 2015 9:59 pm

Nice day to be building and it felt like I actually got something done toward forward progress; little things, but still progress.

Here is the license plate mount after a couple of coats of the mix.
Image

Decided it was time to go for it. Propped the hatch half open; masked around the mount and the recess; taped the backs of the plate bolt holes; smeared GG in block recesses, along edges and on flat areas being careful to keep it away from the wires as much as practical; stuck the mount in; clamped strong backs across the hatch; and put wedge shims in to hold the mount down in the recess.
Image
Image

Jumping ahead, after a few hours I removed the clamps and sanded some of the bubbles.
Image

Because I was conservative with the GG, I will have to seal up the edges with something, maybe spread some GS in there, then this will get “jambed out” with glue and bed sheet.

While I had the hatch propped up I took advantage and faired the foam around the would be hatch handle block. I had an idea for one of those “never really done” 5/ct jobs; I’d like to cast an aluminum “TPCE” logo and mount it on the same bolt pattern as the hatch handle. That way if I ever decide to switch to the handle the bolt holes would be the same.
Image

The foam to bumper edge only needed a little work to fair.
Image

After cutting the blocking for the side clearance lights I finalized their locations. If you look closely at the sharpie outline of the inner cabinet face frame blocking, you can just see a thinner ink outline overlapping same. I held the block up where it looked about right, used my speed square to level and traced around the block. This is the street side front.
Image

In the rear it was a bit of a compromise due to the more gradual profile radius. The light could be either at the same level as the front one, but further forward, or it could be further back but lower. I decided to push it up into the rear wall edging to mitigate this compromise. It puts the light a little closer to the edge of the wall, but I think it will be okay. The hatch is plenty thick that it will look okay with the hatch closed, I just hope that it doesn’t look stupid with the hatch up.
Image

Here’s the levelling technique. Also note the little pen tick mark on the right side matching the inside of the wall edging.
Image

To transfer the hard edge of the wall to trim the block I made a little pencil rubbing. The line between the darker and lighter rubbings is where I cut with the scissors before remembering to take a picture.
Image

After cutting the rubbing the rest of the way I rubbed across from the paper to wood to transfer the edge to be cut on the band saw.
Image
Image

After sawing close to the line and sanding to the line on the big disc sander, I traced around the block onto a strip of melamine to make a router template. Then I stepped off the tracing by 1/16 inch to account for the collar offset on the router shoe.
Image
Image

Next drill a pilot hole to thread the scroll saw blade thru and cut out the template.
Image

The extra length of the template allowed me to clamp it to the side wall w/o getting in the way of the router base.
Image

Made the cut…
Image

… and trimmed the corners out with the steak knife.
Image

Dry fit test. It was so snug I didn’t want to push it all the way in for fear that I would have a hard time getting it back out again.
Image
Image

For the curb side block I just traced the first block and repeated the process. First pic is looking up and forward. Second is looking back and down.
Image
Image

Now all I have to do is open the template up for the rectangular front blocks and figure out a way to hold the template to the side of the foam. Not sure double sided tape will work well enough on the foam, but maybe if I use a couple of temporary drywall screws(?).

Before I glue these in I want to finish the stainless steel mounting plates for the lights, drill the wire holes in the blocks and route the wire ways.
KC
My Build: The Poet Creek Express Hybrid Foamie

Poet Creek Or Bust
Engineering the TLAR way - "That Looks About Right"
TnTTT ORIGINAL 200A LANTERN CLUB = "The 200A Gang"
Green Lantern Corpsmen
User avatar
KCStudly
Donating Member
 
Posts: 9640
Images: 8169
Joined: Mon Feb 06, 2012 10:18 pm
Location: Southeastern CT, USA
Top

PreviousNext

Return to Foamies

Who is online

Users browsing this forum: No registered users and 2 guests