Noob here. I’m in the planning stages of my teardrop. I want to put together a good build, but I’m not a real patient guy, so I want to do it as quickly as possible. I also am “semi-retired,” so I don’t have a lot of spare cash to pour into this. That means keeping it simple and straightforward.
Although I am “semi-retired,” I do work as an aircraft mechanic. The job situation calls for me to work out-of-town. I have found that the most cost-efficient housing arrangement is tent camping at RV parks on military bases. My wife stays home for her own job and to take care of our teenage son. So this camper is mostly just for me right now – although my wife may join me (part-time) at some later date.
I am looking at building a “generic BenRoy” per the plans/instructions on this site. Here are some of my thoughts. I’d like those with experience to chime in.
Use the Harbor Freight 4’x8’ trailer as a base – best bang for the buck. I am thinking that building it out to a 5 ft width won’t add much to cost. But the 6” overhang on each side may call for a lot more fabrication over the wheels. I want to keep it as simple as possible and I’m worried that boxing in the wheels properly may call for an unnecessarily difficult and time-consuming work. I'm 6'1" and 215 lbs. My wife (who may join me occasionally) is 5'7" and weighs a lot less. Is the extra foot of width really worth it if I’m probably going to be by myself most of the time?
Walls – simple solid plywood. Fastest fabrication and ¾” or thicker should have plenty of strength.
Doors – fabricate them myself out of the sidewall plywood. While that adds to time and difficultly, the store-bought doors are (to me, a cheapskate) shockingly expensive. Another question is – two doors or just one? Again, I’ll be alone most of the time. I would still need at least a window on the side opposite the door for ventilation, is the additional door that much more work?
Galley and cabin storage – I’ve seen a lot a wonderful cabinet work in a lot of the builds here. But I’m not a cabinet-maker. Could I get by with a simple counter and a couple of shelves? And simple shelves for cabin storage? Looks like a place to save a lot of fabrication time.
Electrical – Reading up, basic wiring looks manageable. I plan on a shore power inlet since I’m camping in military installation RV parks where even the “primitive” sites have electric and water hookups. Since I live and work in Florida, AC will probably be a necessity – eventually. But not right now. I think I’ll arrange bracing and prewire to add a small air conditioner later. If I’m using a propane camp stove and an ice chest, do I need more than 2 AC outlets in the galley? I may want to add a small TV to the cabin later – using tablets and wifi for entertainment right now. More than 2 AC outlets in the cabin? I don’t plan on boondocking, so I don’t think that I’ll need a DC power system at all.
I also don’t see the need for “porchlights” on the sides. On big RV rigs it makes sense because people congregate under the side awnings. But in the camping pictures I’ve seen of teardrops, people seem to gather at the galley in back – because most teardroppers seem to put a canopy there for shade while cooking. There will already be a galley work light there to act as a “porchlight.”
Finishing – Varnish, paint, or aluminum-clad? I don’t know whether all of the extra work to get a varnish or paint job to look decent is worth the savings over just skinning the whole thing with aluminum. Thoughts?
Teardrops n Tiny Travel Trailersor t n ttt for short (tnttt.com) |
Planning stages
21 posts
• Page 1 of 2 • 1, 2
Planning stages
![]() by Wrenchbender » Wed Sep 16, 2015 5:46 pm
by Wrenchbender » Wed Sep 16, 2015 5:46 pm
-

Wrenchbender - Teardrop Inspector
- Posts: 12
- Joined: Wed Sep 16, 2015 4:02 pm
Re: Planning stages
![]() by tony.latham » Wed Sep 16, 2015 9:25 pm
by tony.latham » Wed Sep 16, 2015 9:25 pm
Wrenchbender:
Two. End of discussion. If the wife gets in there once, and you've got one door, it's not going to work. Besides, two doors means two windows. You really need the ventilation. (Yeah, I know, you could put a window on that side.)
Factory doors are expensive. I'm happy with mine. I've put them in three teardrops, and when I did it, the thought that went through my brain––six times–– was, "that was easy." Building doors is labor intensive, or so I've read. Add up hinges, latches, trim and windows and you'll see what a DIY door costs. I think TC Teardrops sells doors a bit less than Vintage does. (I'm fine with the Vintage doors BTW. The big smoked glass windows is a nice feature.)
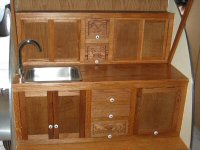
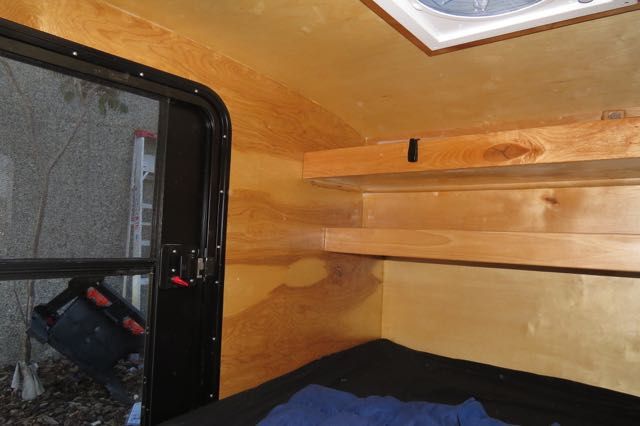
Simple is functional. Take a look at my interior, the bottom shelf is an extension of the galley counter. The 3" lips work great and everything is easy to find:
Take a look at this thread: viewtopic.php?f=50&t=61738 and you'll see a similar interior.
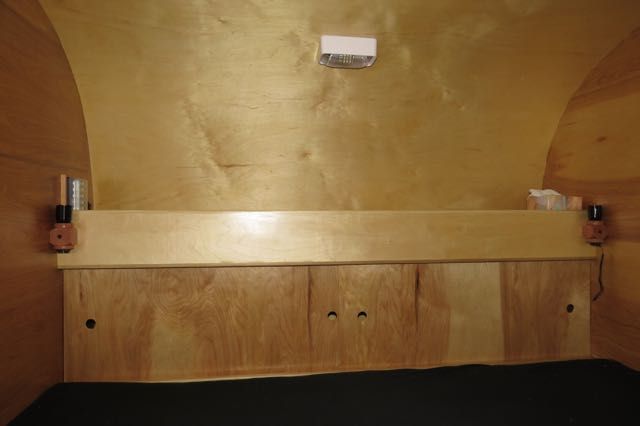
I put sliders up front under a shelf. You need the shelf to "put stuff" like books, glasses or whatever:
My galley is relatively simple. The angled drawer is a challenge, but you could make it with a 90º face, too.

Five wide? Yes, but on a four-wide trailer? It's been done but there are tradeoffs that it sounds like you understand. Northern Tool sells a 5-wide trailer.
A well sealed aluminum-clad teardrop isn't afraid of years in the sun. I don't know anything else that'll do that.
Yep, there's choices though.
Tony
two doors or just one? Again, I’ll be alone most of the time.
Two. End of discussion. If the wife gets in there once, and you've got one door, it's not going to work. Besides, two doors means two windows. You really need the ventilation. (Yeah, I know, you could put a window on that side.)
Factory doors are expensive. I'm happy with mine. I've put them in three teardrops, and when I did it, the thought that went through my brain––six times–– was, "that was easy." Building doors is labor intensive, or so I've read. Add up hinges, latches, trim and windows and you'll see what a DIY door costs. I think TC Teardrops sells doors a bit less than Vintage does. (I'm fine with the Vintage doors BTW. The big smoked glass windows is a nice feature.)
Galley and cabin storage – I’ve seen a lot a wonderful cabinet work in a lot of the builds here. But I’m not a cabinet-maker. Could I get by with a simple counter and a couple of shelves? And simple shelves for cabin storage? Looks like a place to save a lot of fabrication time.
Simple is functional. Take a look at my interior, the bottom shelf is an extension of the galley counter. The 3" lips work great and everything is easy to find:

Take a look at this thread: viewtopic.php?f=50&t=61738 and you'll see a similar interior.
I put sliders up front under a shelf. You need the shelf to "put stuff" like books, glasses or whatever:

My galley is relatively simple. The angled drawer is a challenge, but you could make it with a 90º face, too.

Five wide? Yes, but on a four-wide trailer? It's been done but there are tradeoffs that it sounds like you understand. Northern Tool sells a 5-wide trailer.
Finishing – Varnish, paint, or aluminum-clad?
A well sealed aluminum-clad teardrop isn't afraid of years in the sun. I don't know anything else that'll do that.
Yep, there's choices though.
Tony

-

tony.latham - Gold Donating Member
- Posts: 7074
- Images: 17
- Joined: Mon Jul 08, 2013 4:03 pm
- Location: Middle of Idaho on the edge of nowhere


