The Poet Creek Express - Foamie Hybrid

Canvas covered foamies (Thrifty Alternatives...)

Moderator: eaglesdare

Re: The Poet Creek Express - Foamie Hybrid

Postby Atomic77 » Fri Nov 27, 2015 1:11 pm

Beautiful and looks delish. Glad you had a happy time and a full belly!
Michael

"The Strength is in the Sum of the Parts..."

The Astroliner

Follow The Astroliner Blog Here!

Check out our YouTube video
User avatar
Atomic77
1000 Club
1000 Club
 
Posts: 1463
Images: 309
Joined: Tue Oct 08, 2013 5:29 pm
Location: Fort Wayne Indiana

Re: The Poet Creek Express - Foamie Hybrid

Postby KCStudly » Fri Nov 27, 2015 10:30 pm

It was a very nice meal, and I didn’t feel too stuffed afterward, either. Had leftovers for dinner tonight, too. :D

Today was one of those days where it felt like I didn’t get much done, but did spend some time contemplating my approach to the next few steps. I may take a different approach to glassing the hatch than I had originally thought, and perhaps save a few steps in the process; so maybe time well spent.

I started by peeling the last of the old masking tape off of the seal lip on the hatch. Then I began masking the prefinished areas in prep for glass. Along the straight sections at the hinge spar and sill I used the 2 inch wide (now 1.88 inch… :x ) tape, and for the arch of the ribs I used the more flexible 1 inch (.94 inch… :x ).
Image
Image

This got me the crisp edges needed and enough of a start to use some of the scrap plastic sheeting to cover up the rest of it. I did end up piecing the top section together. Probably a little overkill, but better safe than sorry.
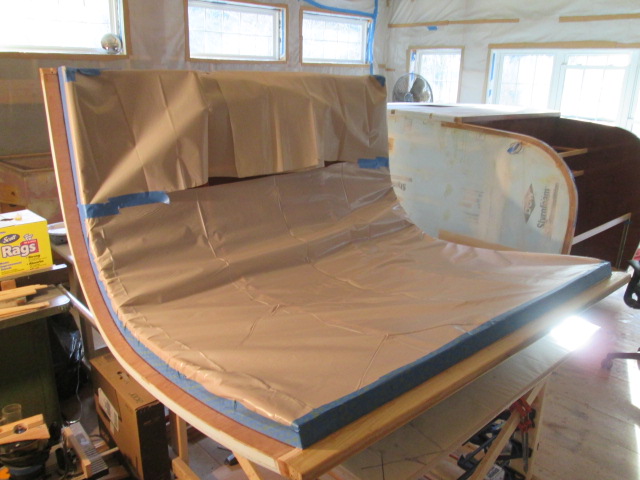
Image

Next I made a little mockup of the edge of the hatch so that I can do a couple of tests on the method for glassing. I have some rolls of glass tape that are a pretty light weight weave and I want to test some before going forward. I forgot to take a pic of that.

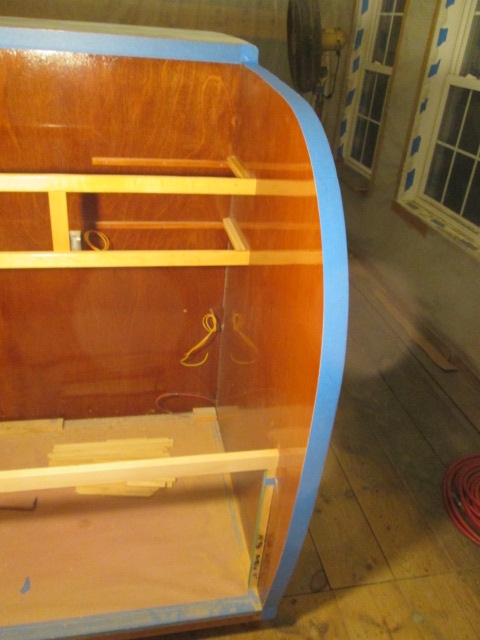
Next I started masking the galley wall edges.
Image

At first I did this by placing the first piece of tape flush to the inside then wrapped the excess onto the outside face. Then I put strips of tape on the outside face of the wall along the edge and folded the tails up onto the top edge of the wall. Then the thought process went into creative mode and I had to stop and think.

One of the glassing techniques I have seen used on Long EZ builds is to use modeling clay as a temporary bridge or dam. This lets you glass over a gap or form without sticking or sagging at an edge or depression.

So with that in mind I was trying to wrap my mind around what sequence I might use and how I might go about glassing the whole hatch and cabin as one using clay in the gaps to seal things up, prevent epoxy dripping inward and forming a bridge for the glass to cross. The area that has me scratching my head is how to do the sharp corner edge of the hatch along the sides.

Option 1 would be to glass the underside lip of the hatch edge, using either strips of the 6oz cloth or the finer rolled tape; then back gouge the side edge for a flox corner; sand that fair to the outside face; then place the hatch, clay the gap, and glass the lot. The thing I don’t like about this option is that I would lose the hard reference along the edge of the ply when doing the gouge, leaving just foam and the narrow edge of the underside glass as my reference.

Option 2 would be to mask the underside of the hatch lip now; mount the hatch; do the clay; do the big glass work; split the hatch back off; then peel the tape up; use the Dremel with a burr to back gouge the underside of the corner, excavating the corner of the ply up to the inside of the side glass; flox the corner and then lay the tape on the underside of the lip capping the flox.

The flox corner is what would let me keep a sharp edge, still have the ends of the cloth adhere right up to the corner and be able to trim and sand excess cloth w/o exposing the plywood edge.

I wish I could figure out a way to bevel the edge for the flox using a router to save a bunch of detail cutting work, but that would involve having to build a dam to lay the flox corner up, and still doesn’t maintain the hard reference edge.

For either of these options I still need to glass the inside and underside of the bumper sill, and I’d like to glass under the hinge on both sides before mounting the hatch again. I think I can layup the first 6 to 8 inches on either side stepping the two plies so that the lap seams are staggered for the main layup. I want to have the hinge in place to lock the hatch shape and location in. With just the two deck screws, one at either corner, the hinge gap tends to open up a tad, and the hatch sagged a little in the middle. Another option would be to cut up the drop piece of the hinge into three pieces; use those as temporary alignment tabs; glass around them; and then back fill the areas where the temporary hinges had been after the fact. I think I like the first method better. It means a bigger area to make even and fair but it would be a more uniform method.

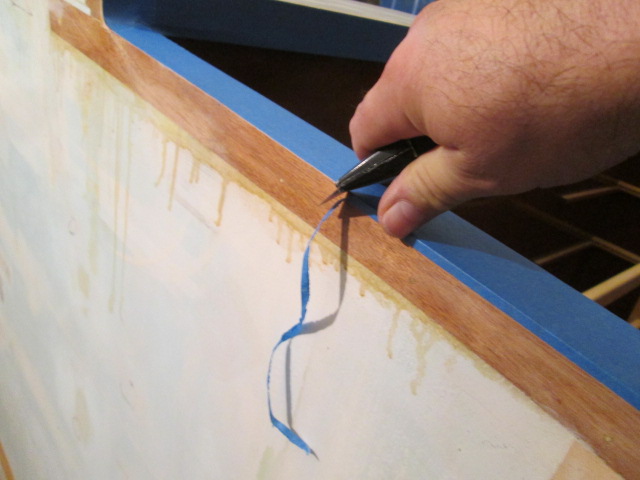
Anyway, with all of this running around in my mind I decided to take the masking tape back off of the side face of the wall (I had only done the street side at this point). Once that was done I used the utility knife to scrape and shave the edge of the top tape in order to peel off the little wrapped edge.
Image

And then did the same on the other side.
Image

In hindsight I should have left the side wall tape on until after the clay was stuffed in. The clay can be a little oily, so you have to be careful not to contaminate with it.

So hopefully my test piece will help me decide which of the above options will work best.
Last edited by KCStudly on Tue Apr 05, 2022 7:18 pm, edited 1 time in total.
KC
My Build: The Poet Creek Express Hybrid Foamie

Poet Creek Or Bust
Engineering the TLAR way - "That Looks About Right"
TnTTT ORIGINAL 200A LANTERN CLUB = "The 200A Gang"
Green Lantern Corpsmen
User avatar
KCStudly
Donating Member
 
Posts: 9640
Images: 8169
Joined: Mon Feb 06, 2012 10:18 pm
Location: Southeastern CT, USA

Re: The Poet Creek Express - Foamie Hybrid

Postby KCStudly » Sat Nov 28, 2015 8:44 pm

Just a couple of hours in the shop today running some tests. Started by trimming the excess foam from the edges of this mockup of the hatch edge. The chunk of scrap foam I selected didn’t have true edges, so I let them run off the edges of the ply piece some during glue up, then trimmed and sanded back a tad to true it up. Just used TB2 spread thin here. The ridge of pine opposite the foam represents a hatch rib. I wanted to see how well things went glassing up against the blue tape to see if I can keep a tight line.
Image

I used the same technique as before with the offset sharpie marker to layout guidelines for the radius edge of the foam.
Image

Then the same concave sanding block to round the corner over.
Image
Image

Then marked four (4) areas for test and prepared the glass. From left to right I will lay 2 layers of 6oz on the sealing lip, then later gouge out and flox the corner to be finished from the outside; two sections with 2 plies of 6oz laid on the “top” (or outside) wrapping around the foam radius and bonded to the edge of the ply (side of the hatch), to be gouged, floxed and later glassed over on the underside (plywood side), one section with 6oz the other with the tape; and finally four (4) plies of the cloth tape to be done like the first area, underside first.
Image

A shot of a 1 inch chip brush cut down to stiffen up the bristles.
Image

I did the plywood areas dry on wet. The fine fibers of the tape didn’t seem to go translucent like the 6oz, but I’m fairly certain there was plenty of wet present, as I laid them each one at a time. First strike for the tape; it took a lot of detail poking and time to feed the epoxy and lay all 4 plies, whereas the 2 plies of 6oz soaked right thru in one step easier and faster.
Image

The 2 plies of 6oz; business as usual. I just hand laid these up against the “rib” and it seemed to be no problem aligning the carefully cut edge. For the larger strips on the real hatch I would more likely use the PMPP technique to keep a crisp edge and help get it laid down neatly.
Image

The two plies of 6oz wrapped easily around the foam 3/4 inch radius, even with no bias.
Image

I had made a 2 pump batch of wet and only used about half of it for this test (so far), so I mixed about three big spoonfuls of the 410 fairing filler in and tried that out on the backside of the tongue box. I may have used too much filler, or the batch may have started to kick because it got pretty thick, so I spread it out quickly over a big area, then scooped some up and did the steps were the side plies wrapped onto the back; then went back and spread the middle of the field out as thin as I could, trying to just fill the weave and not have a lot of extra buildup.
Image
Image
Image
Image

I know it looks like I could have done a better job in some places, but it was starting to drag out, so I let it be and will sand off the excess, also testing how easily that goes.

Yvette has a B-day coming up next week so I had a few errands to attend to and called it a short day.
Last edited by KCStudly on Mon Nov 30, 2015 10:05 am, edited 1 time in total.
KC
My Build: The Poet Creek Express Hybrid Foamie

Poet Creek Or Bust
Engineering the TLAR way - "That Looks About Right"
TnTTT ORIGINAL 200A LANTERN CLUB = "The 200A Gang"
Green Lantern Corpsmen
User avatar
KCStudly
Donating Member
 
Posts: 9640
Images: 8169
Joined: Mon Feb 06, 2012 10:18 pm
Location: Southeastern CT, USA
Top

Re: The Poet Creek Express - Foamie Hybrid

Postby OP827 » Sun Nov 29, 2015 2:10 am

KC, it is good you are making the tests.
I wonder if the fiberglass tape you've used in the test has in fact the needed "epoxy finish" as they call it.
If the glass tape does not turn translucent while coated with epoxy, it may mean that the glass fibers are not properly impregnated and the resulting composite will not have normal structural strength.
Many years ago a glass cloth came with some wax in it and I had to burn this wax with some heat out of the cloth in order to use it with epoxy, otherwise it would not impregnate properly, not get transparent and will not make a good composite.
User avatar
OP827
Donating Member
 
Posts: 1596
Images: 414
Joined: Fri Apr 25, 2014 7:27 pm
Location: Bruce County Ontario
Top

Re: The Poet Creek Express - Foamie Hybrid

Postby KCStudly » Sun Nov 29, 2015 10:40 am

Interesting. There is a label that came with the tape with a Mil-Spec number on it... I'm sure I could look that up, but it also says "plain" on it, so I assumed it would be okay for epoxy. None of the markings indicate what the weight of the cloth is, tho I suppose that would be listed in the Mil-Spec type and -number. My guess is that it is just a very tight weave, and although the epoxy travels with me at approximately room temperature, the glass and everything else stays in the loft ranging from high 30's overnight to mid/low 50's during the day; probably just temperature slowing things down; that pic and my observation were immediately after wetting without allowing time to soak (even the 6oz likes a little soak time to fully wet out). I'll take another look at it today when I get there. I don't think I will use it anyway; so far its only redeeming feature is that it is the right width for the seal lip with just an 1/8 inch or so hanging off, and the selvage edges keep things nice and tidy; same thing can be achieved with the PMPP and the 6oz.

Thanks for the input. :thumbsup:
KC
My Build: The Poet Creek Express Hybrid Foamie

Poet Creek Or Bust
Engineering the TLAR way - "That Looks About Right"
TnTTT ORIGINAL 200A LANTERN CLUB = "The 200A Gang"
Green Lantern Corpsmen
User avatar
KCStudly
Donating Member
 
Posts: 9640
Images: 8169
Joined: Mon Feb 06, 2012 10:18 pm
Location: Southeastern CT, USA
Top

Re: The Poet Creek Express - Foamie Hybrid

Postby Funluvin001 » Sun Nov 29, 2015 6:11 pm

KCStudly wrote:What part was the mistake; the 2 coats instead of 1, or not using a foam roller intended for epoxy?


Uhh that would be the "not using a foam roller intended for epoxy" part. The low pile roller left a mess of texture to deal with. If a textured finish was desired it would have been a neat effect, but that's not so great on the hull of a boat! :lol: Something of a "sanding - make work" project. Ooops!
Funluvin001
Teardrop Advisor
 
Posts: 55
Images: 145
Joined: Sun Aug 16, 2015 6:40 pm
Location: P.E.I. Canada
Top

Re: The Poet Creek Express - Foamie Hybrid

Postby KCStudly » Sun Nov 29, 2015 11:32 pm

Okay, about 6 hrs in today and it feels like I got more done, or at least answered some questions so that I can move on.

First I trimmed up the hatch edge test piece and washed off the amine. Then I back gouged along the lip where the 6oz glass was wrapped around the foam side. I tried the Dremel with the conical burr, but that didn’t work well; the tip speed is next to nothing because the radius of the cutter is also close to nothing. Tried to score the ply with the utility knife, but that was tedious and nonproductive. Then I switched to the rotary cutter plunging down next to the glass and that went much faster; but the lip of the glass seemed fragile and I fragged it in a couple of spots. Next another pass with the rotary cutter at an angle to back bevel the gouge, then switched to the cutoff stone (actually 2 stacked) used as a sanding disc to clean the back side of the glass lip. This beat the edge of the glass up some more. (Also note the flexible cable drive attachment for the Dremel that makes doing detail work that much easier; less weight to wield.)
Image
Image
Image

I’m not sure how much of this rough going was part of the learning curve and how much to attribute to the glass/plywood orientation, but the next area with the 6oz on the plywood lip went much better despite slipping onto the foam with the cutter in a couple of places (I hadn’t bothered to secure the test piece and was just holding it with my opposite hand, so I think I will do even better on the hatch that has a lot more mass and won’t jump around so much while working on it). Plunging down into the second ply of the plywood made it easy to follow the line of the ply for the first cut.
Image

After the bevel cut and switching to the abrasive disc, looking from this angle made it easy to see when the wood had been sanded away and the glass was clean; it turned white.
Image

The lip of glass still seemed a little vulnerable, but either I had done better or it had a bit more structure being supported by the plywood instead of mostly foam.
Image

I just looked up the spec’s on the glass tape as I write this. It’s MIL-C-20079 (glass cloth, textile glass tape, and glass and wire reinforced glass thread) Type 2 (tape), Class 1 (untreated). A closer look at the spec revealed that it is in fact 5.80 oz/yd (although very different from the other cloth of similar weight… call me skeptical… will have to weigh a sample next time), with a thickness of 0.007 inch, 42 warp ends or wales per inch and 32 filling picks or courses per inch, and an average fiber diameter of 0.00036 inch.

The four plies, although slightly white in appearance, seemed to have set up hard, and were much more rigid (compared to the previous sections) once back gouged.
Image

This got me thinking that 3 plies of the regular 6oz cloth cut into strips laid along the underside of the hatch seal lips would be about ideal. The extra ply would also help stabilize the seal lip, so that would also be a good thing. So while the convenience of the tape form is appealing, the performance of the cloth is more familiar and apparent, so I will stick with it.

With the fine weave of the glass tape I daubed on the wet epoxy judiciously. When it came time to pull the masking tape, a simple light score with the utility knife along the base of the ‘rib’ was all it took to help peel a nice clean release.
Image

On the cloth side there was a bit more pooling at the bottom of the rib that took a few more, and heavier scores, plus a bit of picking to remove the masking. But still nothing that won’t be touched up when the seal lips get painted up to the base of the ribs.
Image

Setting that aside to give the wood a chance to dry up from the amine wash, and wanting to get some more things done before getting out the epoxy, I switched gears and sanded the filler test on the back of the TB. A fresh piece of 100 grit on the hand block did okay, but if I had much more to do I think it would be time to get the palm sander out. Not much to be seen in a pic, so none taken.

Then I started preparing poor man’s pre-pregs (PMPP) for the hatch bumper wrap and the side seal lips.

I used a scrap of the rosin paper to wrap and gauge from the base of the sill (on the inside of the hatch) up to the seam between the bumper and the sill on the outside. That way the seam between the bumper wrap and the outer glass skin will land on wood, not foam, making any future fairing to be done a little less risky for the adjacent foam.

Since the bumper wrap is essentially a long narrow rectangle, I didn’t bother with a full pattern; I just laid out the dimensions directly on the PMPP plastic (no pic). I pieced the 2 plies for the bumper wrap out of bias clippings and the last bit of the small 60 inch wide cloth I had bought for the TB. I numbered these carefully and oriented the lengths of the top and bottom plies so that the angled seams don’t overlap and are opposed between layers; similar to how I did the rim on the TB.

Similarly, the strips for the side lips needed to be about 79 inches long, so I had to butt strips together and stagger them between plies. It was a little easier here because these didn’t need to be on the bias, but I used up a bunch of my saved clippings for most of these slender strips. I did both sides of the hatch as one PMPP, one wetting, with a common cut line down the middle to get two strips. To get the third ply I had to get out the big roll of 60 inch cloth that I haven’t touched yet, but felt okay just taking a narrow strip with plenty of margin for the bigger cabin pieces to come later.

None of this is anything new, so I didn’t take pictures of much of it, but here are the PMPP’s all rolled up and staged at the ready.
Image

While I had the big roll out… and that was no small feat getting it out of the packing paper overwrap with the hatch taking up most of the bench, shown here pushed to where it was resting near the very far edge of the bench… I decided to go ahead and cut some strips to glass the hatch hinge location. Two at 4 inches wide and two at 5 inches wide, so that I can stagger the plies at the seams with the rest of the cabin and hatch glass; plus another at 5 inches wide to make up the ends, the difference between the 60 wide cloth and the cabin width, plus wrapping at the sides.
Image

Once I had the roll of cloth wrapped back up and put away, I mixed up a single pump batch of epoxy and thickened it with some of the 403 microfiber filler (I’m calling this flox, although I can’t say for sure that the 403 has cotton fibers, it sure behaves that way). In hindsight I probably should have brushed some wet into the gouges first, but I didn’t think of that at the time, and it will be fine, I’m sure. Here’s the 6oz over wood section.
Image

And the section with the 6oz wrapped up from the foam side. Had to work this a little more with the credit card squeegee due to the blowouts in the glass lip.
Image

And the section with the tape over the wood.
Image

Since I had about twice as much flox as needed, I used a dab to fill those divots in the wire pull hole in the underside of the TB.
Image

I wish I had been more mentally organized. I had a bit more flox (thick filler) left and I wished I had someplace to use it.
Image

It wasn’t until I was on the ride home that I realized I could have used a dab where the hatch seal crosses from the inner skin ply to the hinge spar. There is a slight gap there at the back of the rabbet; and where I rounded the ends of the spar for the seal to roll up, at the transition between the radius and the square edge of the spar, I could have used a little fillet to help the glass transition. Oh well, I’ll get those areas with the next batch.

Anyway, despite already deciding on the method to use for the hatch edges, and proceeding to prep for that, I will continue and complete the test piece since it is helping with the learning curve and technique development. I had thought that I would use the flox corner technique around the side door jambs and doors, as well; but now I am thinking that I will just paint these areas with wet epoxy and not try to glass the jambs or edges of the doors. They have solid cedar framing and I’m thinking I will have my fill (no pun intended) of doing this before I am done with the hatch. We’ll see how tedious it becomes and how things develop at the doors when the time comes.

Felt like I got stuff done tonight and have made it past a big question mark in the build; how to keep a nice sharp panel line and still skin a corner. :)
KC
My Build: The Poet Creek Express Hybrid Foamie

Poet Creek Or Bust
Engineering the TLAR way - "That Looks About Right"
TnTTT ORIGINAL 200A LANTERN CLUB = "The 200A Gang"
Green Lantern Corpsmen
User avatar
KCStudly
Donating Member
 
Posts: 9640
Images: 8169
Joined: Mon Feb 06, 2012 10:18 pm
Location: Southeastern CT, USA
Top

Re: The Poet Creek Express - Foamie Hybrid

Postby felixx » Tue Dec 01, 2015 8:42 pm

Nice to see a bit of Kiwi over there
(Kauri Trivets)
http://www.doc.govt.nz/nature/native-plants/kauri/
Image

Caravan looks good too
felixx
Donating Member
 
Posts: 644
Images: 22
Joined: Sun Nov 30, 2014 3:01 pm
Location: Christchurch, New Zealand
Top

Re: The Poet Creek Express - Foamie Hybrid

Postby KCStudly » Tue Dec 01, 2015 9:58 pm

Thanks for posting and sharing the link. :thumbsup:

And thank you for the encouraging support! 8)
KC
My Build: The Poet Creek Express Hybrid Foamie

Poet Creek Or Bust
Engineering the TLAR way - "That Looks About Right"
TnTTT ORIGINAL 200A LANTERN CLUB = "The 200A Gang"
Green Lantern Corpsmen
User avatar
KCStudly
Donating Member
 
Posts: 9640
Images: 8169
Joined: Mon Feb 06, 2012 10:18 pm
Location: Southeastern CT, USA
Top

Re: The Poet Creek Express - Foamie Hybrid

Postby OP827 » Thu Dec 03, 2015 1:34 am

KC,
As I suspected the FG cloth tape you used in the test could be not suitable for lamination, but for lagging pipes etc as per this source, search for your description - http://www.insulation.org/mtl/pdfs/000045_228.pdf :
Light weight. Meets MIL-C-20079, Type 2,
Class 1; MIL-I-24244 and USCG 164.009.
Primarily used in Navy board

I would not use it for structural lamination unless you know exactly what kind of other stuff is added to it, like teflon for example.

Cheers.
User avatar
OP827
Donating Member
 
Posts: 1596
Images: 414
Joined: Fri Apr 25, 2014 7:27 pm
Location: Bruce County Ontario
Top

Re: The Poet Creek Express - Foamie Hybrid

Postby KCStudly » Thu Dec 03, 2015 8:55 am

Thanks for keeping an eye out for me and offering good input.

I looked up the actual spec here: http://everyspec.com/MIL-SPECS/MIL-SPECS-MIL-C/MIL-C-20079H_38616/

It says that it is untreated. Yes, it is lagging tape commonly used for navy board (heat and fire resistant insulated acoustic panels typically applied to bulkheads). I'm not sure why that would make much of a difference for where I was considering using it, just as reinforcement for the epoxy that would be sealing the plywood where my hatch seal is going to attach. I don't consider this to be a critical structural element; all of the strength here is coming from the adjacent rib, the plywood and the outer "vertical" wrap of the outer skin, which will definitely be the 6oz cloth. The only reason I went with extra plies was to have enough buildup for the back gouging operation; if it hadn't been for that, one ply would have been plenty to seal the surface.

It is a moot point anyway, since I have decided to use the 6oz here as well; already cut the cloth and prepped the prepreg setup. Again, the three plies are to ensure that the flap of skin is robust enough for the back gouging operation; the extra structural strength is just a bonus (while the extra weight is a minor hindrance).

Took last night off in order to make the wife's B-Day more special: wrapped her presents, did some house chores, made her favorite mac and cheese, and had a nice bottle of Merlot all decanted and ready for her when she got home from pottery. :D
KC
My Build: The Poet Creek Express Hybrid Foamie

Poet Creek Or Bust
Engineering the TLAR way - "That Looks About Right"
TnTTT ORIGINAL 200A LANTERN CLUB = "The 200A Gang"
Green Lantern Corpsmen
User avatar
KCStudly
Donating Member
 
Posts: 9640
Images: 8169
Joined: Mon Feb 06, 2012 10:18 pm
Location: Southeastern CT, USA
Top

Re: The Poet Creek Express - Foamie Hybrid

Postby Atomic77 » Thu Dec 03, 2015 10:51 am

Mac and Cheese and Merlot... You know how to party my friend!
Michael

"The Strength is in the Sum of the Parts..."

The Astroliner

Follow The Astroliner Blog Here!

Check out our YouTube video
User avatar
Atomic77
1000 Club
1000 Club
 
Posts: 1463
Images: 309
Joined: Tue Oct 08, 2013 5:29 pm
Location: Fort Wayne Indiana
Top

Re: The Poet Creek Express - Foamie Hybrid

Postby KCStudly » Thu Dec 03, 2015 11:19 am

I make the M&C from scratch using Cabot's "Seriously Sharp" cheddar cheese. It was one of the things on her wish list, so not just your ordinary blue box mix. The Merlot is necessary to... um... :roll: cut the cheese.

You know, on your palate. :lol:

This was just the mid-week casual "on the actual date" celebration. We will have an even nicer dinner out come the weekend.
KC
My Build: The Poet Creek Express Hybrid Foamie

Poet Creek Or Bust
Engineering the TLAR way - "That Looks About Right"
TnTTT ORIGINAL 200A LANTERN CLUB = "The 200A Gang"
Green Lantern Corpsmen
User avatar
KCStudly
Donating Member
 
Posts: 9640
Images: 8169
Joined: Mon Feb 06, 2012 10:18 pm
Location: Southeastern CT, USA
Top

Re: The Poet Creek Express - Foamie Hybrid

Postby Atomic77 » Thu Dec 03, 2015 1:18 pm

That's awesome KC...
Michael

"The Strength is in the Sum of the Parts..."

The Astroliner

Follow The Astroliner Blog Here!

Check out our YouTube video
User avatar
Atomic77
1000 Club
1000 Club
 
Posts: 1463
Images: 309
Joined: Tue Oct 08, 2013 5:29 pm
Location: Fort Wayne Indiana
Top

Re: The Poet Creek Express - Foamie Hybrid

Postby KCStudly » Sat Dec 05, 2015 12:33 am

I’ve mentioned on a few occasions that there is a trap door over the stairs to the loft. This is a big heavy 2x4 framed panel with 1x10 T and G planks on either side filled with bat insulation. It allows Karl to heat the main shop more efficiently, preventing total loss of the heat from the wood stove out thru the vented eaves that are at floor level in the loft. Another advantage to closing the door is that it helps keep metal fab dust, debris and smoke from drafting up into the loft. There’s always a little bit leaking thru, but when he’s doing a lot of grinding and welding on steel, with the trap door open it can get pretty nasty.

The door is maybe 5 ft x 9 or 10 ft long, hinged along the long edge on the outside wall. It uses 30 lbs of barbell weights, 550 paracord and three pulley sheaves to counterbalance and assist with lifting. Two of the pulleys route the cord to a point where the weight can travel freely in a vertical path, while the other one doubles up the pull on the door with the tag end anchored back up at the rafters. Karl has often said that he worries about failure when passing thru the door because you have to be in the way of it when pulling it down behind you. Lifting it on the way up is less hazardous because you are already under it and can just lean a shoulder into it and walk up the stairs, but to get started closing you have to be in the path of the door.

Well the other day when Karl was headed down one of the bent eye bolts anchoring the pulley to the door broke at the shank. The pulley went flying and the corner of the door caught Karl in the forehead ringing his bell pretty good and giving him a decent contusion. He’s okay, but it could have been worse.

So last night (Thursday) I decided that we needed to make a better solution. The anchor point on the door is subjected to loading that constantly changes direction while cycling, which is probably why the shank of the original eye bolt failed flush with the wood; it yielded enough in each cycle to work harden and fail. To remedy this we punched four anchor holes in a base plate and welded a 3/8 inch loop so that the pulley can track and change angle without prying on the anchor. Problem solved, although it took away some build time.
Image

Back on the build, I’m working toward glassing the sealing lip and bumper of the hatch. I decided that the ends of the hatch hinge spar needed to be softened a bit more to let the glass wrap around better. The ends of the spar have a 3/4 inch round over on the front lower edge to allow the seal to run continuously up under the hinge (I should have made this radius even bigger to maybe keep the ‘D’-shape seal from collapsing, but it is what it is now). Originally I had only made the round over a little wider than the seal, then just chamfered the resulting corner about 3/8 inch and blended them a little. I worked them a little more by hand and got to here.
Image
Image

Then I switched back to the hatch edge fiberglass test piece and cut out some swatches, but I ran out of time before being able to lay them up.
Image

Tonight I decided to work the spar ends some more to where I am happy with them and they shouldn’t need any filleting to let the glass lay down around the compound shape. You can also see the small gap between the edge of the rabbet in the spar and the edge of the inner hatch skin ply that will need to be filled.
Image
Image
Image
Image
Image

Wishing that I could improve my step-by-step epoxy sequencing I had gone thru the little details earlier in the day and wrote down a list of the things that I wanted to get done tonight so that they would be cured and ready for tomorrow’s work. I even looked at the list a couple of times before the pilgrimage.

Now I have to tell you that I am pretty bad about following a list. When I go shopping with a list I will typically look at it a few times when I get there, but then get in a groove and fail to check it over good before reaching the checkout. Usually I miss something that is on the list, even when I have it on me.

Same thing happened tonight. I thought I had left the list on my desk and didn’t even look to see if it was in my lunch box/man purse/’briefcase’/tote bag. I’ll explain further in a minute.

Anyway, I set into completing the flox corner experiment. The calculations called for 0.4oz of resin so I rounded up to 0.5 to account for any that would soak into the wood and foam. Since a full pump is about 0.75oz, I used the small dosing scale to measure instead. I must be doing something right because by the time I was done I had a dry cup and just barely enough to wet everything thoroughly, but completely. It was nice to be working on small patches, instead of a larger layup, where I could really concentrate on wetting very thoroughly, but without being too rich anywhere. Here’s the layup over the foam on the section with the 6oz applied to the underside of the ply first. You can see the white line of flox along the edge of the ply thru the layup.
Image

On the middle two sections I didn’t bother using the tape and went right to 2 plies of the 6oz for both.
Image

Here’s the last section that had the tape under the ply. This little piece of glass cloth was from the stuff that Karl donated and had some staining on it from being stored under the eaves of the loft. I wouldn’t have used it anywhere that mattered, but for this test I figured big whoop.
Image

Another 0.25oz of resin (0.30oz with hardener) and about a Tbls of 403 filler was mixed and used to fill those gaps and the temporary screw holes at the hinge spar.
Image
Image

At the bottom of the sealing lip where the inner skin ply meets the bumper sill assembly there was some very slight unevenness, so I smeared a bit of filler across all of it. Maybe the wet epoxy and cloth would have made it without any trouble, but I wanted to be damn sure here. (Note the sharp cornered edges on the ends of the inside face of the bumper.)
Image
Image

On the outside face of the curbside of the bumper there is a dark streak in the poplar where a knot wanted to be. One little spot had a small void there, so I smeared that, too (hatch lying on its back upside down here).
Image

That was about the time I remembered that I had intended to chamfer those front outside corners of the bumper so that I could build up some filler there. This would allow me to sand it back square tomorrow so that I could wrap the end of the bumper glass around on itself all in one layup and still have a sharp flox corner on the edge. Oh well, I’ll figure out something; didn’t want to disturb the wet faired areas there now.

Final act for this evening (Friday) was to sand out the excess epoxy filler at the wire pull hole in the underside of the tongue box.
Image

Had to look and see how it will be with the 3-way pull box mocked up (the branch leg of the box goes up thru the hole... down in pic).
Image
Image

Later at home it occurred to me that I can use 5 minute epoxy with filler to fix those bumper corners in the morning, and then move onto the planned layups without delay.
KC
My Build: The Poet Creek Express Hybrid Foamie

Poet Creek Or Bust
Engineering the TLAR way - "That Looks About Right"
TnTTT ORIGINAL 200A LANTERN CLUB = "The 200A Gang"
Green Lantern Corpsmen
User avatar
KCStudly
Donating Member
 
Posts: 9640
Images: 8169
Joined: Mon Feb 06, 2012 10:18 pm
Location: Southeastern CT, USA
Top

PreviousNext

Return to Foamies

Who is online

Users browsing this forum: jgmahoney and 11 guests