The Poet Creek Express - Foamie Hybrid

Canvas covered foamies (Thrifty Alternatives...)

Moderator: eaglesdare

Re: The Poet Creek Express - Foamie Hybrid

Postby Sheddie » Sat Dec 26, 2015 1:29 pm

Fabulous spread as usual in the KC, extended household! :R :wine:
Now you can head to the workshop, I am keen to see the glass going on the main body. :D
User avatar
Sheddie
1000 Club
1000 Club
 
Posts: 1499
Images: 1129
Joined: Mon Jul 01, 2013 3:26 pm
Location: Whangarei, New Zealand

Re: The Poet Creek Express - Foamie Hybrid

Postby Mary C » Sat Dec 26, 2015 7:43 pm

yum, yum, everything looks wonderful. i am Impressed with the food and your mothers wonderful table. Her quilt with the trees is especially impressive her work is so nice. Mom you do great work!! Merry Christmas!

Mary C.
User avatar
Mary C
1000 Club
1000 Club
 
Posts: 1776
Images: 473
Joined: Mon Oct 15, 2012 6:29 pm
Location: Waco, Georgia

Re: The Poet Creek Express - Foamie Hybrid

Postby KCStudly » Sat Dec 26, 2015 10:19 pm

As you all know, mom is a regular follower of the build and I am sure that she appreciates the kind words.

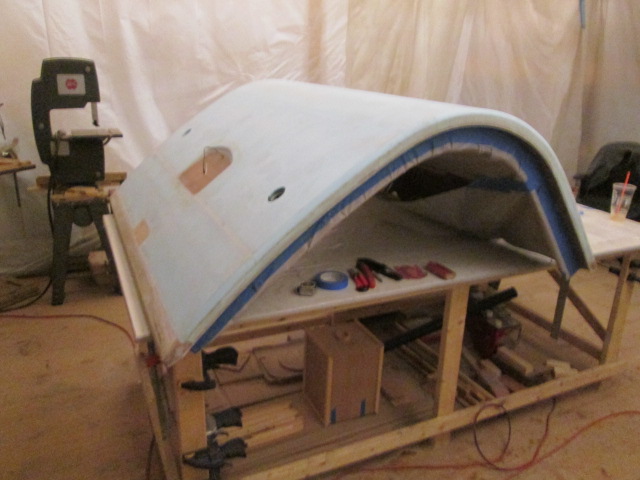
Moving on with prep for remounting the hatch to the cabin, I managed to turn the hatch around on the bench by lifting it up from the hinge side so that the already glassed (and therefore scratch resistant) bumper could be dragged on the table w/o concern. Then I just walked it around the bench to turn it around.
Image

This gave me better access to the license plate recess and to do a better job sanding the fairing at the bumper glass edge.
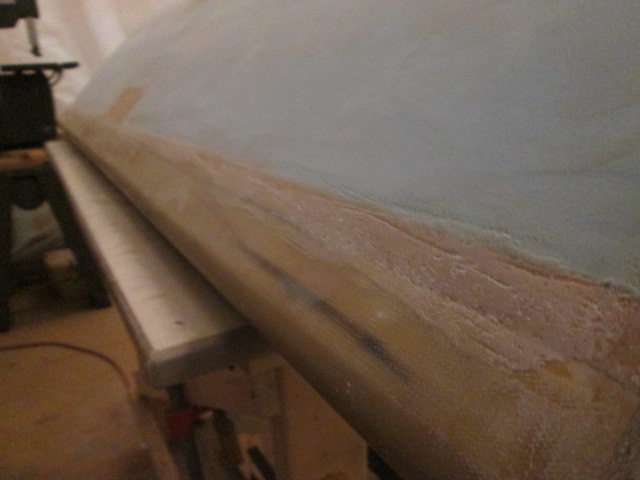
Image

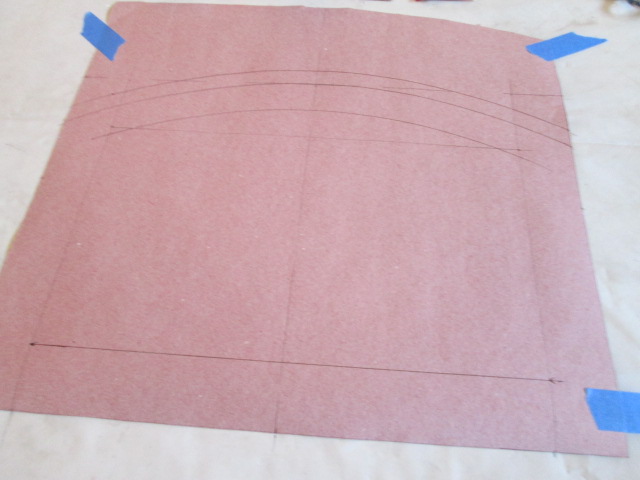
Next I made an oversize template for the license plate recess. The extra piece of blue tape represents the center of the top arc, which I matched to the hatch using the same trammel stick I had used to mark the foam before carving. Then I stepped it off further for the glass to extend out.
Image
Image

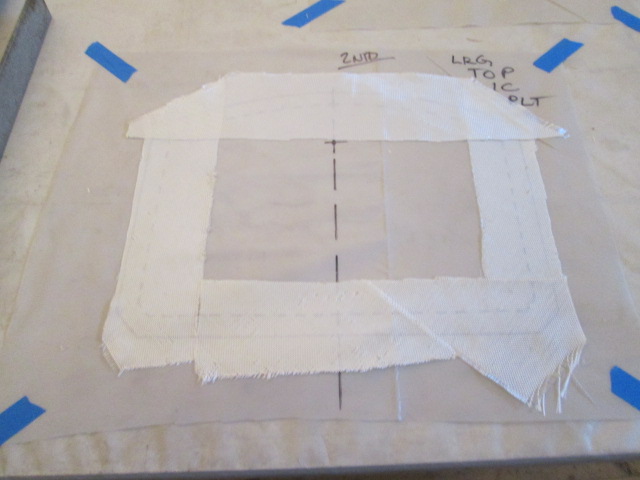
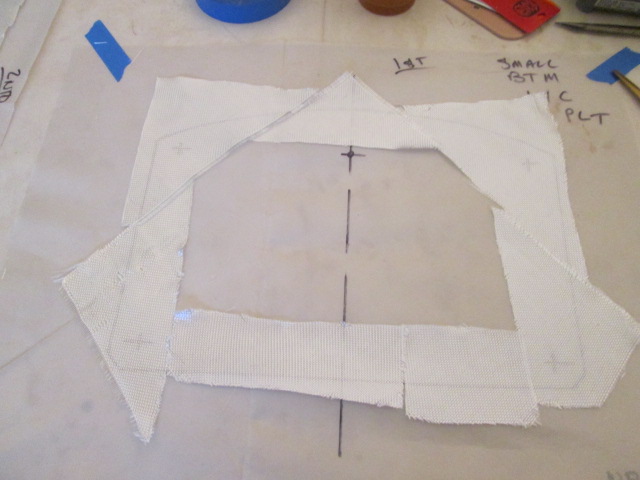
I’m going to try and step the two plies of bias cloth out and us the PMPP technique as I hinted at before, using a single ply PMPP to place the smaller ply over the larger, then cutting it all out and laying it down using the larger plastic cut out to help place it all. To that end I traced the template onto the plastic for the wider ply; then cut the template down by about 3/4 inch all the way around and traced it onto the plastic for the smaller step, adding centerlines and a few reference points to both in order to help line them up.

Again, I’m trying to avoid cutting random bits from the big roll of glass so as not to end up short on the big lengths. I did allow extra when purchasing, but until I layout and rough cut the big layups, I’m not comfortable snipping away at the roll for these smaller tasks, especially since bias cuts take up more yardage. This drove me to try and piece out the license plate border from scraps. I didn’t have enough to fill in the whole field, but since the plate is backed by a 5mm ply insert, that is less of a concern; and it might be easier to get the fibers to wrap the contour better as strips, rather than a full panel. At least that was my thinking at the time. Here is the wider ply border pieced together from bias cuts.
Image

And here is the smaller ply pieced together, again just the border of the plate recess where it transitions from the hatch arch profile to the flat surface of the plate mount.
Image

I’m a little concerned that this pieced together method could all go south and be more trouble than it is worth. Plus I figured this was a small layup and rather than stinking up the joint, I should get the cabin side hinge spar set up before I started mixing epoxy.

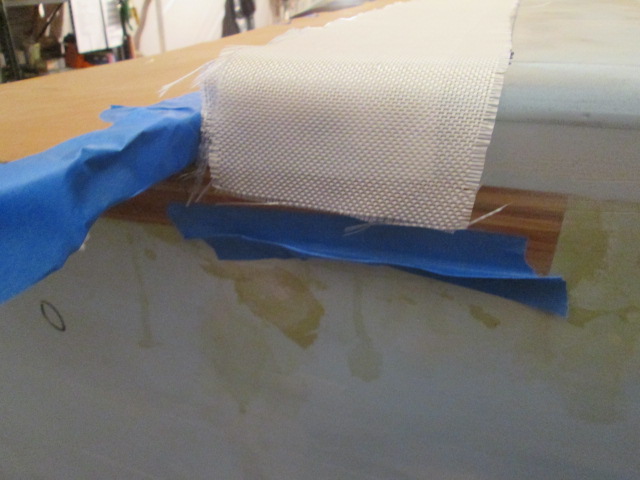
I had already masked the back of the hinge spar with blue tape, but I needed to protect the galley walls and upper shelf face frame; so I laid a stick of the Red Grandis scrap (that I had been using as a temporary hatch prop rod) across the upper end of the galley walls. This helped support some cardboard panels along the leading edge. That I then taped to the back of the spar. Another small scrap of cardboard propped up on the shelf frame supported the back middle of the cardboard splash shelf where the two pieces overlapped. On the side walls under the point where the glass would wrap onto the wall I formed drip edges using 2 inch wide blue tape, and also taped the part of the Red Grandis sticking past the wall to keep it from getting goobered up.

Once that was all set up I found an old block with a nub already screwed on, that I could quickly turn into a scribe; and marked a guideline for the wider of the two glass strips. Then I cut the block back and marked another line for the narrower of the two strips. The nubby block gauged from the back edge of the hinge spar.
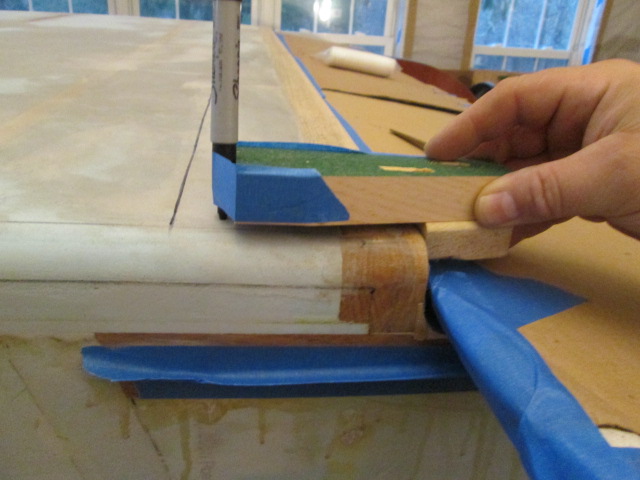
Image

At first I laid the 5 inch wide strip of cloth down first and then the 4 inch wide strip over it, adding in a couple of extension pieces to make up for the 60 inch long strips; but then I remembered a technique that I learned from the Rutan builders that I keep intending to use. By flipping the wider strip on top, the rough edge from the narrower strip will automatically be faired and the rough nubbies along the edge of that strip won’t stick up. Here it is dry on dry before I added some toothpicks to help hold it all in place during the wet out.
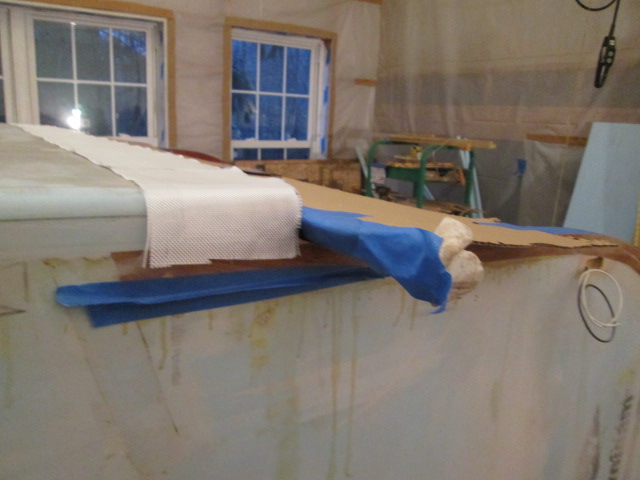
Image

You can see the cardboard drip edge masking shelf better in this shot.
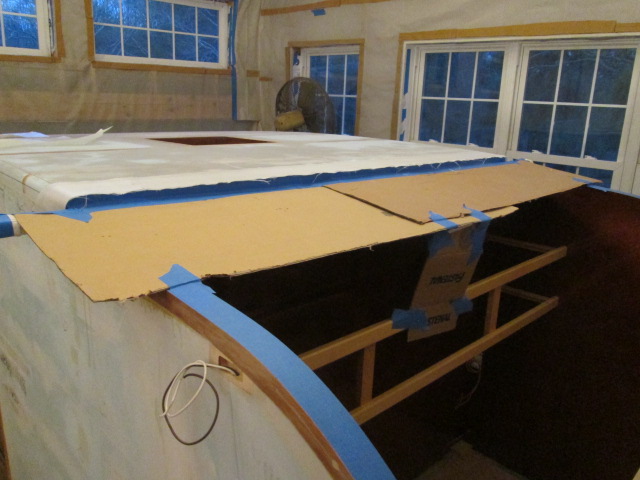
Image

Here you can see the narrower strip under the wider, the butt joint at the extension piece, and a little better look at the tape drip edge on the side wall.
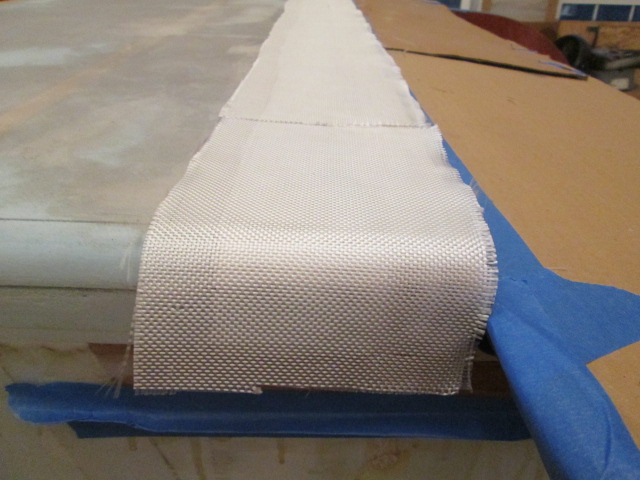
Image

Same thing on the curb side.
Image

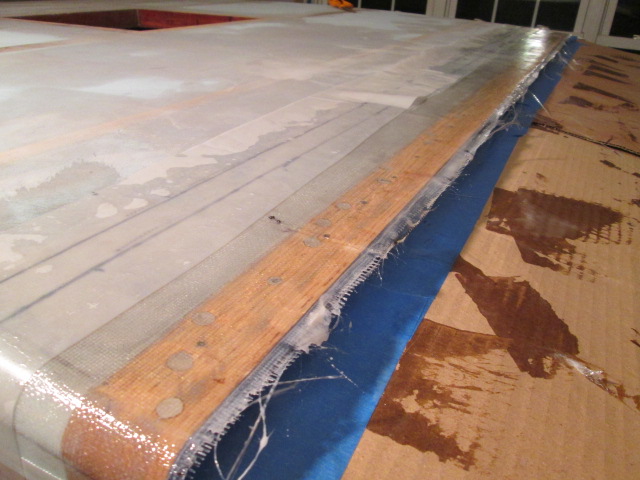
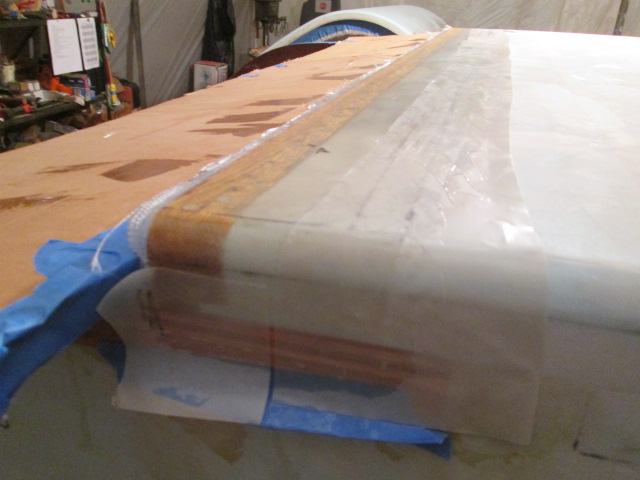
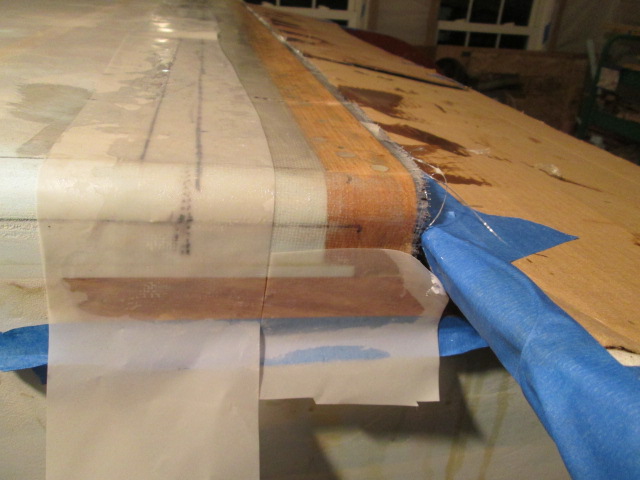
I decided to layup the cabin hinge glass first, since it was a little more straight forward and, by this time, I wasn’t sure how far I was going to get with the license plate. Here I have wet it out, pulled the toothpicks, and laid some strips of the 6mil plastic along the edges of the layup as a poor man’s peel ply. That should reduce the amount of raised nubbies along the cut edge of the glass cloth and reduce the amount of sanding required later to get it faired for the next step.
Image
Image
Image

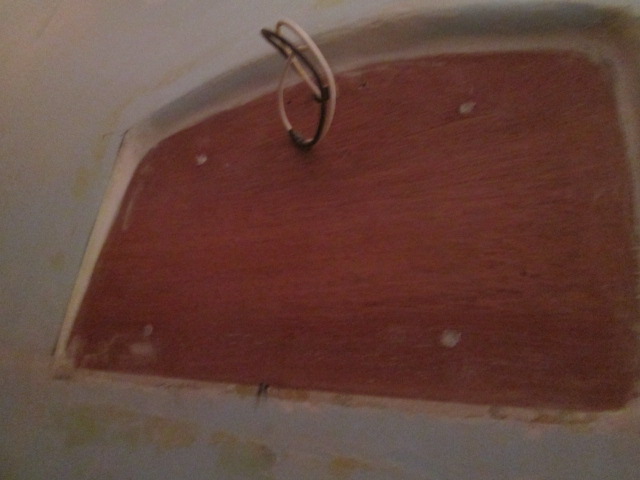
I decided to sleep on the License plate layup. I poked around in my scrap bag and found a bigger rectangular piece that I thought had been unbiased, but found it was actually on the 45, so I may redo that setup, or maybe just fill in the middle of the plate panel to help stabilize the other bits and pieces during the wet out phase. If it all goes south I can just peel it up and keep trying until I figure out what is going to work in that area. Sorry I didn’t take a current pic of the license plate recess. Let me dig one up from the archives… ah, here we go. You can kind of see the shape and contoured border here.
Image

We’ll see if I get out to the build tomorrow. I traditionally make a nice Boxing Day brunch for the wife and me, but she had to work today so that will get pushed off until tomorrow. That and we are going to try and go see the new Star Wars movie, so we’ll see if there is a window in there somewhere for some build time.

One step at a time.
KC
My Build: The Poet Creek Express Hybrid Foamie

Poet Creek Or Bust
Engineering the TLAR way - "That Looks About Right"
TnTTT ORIGINAL 200A LANTERN CLUB = "The 200A Gang"
Green Lantern Corpsmen
User avatar
KCStudly
Donating Member
 
Posts: 9640
Images: 8169
Joined: Mon Feb 06, 2012 10:18 pm
Location: Southeastern CT, USA
Top

Re: The Poet Creek Express - Foamie Hybrid

Postby Atomic77 » Mon Dec 28, 2015 9:57 am

Glad you had a nice holiday. Your meals always look gourmet!
Michael

"The Strength is in the Sum of the Parts..."

The Astroliner

Follow The Astroliner Blog Here!

Check out our YouTube video
User avatar
Atomic77
1000 Club
1000 Club
 
Posts: 1463
Images: 309
Joined: Tue Oct 08, 2013 5:29 pm
Location: Fort Wayne Indiana
Top

Re: The Poet Creek Express - Foamie Hybrid

Postby KCStudly » Mon Dec 28, 2015 1:03 pm

Hope you had a good one, too. Thanks.

Mom has been an amateur gourmet chef for many, many years now, clipping recipes out of newspapers, magazines and online; self taught. For many years mom has been the ring leader (it seems to me) of a "gourmet club" of folks that met back in their "singles club" days, many of whom have now coupled up. They used to get together several months out of the year and collaborate, but the last couple of years I think that has dwindled down. Dad could always figure out what he had on hand and somehow make something good out of it; usually a one pot dish. We were all big fans of Julia Child back in the day, too; she was a big influence on the whole nation teaching people classic french techniques.

From all of this I have fostered a great appreciation of good food made from good fresh ingredients; and I am grateful for it.

Mom tends to try out a lot of new recipes, and usually sticks pretty close to them the first time thru, but she also knows where she can adapt and change things. When I want to try cooking something new, I usually look at a few recipes online, then pick and choose the techniques and ingredients that I see fit; kind of a mixture of my mom's and dad's techniques. I like to say when you have stopped following the recipe, then you are truly cooking. You don't need to follow a recipe exactly. When you use your preferred techniques, fresh ingredients and your taste buds to create something delicious, then you are cooking.
KC
My Build: The Poet Creek Express Hybrid Foamie

Poet Creek Or Bust
Engineering the TLAR way - "That Looks About Right"
TnTTT ORIGINAL 200A LANTERN CLUB = "The 200A Gang"
Green Lantern Corpsmen
User avatar
KCStudly
Donating Member
 
Posts: 9640
Images: 8169
Joined: Mon Feb 06, 2012 10:18 pm
Location: Southeastern CT, USA
Top

Re: The Poet Creek Express - Foamie Hybrid

Postby KCStudly » Tue Dec 29, 2015 12:19 am

Cabin side hinge glass came out pretty good. Overall not quite as nice as the hatch side, but the plastic peel ply worked really well at keeping the nubbies down along the edges. It did create some puckers and waves where the plastic had some creases and flaws in it; and a slight ridge along the edge of the plastic were it met the cloth, but the advantages were better than the disadvantages. I could have done a better job squeegeeing the edge out, but all in all I’m happy with it.

Clean up consisted of pulling the plastic off (easy); rough trimming the back edge of the glass off with a razor knife; scraping it a little closer to the spar with the paint scraper; and sanding it the rest of the way with the small block. Then there was the standard amine cleanup with water and greenie pad; a little more sanding with a radius block in the corners; and some light sanding up top to take down the ridge lines from the plastic (which was still quicker and easier than having to sand nubbies). In the third pic you can kind of see how the weave in the areas under the plastic is pretty much full with cured epoxy, whereas the area that wasn’t covered by plastic is fully textured with the weave pattern.
Image
Image
Image
Image

Now I’m trying to decide if it’s worth the effort to dry fit the hatch to confirm the glass hasn’t affected the fit enough to mess with the hinge screw locations, or if I can get away with drilling the holes back out now while everything is easier to reach. Since I have only run the cloth over the existing holes and didn’t fill them in it’s not like I’m going to change their location, even if I wanted to; so I’m thinking I’ll just drill them out and see what I get (crossed fingers).
KC
My Build: The Poet Creek Express Hybrid Foamie

Poet Creek Or Bust
Engineering the TLAR way - "That Looks About Right"
TnTTT ORIGINAL 200A LANTERN CLUB = "The 200A Gang"
Green Lantern Corpsmen
User avatar
KCStudly
Donating Member
 
Posts: 9640
Images: 8169
Joined: Mon Feb 06, 2012 10:18 pm
Location: Southeastern CT, USA
Top

Re: The Poet Creek Express - Foamie Hybrid

Postby Sheddie » Tue Dec 29, 2015 2:43 am

KCStudly wrote:Now I’m trying to decide if it’s worth the effort to dry fit the hatch to confirm the glass hasn’t affected the fit enough to mess with the hinge screw locations, or if I can get away with drilling the holes back out now while everything is easier to reach. Since I have only run the cloth over the existing holes and didn’t fill them in it’s not like I’m going to change their location, even if I wanted to; so I’m thinking I’ll just drill them out and see what I get (crossed fingers).

My thoughts here would be, you have spent this much time creating perfection, the little bit of time and effort to check it first is well worth it. ;)
User avatar
Sheddie
1000 Club
1000 Club
 
Posts: 1499
Images: 1129
Joined: Mon Jul 01, 2013 3:26 pm
Location: Whangarei, New Zealand
Top

Re: The Poet Creek Express - Foamie Hybrid

Postby Ned B » Tue Dec 29, 2015 4:39 am

Sheddie wrote:My thoughts here would be, you have spent this much time creating perfection, the little bit of time and effort to check it first is well worth it. ;)


KC just as Sheddie says, you'll kick yourself if you don't .
User avatar
Ned B
1000 Club
1000 Club
 
Posts: 1036
Joined: Sat Apr 16, 2011 10:25 am
Location: Syracuse NY (ish)
Top

Re: The Poet Creek Express - Foamie Hybrid

Postby dales133 » Tue Dec 29, 2015 4:59 am

Yep i would.
The canvas changed the tollerances on my hatch clearance a bit but as it happens im actualy pretty happy for the most part but check it now while youve got avenues to correct it.
You cant when its done without redoing alot of work
User avatar
dales133
4000 Club
4000 Club
 
Posts: 4605
Images: 1
Joined: Mon Oct 13, 2014 5:26 pm
Top

Re: The Poet Creek Express - Foamie Hybrid

Postby KCStudly » Tue Dec 29, 2015 7:44 am

Oh for sure I will most likely have to make adjustments to the fit between the hatch and walls. I am expecting that. But if I end up having to make an adjustment at the hinge I figure I will have to drill out all of the screw holes over size and fill them with thickened epoxy in order to move the screws what would probably be half a hole. So at this point, if things line up well, it is easier to drill thru the skin over the holes now (the holes are already there... I suppose I could have gotten away with only drilling every other hole during test fitting).

Another option that is just occurring to me, I still need to drill (or punch) the second pattern in the hinge for the rain seal trim. Push come to shove I could swap things around and use the second pattern for mounting the hinge, and revert to the OEM pattern for the trim (except that would require the second pattern to be countersunk, whereas the trim pattern doesn't need to be). I'll have to think about that.
:thinking:

My original plan was to offset the location of the hinge hole pattern side to side when I cut it to final length, allowing the trim hole pattern to be symmetrical from side to side. Unfortunately I spaced out and made the length cut w/o compensating for this, so the hinge hole pattern is currently centered. I suppose I could buy another length of hinge, offset cut it so that the OEM countersunk holes find new oak and the second trim pattern lands on the existing screw holes (since it is easier to drill or punch a clean hole than it is to get countersunk holes to come out flush in thin stock).
:thinking:

On the plus side, Karl has got the CNC mill drilling series of holes for cable railing posts, so making the trim with accurately placed holes should be no problem!
Last edited by KCStudly on Sat Aug 15, 2020 12:19 am, edited 1 time in total.
KC
My Build: The Poet Creek Express Hybrid Foamie

Poet Creek Or Bust
Engineering the TLAR way - "That Looks About Right"
TnTTT ORIGINAL 200A LANTERN CLUB = "The 200A Gang"
Green Lantern Corpsmen
User avatar
KCStudly
Donating Member
 
Posts: 9640
Images: 8169
Joined: Mon Feb 06, 2012 10:18 pm
Location: Southeastern CT, USA
Top

Re: The Poet Creek Express - Foamie Hybrid

Postby GPW » Tue Dec 29, 2015 1:17 pm

When you know things are going right !!! “ Karl has got the CNC mill “ ... :thumbsup: 8) :D
There’s no place like Foam !
User avatar
GPW
Gold Donating Member
 
Posts: 14920
Images: 546
Joined: Thu Feb 09, 2006 7:58 pm
Location: New Orleans
Top

Re: The Poet Creek Express - Foamie Hybrid

Postby KCStudly » Wed Dec 30, 2015 11:33 pm

Tuesday the weather turned cold and we had our first round of wintry mix waking up to about 3/4 inch of mushy slush. Today was pretty cold, too, only high thirties in the loft, so too cold to consider doing the epoxy on the license plate recess.

Frankly, between my day at work and the cold, I almost didn’t go to the shop; and when I got there I was unmotivated to try to find a work around project.

I did drill thru the glass to open up the hinge screw holes on the cabin side hinge spar, and did a little nit-pick sanding here and there on the hatch bumper; but mostly I just walked around the build contemplating.

I’m back to wanting to fix the dip in the curb side wall top, and I think I have a plan to improve my under counter storage options in the galley.

The theme for all of the cabinet face frames has always been three spaces side by side separated visually at the face frames by two stiles. In the galley the spacing was determined by the width needed for the cooler tray with a bulkhead partition between the cooler bay and the rest of the under counter space (with the cooler bay on the street side of the galley). The larger bay has a free standing stile spaced the same distance from the curb side wall providing a symmetrical appearance. This stile is also structural, helping to support the relatively long span of the counter rail.

There is a lot of available storage space in the wide bay under the counter, but the stile would really limit the size of the items that could pass thru to this space. For example, I’d really like to hang the portable solar panel and side wing tables lying flat under the counter (leaving the floor space open for totes), but neither of those items would fit past the stile.

So in this contemplative state, I came up with a plan to make the stile removable. I’ll cut the stile away from the frame; add a tab to the top of it to engage a clip behind the counter rail; and put a small sliding bolt latch at the bottom back of the stile to lock it into a striker plate let into the floor. That way I can easily reach behind the stile, lift the bolt and tip the stile out for loading and unloading; and still have the stile there for support and appearance otherwise.
KC
My Build: The Poet Creek Express Hybrid Foamie

Poet Creek Or Bust
Engineering the TLAR way - "That Looks About Right"
TnTTT ORIGINAL 200A LANTERN CLUB = "The 200A Gang"
Green Lantern Corpsmen
User avatar
KCStudly
Donating Member
 
Posts: 9640
Images: 8169
Joined: Mon Feb 06, 2012 10:18 pm
Location: Southeastern CT, USA
Top

Re: The Poet Creek Express - Foamie Hybrid

Postby KCStudly » Thu Dec 31, 2015 3:35 pm

I ordered the hatch actuator controller today. I narrowed it down to the basic Northern Tool unit or the fancier Dakota Digital. The Dakota Digital unit has all of the same features plus a nice billet aluminum trimmed control switch, but the Northern Tool version was $30 cheaper with a simple black plastic whip. I plan to mount the control whip (3 button wired remote) discreetly on the inside of the cabin where it will be easier to program and can act as a backup switch, but will use an exterior mounted weatherproof rocker switch as the primary controller thru the remote switch preset feature (momentary ground to trigger the controller to drive the actuators to preset positions; in my case, open or closed). So I figured there was no reason to pay extra for the billet and went with the NT unit.

Northern Tool Linky
KC
My Build: The Poet Creek Express Hybrid Foamie

Poet Creek Or Bust
Engineering the TLAR way - "That Looks About Right"
TnTTT ORIGINAL 200A LANTERN CLUB = "The 200A Gang"
Green Lantern Corpsmen
User avatar
KCStudly
Donating Member
 
Posts: 9640
Images: 8169
Joined: Mon Feb 06, 2012 10:18 pm
Location: Southeastern CT, USA
Top

Re: The Poet Creek Express - Foamie Hybrid

Postby KCStudly » Thu Dec 31, 2015 3:40 pm

Forgot to mention, it also has a high current feature so that if the hatch attempts to close on an immovable object, or meets resistance along the way, it will reverse direction and stop.
KC
My Build: The Poet Creek Express Hybrid Foamie

Poet Creek Or Bust
Engineering the TLAR way - "That Looks About Right"
TnTTT ORIGINAL 200A LANTERN CLUB = "The 200A Gang"
Green Lantern Corpsmen
User avatar
KCStudly
Donating Member
 
Posts: 9640
Images: 8169
Joined: Mon Feb 06, 2012 10:18 pm
Location: Southeastern CT, USA
Top

Re: The Poet Creek Express - Foamie Hybrid

Postby dales133 » Thu Dec 31, 2015 4:35 pm

Sounds good KC,i cant wait to see it work.
Was one thing i was thinking about long and hard and regret not doing to an extent but with my electrical,maths and metal fabrication skills was probably wise to avoid it.
Ive been trying to keep up but due to being busy i confess ive skim read a bit... how much more glass have you got to go
User avatar
dales133
4000 Club
4000 Club
 
Posts: 4605
Images: 1
Joined: Mon Oct 13, 2014 5:26 pm
Top

PreviousNext

Return to Foamies

Who is online

Users browsing this forum: jgmahoney and 6 guests