KCStudly wrote:You're welcome. re: the length of the cleats, I would do full length. With multiple smaller blocks you would have to worry about lining them up. The cleat idea is an easy way to avoid rabbets and dadoes if you are building using simple ply construction. If you are doing a stick built wall or skeleton core, then Sharon's method would be better.
If I may, to simplify what Sharon was describing on her build, she used a frame built wall and let the outer skins overlap at the edges like a flap so that she could screw thru that flap into the abutting frame. Along the tops of the side walls she let the outer ply run high, then nested the ceiling and roof frame assembly down inside the outer skins up on top of the side wall frames; screwing thru the outer side wall skin flaps into the roof frame. Then she trimmed the excess side wall skin off flush to the roof frame and skinned over the whole roof and side walls. It's a good way to go for a stick built and makes a "knit" corner joint (my word for it anyway).
It's an easier way to make the same kind of joint as a rabbet without making a dedicated router cut (although a router with a flush cutting roller guided bit would be the perfect way to trim the little bit extra material left outside of the profile line before putting the roof skin on, or left hanging over the sides on the roof skin... it is a lot easier to trim a little off after assembly and make a joint perfectly flush than it is to try and cut and assembly it exactly; even harder to add back if things come up short. So leave a little extra on the side that is easy to trim or sand and take that off after things have cured.
S. Heisley wrote: I guess I was too detailed.
mariannf wrote:
To my very novice mind the cleat idea (got it KC running the whole length of the joint) sounds the most understandable and doable to me. I also got this reply in another thread:
"Probably the best way is to rout a channel,but not the easiest.I used 3/4 inch C channel aluminum attached to the outside wall with small screws and adhesive.
Then i slid the "bulkhead " in place and used small screws to secure to the C channel."
This too is an approach that I can see taking on: 3/4 c channel attached to the sidewalls, and then the bulkhead wall lowered in to it and screwed. I would value your opinions on this. Based on prior comment i could see how it might raise a similar issue as with the idea of using angle ties.
S. Heisley wrote:mariannf wrote:
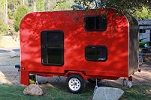
Mariann, did I misunderstand you? Are you asking how to attach the sides to the deck or are you asking how to attach the sides to the front, back, and top? To attach the sides to the deck, I used PL construction glue and cleats; but, I did not use a continuous cleat, as that is not necessary. I strategically placed my cleats in places that would later be hidden from view. You can see them in the picture, previously posted. PL construction glue does a wonderful job of attaching as well as filling in any gaps. Remember that, while screws are good and often necessary, the more screws you put in the wood, the harder it will be to attach other things later on because you will have used up so much space with the screws that you have already put in; and, you could run into a screw when you try to attach something else. A few sturdy cleats (not continuous) can also be very helpful because they can help keep your wall at a 90 degree angle to the deck. Please remember also that metal, such as C channel, is quite heavy and adds weight.
mariannf wrote:S. Heisley wrote:mariannf wrote:
Mariann, did I misunderstand you? Are you asking how to attach the sides to the deck or are you asking how to attach the sides to the front, back, and top? To attach the sides to the deck, I used PL construction glue and cleats; but, I did not use a continuous cleat, as that is not necessary. I strategically placed my cleats in places that would later be hidden from view. You can see them in the picture, previously posted. PL construction glue does a wonderful job of attaching as well as filling in any gaps. Remember that, while screws are good and often necessary, the more screws you put in the wood, the harder it will be to attach other things later on because you will have used up so much space with the screws that you have already put in; and, you could run into a screw when you try to attach something else. A few sturdy cleats (not continuous) can also be very helpful because they can help keep your wall at a 90 degree angle to the deck. Please remember also that metal, such as C channel, is quite heavy and adds weight.
Hi Sharon, you understood correctly I believe. I was asking about wall to wall attachment. I referenced the link you sent in your follow up email when looking at methods for doing this so I am OK on that front.
Thanks!
KCStudly wrote:I think we are trying to say that the router method, or knit corner is very much preferred. One really shouldn't be afraid of routers (except for a healthy dose of safety awareness, as with all power tools). The only real difference in handling a router is that it can go in any direction, whereas the tools you are already familiar with, such as the circular and jig saws, tend to go more in a line. So with a router you have to use straight edges, guide collar jigs, trammels and/or roller guided bits to get the cutting path to go where you want it. A little more setup time and effort, but all easy concepts to grasp, and well documented on the interwebs.
They are one of the most versatile wood working tools available. I have five of them.Can't count the number of times I have used them on my build, it's too many.
As Sharon has pointed out, building a box using full length cleats will result in a much less refined appearance that may be more utilitarian than some people would prefer, but is still a viable option for someone who has expressed a lack of design and fabrication skills.
On the flip side, Mariann, if I may be so bold as to speak for the group, we all have seen a lot of people (sometimes ourselves included) who come on here with some trepidation and end up finding out that they (we), too, can build a surprisingly impressive small camper. That's why we think you can do it, too.
So don't sell yourself short. As Henry Ford once said (paraphrased), "If you think you can't, you are right."
Users browsing this forum: No registered users and 3 guests