The Poet Creek Express - Foamie Hybrid

Canvas covered foamies (Thrifty Alternatives...)

Moderator: eaglesdare

Re: The Poet Creek Express - Foamie Hybrid

Postby GPW » Thu Apr 07, 2016 4:13 pm

Sean, no worries , another five years and he’ll be all caught up ... :R :lol: :lol: :lol: :lol: :lol: :lol:
There’s no place like Foam !
User avatar
GPW
Gold Donating Member
 
Posts: 14920
Images: 546
Joined: Thu Feb 09, 2006 7:58 pm
Location: New Orleans

Re: The Poet Creek Express - Foamie Hybrid

Postby KCStudly » Thu Apr 07, 2016 5:37 pm

Yeah, and right after that GPW will finish putting the drip edge on the FoamStream. :R :lol: :lol: :lol: :lol: :R
KC
My Build: The Poet Creek Express Hybrid Foamie

Poet Creek Or Bust
Engineering the TLAR way - "That Looks About Right"
TnTTT ORIGINAL 200A LANTERN CLUB = "The 200A Gang"
Green Lantern Corpsmen
User avatar
KCStudly
Donating Member
 
Posts: 9640
Images: 8169
Joined: Mon Feb 06, 2012 10:18 pm
Location: Southeastern CT, USA

Re: The Poet Creek Express - Foamie Hybrid

Postby GPW » Fri Apr 08, 2016 6:22 am

I dunno’ that’s asking a lot eh KC ? ..... hahahahahahaha :lol: :lol: :lol:

Sean , it’s not the size of the thread ( unless you’re trying to convince folks to read it ) , it’s the “sincerity" of the build ... :thumbsup: 8) :D
There’s no place like Foam !
User avatar
GPW
Gold Donating Member
 
Posts: 14920
Images: 546
Joined: Thu Feb 09, 2006 7:58 pm
Location: New Orleans
Top

Re: The Poet Creek Express - Foamie Hybrid

Postby tony.latham » Fri Apr 08, 2016 10:55 pm

Here we are this week––25 miles southeast of Poet Creek, Idaho.

Jeeeeez, it was sweet. Had the place all to ourselves. Plan A was a one-nighter. We spent two.

Image

Image

Image

:thumbsup:

Tony

p.s. Although this place is 25 raven-miles from Poet Creek, I'd guess it would take a day and a half to drive from this spot. There's a bit of terrain between this camp and Poet Creek Campground.
User avatar
tony.latham
Gold Donating Member
 
Posts: 7073
Images: 17
Joined: Mon Jul 08, 2013 4:03 pm
Location: Middle of Idaho on the edge of nowhere
Top

Re: The Poet Creek Express - Foamie Hybrid

Postby KCStudly » Sat Apr 09, 2016 5:04 pm

Nice! The wife loves the pic with the puppy. :thumbsup:

I put another 4 hrs in today getting the locker bump out glassed. Stay tuned for a progress post.
KC
My Build: The Poet Creek Express Hybrid Foamie

Poet Creek Or Bust
Engineering the TLAR way - "That Looks About Right"
TnTTT ORIGINAL 200A LANTERN CLUB = "The 200A Gang"
Green Lantern Corpsmen
User avatar
KCStudly
Donating Member
 
Posts: 9640
Images: 8169
Joined: Mon Feb 06, 2012 10:18 pm
Location: Southeastern CT, USA
Top

Re: The Poet Creek Express - Foamie Hybrid

Postby KCStudly » Sat Apr 09, 2016 8:03 pm

So the weather has been marginal for glassing. Most days have been warm enough, but the overnights have been lower than I am comfortable with, and I would rather have brighter days so that I can see what I am doing well enough to QC my work. (The pictures here make it look brighter than it seemed in person.)

Today was still gray and the forecast is for cold again, but it was up to 48 deg F, so rather than launch into the hatch at midday, I decided to bite off a smaller task; the locker bump out.

First I jacked the front end up to a better working height, giving a little tilt back for drip control and better access to the underside. I actually jacked it up a little higher than this during the actual work, but here it is resting on the blocks.
Image

The fitting for the electrical wire inlet into the bottom of the front locker bump out sits a little proud of the wood by about 1/8 inch, and I had not included that in the pattern I made previously. The pattern fit very well, so I decided to risk it and precut the hole in the glass. The glass doesn’t always do what I want it to, but I have been getting better at pushing it around how I want it, so felt better about cutting a neater round hole while it is attached to the plastic sheet, than free handing it.
Image

So I hung the template back up, wrapped the bottom flap under, and just sort of rubbed the rosin paper over the fitting to emboss the location onto the paper. Here you can see how I have picked up the center of the embossing, allowed a little clearance around where the caulk was, and marked the circle cut with a compass.
Image
Image

Cut the hole out using the utility knife.
Image

Flopped the pattern over on the inside face of the plastic and traced out the hole with the Sharpie.
Image
Image

After tucking the main glass roll up neatly and making sure that it was well covered, I taped the plastic sheet pattern down to the bench and positioned the previously cut single ply of glass over it.
Image

Then I mixed up some epoxy and painted it on the locker surfaces, before wetting out the cloth. Once the cloth was wet out, I cut out the pattern, aligned it to the center of the bump out using the marks I had made previously, and stuck it down.

Transferring the cloth from the plastic to the wood went very well. I used the medium Bondo spreader on the outside of the plastic working from the top middle out and down dragging all of the big trapped bubbles out. Then wrapped the sides and peeled the plastic off.

From there it was tucking the top corner darts under the top flap; the top corners down onto the sides; and similarly working the bottom wrap and corners, side darts first then main flap under. The wet on wet didn’t really need any more epoxy. After some light squeegee action everything seemed to lay down very well. And it was all tacky and lean enough that the corners seemed to stay tucked without beading up.
Image
Image
Image
Image

As usual, there were a few little frayed bits and strands that will clean up easily after the cure, but all in all I am happy with how things went.

The hole for the electrical fitting lined up nicely, too.
Image
KC
My Build: The Poet Creek Express Hybrid Foamie

Poet Creek Or Bust
Engineering the TLAR way - "That Looks About Right"
TnTTT ORIGINAL 200A LANTERN CLUB = "The 200A Gang"
Green Lantern Corpsmen
User avatar
KCStudly
Donating Member
 
Posts: 9640
Images: 8169
Joined: Mon Feb 06, 2012 10:18 pm
Location: Southeastern CT, USA
Top

Re: The Poet Creek Express - Foamie Hybrid

Postby KCStudly » Sun Apr 10, 2016 9:28 pm

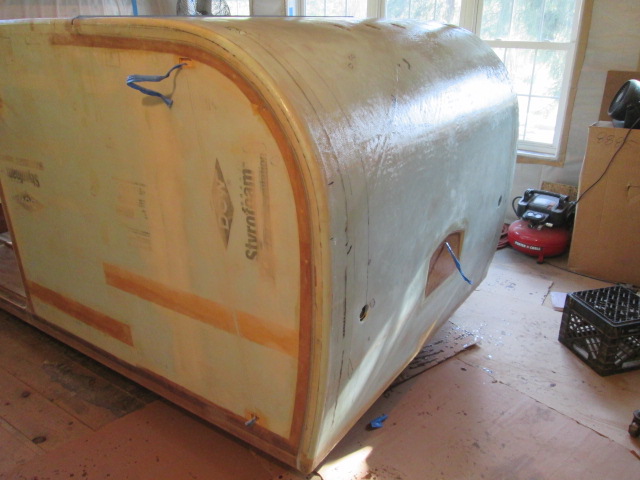
The planets and stars aligned today! Er, well, at least the weather and weekend did. So I glassed the hatch today.

Seems like a milestone to me.

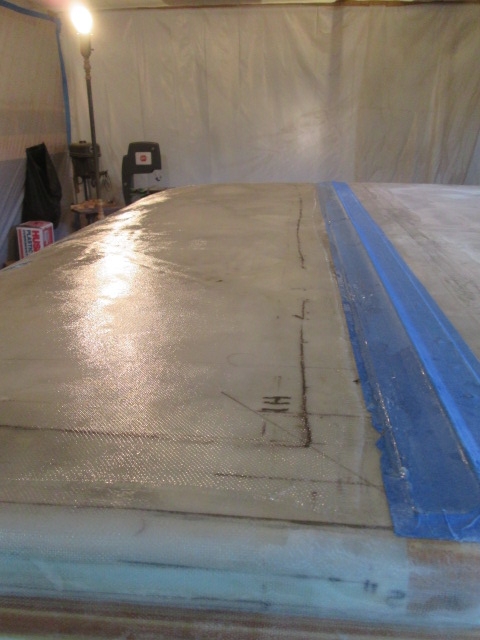
Starting at the top with the cabin level it was pretty easy to squeegee the epoxy where I wanted it. Once I got "over the hump” I jacked the rear up as high as I could and slobbered the next batch on. It quickly became apparent that the best technique for most of the back part was to pour the individual batches along the crest of the bustle then, stepping up to the Bondo spreader (bigger and more efficient than the credit cards), drag the wet over the hump and onto the lower section to about the height of the top of the license plate.

Then I used the chip brush to dab onto the area under the license plate and each lower corner.

Once the first ply was all wet out and squeegeed, I positioned the roll with the second ply at the top, aligned the leading edge and unrolled it. It didn’t line up on the sides as well as I had hoped and I ended up lifting the back part several times trying to position it. Fortunately the first ply was well stuck down and didn’t lift with it. Some serious tugging, dragging with gloved hands and aggressive squeegeeing got things to where I was happy, but later I had to deal with some ripples as I squeegeed the final wet.

Image

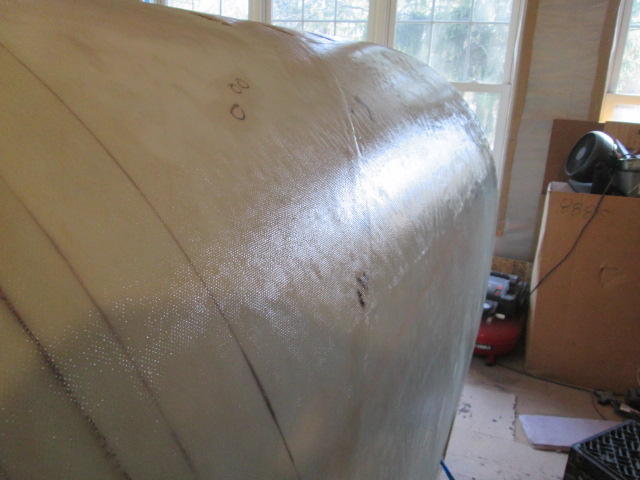
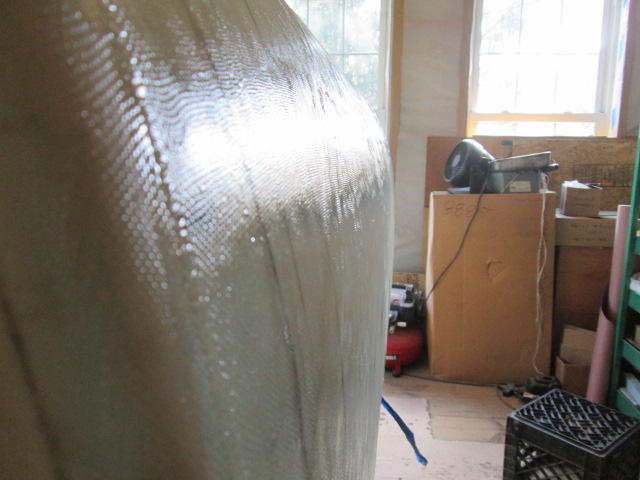
Temps in the loft ranged from about 48 deg F when I started, to about 55 when done, so there were no problems with the “fast” batches kicking off, and the top stayed workable enough by the time I got back up there for the second ply. At the end I spent a good deal of time, well into the leathery stage, going over it all, especially the hump, with the disc roller. That area seemed like it wanted to pucker up into small ripples or waves, perhaps resulting in fisheyes, so I just stayed after it with the roller until it seemed like it was going to stay reasonably flat.

Trimmed the worst of the flyaway strands, and used the utility knife to cut out all of the wire recess openings while they were still leathery.
Image

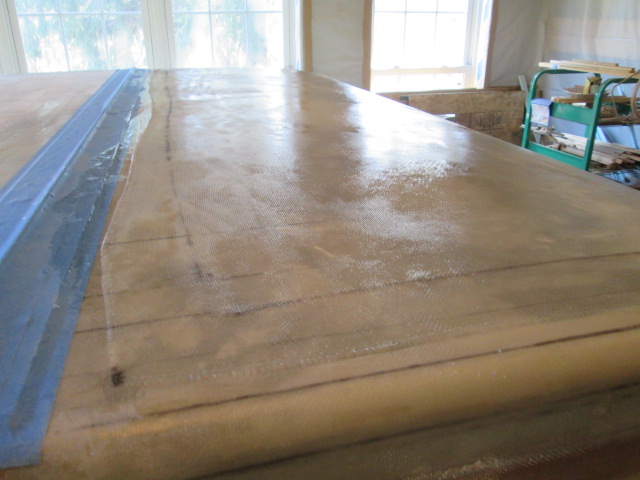
Then some more work with the roller. You can definitely see the diagonal seam where the bias pieces overlap, and the horizontal seam in the foam panels is visible here, too. You may be able to see traces of the ripples just above and below the sunlight glare, here just after rolling them down again.
Image

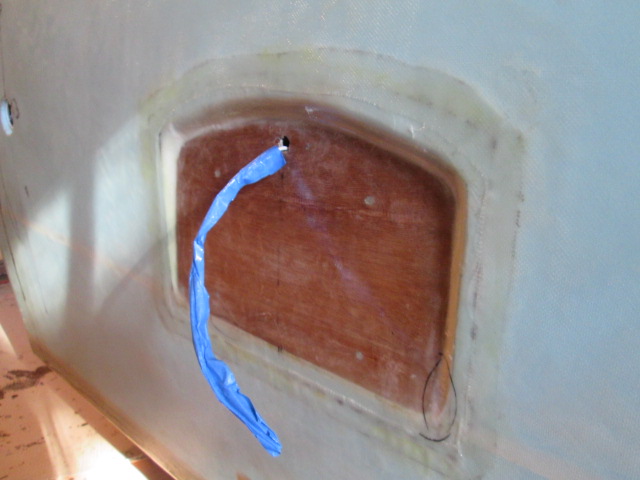
After the troubles I had way back when trying to skin the license plate area with bed sheet material I figured that area would be “back jammed” first, and then the main skin would be applied over and cut away; but when I laid the bias cloth over it seemed like I might be able to just wet it out and triple up on this area. However, when I got to that area while wetting out the first ply it just didn’t want to stay in the inside corner and I felt I was spending too much time fussing with it; so I went back to Plan-A and trimmed each ply out with the utility knife. Having previously skinned this area worked out nicely having a hard cured surface to cut against. You can see the outline of the previous work under lapping the new layup.
Image

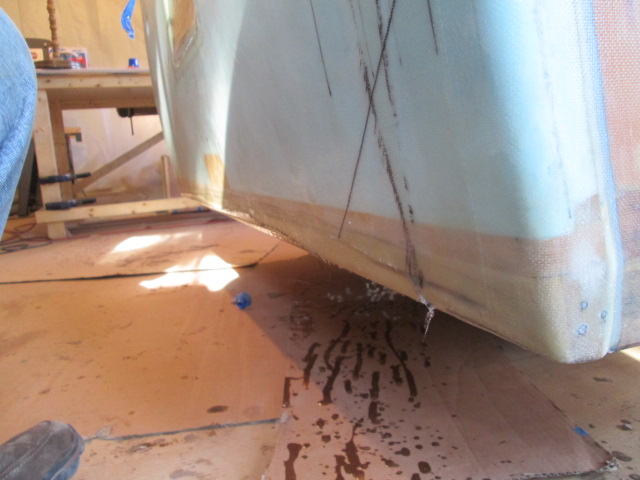
The bias ply ran off the bottom of the bumper a little, so there will be a little cleanup sanding to do to remove the ruffle. Sorry for the odd glare here, the sun was beaming in low thru the windows by now.
Image

Here are a couple of shots looking along the hinge line. Some of the wet got up on the masking tape and may have pooled up a little. In hindsight looking at the photos now, I probably should have peeled the tape up then to make it easier, but will deal with it later.
Image
Image

In the end I think I did okay with the ripples. Hopefully sticking it out and doing all the extra roller work will have prevented the fisheye issues I had on the curb side wall.
Image

Now I’m feeling really confident about finishing the roof. But first I’m going to flip the hinge and add the second hole pattern for the rubber strip trim. Then I’ll cut the hatch free again so that I can stand in the galley and reach the roof easier.
KC
My Build: The Poet Creek Express Hybrid Foamie

Poet Creek Or Bust
Engineering the TLAR way - "That Looks About Right"
TnTTT ORIGINAL 200A LANTERN CLUB = "The 200A Gang"
Green Lantern Corpsmen
User avatar
KCStudly
Donating Member
 
Posts: 9640
Images: 8169
Joined: Mon Feb 06, 2012 10:18 pm
Location: Southeastern CT, USA
Top

Re: The Poet Creek Express - Foamie Hybrid

Postby FinchFlock » Mon Apr 11, 2016 1:12 am

Wow! That sure looks nice! :thumbsup:
FinchFlock
Teardrop Builder
 
Posts: 43
Images: 18
Joined: Wed Feb 10, 2016 4:29 pm
Location: Southern Arizona
Top

Re: The Poet Creek Express - Foamie Hybrid

Postby GPW » Mon Apr 11, 2016 6:24 am

The one obvious difference between canvas and fiberglass is , ..... Canvas shrinks as it dries , tightening and smoothing over the foam .... Fiberglass does not ... so must be applied perfectly ...
And we’re still wondering about the self-healing of fiberglass over foam .. Maybe ??? :thinking:
There’s no place like Foam !
User avatar
GPW
Gold Donating Member
 
Posts: 14920
Images: 546
Joined: Thu Feb 09, 2006 7:58 pm
Location: New Orleans
Top

Re: The Poet Creek Express - Foamie Hybrid

Postby KCStudly » Mon Apr 11, 2016 6:37 am

FinchFlock wrote:Wow! That sure looks nice! :thumbsup:

Thanks. Thanks a lot. 8)

GPW,
Well, nothing is perfect. What my testing showed me is that the 2 plies of 6oz glass cloth is less flexible when cured and therefore less likely to dent in the first place. It still has a little give if you press really hard, but not enough to make a permanent impression, and it does not appear to result in delam, so I am good with it. :thumbsup:

With the glass I think it will also be easier to sand and filler fair any uneven areas and seams in a durable fashion after the fact, whereas I'm not so sure if canvas would sand equally well; and can't remember what has been used as a weather proof fairing compound (maybe latex caulk? ...sandable?). :thinking:

No argument, I'm still good with my choice. :thumbsup:
KC
My Build: The Poet Creek Express Hybrid Foamie

Poet Creek Or Bust
Engineering the TLAR way - "That Looks About Right"
TnTTT ORIGINAL 200A LANTERN CLUB = "The 200A Gang"
Green Lantern Corpsmen
User avatar
KCStudly
Donating Member
 
Posts: 9640
Images: 8169
Joined: Mon Feb 06, 2012 10:18 pm
Location: Southeastern CT, USA
Top

Re: The Poet Creek Express - Foamie Hybrid

Postby Runout » Mon Apr 11, 2016 7:53 am

Hey KC, I've been following your build for awhile and am planning on doing something similar. I was just wondering if you had any idea what the weight of your rig is as it sits now. I'm trying to stay around 1500 lbs, so knowing where you are now would help me plan a bit.

Thanks,
Mick
Runout
Teardrop Inspector
 
Posts: 5
Joined: Mon Mar 07, 2016 4:33 am
Top

Re: The Poet Creek Express - Foamie Hybrid

Postby GPW » Mon Apr 11, 2016 8:50 am

KC, please don’t take me wrong .. I understand the parameters of both. And that both are completely DIFFERENT with differences that are acceptable to the builder ... Fiberglass is most always used to make nice SMOOTH surfaces ( like on Corvettes, IME ) ... With Canvas , texture and seams are accepted as the norm. Both , a way of skinning that seems to be Perfectly acceptable over Foam and Great to have a choice ... :thinking: ...
You can imagine with Foamies being so “new" to the traditional way of trailer making , there is much to experiment with and still so much to learn . And opinions keep changing the more we learn ... Right now , I’m leaning to the use of fiberglass tape AND canvas Together in a sorta Hybrid skinning ... Maybe some chipboard in there too ... Just exploring the uncharted ( and sometimes controversial) realm of Foamie building ... Goodness knows , we’ve made planes fly , made of Foam ,for many years now , so we know the Foam will work ... the question now always becomes how to make it “pretty” ... :roll: And what is “pretty” really ??? ... :NC
There’s no place like Foam !
User avatar
GPW
Gold Donating Member
 
Posts: 14920
Images: 546
Joined: Thu Feb 09, 2006 7:58 pm
Location: New Orleans
Top

Re: The Poet Creek Express - Foamie Hybrid

Postby ghcoe » Mon Apr 11, 2016 9:59 am

KCStudly wrote: I'm not so sure if canvas would sand equally well; and can't remember what has been used as a weather proof fairing compound (maybe latex caulk? ...sandable?). :thinking:


https://www.youtube.com/watch?v=JoEUPHG9BfM
George.

Gorrilla Glue, Great Stuff and Gripper. The three G's of foamie construction.

My build viewtopic.php?t=54099
Working with flashing for foamie construction viewtopic.php?f=55&t=60303
Making a hot wire http://tnttt.com/viewtopic.php?f=55&t=55323
User avatar
ghcoe
1000 Club
1000 Club
 
Posts: 1982
Joined: Fri Dec 11, 2009 11:20 pm
Location: SW Idaho
Top

Re: The Poet Creek Express - Foamie Hybrid

Postby GPW » Mon Apr 11, 2016 12:42 pm

KC , not meaning to be OT , but since you like trains , I finished my painting and posted a copy in my Album here... Just FYI ...
There’s no place like Foam !
User avatar
GPW
Gold Donating Member
 
Posts: 14920
Images: 546
Joined: Thu Feb 09, 2006 7:58 pm
Location: New Orleans
Top

Re: The Poet Creek Express - Foamie Hybrid

Postby KCStudly » Mon Apr 11, 2016 1:27 pm

That's really nice, GPW. I like it! :thumbsup: Not trying to disparage canvas at all, just noting some of the differences as I learn more about the glass.

GHCoe, ah yes, the ventilation mastic; the stuff Rosie used on her punt (wasn't it?).

Re: weight. I really don't know for sure at this point. The trailer is at 472 lbs with the stock Jeep steel wheels and 27 inch tires. best guess on the cabin with doors and hatch as it sits right now maybe 500 lbs, but that is a SWAG.

I'm hoping for under 1200 over the road loaded but would be happy with anything under 1500. She may still surprise me. :worship:
Last edited by KCStudly on Sat Aug 15, 2020 9:41 pm, edited 1 time in total.
KC
My Build: The Poet Creek Express Hybrid Foamie

Poet Creek Or Bust
Engineering the TLAR way - "That Looks About Right"
TnTTT ORIGINAL 200A LANTERN CLUB = "The 200A Gang"
Green Lantern Corpsmen
User avatar
KCStudly
Donating Member
 
Posts: 9640
Images: 8169
Joined: Mon Feb 06, 2012 10:18 pm
Location: Southeastern CT, USA
Top

PreviousNext

Return to Foamies

Who is online

Users browsing this forum: No registered users and 3 guests