The Poet Creek Express - Foamie Hybrid

Canvas covered foamies (Thrifty Alternatives...)

Moderator: eaglesdare

Re: The Poet Creek Express - Foamie Hybrid

Postby dales133 » Fri Apr 22, 2016 5:31 am

GPW wrote:KC, there used to be a choice of spray Fillers for fiberglass , I remember we used a product called Feather Fill, but that was some time ago . I’m sure there are many good products now that will give you the smoothness you want . No matter what we used ,there was still a good deal of finish sanding involved ... can’t get around that ...

Yea high biuld primer and spray putty should take care of alot of that.
Looking good mate , i empathise with you on the sometimes seemingly endless journey.
User avatar
dales133
4000 Club
4000 Club
 
Posts: 4605
Images: 1
Joined: Mon Oct 13, 2014 5:26 pm

Re: The Poet Creek Express - Foamie Hybrid

Postby KCStudly » Fri Apr 22, 2016 8:58 pm

Thanks guys. I definitely have some decisions to make when it comes to the fill and paint schedule.

Tonight, despite being deadbeat tired after working over a bit, I dragged myself out to Mecca and took the hatch hinge off.

I managed to snap six of the #6 screw heads off. GRRRRR :x

I’ll have to dig them out and pot with thick like I did before.

I figure there were a few contributing factors. For one, I had reused the same screws that I had run in before. If the screw is not well centered and screwed straight in, when the head pulls up on one side of the countersink the head tends to rock or bend over right as it gets tight, thus working the screw right where it is thinnest. The other thing I found was if I kept a soft touch on the cordless drill trigger going very slowly at first it didn’t “hit” the screw so hard with torque and gave it a chance to overcome the “sticktion” in the hard oak. If I didn’t pay close attention it was easy to just yank the trigger and pop the weaker screws.

So… since I don’t need the factory countersinks that came with the hinge, and will be drilling new countersinks on the other side, I think I will move up to a #8 size screw and also drill the countersinks out of the original holes, using #8 screws for the rubber seal trim, too. Also, I have since bought a set of those self-centering drill bit guides and can use them to open up the existing holes in the spars when I reinstall the hinge. Maybe wax or soap the screws next time, too.

And that was it. I was “punch drunk dopey” and decided it was better to quit for the night.

Tomorrow is another day.
KC
My Build: The Poet Creek Express Hybrid Foamie

Poet Creek Or Bust
Engineering the TLAR way - "That Looks About Right"
TnTTT ORIGINAL 200A LANTERN CLUB = "The 200A Gang"
Green Lantern Corpsmen
User avatar
KCStudly
Donating Member
 
Posts: 9640
Images: 8169
Joined: Mon Feb 06, 2012 10:18 pm
Location: Southeastern CT, USA

Re: The Poet Creek Express - Foamie Hybrid

Postby GPW » Sat Apr 23, 2016 5:42 am

We use beeswax on screws ( many hears now) ... really makes a difference and seals the holes a bit ... :thumbsup:
There’s no place like Foam !
User avatar
GPW
Gold Donating Member
 
Posts: 14920
Images: 546
Joined: Thu Feb 09, 2006 7:58 pm
Location: New Orleans
Top

Re: The Poet Creek Express - Foamie Hybrid

Postby KCStudly » Sun Apr 24, 2016 8:40 pm

Let’s get caught up again. Between yesterday and today I got the hatch hinge modified. To recap, this was a triple win.

First, I had screwed up when I cut the hinge to length. The end goal was to have one set of holes where the hinge screws down hard to the spars and a second set of holes for the aluminum trim strips that will clamp the outer rubber seal strip to the top side of the hinge leaves (rather than just screwing down thru the rubber and having the hinge squirm around under its resiliency). And when I cut the hinge I forgot to offset the OEM countersunk holes so that the trim retaining screws would be symmetrical across the camper. So by drilling and countersinking the second hole pattern I get the symmetry I want.

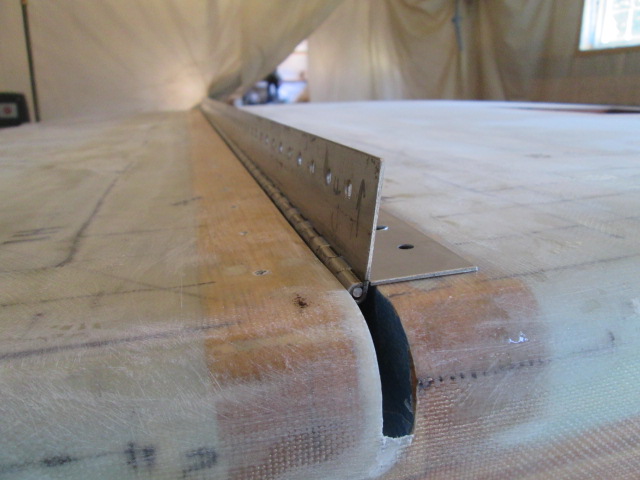
Second, by flipping the hinge over so that the barrel of the hinge nests down in the gap between the spars, the seal rubber will lay nice and flat for a much sleeker look. I saw this done on another person’s post and I really liked it much better (sorry I don’t remember who to give credit to).

And third, since I would have to countersink the new pattern anyway, I could increase the size of the screws from #6 to #8, hopefully solving my issue with snapping screws.

Now if you consider the diameter of the screw heads and the 82 deg taper, compared to the thickness of the hinge leaf… a mere 1/16 inch SS… the thru hole in the bottom of the countersink is actually larger than the nominal screw diameter. That means that the OEM holes are already big enough to accept the increased size of the #8 screws since the countersinks for their heads will be up in the seal trim pieces. In a way, a fourth win; nothing had to be done to them.

On Saturday Yvette and I ran some household errands, so I got a late start. Then I finished up early since we were going out with Karl and Chris to celebrate Chris’ upcoming B-day, so it was a relatively short session.

I did manage to layout and prick punch the second hole pattern. I used spring clamps to clamp the tape measure and hinge to the edge of the bench; then used a combination square and carbide scribe to pick off the hole spacing; and finally, adjusted the square for the edge distance and went down the line making the cross hatch marks.

If you’ve never done this type of layout there is a technique to placing prick punch marks very accurately. A nice sharp tip on your punch is the first thing. If you can’t “feel” the tip of punch into the cross hairs of your scratch lines, get it as close as you can by eye then just barely tap the punch with a light ball peen hammer. If you’re not happy with the accuracy of your initial mark you can tilt the punch a bit toward the direction you want and move the mark by tapping a few more times a little more firmly and driving the mark to where it needs to be. Once you get the mark well centered, straighten the punch up and give it a good rap or two to really set the mark.

Karl and I made a few fine tuning adjustments to the iron worker, taking the slop out of the spindle guides and lubricating all of the grease points, so that the small punch would center in the die consistently. Then Karl gave me a hand running the hinge thru punching all of the new holes. It was a big help holding the hinge as it can be a bit floppy when laid open flat; and running the iron worker is already a bit like rubbing your tummy, patting your head and dancing on one foot at the same time. You have to unlatch the punch ram with one hand, hold the part into the punch prick, press the foot treadle and lift, all while getting the hand held stripper tool in the right place on the up stroke. Do that 60 times.

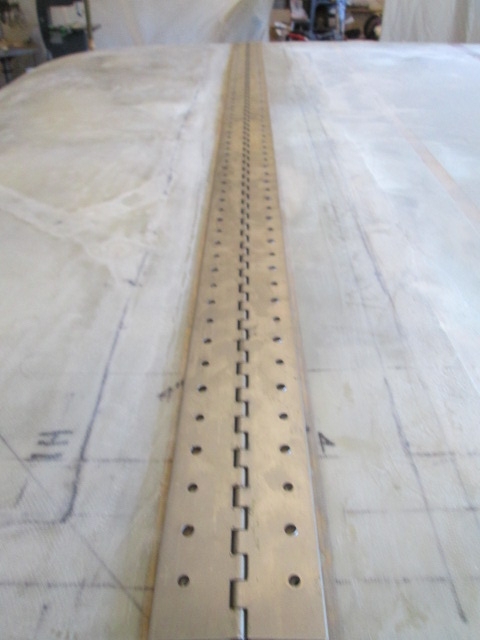
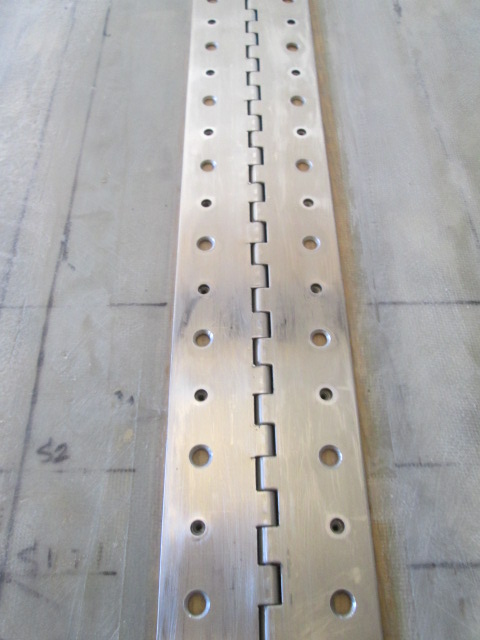
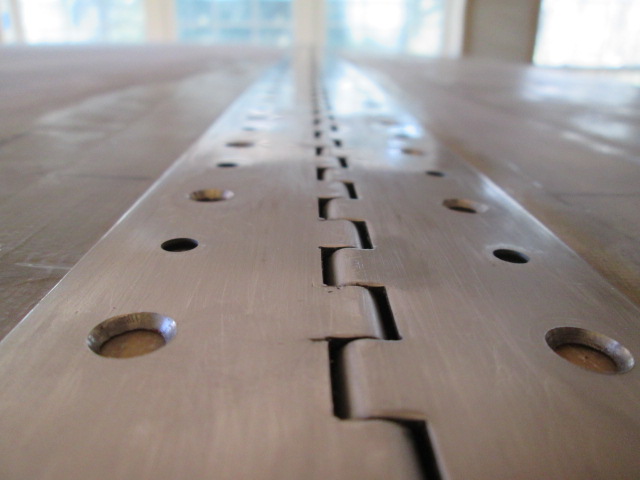
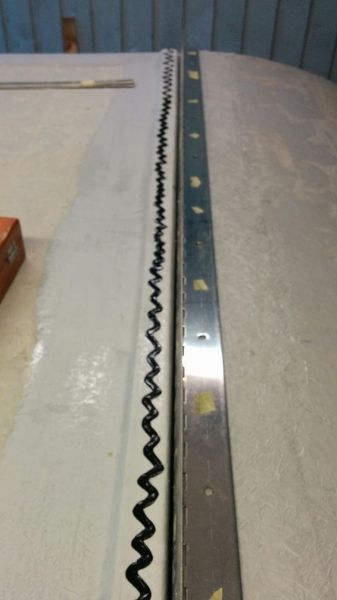
I did the layout and prick punch work upstairs while my camera was downstairs, then while punching the holes my hands were oily from the WD40 we used as a tool lube, so I didn’t get any pics of any of it; but here is the hinge flipped over with the second pattern punched.
Image

Just eyeballing to make sure that the existing holes in the spars still line up well. I had some concern that I might have to shave some off of the rear face of the cabin side spar, but there ended up being plenty of clearance with a little wiggle room.
Image

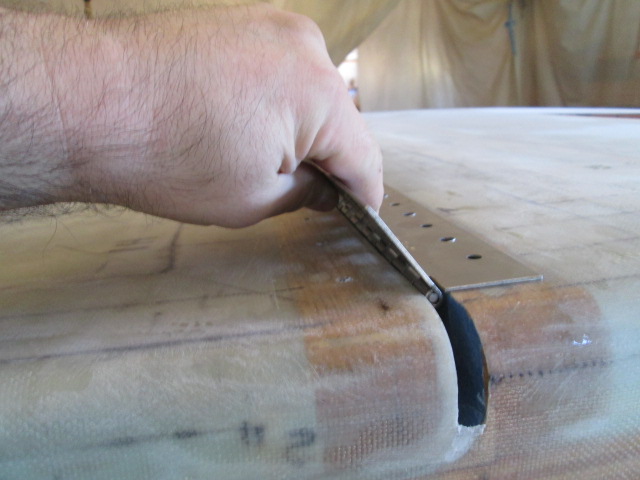
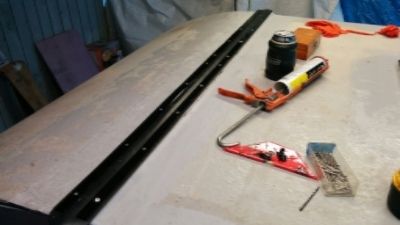
This pic shows the hinge opened all the way back past 90 degs, followed by a pic showing the approximate position the hinge will reach when the hatch actuators are at full stroke, approximately 60 degs, showing that there is plenty of travel with the hinge reversed.
Image
Image

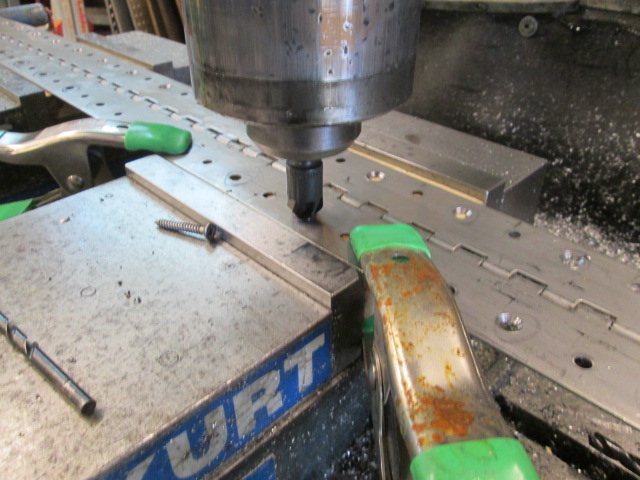
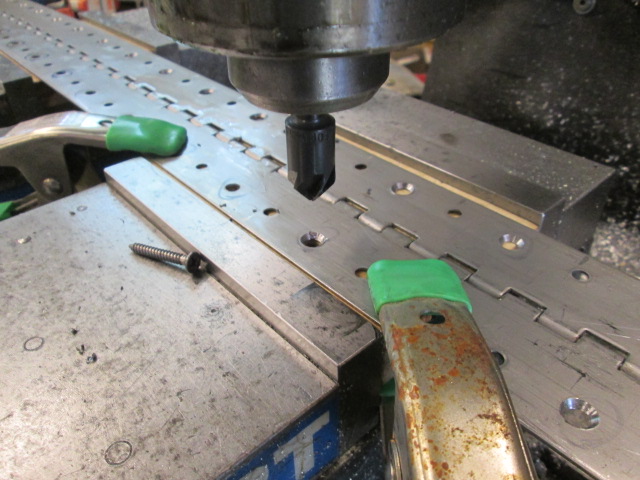
Today I did the countersinks. I used a couple of pieces of waste wood shimmed up in the double vises on the mill, then ran a 1/4 inch cutter down thru the middle to cut a slot for the barrel of the hinge to register into. One of those holes was drilled thru to align with the hole offset in the hinge so that the chips would fall thru and I could drop a screw in to check the depth of the countersinks as I went.
Image

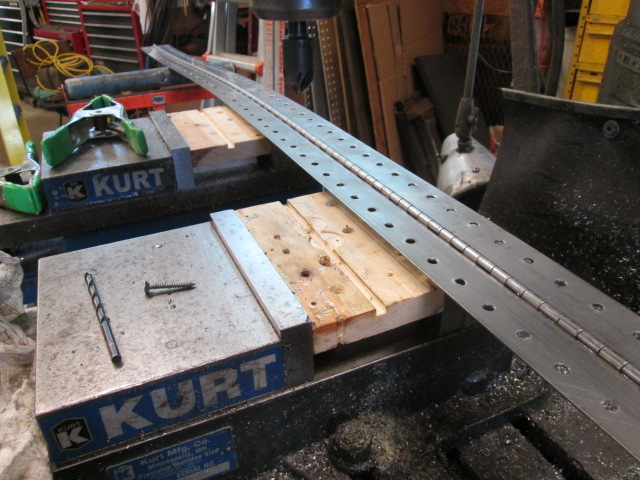
With the hinge flipped over and the barrel just snug in the slot I used spring clamps to hold the hinge down pat. Even still, the leaf had a little flex and the wood isn’t as stiff as a chunk of aluminum would have been, so it worked best to eyeball the depth of each countersink and check frequently with the screw. The size of the punched hole worked out great so that when the depth of the countersink was about perfect there was just a hair thickness of cylindrical hole left at the bottom, so I quickly got the hang of finding the right depth fairly accurately. I moved the hinge for each hole; the spring clamps with rubber pads had just the right amount of give to where if I gave the initial feed a little jab like poke it would center up the hole, rather than starting and staying lopsided.
Image
Image

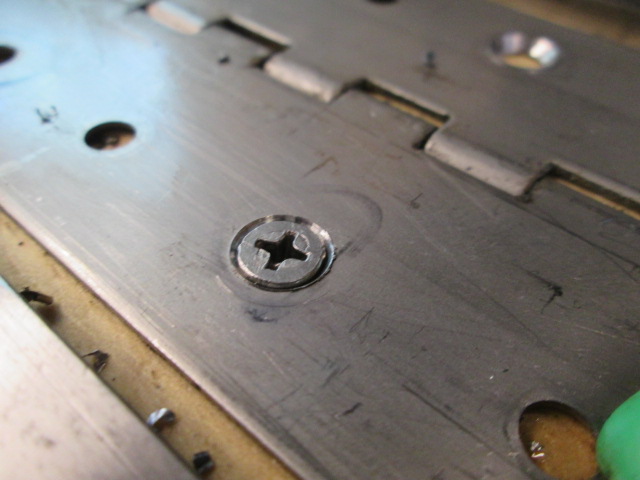
Not bad. You’ll note that I circled every other hole with a sharpie just to make sure I didn’t mess up the pattern, and although the lube acted as a solvent dissolving the ink, I could still differentiate the marked holes. Also, you can see how the countersinking bit made just the slightest raised burr around the edges of the holes.
Image

Back upstairs in the loft I used the small very fine file and small sanding block to scuff off the burrs on both sides of both leaves, cleaned the hinge well and did another test fit.
Image
Image

I’m pretty happy with that! Unfortunately the local orange box didn’t have enough of the #8 screws in SS, so I will have to order them.

I want to get the hinge screwed down again to lock in this hatch alignment before I cut the hatch free again, but there are plenty of other things to do while I wait for the brown truck.
Last edited by KCStudly on Thu Apr 28, 2016 10:59 am, edited 1 time in total.
KC
My Build: The Poet Creek Express Hybrid Foamie

Poet Creek Or Bust
Engineering the TLAR way - "That Looks About Right"
TnTTT ORIGINAL 200A LANTERN CLUB = "The 200A Gang"
Green Lantern Corpsmen
User avatar
KCStudly
Donating Member
 
Posts: 9640
Images: 8169
Joined: Mon Feb 06, 2012 10:18 pm
Location: Southeastern CT, USA
Top

Re: The Poet Creek Express - Foamie Hybrid

Postby GPW » Mon Apr 25, 2016 5:55 am

Super job KC !!! :thumbsup: 8) Great way to keep the hatch aligned , pre-hinging ... 8) :applause:
There’s no place like Foam !
User avatar
GPW
Gold Donating Member
 
Posts: 14920
Images: 546
Joined: Thu Feb 09, 2006 7:58 pm
Location: New Orleans
Top

Re: The Poet Creek Express - Foamie Hybrid

Postby KCStudly » Mon Apr 25, 2016 6:57 am

Thanks GPW.

I checked my new centering drill tool against the countersinks and found that the diameter of the tip of the tool is just a little smaller than the countersink, meaning that it won't necessarily center itself perfectly. WTH :?

Oh yeah, it's because the hinge leaves are so thin the bottom of the countersink isn't as small as it would be at the full depth of the screw head. I'll have to run a counter sink down in the hinge holes to scoop out a little of the wood/FG first making room for the lower portion of the screw head and giving the centering drill something concentric to pilot off of.
KC
My Build: The Poet Creek Express Hybrid Foamie

Poet Creek Or Bust
Engineering the TLAR way - "That Looks About Right"
TnTTT ORIGINAL 200A LANTERN CLUB = "The 200A Gang"
Green Lantern Corpsmen
User avatar
KCStudly
Donating Member
 
Posts: 9640
Images: 8169
Joined: Mon Feb 06, 2012 10:18 pm
Location: Southeastern CT, USA
Top

Re: The Poet Creek Express - Foamie Hybrid

Postby GPW » Mon Apr 25, 2016 12:24 pm

Like they say ," don’t sweat the big stuff !! “ But truthfully it’s all the little stuff that drives one CRAZY ... :? ... :duh:
There’s no place like Foam !
User avatar
GPW
Gold Donating Member
 
Posts: 14920
Images: 546
Joined: Thu Feb 09, 2006 7:58 pm
Location: New Orleans
Top

Re: The Poet Creek Express - Foamie Hybrid

Postby Wobbly Wheels » Tue Apr 26, 2016 9:47 pm

Just caught up on your build KC. As always, your attention to the little details is impressive as heck...even if it makes the job seem Sisyphean sometimes.

Knowing that you will have put a lot more thought into it than I did :oops: I'm curious to know how you arrived at the decision to drill the second set of holes in your spring leaves. I did my hinge (1, 2) the same way with aluminum strips holding down a gasket strip, but I countersunk half of the existing holes for initial install and left the rest for the trim screws to run through rather than drilling a second set of holes.
User avatar
Wobbly Wheels
Donating Member
 
Posts: 1080
Joined: Tue Mar 15, 2011 9:51 am
Top

Re: The Poet Creek Express - Foamie Hybrid

Postby KCStudly » Wed Apr 27, 2016 8:45 am

I thought about going that way, and it would have been much less Sisyphean (... except I hope when my "boulder" gets to the top it doesn't roll back down!!!), but I erred on the safe side, figuring that a full complement of rigidly fastened screws would meet the OEM design intent, with the second set perhaps adding some additional stability despite the rubber interface. The other option would have probably been fine, especially on a light hatch, but my hatch is actually fairly heavy.

One more thing to consider, by riddling the hinge full of holes, one might consider that it has become weaker, at least marginally so for handling purposes, but not to any detriment that I could discern. I'm happy with the way it's going.
KC
My Build: The Poet Creek Express Hybrid Foamie

Poet Creek Or Bust
Engineering the TLAR way - "That Looks About Right"
TnTTT ORIGINAL 200A LANTERN CLUB = "The 200A Gang"
Green Lantern Corpsmen
User avatar
KCStudly
Donating Member
 
Posts: 9640
Images: 8169
Joined: Mon Feb 06, 2012 10:18 pm
Location: Southeastern CT, USA
Top

Re: The Poet Creek Express - Foamie Hybrid

Postby KCStudly » Wed Apr 27, 2016 11:31 pm

I got the hatch hinge refit tonight.

The orange box store only had the #8 x 1-1/2 inch SS sheet metal screws in small packs of three (3) and only had a few packs on the rack. I needed something like 122 screws, so I bought them from McMaster-Carr. Since the seal trim screws will be exposed to the elements, I selected 316SS. Lesser alloys in the 18-8 family are more likely to rust, especially if exposed to salt, such as in coastal regions or from deicing road salt. Since they came 50 to a box and I needed 62 for the trim, plus 60 for the hinge, I just went ahead and ordered all three (3) boxes in 316.

Here is a comparison of the Everbilt brand from the orange and the bulk 316 from McMaster. The store bought ones (top in second pic) have a finer thread count and a little more thickness at the top of the head.
Image
Image

Note that I am using sheet metal screws in lieu of wood screws. The sheet metal screw threads go all the way up to the head making them well suited for fastening thin items (like this hinge and the 5mm plywood), whereas wood screws have a shank that would require a clearance hole to be drilled.

Here’s what I was talking about with the self-centering drill bit. The thinness of the hinge leafs make the bottoms of the countersunk holes larger in diameter than the guide was designed for. In the first pic the guide is all the way to the left, and in the second pic it is to the right.
Image
Image

The solution was to use this 82 deg chamfering bit to hog out a bit of the FG and oak. The bit self-centered in the SS and made a nicely centered conical divot.
Image
Image

Now the self-centering drill guide actually had something to find the center of and I could drill the pilot holes. (The screw in the foreground is one of the old #6’s just being used temporarily here to locate the hinge thru the original holes until I get the new #8’s zoomed in).
Image
Image

The self-centering drill didn’t drill deeply enough for these screws so I used these holes as pilots and deepened them with my Dewalt pilot/countersinking quick change drill/driver.

This is the wax I had on hand, so this is what I used on the screws. Just a little blob on a paper towel to run the tips of the screws in was all that was needed.
Image

I did have to be careful not to track the wax all over the hatch and cabin roof where there is more FG and bodywork to be done, so I scrubbed the hinge down well with a dry paper towel, followed by one of those eyeglass packet wipe towelettes that has alcohol and a bit of ammonia in it.

Here is the finished result. All of the screws socked down nice and straight with very little variation. I’m pretty happy with the result.
Image
Image

Doing all four of those operations (centering, drilling, drilling deeper, and installing a screw) 60 times took most of the session, but I couldn’t resist making an attempt to cut the hatch free and opening it again. I started with the serrated steak knife but found that it was a bit difficult to follow the curve. Due to the relative thickness of the blade it wanted to bind.

The utility knife worked better with its thinner blade, but with 2 plies it didn’t slice easily. The solution was to stick about 1/4 inch of the tip of the blade thru the glass in the seal gap, guiding the knife with my left hand as I tapped on the nose of the handle with the small plastic mallet, thus driving the blade along in small increments.

That worked pretty well and I got thru the curb side.
Image

But after getting started on the street side the cheap POS utility knife, with its non-interlocking handle halves and plastic blade cradle, allowed the blade to slip up between the split in the handle halves while the back end of it sliced down thru the plastic blade cradle inside of the handle. Good. Now that tool is worth scrap value, which is about what it was worth before. This gave me a good excuse to stop on the way home and buy a proper Stanley utility knife with interlocking handle halves and a steel blade cradle. That should stand up to the abuse much better.

I’ll finish cutting away the hatch tomorrow.
KC
My Build: The Poet Creek Express Hybrid Foamie

Poet Creek Or Bust
Engineering the TLAR way - "That Looks About Right"
TnTTT ORIGINAL 200A LANTERN CLUB = "The 200A Gang"
Green Lantern Corpsmen
User avatar
KCStudly
Donating Member
 
Posts: 9640
Images: 8169
Joined: Mon Feb 06, 2012 10:18 pm
Location: Southeastern CT, USA
Top

Re: The Poet Creek Express - Foamie Hybrid

Postby GPW » Thu Apr 28, 2016 5:31 am

Looks Good !!! :thumbsup: Paste wax ??? is that really a wax ???  :NC
There’s no place like Foam !
User avatar
GPW
Gold Donating Member
 
Posts: 14920
Images: 546
Joined: Thu Feb 09, 2006 7:58 pm
Location: New Orleans
Top

Re: The Poet Creek Express - Foamie Hybrid

Postby KCStudly » Thu Apr 28, 2016 6:17 am

GPW wrote:Looks Good !!! :thumbsup: Paste wax ??? is that really a wax ???  :NC


Thanks GPW. Yup, it's really wax. It's just got a solvent in it to make it nice and spreadable.
Johnson's Paste Wax MSDS
KC
My Build: The Poet Creek Express Hybrid Foamie

Poet Creek Or Bust
Engineering the TLAR way - "That Looks About Right"
TnTTT ORIGINAL 200A LANTERN CLUB = "The 200A Gang"
Green Lantern Corpsmen
User avatar
KCStudly
Donating Member
 
Posts: 9640
Images: 8169
Joined: Mon Feb 06, 2012 10:18 pm
Location: Southeastern CT, USA
Top

Re: The Poet Creek Express - Foamie Hybrid

Postby KCStudly » Thu Apr 28, 2016 11:11 pm

Image
The hatch is cut free again. It is notably stiffer than before, and slightly heavier.

I like the hinge orientation much better now.
Image

The corners of the bumper need to be faired back. This is where the wall glass wrapped onto the hatch, where I cut down the middle of the seal gap.
Image

A little higher up on the street side of the hatch you can see where I will need to scrape and sand back to the glass on the seal lip, but it all seems to be well adhered to the flox corner.
Image

In this pic of the street side galley wall you can see the other side of the cut where the rough edge needs to be brought back to the wall edge that was masked with blue tape previously.
Image

After scraping the bulk of the edge down; sanding flat (-ish) to the wall edge; knocking the sharp edge off a tad; and removing the tape it looked like this.
Image

I did this right away mostly to avoid getting hurt by the rough edge, or having it rough up the hatch when I close it again, but it didn’t need to be perfect at this point. This edge will get a rabbet soon for the hatch seal to nest into.

I got the curb side scraped down mostly, too, all but to the floor before having to bug out for the night. I’ll clean up the hatch edges once it comes back off, since it will be easier to reach and I won’t have to work overhead. The hatch has to come back off anyway to fix those broken screws and for better access to glass the roof.

The weather is supposed to be cooler for the next couple of days into the weekend, so I would like to take advantage of that to do the roof glass so that I can use the ‘fast’ hardener on hand (rather than having to buy more ‘slow’. Karl has offered to help me remove the hatch tomorrow (Friday) night.

For the profile radius on the front wall I think I can mitigate the troubles I had with the fast hardener dripping over, so as to avoid the ripples and texture that I got on the hatch. At first I had thought that I would divide the rest of the roof glass into two roughly equal sections, including the upper front wall/front radius and front part of the roof as one section; and the rear 2/3 part of the roof as another. However, what I think I have learned is that the flatter top section should go easier and quicker because the wet can be poured on quickly and spread relatively easily with a large squeegee. It was only once I tried making the transition down the back of the hatch that things started getting sloppy, dripping and running.

So I think it makes more sense to handle the vertical part of the front wall and a smaller area up most of the front radius, making that more manageable to do using the Poor Man’s Pre-Preg (PMPP) technique. That way I can get the glass wet out quickly on the bench, wet the surface and hopefully place the plies more uniformly. Then the larger main roof should go fairly well, maybe even separating that into two operations.
Last edited by KCStudly on Fri Apr 29, 2016 6:26 am, edited 1 time in total.
KC
My Build: The Poet Creek Express Hybrid Foamie

Poet Creek Or Bust
Engineering the TLAR way - "That Looks About Right"
TnTTT ORIGINAL 200A LANTERN CLUB = "The 200A Gang"
Green Lantern Corpsmen
User avatar
KCStudly
Donating Member
 
Posts: 9640
Images: 8169
Joined: Mon Feb 06, 2012 10:18 pm
Location: Southeastern CT, USA
Top

Re: The Poet Creek Express - Foamie Hybrid

Postby GPW » Fri Apr 29, 2016 6:20 am

Looks Great !!! :applause: :beer:
There’s no place like Foam !
User avatar
GPW
Gold Donating Member
 
Posts: 14920
Images: 546
Joined: Thu Feb 09, 2006 7:58 pm
Location: New Orleans
Top

Re: The Poet Creek Express - Foamie Hybrid

Postby aggie79 » Fri Apr 29, 2016 8:55 am

KC,

The hinge install looks fantastic! "Barrel down" is a much cleaner look.

Johnson Wax is one of my "go to" products. It is not intended for this, but I use it to keep my machined tool surfaces from rusting. I've also used it as a mink oil substitute to keep leather boots water resistant. It is getting harder and harder to find though.

Keep marching forward! Some day we'll have Buick talk.

Take care,
Tom
Tom (& Linda)
For build info on our former Silver Beatle teardrop:
Build Thread

93503
User avatar
aggie79
Super Duper Lifetime Member
 
Posts: 5405
Images: 686
Joined: Tue Aug 07, 2007 5:42 pm
Location: Watauga, Texas
Top

PreviousNext

Return to Foamies

Who is online

Users browsing this forum: No registered users and 3 guests