.
Thanks OP.
The wet on wet using the PMPP technique is by far the most controlled way of doing a vertical or awkward surface that I have tried. Small layups are very manageable, as are medium size, depending on the "angle of the dangle". It's like contact cement; it works best if you get it aligned properly before the two surfaces touch too much. With two people tugging on the plastic sheet it takes all of the tension and doesn't skew like the woven cloth can. Also, you don't pull strands out of place like you can when tugging on the cloth directly; so it works good an larger layups, too, so long as you have help.
When I did larger dry on dry layups, I did at least some of them by pushing the epoxy thru both layers. It seemed to take longer than doing two individual plies, but there was no rush to getting the plies into position, no premature sticking in the wrong spot and no wadded up cloth. For larger areas, working alone, this seemed to be the least awkward/most successful option.
For the roof, the last of the big layups, I am toying with thoughts of getting both pieces of cloth into position and then folding them over on themselves half way. Wet half of the foam, unfold half a ply, wet, unfold, reverse fold dry back on itself, reverse fold other dry, wet other end foam, unfold, wet, unfold, wet it all. But that could get ugly if epoxy soaks up thru the dry folds prematurely.
If I thought I could unroll the second ply over the wet first ply from a spool and have it line up right w/o puckers, wrinkles or creases, I might try that, but I don’t think that is likely.
The two best options seem to be, if I am by myself, to place the glass first and push the epoxy thru; or, if I have help, wet out the foam, stretch and place the dry cloth over, then wet it, and then repeat.
It doesn’t seem to matter which technique I use, there are always a certain number of fish eyes. Sometimes ripples. I haven’t figured out how to completely eliminate the fish eyes. They seem to want to wet out and disappear, at least briefly when actively rolling or stippling, but then they show back up. The ripples are probably from over aggressive scraping with the squeegee, buckling up the first ply under the second.
I had thought some of the fish eyes were over local depressions and the glass was springing up off of the low spots in the foam from tension in the fibers, but on this last layup I got some that seemed to be blistered out ever so slightly. Wondering if I have been perspiring onto the cloth(?). Gave half a thought to something in the foam or spackle gassing off, or just thermal expansion pockets. Dunno.
The only thing I haven’t tried is using a slurry of filler in the base wet coat, and/or vacuum bagging.
The bag setup I used for laminating the inner wall plywood skins was okay for that task, but I’m not sure I could get something that rudimentary to work well here; and I don’t have a suitable vacuum pump.
It’s kind of late in the game to make any drastic changes, too. Funny thing is that with all of the techniques I have tried, the results have all been more or less similar, and any differences can’t necessarily be attributed solely to the method. All of it has been suitable, or at least has been after minor corrections, repairs and/or touch-ups.
I still haven’t decided what my tolerance level is for the fish eyes; do I want to try and drill-n-fill all of them (using the hypo)? Will the little slivers of air expand later and make blisters in the paint? Most of these are smaller than my pinkie fingernail. Some much smaller. SWAG, if I were to count them all there might be 40 or so over the whole camper (so far). Some you really have to look hard to see with a light, and even then I can’t always be sure of what I’m seeing.
Part of me just wants to roll on by and call it good. If I had any confidence at all that they won’t manifest in paint flaws later, I’d just keep going. I have no concern about structural integrity whatsoever. We’re talking something like less than 1/2 a percent of the total area, probably even a lot less. It’s not an airplane (or hydroplane) structure and won’t be subjected to those types of flying forces, so a few minimal flaws can be tolerated in that regard.
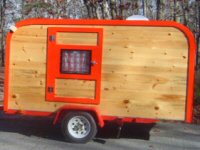
One more thought… I’m really pleased with how the hatch stiffened up. It no longer twists enough to drag on the inside of the street side wall. When resting on the centrally located temporary prop, when I lift up on one corner of the bumper it only moves up about 1/4 inch before coming off of the stick. I don’t recall making a note of the amount of twist prior to glassing, but would hazard to say that it would have been at least an inch, perhaps 1-1/2 using the same method, to the point that I avoided cycling it that way. Now I have no concerns. It’s what I expected to happen, but it is still a relief that it actually did!


