11'6" three berth ply/foam/aly composite caravan

...ask your questions in the appropriate forums BUT document your build here...preferably in a single thread...dates for updates, are appreciated....

Re: 11'6" three berth ply/foam/aly composite caravan

Postby pchast » Wed Mar 22, 2017 8:28 pm

To ball park it: :D
Look at the relative sizes of the pulleys.......... if that's a, say, 15" diameter pulley start with a 5" diameter on the motor and go smaller in steps to get the vac. you want.
:thinking:
Or....Check the belts that you have to use and get the diameter spec for the smallest pulley designed for it. See if that's enough vacuum. If not increase the size of the pulley as needed until you stall the motor.
:lol:
You would need more horsepower then.
pchast
Platinum Donating Member
 
Posts: 2056
Images: 97
Joined: Mon Jan 28, 2013 5:47 pm
Location: Athens, NY

Re: 11'6" three berth ply/foam/aly composite caravan

Postby hossesdad » Fri Mar 24, 2017 4:14 am

KC and Pete, the advice is much appreciated. KC, some Kiwi girl should have been detailed to keep you here. 8)

I found two small pulleys and bought another and a yard long belt ( this would be a two-yard belt in some circles). I am going to mount everything on timber and proceed to follow Pete's suggestions. There is no suggested rpm on the pump, no details at all apart from makers name, I cannot identify it from internet photos so don't have the specs. The electric motor is .75kw and 1450 rpm, class E. I have some old steel water pipe, a welder, some thick-walled polyethylene pipe, the odd fitting from my plumbing box and three joined together tanks from an old compressor. Everything else will cost money so the plumbing may therefor be country style. I think I need to hold a vacuum of between one and four psi over pieces about 48 square feet by 2 inches for three hours each, there will be eight of them. That machine sure does suck even when turned by hand, if you don't hear from me for a week, tell someone to look inside the pump in case things got out of hand. :lol: Photos will follow.
User avatar
hossesdad
Teardrop Advisor
 
Posts: 70
Images: 178
Joined: Fri Sep 02, 2016 5:19 am
Location: New Zealand

Re: 11'6" three berth ply/foam/aly composite caravan

Postby KCStudly » Fri Mar 24, 2017 11:34 am

hossesdad wrote:KC, some Kiwi girl should have been detailed to keep you here. 8)

Believe me, I was looking, even had a couple of potential takers, but no such luck. :NC
KC
My Build: The Poet Creek Express Hybrid Foamie

Poet Creek Or Bust
Engineering the TLAR way - "That Looks About Right"
TnTTT ORIGINAL 200A LANTERN CLUB = "The 200A Gang"
Green Lantern Corpsmen
User avatar
KCStudly
Donating Member
 
Posts: 9633
Images: 8169
Joined: Mon Feb 06, 2012 10:18 pm
Location: Southeastern CT, USA
Top

Re: 11'6" three berth ply/foam/aly composite caravan

Postby hossesdad » Sat Mar 25, 2017 1:46 am

Built the indoor table for the glueing and vacuum bagging using the oversize sawhorses. Here I am cutting the second half to size. I made a cutting jig for my circular saw out of the waste.

Image

The Dow Corning Foamular 250 available here is shiplap, yellow and made in India.

Image

the glueing and vacuum table

Image

(edited to avoid exciting anyone) bought a new drill driver combo when in town, a six year replacement warranty on the tools, three year replacement warranty on the batteries. Made in China. ( The Makitas with the spec were more than twice the price. I have thirty quality power tools and machines and ten others. A quality tool may be defined as a tool you fix without thinking; these are not those, if that makes sense. There are movre views on tools than good views in Yosemite and each is a pleasure to someone. I will only say that I had a friend, now passed on, who owned a top spec brand new Porsche 944 and a rundown apartment in a back street. I loved him dearly but I don't copy him. I fully expect to hand in my tool kit before my current collection is worn out. ) Drill is fine, driver is amazing. The other battery is on the charger. Drove fifty 3in screws on a bit of a charge.

Image

making up homemade sash cramps for glueing the foam edge to edge. The sheets are not straight nor square, I will make the panels oversize and cut down square.

Image

example of unstraight

Image

putting beeswax on the sawing jig for the circular saw. I put it on the plate of the saw and blade too, from time to time. Huge difference in effort needed. Incidentally, to make a sawing jig like this, just cut an absolutely parallel sided rectangle about 4 inches wide and as long as you want, glue and screw it onto an oversize bit of ply and then run the saw down each side, once on the narrow side, once on the wide side, and let the blade do the measuring for you. If you make the effort to do one, once you have your line on the material to be cut, you just lay your jig on the line and screw it or clamp it and run the saw down it, vroom, blade cuts perfectly on the line every time. this one is 8 feet long

Image

I have decided to do the walls this way and do a fibreglass-over-foam roof for the ability to have waterproof flanges on the two hatches and ease of making it curved.
User avatar
hossesdad
Teardrop Advisor
 
Posts: 70
Images: 178
Joined: Fri Sep 02, 2016 5:19 am
Location: New Zealand
Top

Re: 11'6" three berth ply/foam/aly composite caravan

Postby rruff » Sat Mar 25, 2017 6:44 pm

hossesdad wrote:I will have to get on to your threads tomorrow, rruff, and find out where you are at.


I'm still haven't left the gate! :thinking: :NC Getting close though. Decided to go with a epoxy-fiberglass exterior. Experiments so far indicate that a layer of 1708 + 6oz will be both cheaper and lighter than 3mm Okoume + 6oz.

There are advantages to using epoxy in warm weather (>70F), which is one reason why I haven't started. You can use the slow cure stuff which has a longer pot life, less blush, and is slightly less brittle.

The carpet seam roller and wallpaper perforator together seem to texture the foam very well. Smearing down a paste of silica thickener and epoxy first seems to work fine. Total weight added for the paste and layup is ~1.1x the cloth weight, which I'm happy with. I really need to roll the layup a good amount to get the epoxy use that low. I'm also on flat surfaces which probably helps.

From what I've read, polyester gelcoat over epoxy will work fine provided that epoxy was mixed well in the proper ratios, has fully cured, had all blush removed, and is sanded and cleaned. I'll probably do it.
rruff
Teardrop Master
 
Posts: 142
Joined: Wed Sep 28, 2016 3:54 pm
Location: Ruidoso, New Mexcio
Top

Re: 11'6" three berth ply/foam/aly composite caravan

Postby hossesdad » Sun Mar 26, 2017 2:25 pm

From what I've read, polyester gelcoat over epoxy will work fine provided that epoxy was mixed well in the proper ratios, has fully cured, had all blush removed, and is sanded and cleaned. I'll probably do it.


nice to hear from you. I can't confirm the above, except that I believe, as you suggest, one has to add any layup to epoxy either when uncured or after the amine blush has appeared and been removed. I imagine the polyester and the epoxy as two different kinds of plastics which one is bonding together using polyester resin as the glue (the epoxy being hard when the polyester is applied). Then it occurs to me, I have never heard of polyester being recommended as glue...it's a dilemna. But if all the polyester is doing is holding on a gelcoat, well, surely it can do that. But such are those odd little things, like capillary moisture pressure, which can be 10 psi, I hear, that maybe not. Good luck. The purpose of research is to avoid the pitfalls, not to scrap ones dreams and plans, go to it. :applause:

If you are getting the resin/mat ratio down to 1 to 1.1 by weight, you are doing very well as I remember it. I believe high vacuum infusion bagging get it to 2 mat to 1 resin by weighty and that is why they go to the trouble. The mat is the strength, the resin is the bonder. But I am just chatting, Swoody and others will know.
User avatar
hossesdad
Teardrop Advisor
 
Posts: 70
Images: 178
Joined: Fri Sep 02, 2016 5:19 am
Location: New Zealand
Top

Re: 11'6" three berth ply/foam/aly composite caravan

Postby hossesdad » Sun Mar 26, 2017 3:46 pm

I have decided to do the walls this way and do a fibreglass-over-foam roof for the ability to have waterproof flanges on the two hatches and ease of making it curved.


freeing the roof to be any shape has removed a block to the design. ( I am trying to let the van design herself around our decisions, only making sure that I am looking ahead with regard to conduits, furring strips, vents and the like. Form will follow function). I am going to use fibreglass cloth and epoxy. I want two hatches because one of my goals is to put three beds in the back, giving Ebi a bunk bed that is like her own room above our feet. I am putting a hatch above her head so she can stargaze . (She will have an escape window/little girls entrance, too, complete with ladder rungs to the ground). Even after removing her space from my calcs, the volume of the interior will be five or six times that of a small teardrop.
User avatar
hossesdad
Teardrop Advisor
 
Posts: 70
Images: 178
Joined: Fri Sep 02, 2016 5:19 am
Location: New Zealand
Top

Re: 11'6" three berth ply/foam/aly composite caravan

Postby rruff » Mon Apr 03, 2017 7:14 pm

hossesdad wrote:I am going to use fibreglass cloth and epoxy.


Could you provide some details on what your camper dimensions are, and how your walls are built up? I guess you were going with ply/foam/aluminum? Internal stringers (frame)?
rruff
Teardrop Master
 
Posts: 142
Joined: Wed Sep 28, 2016 3:54 pm
Location: Ruidoso, New Mexcio
Top

Re: 11'6" three berth ply/foam/aly composite caravan

Postby hossesdad » Wed Apr 05, 2017 1:04 am

Could you provide some details on what your camper dimensions are, and how your walls are built up? I guess you were going with ply/foam/aluminum? Internal stringers (frame)?


Rruff, been on a business trip, nice to hear from you.

The external dimensions of our cabin should be exactly 3600mm long x 2200mm wide x 1950mm high at the highest point, giving 1900mm headroom inside in the middle. (That’s 11 foot 10 inches long x 7foot 3 inches wide x 6 foot 5inches high, giving 6foot 3 inches headroom in the centre.) It will be lower at the ends of the roof for runoff and streamlining, so lowest at the front.

The floor is ¾” treated ply.

Yes, I am planning to do the walls in ¼” treated ply inside, 2” foamular 250 and 0.036 inch aluminum outside (edited to add a zero!), the whole lot held together by epoxy thickened with West microfibers adhesive blend made up to a putty consistency, spread with a slotted trowel and then a spreader and pressed together by a vacuum bag at about 2psi of vacuum (That is 288 lbs per square foot, of course). Did a test (without vacuum, using weights because my plumbing isn’t ready) held well although needed more weight round the edges...it is for that uniformity that I am using the vacuum. One has to pull off the face of the foam to release the ply or aluminium.

I am going to rout and epoxy 4” strips of ply flat to the outside walls where the foam pieces join (the foam pieces are 600mm wide). That strengthens the joins and gives me a furring strip to screw or rivet the aly to in the future if it delaminates anywhere.

Inside, I mean to have ply furring strips routed and epoxied into the foam beneath the wall ply, one at bed height, one at shoulder height. I will probably put framing at the door and windows and access hatches when I make the wall panels but I am toying with adding it after, although that is not so easy to do because of the aluminium. I am also considering other material i can use, eg, plastic...don't like wood near the windows and doors.

The shape of the caravan will be determined by building the walls oversize and cutting them to a profile I like, then putting them up. The roof will be wooden stringers, foam and thin ply covered in fibreglass. I may make the roof in place, I may make it elsewhere, in two pieces and epoxy it on and together.

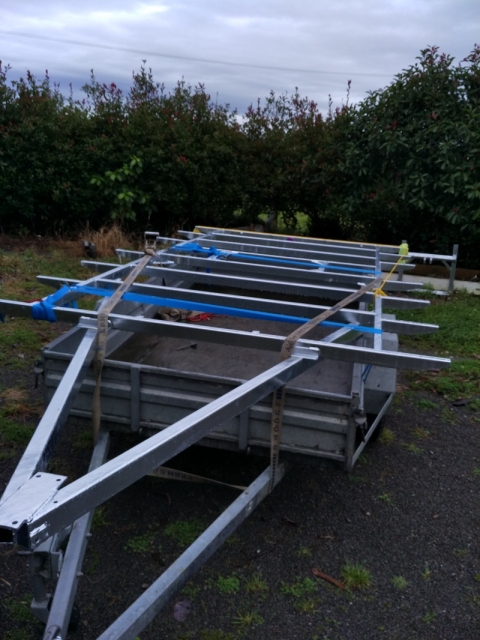
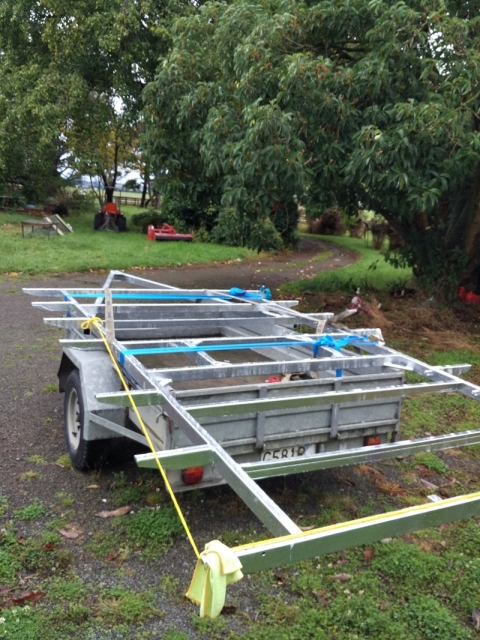
Here are photos of the chassis back from galvanising.

front view
Image
rear view. All the cross-members bar three are galvansised inside and out, ditto the a-frame. The rails are galvanised outside. I may put some rust preventative in them.
Image
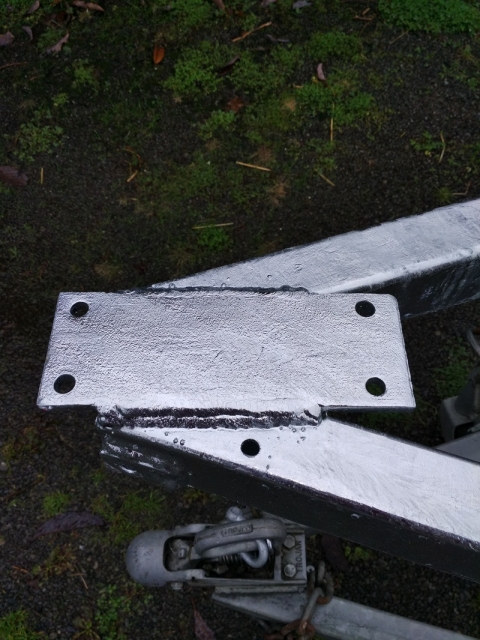
I love the look of galvanising...it makes jewellry out of steel!
Image

You cannot see it clearly but the chassis has conduit holders welded on and all holes drilled for the trailer lights. Likewise the holes have been drilled for running the brake pipes and hoses in a neat way (Hydraulic brakes).
User avatar
hossesdad
Teardrop Advisor
 
Posts: 70
Images: 178
Joined: Fri Sep 02, 2016 5:19 am
Location: New Zealand
Top

Re: 11'6" three berth ply/foam/aly composite caravan

Postby hossesdad » Wed Apr 05, 2017 4:40 am

Sorry, Rruff, should make it clear: there is no frame, this is a composite build. There will be furring strips and a bit of framing around doors and windows, or maybe not even that. Is that a good idea? Ask me in three months :worship:
User avatar
hossesdad
Teardrop Advisor
 
Posts: 70
Images: 178
Joined: Fri Sep 02, 2016 5:19 am
Location: New Zealand
Top

Re: 11'6" three berth ply/foam/aly composite caravan

Postby KCStudly » Wed Apr 05, 2017 11:25 am

It's my understanding that you can not galvanize a sealed item, like an enclosed tubular frame rail, due to the hazard of the air volume expanding with the heat of the process. A friend has fabrications galvanized on a fairly regular basis and he says that if he does not provide appropriate holes, the platter will either do it for him (with or without permission), or they will refuse the job.

Check your chassis again and see if they did not add holes; your tubes may already be galvanized inside! :thumbsup:
KC
My Build: The Poet Creek Express Hybrid Foamie

Poet Creek Or Bust
Engineering the TLAR way - "That Looks About Right"
TnTTT ORIGINAL 200A LANTERN CLUB = "The 200A Gang"
Green Lantern Corpsmen
User avatar
KCStudly
Donating Member
 
Posts: 9633
Images: 8169
Joined: Mon Feb 06, 2012 10:18 pm
Location: Southeastern CT, USA
Top

Re: 11'6" three berth ply/foam/aly composite caravan

Postby hossesdad » Wed Apr 05, 2017 4:15 pm

Check your chassis again and see if they did not add holes; your tubes may already be galvanized inside!


KC, How to find out where the galv got to? Your are exactly right about the sealed chambers needing to be drilled, those closed members had the biggest holes i dared drill in them (10mm/about 3/8ths) and about five per member, but they are expansion holes to avoid explosion and to drain out any galv afterwards and I didn't think to let in enough galv for coverage. I have always assumed that the galv doesn't do a thorough job through those holes but like all assumptions, it begins with an 'ass". I will today e-mail the galv company, Webforge, and ask them their opinion.Something would depend on how long the frame spends in the galv and whether it is turned. I don't know those things. :thinking: :) But if there is galv inside those tubes it will be on the floor of the tube which is where it is needed because that is where the water will be.

I used angle iron in places and made as much tube open both ends, probably 70%, as I could in order to get throrough galavanising. There is always room for more thought. I could have opened decent holes in the closed members and welded them shut afterwards, subject to holding my breath whilst welding...I won't use galvanised tubing for welded structures because I can grind the zinc off the outside but not the inside, so the dangerous fumes are still there. Usually green. Ask me how I know.

Poet Creek looks like my kind of place. :applause: Heart Lake, now called Lake Aorere, would be my Poet Creek...four days from any road end. Been there eight times so far, and arrived from every possible direction. Paradise with sandflies, it is only paradise if you have Dimp.
User avatar
hossesdad
Teardrop Advisor
 
Posts: 70
Images: 178
Joined: Fri Sep 02, 2016 5:19 am
Location: New Zealand
Top

Re: 11'6" three berth ply/foam/aly composite caravan

Postby KCStudly » Thu Apr 06, 2017 6:54 am

Googled Lake Aorere images. Nice! :thumbsup:
KC
My Build: The Poet Creek Express Hybrid Foamie

Poet Creek Or Bust
Engineering the TLAR way - "That Looks About Right"
TnTTT ORIGINAL 200A LANTERN CLUB = "The 200A Gang"
Green Lantern Corpsmen
User avatar
KCStudly
Donating Member
 
Posts: 9633
Images: 8169
Joined: Mon Feb 06, 2012 10:18 pm
Location: Southeastern CT, USA
Top

Re: 11'6" three berth ply/foam/aly composite caravan

Postby hossesdad » Thu Apr 06, 2017 6:34 pm

For those of you who use Sketchup and Solidworks, sorry, I use Ebi's crayons and pages stolen from her schoolbooks. (And wife has a technology company! 8) ) Here are my calcs of the wall layout, trying to put the joins in sensible places. I post it for your amusement....I would describe myself as an enthusiast for technology hampered by a horse-drawn mind. :lol:

(edit) The walls are being made in halves and joined together with a spline in the foam, the overlap on the ply and the 300mm aly strip.

Image
Last edited by hossesdad on Thu Apr 06, 2017 9:32 pm, edited 1 time in total.
User avatar
hossesdad
Teardrop Advisor
 
Posts: 70
Images: 178
Joined: Fri Sep 02, 2016 5:19 am
Location: New Zealand
Top

Re: 11'6" three berth ply/foam/aly composite caravan

Postby hossesdad » Thu Apr 06, 2017 9:28 pm

for information to help anyone make decisions about builds, got the bill for galvanising, cost $270 NZD, so about $180 USD.
User avatar
hossesdad
Teardrop Advisor
 
Posts: 70
Images: 178
Joined: Fri Sep 02, 2016 5:19 am
Location: New Zealand
Top

PreviousNext

Return to Build Journals

Who is online

Users browsing this forum: No registered users and 7 guests