Welcome to the "Learning Curve"

...ask your questions in the appropriate forums BUT document your build here...preferably in a single thread...dates for updates, are appreciated....

Re: Welcome to the "Learning Curve"

Postby Lou.Catozzi » Tue Nov 07, 2017 10:16 pm

I really like that shape. Well done thus far!


Thanks Johnysteam! Slow and unsteady, that's my progress report. That Semi-Standi of yours is pretty sweet. You have the interior decked out pretty nice. I hope mine finishes out as nice as yours!
User avatar
Lou.Catozzi
Teardrop Builder
 
Posts: 41
Images: 41
Joined: Wed Apr 20, 2016 3:54 am
Location: Round Rock, Tx

Learning Curve - Build Days 18 & 19

Postby Lou.Catozzi » Mon Dec 11, 2017 6:42 pm

Well, things are progressing slowly. Over the past month or so I've been working on the starboard wall framing. I have most of the framing in place forward of the galley bulkhead. I'm still working out the details of the hatch to sides joint so I wanted to get at least one wall vertical and temporarily in place so I could visualize things better.

Image

This is a wide angle photo so some of the framing looks skewed. It really isn't. Everything is nice and plumb and level that should be. Rather than finish the wall framing aft of the bulkhead I have gone ahead and started framing the port wall. After that piece has caught up to it's twin I'll continue designing and building out the wall design before starting on the galley area and the cabin interior cabinetry. I've also started planning out the electrical systems. At this point I think I'll go with a 12V deep cycle battery on the tongue and charged from the Jeep to power all the lighting and a few USB charging ports and a separate 120V system to power a few outlets in the cabin and galley from shore power at established campgrounds. I plan to use propane canisters for cooking and possibly for lighting in the galley while boondocking. No solar and no battery charging from shore power at this point.
User avatar
Lou.Catozzi
Teardrop Builder
 
Posts: 41
Images: 41
Joined: Wed Apr 20, 2016 3:54 am
Location: Round Rock, Tx

Learning Curve - Build Days 18 & 19 - Continued

Postby Lou.Catozzi » Sat Jan 20, 2018 6:11 pm

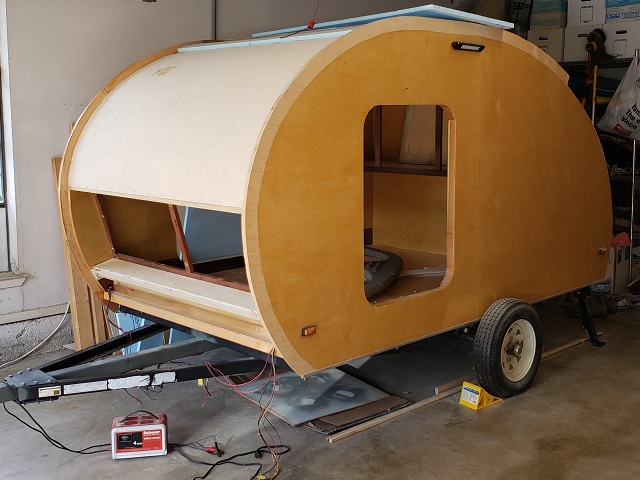
Today wasn't really a build day. The only tools I used was a ruler and a pencil. This was the first day in about a month that the weather and my health allowed me to even play with the project. I rolled it outside into the driveway and stood up the port side wall and temporarily braced it to get a give me an idea of the size of the finished project.

Image

Image

It is bigger than I have been imagining for the past two years of looking at drawings. It is going to be interesting to see how the Jeep behaves when I try to go somewhere with the teardrop in tow.

Next steps are to finish routing the walls in preparation for adding the roof, finishing the galley design, and then start running the wires in the side walls. After that I'll insulate the side walls, put on the inner wall skins, and get them permanently attached to the floor.
User avatar
Lou.Catozzi
Teardrop Builder
 
Posts: 41
Images: 41
Joined: Wed Apr 20, 2016 3:54 am
Location: Round Rock, Tx
Top

Learning Curve - Build Day 20

Postby Lou.Catozzi » Mon Mar 12, 2018 8:31 pm

It's been a while but today the stars aligned (weather, health, time, money) enough for me to spend the day working on the teardrop again. I glued in two layers of 3/4" foam panels into the port wall framing and ran most of the wiring for that side of the trailer.

Image

After that I decided to cut down the wall template from it's exterior wall skin profile to that of the cabin interior. That involved cutting about 5.5" off the bottom edge of the template, cutting off the aft end of template at the interior edge of the bulkhead, and trimming the roof curve down 1.625" which is the thickness of the headliner and roof foam and fiberglass.

Image

The interior wall template is just laying on top of the port wall to help visualize the interior wall at this point. Ignore that extra hole to the left of the one with the wires! Measure once, drill twice, not!

Next up will be finishing the port wall wiring, cutting the interior wall out of 1/8" birch ply, and routing out the ledge at the top of the wall for the roof system to rest into. Then on to the starboard wall. Forward!
User avatar
Lou.Catozzi
Teardrop Builder
 
Posts: 41
Images: 41
Joined: Wed Apr 20, 2016 3:54 am
Location: Round Rock, Tx
Top

Learning Curve - Build Day 21

Postby Lou.Catozzi » Sat Mar 17, 2018 7:20 pm

Today I made some great progress.

First I finished running the wiring in the port wall. My fuse block and ground buss bar will be in a cabinet in forward end of the cabin. When I cut the foam for each wall cavity I left an inch open at the bottom of the wall and drilled holes thru each wall stud as a place for the wiring bundle to run. Wires go from the floor up inside the the wall just aft of the door frame (for the cabin and porch lighting and for the roof vent fan) and just forward of the aft bulkhead (turn/brake/licence plate on galley hatch and power for galley lighting).

Next I sanded down the foam insulation in the wall cavities. The walls have 1.5" framing and there are two layers of 3/4" rigid XPS foam. Unfortunately, the XPS is actually .8" thick so I have to sand it down level with the framing before I can apply the interior wall skin.

One of the reasons that I haven't made a whole lot of progress lately is that I was up against a task that I hadn't figured out how to do with the tools and materials I had available. When that happens (often!) I usually respond by slowing down progress on the tasks leading up to the puzzling task until a solution appears or occurs to me. Today I think I have solved one of those types of tasks that have been bugging me. The wall framing at the top of the wall where the roof attaches is made up of shaped pieces of 1.5 x 3" poplar on edge vertically and smoothed to the curve of the roofline.

I need to cut a ledge out of the inner surface of this poplar so that the headliner and the foam sheets that make up the roof can sit flush with the outside top of the walls.

Image

Today I finally came up with a plan to carve that ledge. My template for the inner wall skin and the inner edge of the ledge is less than 1/4" thick and the ledge needs to be 3/4" deep. The Perfect tool for the job would be a straight router bit with 3/4" cutting length and a bearing to ride on the edge of the template. However my only similar router bit has a 1" cutting length. That would cut too deep by itself. My solution (a really simple one after I finally thought of it) is to make a thicker template with a piece of 1/2" BB plywood I had left over. BB plywood is not cheap but it is cheaper than a new router bit IF I could even find one with a 3/4" cutting length (depth?)

That was my day. Next up is to try this solution by cutting the ledge on the port wall.
User avatar
Lou.Catozzi
Teardrop Builder
 
Posts: 41
Images: 41
Joined: Wed Apr 20, 2016 3:54 am
Location: Round Rock, Tx
Top

Re: Welcome to the "Learning Curve"

Postby clamlamp » Sun Apr 08, 2018 4:15 pm

great job so far on the build! :applause:
User avatar
clamlamp
Teardrop Master
 
Posts: 218
Joined: Mon Oct 02, 2017 2:54 pm
Top

Learning Curve - Build Day 22

Postby Lou.Catozzi » Thu Dec 27, 2018 2:00 pm

Well, I've been picking away at the project for months, just doing a little this or that as several design challenges percolated thru the grey matter. I finally got thru some of those issues and actually spent most of a day back before Christmas working on the tear again.
Image
After checking that I had all the wiring that I wanted run thru the starboard wall framing I dumped about a pint of TB2 all over the inner wall framing and insulation and lay out the inner wall skin - a 4x8 sheet of 1/8" BB ply. There is a 5" gap between the bottom edge of this ply and the bottom edge of the wall. I will fill this gap with a removable piece of ply later. This removable piece will give me access to the wiring and to the bolts that will help attach the walls to the floor.
Image]
Here is the starboard wall the next day after I removed all the weight and trimmed the edge with the router.
User avatar
Lou.Catozzi
Teardrop Builder
 
Posts: 41
Images: 41
Joined: Wed Apr 20, 2016 3:54 am
Location: Round Rock, Tx
Top

Re: Welcome to the "Learning Curve"

Postby capnTelescope » Fri Dec 28, 2018 1:52 pm

Looking good, Lou. Glad to see you're back at it. :thumbsup:

I couldn't say for sure whether the percolatin' or the shopping for "just the right thing" was the number one consumer of build time. It wasn't actually building anything, that's for sure. :D
I'll burn that bridge when I come to it.

Brad
ImageImageImage

Building the Bed & Breakfast
User avatar
capnTelescope
Lifetime member
 
Posts: 1221
Images: 368
Joined: Sun Jun 27, 2004 3:44 pm
Location: Round Rock, TX
Top

Re: Welcome to the "Learning Curve"

Postby lthomas987 » Fri Dec 28, 2018 6:23 pm

capnTelescope wrote:
I couldn't say for sure whether the percolatin' or the shopping for "just the right thing" was the number one consumer of build time. It wasn't actually building anything, that's for sure. :D


So true! Your build is looking good.


Sent from my LG-LS993 using Tapatalk
Laura
Bike-Drop a Micro-Foamy Build Journal http://www.tnttt.com/viewtopic.php?f=50&t=59274
My first Superlegarra-ish Foamy build http://www.tnttt.com/viewtopic.php?f=55&t=59049
User avatar
lthomas987
Donating Member
 
Posts: 357
Images: 204
Joined: Sun Feb 02, 2014 2:41 pm
Location: Minneapolis, MN, USA
Top

Progress (Sort of) Report

Postby Lou.Catozzi » Sat Jul 13, 2019 7:18 pm

Wow! My last post was over 6 months ago! Where does the time go. I haven't really done much of any work on the camper lately but over the past few weeks I've finally made up my mind on the first major upgrade. I've decided to replace the springs, axle, hubs, and tires that came with the 5x8 trailer kit from Northern Tools. The more I looked at those stock tires and wheels the more doubt kept creeping into my mind about their quality and durability.

I am probably going to go with a Dexter Torflex axle with electric brakes and 13" wheels and passenger tires. I've also decided to go out and buy a 12,000 BTU window a/c unit for my two-car garage where I am building the camper. The attached garage is probably not insulated but it should make it a little more bearable to work in there during the Texas summers.
User avatar
Lou.Catozzi
Teardrop Builder
 
Posts: 41
Images: 41
Joined: Wed Apr 20, 2016 3:54 am
Location: Round Rock, Tx
Top

It's Been Far Too Long...

Postby Lou.Catozzi » Fri Jan 15, 2021 11:22 am

...since I reported any progress on the Learning Curve. I have continued to pick away at it over the past two years but I haven't felt motivated to document any of the work. It is past time to rectify that. Here is verbage describing the last two years. I'll post what pictures I have in a follow-up post.

When I left off the build documentation I had just closed in the frame-construction side walls. They have now been permanently added to the floor of the cabin. I also added a framed wall separating the cabin from the galley and framed in the galley countertop. There will be minimal wiring and no plumbing in the galley. I have not started the galley hatch yet as that is going to be complicated as it will be framed construction with an 1/8" ply inner layer, 3/4 x 1.5 poplar framing, foam insulation, and fiberglass outer layer. This is the same contruction method for the roof of the tear. The hatch will also contain the turn signals, brake lights, and the license plate holder.

The entire roof of the cabin has received the 1/8" ply inner layer. Above this is the 3/4 x 1.5 poplar spars to frame in the ceiling vent. There is a 1.5 x 3.5 poplar spar at the top of the galley/cabin wall that will support the hatch hinge. That is probably structurally overkill but it solved a couple issues laying out how the hatch joins the roofline.

I have also framed in a large storage cabinet in the cabin at the top of the wall with the galley and a small cabinet in the front of the cabin that is sloped forward so I can lean against it while sitting up in bed. This forward cabinet also holds the air conditioning ducts. There will be an a/c unit on the tongue that will be plumbed into the cabin thru the front wall. Cold air will enter via a 3" PVC pipe routed to vents on the top of the forward cabinet and the return will be via vents on the sides of the forward cabinet. This might sound confusing but I have pictures. Soon, I promise!

In other news....I am retired now after 39 years with IBM. It was a great place to work but I am glad that is behind me now as I move forward with finishing this project - yeah, right! - and getting it out on the road.
User avatar
Lou.Catozzi
Teardrop Builder
 
Posts: 41
Images: 41
Joined: Wed Apr 20, 2016 3:54 am
Location: Round Rock, Tx
Top

Re: Welcome to the "Learning Curve"

Postby pchast » Fri Jan 15, 2021 9:52 pm

Congratulations on your retirement. :thumbsup:
pchast
Platinum Donating Member
 
Posts: 2056
Images: 97
Joined: Mon Jan 28, 2013 5:47 pm
Location: Athens, NY
Top

Re: Welcome to the "Learning Curve"

Postby Lou.Catozzi » Sat Jan 16, 2021 6:30 pm

pchast wrote:Congratulations on your retirement. :thumbsup:

Thnx, Pete! Freeing up those 40-50 hours a week really has helped get more time to work on the tear. But there is plenty of other distractions and honey-do lists and long-delayed house projects, also.
User avatar
Lou.Catozzi
Teardrop Builder
 
Posts: 41
Images: 41
Joined: Wed Apr 20, 2016 3:54 am
Location: Round Rock, Tx
Top

It's Been Far Too Long...

Postby Lou.Catozzi » Sat Jan 16, 2021 8:34 pm

Here are the pictures I have of the work done over the last 18 months. I didn't take nearly enough but these should give you an idea of what's been going on.

Image
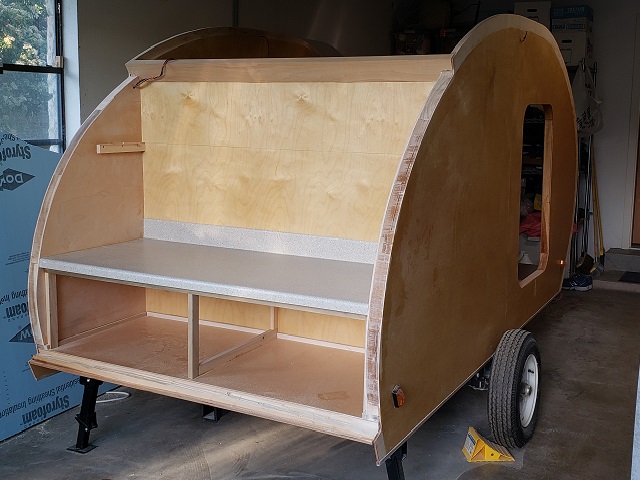
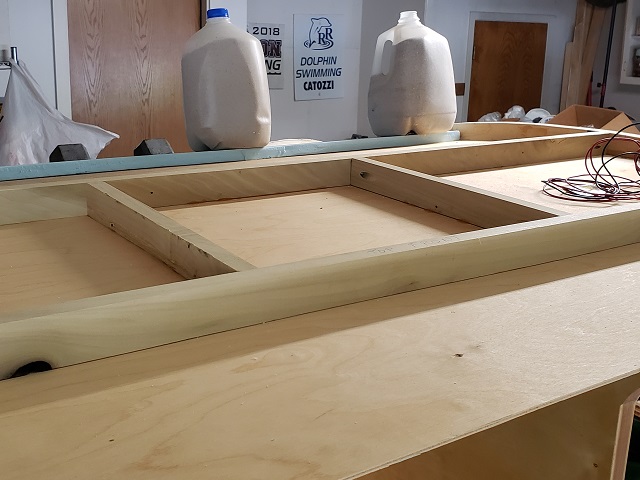
Here is a view of the galley showing the wall separating the cabin from the galley area. The countertop have been framed in and installed and there is a shelf to be installed above the countertop. You can also see the 2x4 beam of poplar that will anchor the hinges for the galley hatch.

Image
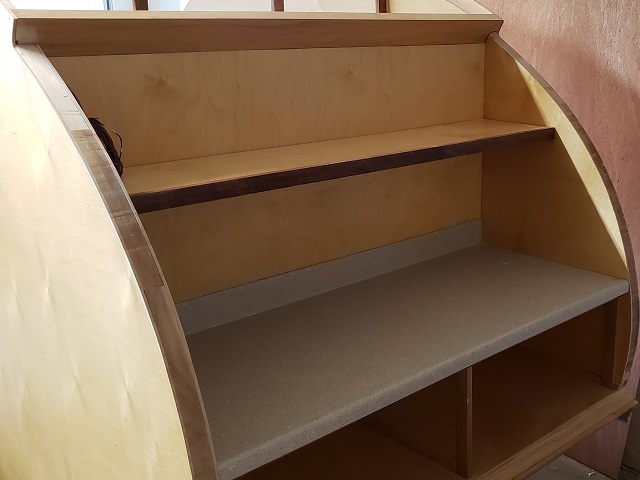
Here is that shelf above the countertop installed.

Image
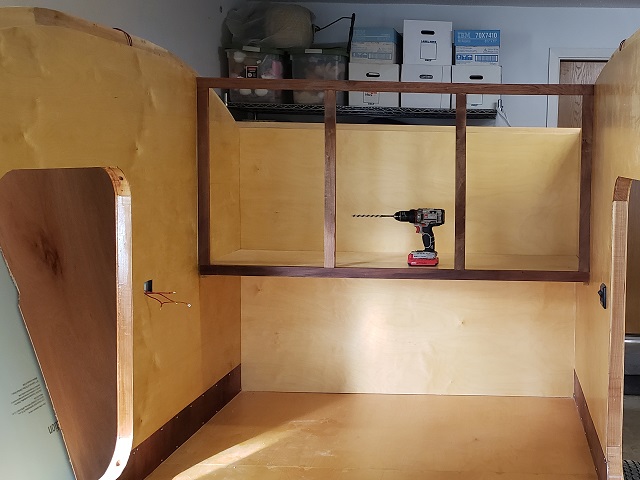
A view of the storage cabinet being framed in the rear of the cabin at the top of the galley wall. You can also see some of the wiring work being done.

Image
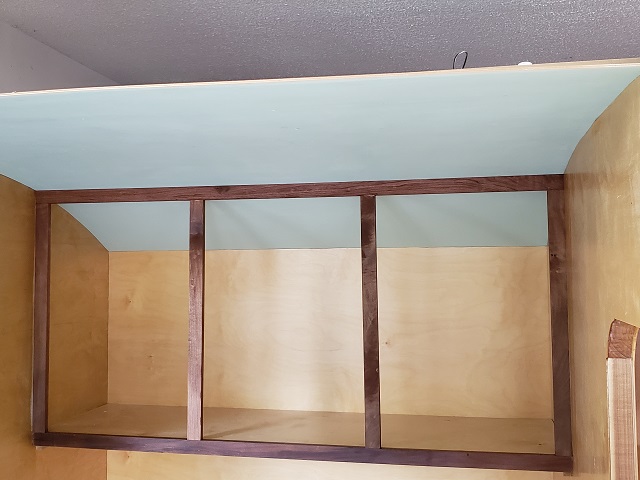
The first section of the cabin headliner has been installed. This is 1/8" birch plywood that has been pre-painted a light green.

Image
Here is the framing for the vent fan going into the short flat section of the ceiling. You can also see that I have started covering the headliner plywood with 1.5" of blue foam kerfed to fit the curved roofline. After all the foam is in place I will be shaping it and covering it with fiberglass cloth and epoxy.

Image
More of the headliner has been installed and more of the foam, also. Additionally, you can see framing for the small storage cabinet in the front of the cabin.
Image
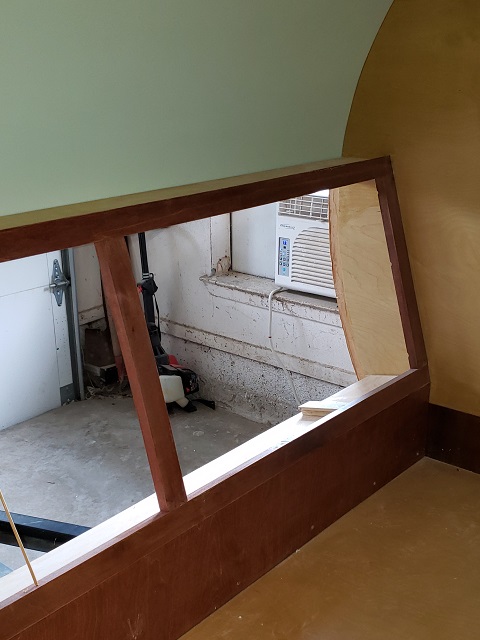
Here is a view of the forward storage cabinet framing from inside the cabin.

Image
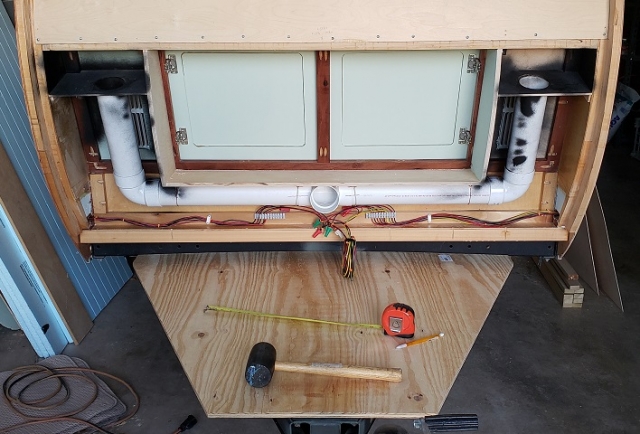
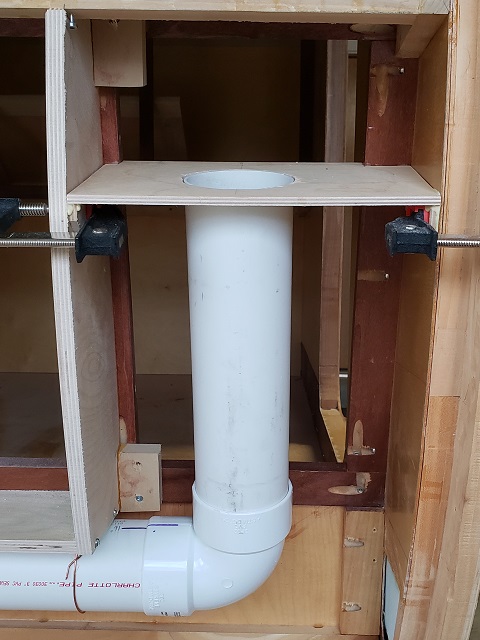
Skip forward a few weeks and here is the outside of the forward storage cabinet with air conditioning ductwork in place and wiring work visible below that. This area will be open to the tongue box for the air duct and return air to pass between the box and the cabin. The black spray paint is to help hide the view of the ductwork if looking into the vents inside the cabin.

Image
Here is some detail of the air conditioning ductwork. Cool air will come in thru the PVC pipe duct and enter the cabin via a vent in the top of the space above the end of the duct. Return air will leave the cabin thru another vent behind this duct. It can be better seen in another photo.
Image
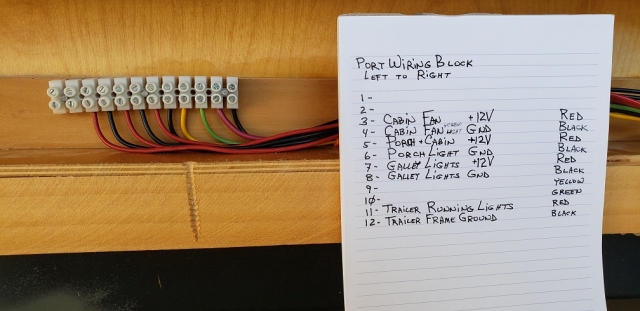
Detail photo of some of the wiring below the forward storage cabinet.

Image
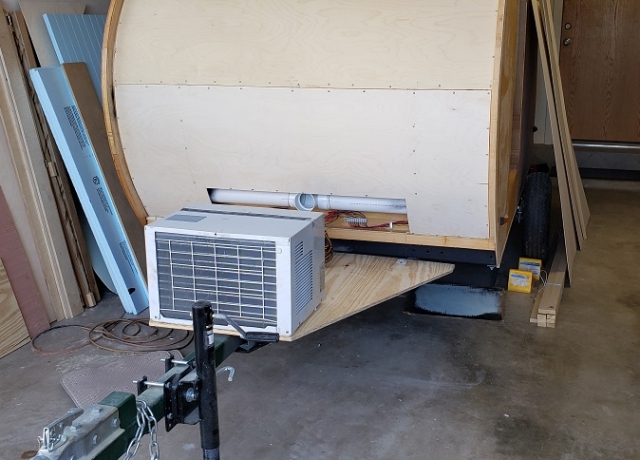
The last piece of the cabin headliner has been installed. It forms the back wall of the forward storage cabinet. You can see the PVC that acts as the cold air duct for the air conditioning. The returning air will flow freely thru the rest of the opening and be routed back to the air conditioner. You can see the a/c unit sitting on the floor of the tongue box.

Image
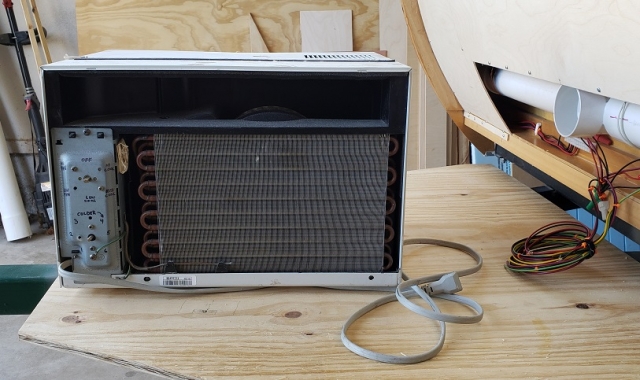
Here is a detail photo of the front of the a/c unit. I have removed the front panel so that I can frame it into the tongue box and plumb in the cold air and return air. I'm not yet sure if I'm going to try to wire the controls into the cabin or simply wire a power switch into the cabin to just turn it on and off as needed.

Image
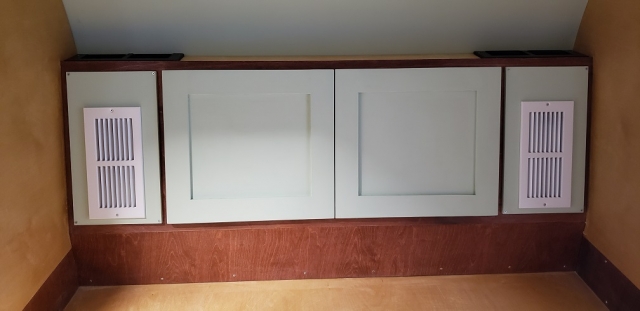
Here is a cabin interior view of the forward storage cabinet with the two center storage doors and the spaces on the sides for the a/c vents. The cool air comes in thru the black vents in the top of the cabinet and the white vents are for the return air.

Image
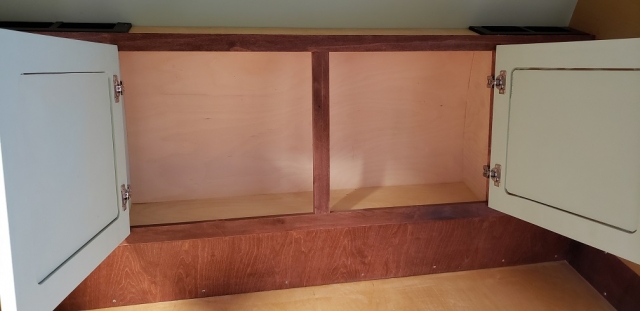
Here is a view of the forward storage cabinet with the doors open. I haven't decided yet if I'm going to paint the back interior of the cabinet light green to match the ceiling or if I will just seal it with clear satin polyurethane.


With that I am caught up documenting the work done up to this point.
User avatar
Lou.Catozzi
Teardrop Builder
 
Posts: 41
Images: 41
Joined: Wed Apr 20, 2016 3:54 am
Location: Round Rock, Tx
Top

Re: Welcome to the "Learning Curve"

Postby KCStudly » Sun Jan 17, 2021 6:06 am

I recommend that you skin the outside surface of your foam before applying the epoxy/FG.

I glassed directly over a combination of foam, light weight spackle filler and guide coat primer, and had (am still having) troubles... small areas of lack of adhesion and some hand sized blistering (puffed out areas as if something was still out gassing... which I will need to drill and see if I can get to lay back down and adhere using the syringe method.

I spent far too much time and materials trying to get the foam even close to fair, all on the premise of saving the weight of an outer ply layer. In the grand scheme of things the job would have been faster, easier, probably less expensive and definitely better, without very much, if any weight penalty if I had skinned with 1/8 ply them glassed.

Just saying, I've been there. Am still there, in fact. The blistering is such a nuisance after all of my hard work that it is discouraging me from completing TPCE.
KC
My Build: The Poet Creek Express Hybrid Foamie

Poet Creek Or Bust
Engineering the TLAR way - "That Looks About Right"
TnTTT ORIGINAL 200A LANTERN CLUB = "The 200A Gang"
Green Lantern Corpsmen
User avatar
KCStudly
Donating Member
 
Posts: 9633
Images: 8169
Joined: Mon Feb 06, 2012 10:18 pm
Location: Southeastern CT, USA
Top

PreviousNext

Return to Build Journals

Who is online

Users browsing this forum: No registered users and 14 guests