 by working on it » Tue Jul 09, 2019 8:22 am
* When I first used the "mix" on bare plywood (no prep, no sanding, no primer), during pre-painting tests on my TTT build, in 2012, I had best results using 3:1 thinner:poly, then 2:1, then 1:1, followed by 100% polyurethane. I let each application just barely dry to "tacky", before I went on to the next step. Then, allowing the poly to completely cure for days, I followed with my choices of TSC (Tractor Supply) alkyd (oil-based) enamel tractor paint, Rustoleum No-rust Enamel (because I had enough already on hand, that I wanted to use for the edge trim), and TSC aluminized silo paint (that didn't say it was for wood), with no prep, again, just two coats in quick succession. Worked perfectly, and no tendency to bubble-up or separate from the poly "primer".
* Of course, my testing was done on small pieces, under optimal (as close as it gets here in spring in N.Texas, if not just a little cool) temperature and humidity; the actual application on my trailer shell was done in direct sunlight, at 106-110 degrees, following the same method, but allowing one full week to allow the poly to cure, inside a 80-90 degree temperature building, between poly and paint (which was also applied in 105+ temps in direct sunlight. If there was going to be any problems with adherence, it should've shown up after going so far into extreme variance from the recommended application procedures. But, after 6+ years, there has been no deterioration.
* The plywood used was pre-sanded from the manufacturer, and pretty finely grained, which is a far cry from my next use of the poly "mix" and aluminized paint (this time Rustoleum, again not recommended for wood), on my truck bed cover panel project. on it, the plywood was of a lower grade, pretty rough, and again I did no prep at all. I used 2:1 thinner:poly, then 1:1 thinner: poly, then pure poly on both sides (with 2 coats of each step on the topside, and only one of each step on the underside. Same method was used, just allowing each step to get tacky before proceeding. But, the weather was very humid, and rainy then, and the poly never got fully cured before I used the aluminized topcoat. As soon as there was a chance to apply the paint on a hot, dry afternoon two days later? , I quickly applied two coats of the aluminum on just the topsides, and called it done.
* Time will tell how the aluminized paint will last on the bed cover panels, since there was less care given to the application. But, so far, after a month of exposure to rain, direct 100 degree sun, and all sorts of stuff falling on the covers (the reason why I built them), there's been no sign of the aluminum paint lifting off of the poly/"mix" preparation underneath. at this point, I fully expect the oil-based paint to adhere to a poly/"mix" undercoat as well as if proper prep work and/or actual primers had been used. I think the polyurethane-thinner "mix"-oil based paint will work on any wood, bare or not. The solvents seem to bond the varied coatings together, and since the "mix" has gained a foothold in the wood, they all happily live together. If aluminized paint will stick to a non-metal, non-primered, no-prep plywood surface, then it'll stick to prepped wood even better, I bet. Who needs primer?
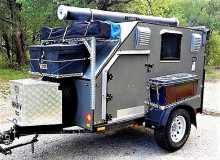
2013 HHRv "squareback/squaredrop", rugged, 4x8 TTT, 2225 lbs- *3500 lb Dexter EZ-Lube braked axle, 3000 lb.springs, active-progressive bumpstop suspension
- *27 x 8.5-14LT AT tires (x 3) *Weight Distribution system for single-beam tongue
- *100% LED's & GFCI outlets, 3x fans, AM/FM/CD/Aux. *A/C & heat, Optima AGM, inverter & charger(s)
- *extended-run, on-board, 2500w generator *Coleman dual-fuel stove & lantern, Ikea grill, vintage skillet
- *zinc/stainless front & side racks *98"L x 6" diameter rod & reel carrier tube on roof


 oil based poly is what you want ...

 That’s it !!!
  That will treat a LOT of wood …

