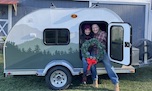
the pics along w/ the tutorial have proven this is a very attractive finish for a hand crafted camper
sw
A Little Tearapy
Re: A Little Tearapy
![]() by swoody126 » Sun Oct 04, 2020 10:26 am
by swoody126 » Sun Oct 04, 2020 10:26 am
"we are the people our parents warned us about" jb
- swoody126
- 500 Club
- Posts: 771
- Joined: Mon Feb 22, 2016 6:11 pm
- Location: north of Ft Worth
Re: A Little Tearapy
![]() by erfnie » Mon Oct 05, 2020 8:10 am
by erfnie » Mon Oct 05, 2020 8:10 am
Hatch Catch Up
It's by no mistake that it took us this long to start building the hatch. Admittedly, we've been procrastinating this part . But it was now time to get it going.
This will give the PMF some good time to dry well before painting too.
We had already roughly cut out all the hatch pieces awhile ago. They just needed to be smoothed, sanded and trimmed to correct measurements at the ends.
They were all cut from 3/4 inch plywood. The top and bottom straight pieces are poplar boards.

Then we started from the outside and worked our way in.

We used glue and kreg holes and screws to put it all together. All the edges are doubled up.

Some test fitting in place.


Once the measurements for the spar spacing were all figured out, we started adding the cross pieces and attaching the spars from the outside working in.


When the framework was done we attached the 1/8" ply on the inside with heavy duty adhesive and staples along the outside edges.
After that was dry we trimmed it off with the router.

Here's what it looks like from the outside. Now we can figure out the route for wires for the lights on the underside of the hatch.

And the view of the inside/underside. We attached some thin strips of ply along the edges to cover up most of the staples.

Cutting and fitting pieces of rigid insulation for the spaces.

Here's the hole where the wires for the hatch lights will enter. It leads to the top area of the galley where all the other wires already run, leading to the power center.

Starting to finish the underside with stain/poly. The wires for the hatch lights are in place and poking through the holes as you can see.

This picture shows the back pieced with rigid insulation. The small square piece is actually an upside-down hollow box, placed over the hole with the wires coming through.
It provides a little extra space to stuff wires into the hole from the other side and that hole will be hidden by the light fixture once it's in place.

All the insulation and wires in place, ready for filling the gaps with Great Stuff.

Jumping ahead, we attached the plywood to the outside. Our hatch has a straight part at the bottom and we had to make a joint where the curve starts
to keep the overall shape intact.
In hindsight I wish we would've spliced these pieces better, but Hopefully the paint job will distract the eye enough and cover it up later.
Then we proceeded to skin it with the canvas just like the main body of the teardrop.


The canvas was wrapped around the edges and held with clamps until it dried. We trimmed off the excess after it dried.


Next up... Painting!
It's by no mistake that it took us this long to start building the hatch. Admittedly, we've been procrastinating this part
. But it was now time to get it going. This will give the PMF some good time to dry well before painting too.
We had already roughly cut out all the hatch pieces awhile ago. They just needed to be smoothed, sanded and trimmed to correct measurements at the ends.
They were all cut from 3/4 inch plywood. The top and bottom straight pieces are poplar boards.
Then we started from the outside and worked our way in.
We used glue and kreg holes and screws to put it all together. All the edges are doubled up.
Some test fitting in place.
Once the measurements for the spar spacing were all figured out, we started adding the cross pieces and attaching the spars from the outside working in.
When the framework was done we attached the 1/8" ply on the inside with heavy duty adhesive and staples along the outside edges.
After that was dry we trimmed it off with the router.
Here's what it looks like from the outside. Now we can figure out the route for wires for the lights on the underside of the hatch.
And the view of the inside/underside. We attached some thin strips of ply along the edges to cover up most of the staples.
Cutting and fitting pieces of rigid insulation for the spaces.
Here's the hole where the wires for the hatch lights will enter. It leads to the top area of the galley where all the other wires already run, leading to the power center.
Starting to finish the underside with stain/poly. The wires for the hatch lights are in place and poking through the holes as you can see.
This picture shows the back pieced with rigid insulation. The small square piece is actually an upside-down hollow box, placed over the hole with the wires coming through.
It provides a little extra space to stuff wires into the hole from the other side and that hole will be hidden by the light fixture once it's in place.
All the insulation and wires in place, ready for filling the gaps with Great Stuff.
Jumping ahead, we attached the plywood to the outside. Our hatch has a straight part at the bottom and we had to make a joint where the curve starts
to keep the overall shape intact.
In hindsight I wish we would've spliced these pieces better, but Hopefully the paint job will distract the eye enough and cover it up later.
Then we proceeded to skin it with the canvas just like the main body of the teardrop.
The canvas was wrapped around the edges and held with clamps until it dried. We trimmed off the excess after it dried.
Next up... Painting!
 )
)-
erfnie - Teardrop Advisor
- Posts: 64
- Images: 367
- Joined: Wed Oct 10, 2018 4:40 am

 I also need to mention our case of shop envy... but moving along.