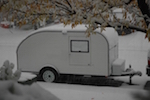
Need advice on draw latches...

Anything to do with mechanical, construction etc

Need advice on draw latches...

Postby kayakrguy » Fri Oct 27, 2006 5:56 am

Hi folks,

As the time to skin hatch and attach hinges etc approaches I need to get a handle on closing hatch. I am leaning to draw latches (lockable) to get a good tight seal.

I would appreciate advice on 1) some good draw latches and 2) how to attach to the hatch so that the hatch isn't overly 'stressed' or beat up from the pull of the latches 3) I would also appreciate advice on selections of handles etc for lifting/latching the hatch at the bottom...

Thanks very much,

Jim
A disposition to preserve, and an ability to improve, taken together, would be my standard of a statesman...

But what is liberty without wisdom, and without virtue? It is the greatest of all possible evils; for it is folly, vice, and madness, without tuition or restraint.

Edmund Burke
User avatar
kayakrguy
Lifetime member
 
Posts: 917
Images: 195
Joined: Sun Feb 05, 2006 8:26 pm
Location: Jersey Shore

Postby b.bodemer » Fri Oct 27, 2006 8:08 am

Jim,
I think you'll get a lot of responses here................

I decided to go with a Austin Hardware draw pull keyed in pairs. I haven't installed them yet but feel they are going to work great, tighten in my hatch just enough and I only have to use one key. I can wrap it around the side wall to the hatch and use it at 90 degrees.

If you go with something keyed make sure you tell the salesperson you want them "keyed in pairs".

Product Number: AH RN232000-01 ZNPR

Image
Barb
User avatar
b.bodemer
1000 Club
1000 Club
 
Posts: 1608
Images: 328
Joined: Mon May 08, 2006 5:43 pm
Location: Lakewood OH

Postby halfdome, Danny » Fri Oct 27, 2006 9:08 am

b.bodemer wrote:Jim,
I think you'll get a lot of responses here................

I decided to go with a Austin Hardware draw pull keyed in pairs. I haven't installed them yet but feel they are going to work great, tighten in my hatch just enough and I only have to use one key. I can wrap it around the side wall to the hatch and use it at 90 degrees.

If you go with something keyed make sure you tell the salesperson you want them "keyed in pairs".

Product Number: AH RN232000-01 ZNPR

Image
Barb

Austin Hardware has lots of different latches but these in the photo shouldn't be used for security purposes since all it would take is the removal of two screws to get in. I went with latches without locks. :) Danny
ImageImage
"Conditions are never just right. People who delay action until all factors are favorable do nothing". William Feather
Don't accept "It's Good Enough" build to the best of your abilities.
Image
Teardroppers Of Oregon & WashingtonImage
User avatar
halfdome, Danny
*Happy Camper
 
Posts: 5894
Images: 252
Joined: Sun Aug 14, 2005 11:02 pm
Location: Washington , Pew-al-up
Top

Postby Jst83 » Fri Oct 27, 2006 9:45 am

b.bodemer wrote:I decided to go with a Austin Hardware draw pull keyed in pairs. I haven't installed them yet but feel they are going to work great, tighten in my hatch just enough and I only have to use one key. I can wrap it around the side wall to the hatch and use it at 90 degrees.

Product Number: AH RN232000-01 ZNPR


Just trying to figure how you would bend it around the hatch. Which half would go on the hatch and which on the side wall. I'm haveing a brain freeze.
Danny brings up a good point about the screws but I think that could be remidied so you couldn't access the screws.
Image
User avatar
Jst83
3000 Club
3000 Club
 
Posts: 3606
Images: 215
Joined: Thu Jul 20, 2006 7:33 pm
Location: Indiana, Greenfield
Top

Postby JunkMan » Fri Oct 27, 2006 9:58 am

halfdome, Danny wrote:Austin Hardware has lots of different latches but these in the photo shouldn't be used for security purposes since all it would take is the removal of two screws to get in. I went with latches without locks. :) Danny


If you can get at the back side of the screws, and use machine screws with nylock nuts, it would be very hard for someone to get the screws out. Of course all it would take is a small pair of bolt cutters, if someone was determined to open them.
Jeff & Odie
Black Hills of South Dakota
User avatar
JunkMan
500 Club
 
Posts: 974
Images: 50
Joined: Sun Oct 24, 2004 6:21 pm
Location: Rapid City, South Dakota
Top

Postby Miriam C. » Fri Oct 27, 2006 11:01 am

You can also use screws with a square or hex hole. Not everyone runs around with a full set of screwdrivers.
“Forgiveness means giving up all hope for a better past.â€
User avatar
Miriam C.
our Aunti M
 
Posts: 19675
Images: 148
Joined: Wed Feb 15, 2006 3:14 pm
Location: Southwest MO
Top

Postby Endo » Fri Oct 27, 2006 11:02 am

Danny
Image

Austin Hardware has lots of different latches but these in the photo shouldn't be used for security purposes since all it would take is the removal of two screws to get in. I went with latches without locks. :) Danny


I used the same latches. You can very easily make them more secure by using screws with "one way heads".

Image


I was able to attach mine to the 1/8" aluminum trim on my hatch with pop rivets.
Brad (aka Endo)
ImageImage Image
In God We Trust
User avatar
Endo
500 Club
 
Posts: 721
Images: 138
Joined: Fri Apr 01, 2005 9:59 am
Location: Ohio
Top

Postby halfdome, Danny » Fri Oct 27, 2006 11:15 am

Endo wrote:
Danny
Image

Austin Hardware has lots of different latches but these in the photo shouldn't be used for security purposes since all it would take is the removal of two screws to get in. I went with latches without locks. :) Danny


I used the same latches. You can very easily make them more secure by using screws with "one way heads".

Image


I was able to attach mine to the 1/8" aluminum trim on my hatch with pop rivets.

That screw would be more secure but the handle in the center of the hatch should be your best spot for security. Mine has a large strike plate hidden from the exterior. From what I've understood the purpose of the side latches is to pull down the hatch outer edges to keep out rain while driving. Anyway that is the reason I used them :) Danny
ImageImage
"Conditions are never just right. People who delay action until all factors are favorable do nothing". William Feather
Don't accept "It's Good Enough" build to the best of your abilities.
Image
Teardroppers Of Oregon & WashingtonImage
User avatar
halfdome, Danny
*Happy Camper
 
Posts: 5894
Images: 252
Joined: Sun Aug 14, 2005 11:02 pm
Location: Washington , Pew-al-up
Top

Postby asianflava » Fri Oct 27, 2006 12:04 pm

When I installed mine, I marked the latch at it's max and min extension. Then, I out the screw in between the 2. Don't know if that is the right way to do it but it works for me.

I put a piece of T-molding on the bottom ledge of the hatch. Initially it was to hold down the aluminum until I found a better solution. I kept it there because it did 2 things for me.
1) it provides a nice grip area to open and close the hatch
2) it is like a water brake for water the runs down the back of the hatch. The water will run off it instead of running into the bottom of the hatch.
User avatar
asianflava
8000 Club
8000 Club
 
Posts: 8412
Images: 45
Joined: Mon Aug 02, 2004 5:11 am
Location: CO, Longmont
Top

Postby b.bodemer » Fri Oct 27, 2006 1:39 pm

Yes...........I'll be able to get to the back and use a nut and make it more secure.

The latches main purpose is to draw the hatch a little tighter and having an extra lock is ok too.

Barb
User avatar
b.bodemer
1000 Club
1000 Club
 
Posts: 1608
Images: 328
Joined: Mon May 08, 2006 5:43 pm
Location: Lakewood OH
Top

Postby kayakrguy » Fri Oct 27, 2006 2:49 pm

Barb and everyone,

Wow, there seems to be a good consensus about the Austin latches, with one concern about security. I could do the bolt and nylock thing...or the one way screw--Endo, where do you get those, I have never heard of them before--but then that's nothing new! :o

I am not completely indifferent to the security issue simply because of the electrical stuff in the galley--the battery and the converter etc...

I realize that the determined thief can overcome this latch, but then they could overcome just about anything I put on there--its only 1/4 inch ply with some spars and ribs! At some point you simply have to refuse to become paranoid. But then I am reminded of the old saying, 'Just because you're paranoid does not mean people AREN'T out to get you :lol:

Jim
A disposition to preserve, and an ability to improve, taken together, would be my standard of a statesman...

But what is liberty without wisdom, and without virtue? It is the greatest of all possible evils; for it is folly, vice, and madness, without tuition or restraint.

Edmund Burke
User avatar
kayakrguy
Lifetime member
 
Posts: 917
Images: 195
Joined: Sun Feb 05, 2006 8:26 pm
Location: Jersey Shore
Top

Postby Ken A Hood » Fri Oct 27, 2006 3:21 pm

http://www.spaenaur.com/view_pdf.asp?Page=L25

#D-2001 is a right angle clamp

They have several different types (lockable) pages L20-L33.......

I know I've seen some more lockable right angle ones, with a concealed hinge.


Image

McMaster-Carr page 2826/2827


You have to be careful if you plan on using the tamper proof screws, "if" you ever need to replace/fix the latch you'll need to drill out the screw.....
Disclaimer: I in no way resemble the avatar shown. Furthermore, I in no way have any affiliation to the Trailer Park Boys and more specifically Bubbles!
User avatar
Ken A Hood
500 Club
 
Posts: 841
Images: 42
Joined: Sun Apr 18, 2004 8:15 pm
Location: ON CANADA
Top

Postby WoodSmith » Fri Oct 27, 2006 7:49 pm

Ken A Hood wrote:You have to be careful if you plan on using the tamper proof screws, "if" you ever need to replace/fix the latch you'll need to drill out the screw.....


Nothing so drastic - 30 seconds with a cut-off disc in a dremel tool and you have a slot for a flat head screwdriver. Also works great for those phillips screws that you drove with the cordless drill and spun the bit till the phillips is more like a crater.

I hate when that happens. :x
Glen Smith
Build Journal
WoodSmith
Donating Member
 
Posts: 213
Images: 40
Joined: Tue Mar 29, 2005 11:07 pm
Location: RTP NC
Top

Postby Gerdo » Mon Oct 30, 2006 4:48 pm

These are the latches that I used. It takes a padlock, even if it is a small one. All but two screws are behind the latch.
Image
Image
They are adjustable so you can fine tune the pressure after mounting. I set to the middle of the adjustment and mounted them.
Image
I am using a grab handle that I bought at a cargo trailer shop.
Image

As mentioned above nothing is completely secure. If someone wants into something they are going to get in.
User avatar
Gerdo
1000 Club
1000 Club
 
Posts: 1361
Images: 156
Joined: Mon Apr 25, 2005 12:02 am
Location: Littleton, Colorado
Top

Postby dwgriff1 » Mon Oct 30, 2006 7:16 pm

I had not thought about this kind of latch.

My biggest concern is not water, but dust. The back of a trailer can pick up a lot of the stuff.

Thanks for bringing up the subject! This may be the answer.

dave
User avatar
dwgriff1
500 Club
 
Posts: 947
Images: 4
Joined: Mon Jul 04, 2005 4:20 pm
Location: SW Idaho
Top


Return to Teardrop Construction Tips & Techniques

Who is online

Users browsing this forum: No registered users and 4 guests