The walls are up (for good)

Anything to do with mechanical, construction etc

The walls are up (for good)

Postby ccdell » Thu Sep 27, 2007 9:16 pm

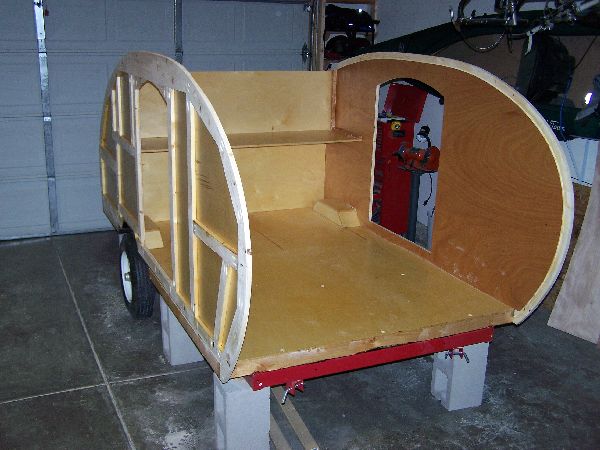
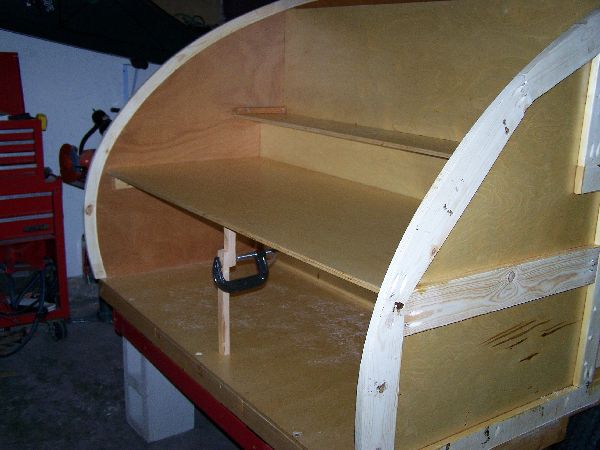
After what seems like forever, the current round of varnishing is done. Now things are starting to come together. Today, I finally got to put the walls up for good. Finally it is starting to look like a teardrop. I would love to say that everything went together perfectly, but that was not the case. However, there were no major problems, so I am a happy (almost) camper. I am still shooting on having it together for the "Last Gasp" gathering... But I am still not committing to which year. Teardrop time -- Ain't it great. :)

Image
Image
User avatar
ccdell
Teardrop Advisor
 
Posts: 88
Images: 27
Joined: Sat Oct 14, 2006 4:03 pm
Location: Colorado Springs, CO

Postby Classic Finn » Fri Sep 28, 2007 6:12 pm

Hey there Colorado USA.. Youve done real well.. Now that youve got the walls up the excitement starts to grow as you go.. Its a great feeling..

Keep up the great work... :applause: :applause:

I,ll be watching your progress so post more pics.. since thats the only way I can see it all the way from our lil Country of Finland way far up Nort.

Regards
Classic Finn :thumbsup: :thumbsup:
Royal Teardrop Society Scandinavian Bureau Chief of Staff

Image
User avatar
Classic Finn
Midnight Sun Voyager
 
Posts: 17488
Images: 146
Joined: Fri Apr 29, 2005 4:29 am
Location: Country of Finland

Postby mikeschn » Fri Sep 28, 2007 6:38 pm

Looks good to me. I've often thought about building the sidewalls from the inside out, like you are doing, and doing the poly (varnish) on the bench. I'll bet that made your job easier...

Mike...
The quality is remembered long after the price is forgotten, so build your teardrop with the best materials...
User avatar
mikeschn
Site Admin
 
Posts: 19202
Images: 475
Joined: Tue Apr 13, 2004 11:01 am
Location: MI
Top

Postby Mike C. » Sat Sep 29, 2007 9:10 am

:thumbsup: ccdell :thumbsup:

Lookin' good !!!! Looks like it'a going to be a comfy trailer. What are your doors going to look like, with the rounded top? Going to have round windows? :thinking:

What about the galley? Leave it simple or are you going to build cabinets?

Keep the pictures coming!!!! :applause: :applause:
Uncle M ( Mike )
User avatar
Mike C.
our Uncle M
 
Posts: 4140
Joined: Mon Jun 18, 2007 10:13 pm
Location: Southwest, MO
Top

Postby Miriam C. » Sat Sep 29, 2007 12:17 pm

:applause: :applause: :thumbsup:
Good Job! Don't forget to keep it square. You might add some 90 degree blocking from floor to side, till you get the spars in and sides on.

Image
“Forgiveness means giving up all hope for a better past.â€
User avatar
Miriam C.
our Aunti M
 
Posts: 19675
Images: 148
Joined: Wed Feb 15, 2006 3:14 pm
Location: Southwest MO
Top

Postby ccdell » Sat Sep 29, 2007 8:47 pm

Thanks all for the replys and encouragement. I had planned on working on the front cabinet today, but "we" decided to take a drive instead. So, maybe tomorrow.

CF, It is really fun to see the shape coming along, and I will try and keep the pictures coming. The only holdup is the camera is upstairs and the garage is downstairs... and I am lazy!

Mike, I saw the inside out approach mentioned here on the site and I really thought it would make things easier. Of course, with this being my first one, I have no way of knowing if it's easier, but it does seem to give me a chance "reconsider" (i.e. Fix) some of my earlier decisions.

Mike C. The doors will have the windows with the rounded corners and screened sliders. Right now, the plan for the galley is to keep it simple. Stove mounted on a slider and maybe 3 drawers, open shelves, no sink, no cooler, and a couple of removable boxes/baskets. It seems my last two projects didn't give my wife much confidence in my building ability. (picts below).

Miriam. The temp spars were sitting off to the side when the picture was taken and installed shortly there after. :) But your point is well taken. I plan to ensure everything is squared up again before I put in the front cabinet. (and again before the permanent spars).

Previous Projects:
Image
Image
User avatar
ccdell
Teardrop Advisor
 
Posts: 88
Images: 27
Joined: Sat Oct 14, 2006 4:03 pm
Location: Colorado Springs, CO
Top

Postby Micro469 » Sat Sep 29, 2007 10:47 pm

[quote="ccdell"]Thanks all for the replys and encouragement. I had planned on working on the front cabinet today, but "we" decided to take a drive instead. So, maybe tomorrow.[quote]


And I thought I was the only one.... :lol:
John
Image
User avatar
Micro469
Super Lifetime Member
 
Posts: 3185
Images: 382
Joined: Mon Nov 07, 2005 10:46 pm
Location: Brampton,Ontario,Canada
Top


Return to Teardrop Construction Tips & Techniques

Who is online

Users browsing this forum: No registered users and 8 guests