Weerider's Teardrop Project.

Anything to do with mechanical, construction etc

Postby b.bodemer » Tue Sep 04, 2007 11:08 am

I especially like the way you are installing your ac.

Barb
User avatar
b.bodemer
1000 Club
1000 Club
 
Posts: 1608
Images: 328
Joined: Mon May 08, 2006 5:43 pm
Location: Lakewood OH

Postby jeepr » Tue Sep 04, 2007 11:32 am

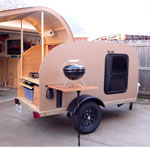
Wow, yours looks like a professional build compared to mine! I feel like I'm flying by the seat of my pants when I look at your tear. :lol:

I really like your profile. I had some drawings like that and decided to go with a Benroy type front and a rear closer to your design. Except with my elliptical line, I spent less time making it straight and more time with the belt sander.. :whistle:
Mike C.
User avatar
jeepr
The 300 Club
 
Posts: 422
Images: 38
Joined: Sun Aug 28, 2005 7:57 pm
Location: Harrison Township, Michigan

Postby Weerider » Tue Sep 04, 2007 7:05 pm

Thanks Sam and yes I do wish it was a bit shorter.

Thanks Micro469 I spent lots of time and looked at lots of pix on this site before deciding how to go about installing that AC.

Esteban, I used a glue joint cutter and my router and 12' pipe clamps to put the joints together. As you can see I used 3/4" birch ply for the sides and 3/4" for the framing. Here is a pic... if you look close you can see the joint. Most of the joint was cut out with the door and the framing served as extra strength along the top joint.
Image

Thanks Barb, I looked all through your album and think your tear is great!

Jeepr, your project looks to be progressing very well and you should be proud of it. I feel my project is rather amateurish when I look at Steve Frederick's builds.

Howard
The ones who say it cannot be done should stay out of the way of the ones who are doing it!
User avatar
Weerider
Teardrop Advisor
 
Posts: 96
Images: 99
Joined: Tue Jun 19, 2007 5:16 pm
Location: Havana, FL
Top

FAN

Postby Weerider » Tue Sep 04, 2007 7:37 pm

I picked up this 115V fan at Granger today. It moves 117CFM, is rated for continuous duty, can be mounted vertically or horizontally, has 4.375" diameter blades and only pulls 0.24 Amps (20 Watts). I think it will be great for assisting the exhaust from the AC and it's much quieter than a bath exhaust fan. I will post pix once I have it mouted.
Image
Last edited by Weerider on Wed Sep 05, 2007 6:01 am, edited 1 time in total.
The ones who say it cannot be done should stay out of the way of the ones who are doing it!
User avatar
Weerider
Teardrop Advisor
 
Posts: 96
Images: 99
Joined: Tue Jun 19, 2007 5:16 pm
Location: Havana, FL
Top

Postby Miriam C. » Tue Sep 04, 2007 8:24 pm

Really looking great Howard. I am looking forward to seeing how the fan works. The small bath fan doesn't keep up with the air conditioner so this might work better.
“Forgiveness means giving up all hope for a better past.â€
User avatar
Miriam C.
our Aunti M
 
Posts: 19675
Images: 148
Joined: Wed Feb 15, 2006 3:14 pm
Location: Southwest MO
Top

Progress

Postby Weerider » Sun Sep 30, 2007 6:10 pm

I got all the ribs in on top of the headliner and 1.5" of rigid foam is next.
Image
I got the insulation in and here I am screwing down the first layer of the outer skin.
Image
I may have built it a little stronger than absolutely necessary...but I like it that way.
Image

We sure are looking forward to camping in our Teardrop camper.
We need to come up with a name for it.

Howard 8)
Last edited by Weerider on Mon Oct 01, 2007 10:34 am, edited 3 times in total.
The ones who say it cannot be done should stay out of the way of the ones who are doing it!
User avatar
Weerider
Teardrop Advisor
 
Posts: 96
Images: 99
Joined: Tue Jun 19, 2007 5:16 pm
Location: Havana, FL
Top

Postby caseydog » Sun Sep 30, 2007 6:26 pm

WOW! Very nice profile, and a smart looking build. That joint in your ply looks like it should last forever, too.

I'll be saving your photos for my future build.

I wonder how many brand names that AC unit is sold under. :lol:

BTW, I did not have any success using a cabinet fan like that for my AC. But, the built-in cooling fan on the AC unit works fine, if there is a good, easy path for the exhaust air. I used dryer vent tubing and vent, and it works fine without any help.

CD
Image

My build journal is HERE
User avatar
caseydog
Platinum Donating Member
 
Posts: 12420
Images: 515
Joined: Tue Jan 16, 2007 1:44 pm
Top

Postby Classic Finn » Sun Sep 30, 2007 7:11 pm

Yes Sir Howard that is very nice... I really like the profile.. :applause: :applause: :applause:

Classic Finn :thumbsup:
Royal Teardrop Society Scandinavian Bureau Chief of Staff

Image
User avatar
Classic Finn
Midnight Sun Voyager
 
Posts: 17488
Images: 146
Joined: Fri Apr 29, 2005 4:29 am
Location: Country of Finland
Top

Postby bgordon » Mon Oct 01, 2007 5:03 am

Howard,

Great build! You sure don't mess much when you say your tear is sturdy! :lol: :lol:

My question (actually two):
1. Did you cover with masonite, or is that some or other darkwood ply that we guys in the Southern Hemisphere don't know about? :?
2. What are you going to cover it with finally? Aluminum, paint, etc??
Barrie

Keep moving forward.
Psalm 1:1-3.

Build Journal: bgordon's 5 week cardboard & fiberglass build
http://www.tnttt.com/viewtopic.php?f=50&t=38781
User avatar
bgordon
Teardrop Master
 
Posts: 299
Images: 122
Joined: Tue Apr 24, 2007 6:45 am
Location: Johannesburg, South-Africa
Top

Postby Weerider » Mon Oct 01, 2007 10:31 am

CD, thanks for the AC info. After mine is up and running I will post pix and report on how it works.

Classic Finn, thanks for the complement on the profile. Seems that lots of folks like the profile... I must have gotten that part right. I don't know how to do a CAD of the thing but I will work on a pencil drawing with all the specs and post it here. Perhaps I can persuade Andrew to do a CAD and post it along with his collection of profiles. His drawings were a great help when I was designing mine.

Barrie, yes it's 1/8" Masonite. I will be applying two layers with staggered seams. It's attached with polyurethane construction adhesive and 1.25" deck screws. The final finish will be aluminum sheet either .032" or .040". I would like some recommendation as to which thickness alum. is best for this application.

Howard 8)
The ones who say it cannot be done should stay out of the way of the ones who are doing it!
User avatar
Weerider
Teardrop Advisor
 
Posts: 96
Images: 99
Joined: Tue Jun 19, 2007 5:16 pm
Location: Havana, FL
Top

Postby bgordon » Mon Oct 01, 2007 1:23 pm

Howard,

Thanks for the info!

By the way, why do you want to add two layers of masonite? I think one layer will be quite adequate if you still want to add aluminum, not so? Or am I missing something?

Could you post a photo of the profile, or perhaps a scanned drawing? I agree with Classic Finn. The profile looks cool! 8) 8) :applause:
Barrie

Keep moving forward.
Psalm 1:1-3.

Build Journal: bgordon's 5 week cardboard & fiberglass build
http://www.tnttt.com/viewtopic.php?f=50&t=38781
User avatar
bgordon
Teardrop Master
 
Posts: 299
Images: 122
Joined: Tue Apr 24, 2007 6:45 am
Location: Johannesburg, South-Africa
Top

Postby Weerider » Tue Oct 02, 2007 3:49 pm

bgordon wrote:Howard,

Thanks for the info!

By the way, why do you want to add two layers of masonite? I think one layer will be quite adequate if you still want to add aluminum, not so? Or am I missing something?

Could you post a photo of the profile, or perhaps a scanned drawing? I agree with Classic Finn. The profile looks cool! 8) 8) :applause:


Barrie,

You are right that one layer of 1/8" masonite would probably be quite adequate. Unfortunately I suffer form the American idea that if one is good then two must be better. I don't know if that's an American idea or just a human idea. :thinking: Anyway, I hate the idea of having to go back and beef up or strengthen a project after the fact. If I was to use only one layer, I wouldn't have used pieces that didn't span the full width of the trailer. The first layer has lengthwise joints that the second layer doesn't. All joints are staggered and it turned out quite smooth and very stiff.

Here is a picture of the profile cut out of cardboard. It's 120" long and 54" high. I liked the profile of the Cub and the Grumman 2 and wanted all the lines to flow together with no flat spots. The upper part of the profile is a combo of two ellipses that peak at 40" back from the nose. The lower part is two different radii. I will work on a pencil drawing with all the specs.

Howard 8)
Image
The ones who say it cannot be done should stay out of the way of the ones who are doing it!
User avatar
Weerider
Teardrop Advisor
 
Posts: 96
Images: 99
Joined: Tue Jun 19, 2007 5:16 pm
Location: Havana, FL
Top

Postby mikeschn » Tue Oct 02, 2007 5:34 pm

Howard... It looks really good.

re your aluminum question, I used .040 because that's what I could get. I think .032 would work just fine also.

As you probably already know, the aluminum is bonded with an adhesive, and then captured under the edge molding. In practice the adhesive doesn't hold very long, but it does help keep it sticking to the side of the plywood.

Mike...

P.S. Are you going to use CPES on that masonite?
The quality is remembered long after the price is forgotten, so build your teardrop with the best materials...
User avatar
mikeschn
Site Admin
 
Posts: 19202
Images: 475
Joined: Tue Apr 13, 2004 11:01 am
Location: MI
Top

Postby Darren » Tue Oct 02, 2007 6:22 pm

Very nice build. Keep the updates coming. :thumbsup: :thumbsup: :applause:
Image
User avatar
Darren
the camper formerly known as Victor Star
 
Posts: 1356
Images: 161
Joined: Sat Dec 03, 2005 12:09 am
Location: Shawnee, Kansas (KC)
Top

Postby Weerider » Tue Oct 02, 2007 6:24 pm

mikeschn wrote:Howard... It looks really good.

re your aluminum question, I used .040 because that's what I could get. I think .032 would work just fine also.

As you probably already know, the aluminum is bonded with an adhesive, and then captured under the edge molding. In practice the adhesive doesn't hold very long, but it does help keep it sticking to the side of the plywood.

Mike...

P.S. Are you going to use CPES on that masonite?


Thanks Mike, I am thinking that the .032" will probably be fine since I used 2 layers of Masonite and the skin is already very stiff. If there isn't much difference in price I may go with the .040". What is the preferred adhesive for the aluminum? Seems like I read somewhere that folks were using outdoor carpet adhesive. What is CPES? I was planing to apply a coat of urethane to the masonite once everything was filled and sanded and then whatever adhesive on top of that.

Howard 8)
The ones who say it cannot be done should stay out of the way of the ones who are doing it!
User avatar
Weerider
Teardrop Advisor
 
Posts: 96
Images: 99
Joined: Tue Jun 19, 2007 5:16 pm
Location: Havana, FL
Top

PreviousNext

Return to Teardrop Construction Tips & Techniques

Who is online

Users browsing this forum: No registered users and 5 guests