Shore power is in. Got the base level kitchen cabinet framing about done. Still got some paneling to get done. Getting closer and closer.

<img alt="Checking Spacing for Fridge and water jug" src="http://www.technoprimitive.org/wordpress/wp-content/uploads/2007/10/camperpixchecking-spacing-for-fridge-and-water-jug.jpg" width="500" height="375" />
Checking spacing for fridge and water jug.
<img alt="Front view" src="http://www.technoprimitive.org/wordpress/wp-content/uploads/2007/10/camperpixfront-view1.jpg" width="500" height="375" />
Got just enough room if I use plastic for the side panels.
<img alt="Close but will fit" src="http://www.technoprimitive.org/wordpress/wp-content/uploads/2007/10/camperpixclose-but-will-fit.jpg" width="500" height="375" />
Close but should fit with no problem.
<img alt="Just right" src="http://www.technoprimitive.org/wordpress/wp-content/uploads/2007/10/camperpixjust-right.jpg" width="500" height="375" />
Clearance is just right.

<img alt="Putting in shore power" src="http://www.technoprimitive.org/wordpress/wp-content/uploads/2007/10/camperpixputting-in-shore-power.jpg" width="500" height="375" />
Putting in shore power box. Note red jumper at of breaker panel. It is use to jump both sides together so all breakers get power. I may change this and use one side for the inverter and the other for mains power.

<img alt="Using rightmost breaker for main cutoff" src="http://www.technoprimitive.org/wordpress/wp-content/uploads/2007/10/camperpixusing-rightmost-breaker-for-main-cutoff.jpg" width="500" height="375" />
This box isn't set up for a master disconnect so I put the power in on the rightmost breaker which is a 20 amp and use it for the panel master disconnect. The branch breakers are all 15 amp.
<img alt="Camper power cord" src="http://www.technoprimitive.org/wordpress/wp-content/uploads/2007/10/camperpixcamper-power-cord.jpg" width="500" height="375" />
Camper power cord and wall feedthrough.
<img alt="Cover on" src="http://www.technoprimitive.org/wordpress/wp-content/uploads/2007/10/camperpixcover-on.jpg" width="500" height="375" />
Cover on and power cord run.
<img alt="Building wall enclosure" src="http://www.technoprimitive.org/wordpress/wp-content/uploads/2007/10/camperpixbuilding-wall-enclosure.jpg" width="500" height="375" />
Electrical enclosure framed in. Still got to install the 12 volt stuff and 300 watt inverter.
<img alt="Framing going up around wheelwell" src="http://www.technoprimitive.org/wordpress/wp-content/uploads/2007/10/camperpixframing-going-up-around-wheelwell.jpg" width="500" height="375" />
Getting the framing up around the wheel well. White plastic and paneling also had to be cut and installed prior to doing this.
<img alt="Getting closer" src="http://www.technoprimitive.org/wordpress/wp-content/uploads/2007/10/camperpixgetting-closer.jpg" width="500" height="375" />
Another view showing back wall. I used white here to lighten the underside of the counter. Didn't want it on the counter back cause it's so hard to keep looking clean in a kitchen.

<img alt="Storage area floor framing done" src="http://www.technoprimitive.org/wordpress/wp-content/uploads/2007/10/camperpixstorage-area-floor-framing-done.jpg" width="500" height="375" />
Storage area floor framing done. Got to cut the plywood and then put in the divider framing and skin this section. Then will put a solid plywood top on and then build the next level and countertop on it. Should save a few cuts in the plywood dodging framing.
That's it for today. More as I get to it.

Appreciate all the pictures
 Started out to build a 6x10 teardrop looking trailer but as a standie. Got the walls up 4 feet and decided to go with flat panels to make life easier, then got to looking at an old Shelter II book and made the mistake of looking at the Gypsy wagon. It all fell apart/in place and this is the result.
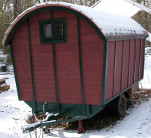
 Though I have to be here instead, we may try camping in it down in the field over the weekend just to see how it sleeps/lives anyway.
  Will try to get it on the road for a short run next week to see how it handles.