Hatch Props?

Anything to do with mechanical, construction etc

Hatch Props?

Postby Gerdo » Thu Sep 11, 2008 9:20 am

I'm looking to buy some of the mechanical hatch props like I used.
Image
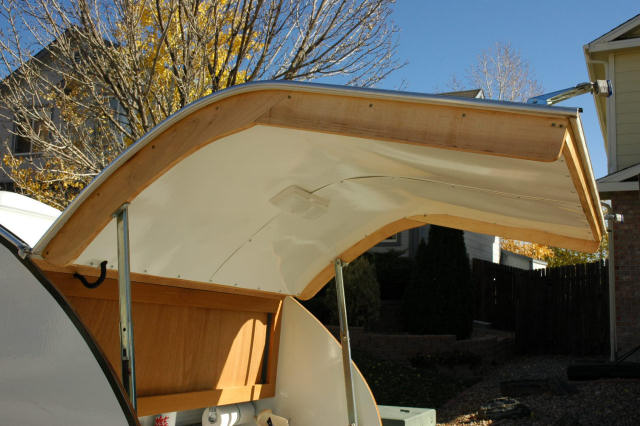
I've looked at Austin Hwd and McMaster Carr and neither carry them anymore. Anyone have another supplier?
User avatar
Gerdo
1000 Club
1000 Club
 
Posts: 1361
Images: 156
Joined: Mon Apr 25, 2005 12:02 am
Location: Littleton, Colorado

Postby Dean_A » Thu Sep 11, 2008 10:50 am

Austin Hardware still sells them, but they're harder to find since they re-did their site (for the worse).

Here's a link: http://www.austinhardware.com/subcatego ... bCatID=203
User avatar
Dean_A
Gold Donating Member
 
Posts: 597
Images: 55
Joined: Sat Oct 21, 2006 5:24 pm
Location: San Diego, CA

Postby Gerdo » Thu Sep 11, 2008 1:17 pm

Dean

That is exactly what I'm looking for. You da man!

Thanks
User avatar
Gerdo
1000 Club
1000 Club
 
Posts: 1361
Images: 156
Joined: Mon Apr 25, 2005 12:02 am
Location: Littleton, Colorado
Top

Postby Creamcracker » Thu Sep 11, 2008 1:49 pm

Gerdo wrote:Dean

That is exactly what I'm looking for. You da man!

Thanks


So which ones did you use (of those shown on the link) ----how do they work, for closing/opening? ANy close up ics of the emchanism?
Philip
Image Image
3rd Annual Out of Control Shop Winner :)
User avatar
Creamcracker
Teardrop Graduate
 
Posts: 1126
Images: 142
Joined: Fri Sep 22, 2006 7:38 am
Location: VA Culpeper
Top

Postby Dean_A » Thu Sep 11, 2008 3:12 pm

I used these as well. They are a star-wheel type mechanism, so they lock automatically in the up position, then release by lifting up a little bit. The mechanism works great and they hold a ton of weight. They also have a hole that you can put a pin into when they are in the up position to prevent them from closing accidentally, though I can't image that ever happening unless you were in gale-force winds.
I don't remember what length I got, but I ended up cutting them down anyway to exactly the size I needed.
Image
User avatar
Dean_A
Gold Donating Member
 
Posts: 597
Images: 55
Joined: Sat Oct 21, 2006 5:24 pm
Location: San Diego, CA
Top

Postby Creamcracker » Thu Sep 11, 2008 3:42 pm

They look very similar to what is fitted to the bonnet of my MGB as seen in this catalog: Item 16 -- (cheaper at austin hardware)

http://www.victoriabritish.com/ICATALOG ... px?Page=42

Philip
Image Image
3rd Annual Out of Control Shop Winner :)
User avatar
Creamcracker
Teardrop Graduate
 
Posts: 1126
Images: 142
Joined: Fri Sep 22, 2006 7:38 am
Location: VA Culpeper
Top

Postby Gerdo » Thu Sep 11, 2008 6:17 pm

BONNET?

Your car wears a BONNET?
User avatar
Gerdo
1000 Club
1000 Club
 
Posts: 1361
Images: 156
Joined: Mon Apr 25, 2005 12:02 am
Location: Littleton, Colorado
Top

Postby Creamcracker » Thu Sep 11, 2008 6:20 pm

Gerdo wrote:BONNET?

Your car wears a BONNET?


Yep! and it's prettier than a HOOD!
Image
Image Image
3rd Annual Out of Control Shop Winner :)
User avatar
Creamcracker
Teardrop Graduate
 
Posts: 1126
Images: 142
Joined: Fri Sep 22, 2006 7:38 am
Location: VA Culpeper
Top

Postby Gerdo » Thu Sep 11, 2008 6:22 pm

Just kidding.

I have a TR6 and yes it also has a bonnet.


I used these on my teardrop because I knew that they would work. My hatch is big and a little heavy. I also didn't like the thought of gas shocks constantly pushing on the mounting screws. I also didn't want to have to replace them when they can't hold the hatch open from age or cold. These are predictable. I just bought a pair to replace the gas struts on my pickup topper back window.
User avatar
Gerdo
1000 Club
1000 Club
 
Posts: 1361
Images: 156
Joined: Mon Apr 25, 2005 12:02 am
Location: Littleton, Colorado
Top

Postby Creamcracker » Thu Sep 11, 2008 6:26 pm

Gerdo wrote:Just kidding.

I have a TR6 and yes it also has a bonnet.


I used these on my teardrop because I knew that they would work. My hatch is big and a little heavy. I also didn't like the thought of gas shocks constantly pushing on the mounting screws. I also didn't want to have to replace them when they can't hold the hatch open from age or cold. These are predictable. I just bought a pair to replace the gas struts on my pickup topper back window.


Can you quote the part number you bought?
Philip
Image Image
3rd Annual Out of Control Shop Winner :)
User avatar
Creamcracker
Teardrop Graduate
 
Posts: 1126
Images: 142
Joined: Fri Sep 22, 2006 7:38 am
Location: VA Culpeper
Top

Postby boomboomtulum » Thu Sep 11, 2008 6:40 pm

This is exactly what I have been looking for as well. Now a Question. What method other than Trial & Screw -up is best for fitting? Where and how do you figure placement of these and length of supports?
:thinking: :thinking:

Dave
http://www.mikenchell.com/forums/album_ ... c_id=37109

Have'nt been everywhere yet, but it's on my list.
User avatar
boomboomtulum
Teardrop Master
 
Posts: 275
Images: 50
Joined: Sun Aug 19, 2007 10:08 pm
Location: North Of Sacramento
Top

Postby Dean_A » Thu Sep 11, 2008 7:00 pm

boomboomtulum wrote:This is exactly what I have been looking for as well. Now a Question. What method other than Trial & Screw -up is best for fitting? Where and how do you figure placement of these and length of supports?
:thinking: :thinking:

Dave


There's more info than you'll ever need in the index at the top (see links below), but trial and error worked for me just fine. One thing that makes it a lot easier is if you get the struts positioned after you've framed your hatch, but BEFORE you skin it. That way you can see/reach through when it's closed to help in the positioning. It's also easier with these mechanical props vs. the gas ones because you're not fighting the compressed gas.

Galley hatch prop stick, gas struts, springs :
http://tnttt.com/viewtopic.php?t=10136
http://tnttt.com/viewtopic.php?t=9600
http://tnttt.com/viewtopic.php?t=8880
http://tnttt.com/viewtopic.php?t=8874
http://tnttt.com/viewtopic.php?t=7288
http://tnttt.com/viewtopic.php?t=6232
http://tnttt.com/viewtopic.php?t=6218
http://tnttt.com/viewtopic.php?t=6175
http://tnttt.com/viewtopic.php?t=5545
http://tnttt.com/viewtopic.php?t=2405
http://tnttt.com/viewtopic.php?t=5074
http://tnttt.com/viewtopic.php?t=5005
http://tnttt.com/viewtopic.php?t=7848
http://tnttt.com/viewtopic.php?t=7047
http://tnttt.com/viewto ... 228#296228
User avatar
Dean_A
Gold Donating Member
 
Posts: 597
Images: 55
Joined: Sat Oct 21, 2006 5:24 pm
Location: San Diego, CA
Top

Postby Gerdo » Thu Sep 11, 2008 8:23 pm

The way I figured which to buy and where to mount was simple. I marked, with tape, where I wanted the props to mount when opened and compaired the given sizes. I then closed the hatch to see if I was at the closed length or longer, longer is not bad. If not I moved my marks until the two worked. I wanted the mounting points out as far as possable.
User avatar
Gerdo
1000 Club
1000 Club
 
Posts: 1361
Images: 156
Joined: Mon Apr 25, 2005 12:02 am
Location: Littleton, Colorado
Top

Postby Dean_A » Thu Sep 11, 2008 8:33 pm

Gerdo wrote:The way I figured which to buy and where to mount was simple. I marked, with tape, where I wanted the props to mount when opened and compaired the given sizes. I then closed the hatch to see if I was at the closed length or longer, longer is not bad. If not I moved my marks until the two worked. I wanted the mounting points out as far as possable.

That's pretty much what I did too, but you described it much better! :thumbsup:
User avatar
Dean_A
Gold Donating Member
 
Posts: 597
Images: 55
Joined: Sat Oct 21, 2006 5:24 pm
Location: San Diego, CA
Top

Postby 2bits » Thu Sep 11, 2008 10:45 pm

Keith here on the board showed me his hatch stands and I am going to do mine like that. For the poles he used conduit, and put an insulating pad around it for looks and to keep it from banging around. For the base he used a pair of those kick down door stoppers, but flipped them over, (the conduit slipped right over it) so they both lay flat on the galley counter and flip up. I can't remember what he used to attach to the hatch, maybe he can chime in, but it was a small tube that he drilled a hole in. Then he flattened out the conduit and drilled a hole in the flat part to go through the stud.

I know that's alot of talking but it is a real simple and cheap design and looks nice. Obviously not hydraulics but not bad for $10.
Thomas

Image
User avatar
2bits
2bit Member
 
Posts: 5132
Images: 8
Joined: Thu Dec 27, 2007 6:04 pm
Location: Lake Tawakoni, TX
Top

Next

Return to Teardrop Construction Tips & Techniques

Who is online

Users browsing this forum: No registered users and 11 guests