Glory!! One door on and one to go

Anything to do with mechanical, construction etc

Glory!! One door on and one to go

Postby Geron » Sat Jun 18, 2005 10:18 am

After about 6 weeks of stalling, etc. Finished one door. In the final stages it was beaten into submission (Some one else said this first!!) I'll never show close ups of the inside small radius :R

[url="http://www.hunt101.com/?p=297811&c=500&z=1"]Image[/url]

[url="http://www.hunt101.com/?p=297810&c=500&z=1"]Image[/url]

At some point, if anyone is interested, I'll post what I"ve learned in constructing and mounting these curved :? 
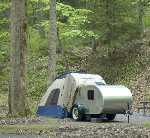
Doors. I believe the second door will go smoother now that I've learned a thing or two.

Next TD 8) 8) SQUARE DOORS definitely.
If it's not broken, you're not trying hard enough.
User avatar
Geron
1000 Club
1000 Club
 
Posts: 1522
Images: 173
Joined: Tue Jan 18, 2005 6:23 am
Location: Georgia, Cherrylog

Postby Michael W » Sat Jun 18, 2005 10:25 am

Your door looks good. Keep up the good work.

Our teardrop also has two sides:

My side: First try-learn what not to do.
Her Side: Apply lessons learned.
User avatar
Michael W
Teardrop Master
 
Posts: 138
Images: 34
Joined: Wed Jun 01, 2005 10:09 am
Location: SE Michigan

Postby Geron » Sat Jun 18, 2005 10:47 am

Michael W wrote:Your door looks good. Keep up the good work.

Our teardrop also has two sides:

My side: First try-learn what not to do.
Her Side: Apply lessons learned.


Got a good chuckle out of that one :laughter:

Geron
If it's not broken, you're not trying hard enough.
User avatar
Geron
1000 Club
1000 Club
 
Posts: 1522
Images: 173
Joined: Tue Jan 18, 2005 6:23 am
Location: Georgia, Cherrylog
Top

Postby McTeardrops » Sat Jun 18, 2005 11:17 am

Geron-What did you use for trim on inside of doors?
Lenny

[email protected]
I've reached the stage, in life, where my foam has more memory than I do!
User avatar
McTeardrops
The 300 Club
 
Posts: 340
Joined: Sun Aug 01, 2004 12:08 pm
Location: Texarkana Texas
Top

Postby Geron » Sat Jun 18, 2005 11:47 am

McTeardrops wrote:Geron-What did you use for trim on inside of doors?


1/2" angle aluminum .050 from HD. Annealed and thoroughly beaten, beaten, beaten and cursed. The large radius does quite well. The 6" radius - fugettaboutit. :cry: 
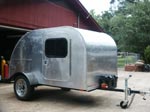
If the inside skin would allow it I think it would be helpful to taper the 6" radius side to 1/4" at the radius instead of 1/2". It would bend much better. I'll give it a try on the other door. If it works - pull this on off and "do over"

Geron
If it's not broken, you're not trying hard enough.
User avatar
Geron
1000 Club
1000 Club
 
Posts: 1522
Images: 173
Joined: Tue Jan 18, 2005 6:23 am
Location: Georgia, Cherrylog
Top

Postby j_b317 » Sat Jun 18, 2005 3:28 pm

I'm trying to get my doors mounted now in order to leave for Minden on Tuesday and I'm in a bind!

I've got the T moulding, and the edge moulding to go on the doors and in the cut outs respectively, but I'm not sure where to go with it. I cut the additional 1/8" off the bottom and the hinge side of the doors, but there's still not nearly enough room for the door frame edge moulding and the T moulding to fit in that slot. I want to be sure I'm going in the right direction before I lop more off the doors.

Any suggestions? :thinking:

jb
"Everybody dies but not everybody lives!"
j_b317
Teardrop Inspector
 
Posts: 12
Joined: Sat Feb 05, 2005 10:10 pm
Location: Arkansas
Top

Postby Geron » Sat Jun 18, 2005 4:31 pm

j_b317 wrote:I'm trying to get my doors mounted now in order to leave for Minden on Tuesday and I'm in a bind!

I've got the T moulding, and the edge moulding to go on the doors and in the cut outs respectively, but I'm not sure where to go with it. I cut the additional 1/8" off the bottom and the hinge side of the doors, but there's still not nearly enough room for the door frame edge moulding and the T moulding to fit in that slot. I want to be sure I'm going in the right direction before I lop more off the doors.

Any suggestions? :thinking:

jb


Sent you a PM. Let me know if it's confusing. Email me if the PM is totally obscure.

Geron
If it's not broken, you're not trying hard enough.
User avatar
Geron
1000 Club
1000 Club
 
Posts: 1522
Images: 173
Joined: Tue Jan 18, 2005 6:23 am
Location: Georgia, Cherrylog
Top

Postby Geron » Sat Jun 18, 2005 7:58 pm

Whoa, Just noticed that today is my 5 mo. anniversary joining the forum. and starting my TD.

Geron ;)
If it's not broken, you're not trying hard enough.
User avatar
Geron
1000 Club
1000 Club
 
Posts: 1522
Images: 173
Joined: Tue Jan 18, 2005 6:23 am
Location: Georgia, Cherrylog
Top

Postby bdosborn » Sat Jun 18, 2005 8:32 pm

Cool doors. I feel your pain on the trim, I'm not very hapy with mine. Better hurry up though, Minden is next weekend!
Bruce
2009 6.5'X11' TTT - Boxcar
All it takes is a speck of faith and a few kilowatts of sweat and grace.
Image
Boxcar Build
aVANger Build
User avatar
bdosborn
Donating Member
 
Posts: 5595
Images: 806
Joined: Wed May 05, 2004 11:10 pm
Location: CO, Littleton
Top

Postby Geron » Sun Jun 19, 2005 6:14 am

bdosborn wrote:Cool doors. I feel your pain on the trim, I'm not very hapy with mine. Better hurry up though, Minden is next weekend!
Bruce


Never make it -- VBS next week anyway.

Geron
If it's not broken, you're not trying hard enough.
User avatar
Geron
1000 Club
1000 Club
 
Posts: 1522
Images: 173
Joined: Tue Jan 18, 2005 6:23 am
Location: Georgia, Cherrylog
Top

Postby IraRat » Sun Jun 19, 2005 8:57 am

Geron--when you do the other one, PLEASE take a gazillion photos, like you're presenting a "How To."

Those doors are scaring the living crap out of me, and although I'll most probably go the traditional route (what other choices do we have?), my mind has been racing trying to come up with some new, innovative solution that no one's thought of yet.

But I guess you can't reinvent the wheel.
--Ira

"My HD and Wal-Mart have been out of Titebond for weeks, and I think it's a communist conspiracy."
User avatar
IraRat
Forum Storyteller
 
Posts: 1573
Joined: Wed Apr 06, 2005 8:43 am
Location: South Florida
Top

Postby Geron » Sun Jun 19, 2005 1:12 pm

IraRat wrote:Geron--when you do the other one, PLEASE take a gazillion photos, like you're presenting a "How To."

Those doors are scaring the living crap out of me, and although I'll most probably go the traditional route (what other choices do we have?), my mind has been racing trying to come up with some new, innovative solution that no one's thought of yet.

But I guess you can't reinvent the wheel.


Irarat,

I'm going to risk posting my instructions here for all to see. I am not a writer of clear instructions. This is just a start. Everyone, Ask questions and add to the instructions. This is perhaps the most difficult step in building the TD. Clear directions would have helped me considerably. I have one more to build and will probably learn much more about it.

Here they are for what it's worth.

Fitting Curved Doors

1. Use the scrap cut out from the side and VERY CAREFULLY and ACCURATELY scribe the outline of the finished trimmed door opening on the door. Have someone hold the door in place as you scribe.

2. Trace a line ¼ in. inside the outline of the door opening. Again very carefully. Contrary to installing doors in houses, you have NO room for error with the TD door. If you are unsure of the ¼” measure, calculate the size of the skin and trim that will be mounted to the edge of the door and allow about 1/8” more for clearance.


Cut carefully to the above line

3. Finish construction of the door cutting for window and gluing in necessary framing and insulation. Complete inside and outside skins. Wait about mounting the window. You’ll want to use the hole for the window to hold the door in position plus the door will be lighter and easier to handle.
4. You can now mount the hinge to the Cabin. It will remain fixed and the door will be adjusted by moving the door up and down on the hinge ON THE DOOR SIDE – See step 7

5. You can permanently mount the trim to the hinge side of the door because from here on out all the trimming/shimming will be done on the part of the door that opens. Do not permanently mount the skin and trim to the edge of the radius side of the door. You may need to remove it for fitting purposes. Mount this trim temporarily (w/o silicone caulk)

6. Mount the door to the cabin – Check the gap between the door and cabin. Use a piece of 1/4” Stock (Lathe – whatever) to check the gap between the door and cabin. If the ¼” stock drags at a certain point cut/sand the door till the gap is right. If there is a spot that is too loose – mark it for a shim under the skin.

7. TIP/TRICK On the Hinge on the door side make two of the screw holes into slots about ½ to ¾ inches long. This allows you to fix the hinge to the door using only these two slots and then position the door in the opening by sliding it up or down in the slots to make it fit properly. This gives you a proper vertical fit. When positioned tighten the two screws in the slots and mark the other screw holes.

8. THIS IS A REITERATION OF STEP 6 - I JUST DIDN'T DELETE IT Remove the door. Put the skin on the edge of the door and temporarily mount all trim. Mount the door using only the two screws in the slots in the hinge. Check for fit. Mark all uneven (high/low) places between the door and door opening. Measure carefully so you’ll know where and how much to cut and shim if necessary. Maybe you’ll get the perfect fit the first time – Yeah Right!! Remove door and door trim. Cut/Sand down high places you mark and shim (with whatever – I used scrap aluminum skin) up the low places. THIS IS A REITERATION OF STEP 6.

9. Check a second time for that perfect fit. If satisfied permanently mount and caulk all edge trim. Mount door.

10. Use hammer and beat the heck out of any place that drags once the door is mounted

11. Das all folk’s
If it's not broken, you're not trying hard enough.
User avatar
Geron
1000 Club
1000 Club
 
Posts: 1522
Images: 173
Joined: Tue Jan 18, 2005 6:23 am
Location: Georgia, Cherrylog
Top

Use heat?

Postby gman » Sun Jun 19, 2005 1:55 pm

Did you try useing a tourch to heat the Aluminum in the Radius as you bent it? Small propane like used for plumbing is easy to control with one hand as you press with other. Wear heavy leather gloves, Al will tranfer heat far and fast.
Junk is something you've kept for years
And throw away three weeks before you need it.
User avatar
gman
The 300 Club
 
Posts: 320
Images: 13
Joined: Thu Jun 16, 2005 8:31 pm
Location: I-5 in Washawayington
Top

Use heat?

Postby gman » Sun Jun 19, 2005 1:56 pm

Did you try useing a tourch to heat the Aluminum in the Radius as you bent it? Small propane like used for plumbing is easy to control with one hand as you press with other. Wear heavy leather gloves, Al will tranfer heat far and fast.
Junk is something you've kept for years
And throw away three weeks before you need it.
User avatar
gman
The 300 Club
 
Posts: 320
Images: 13
Joined: Thu Jun 16, 2005 8:31 pm
Location: I-5 in Washawayington
Top

Re: Use heat?

Postby Geron » Sun Jun 19, 2005 2:01 pm

gman wrote:Did you try useing a tourch to heat the Aluminum in the Radius as you bent it? Small propane like used for plumbing is easy to control with one hand as you press with other. Wear heavy leather gloves, Al will tranfer heat far and fast.


Yeah, I annealed it a couple times. Got the kinks out but the ripples are premanent. On the next door - they did this on my aliner - I plan to taper the bending leg from 1/2" to 1/4" as it approaches the radius and through the radius. 1/4" bends much much better than 1/2" - I think this will work along with the annealing. Just make sure that the inside skin will be coverd with the 1/4" angle width.

Geron
If it's not broken, you're not trying hard enough.
User avatar
Geron
1000 Club
1000 Club
 
Posts: 1522
Images: 173
Joined: Tue Jan 18, 2005 6:23 am
Location: Georgia, Cherrylog
Top

Next

Return to Teardrop Construction Tips & Techniques

Who is online

Users browsing this forum: No registered users and 2 guests