Interior Wooden Cabinet Doors

Anything to do with mechanical, construction etc

Interior Wooden Cabinet Doors

Postby Classic Finn » Wed Feb 18, 2009 2:29 pm

We are wondering if you folks have photos of the interior cabinets doors you have made? Id love to get some instructions and Ideas as to how to go about making some. Since I dont have much experience in this.

Photos are welcome also.

Classic Finn ;)
Royal Teardrop Society Scandinavian Bureau Chief of Staff

Image
User avatar
Classic Finn
Midnight Sun Voyager
 
Posts: 17488
Images: 146
Joined: Fri Apr 29, 2005 4:29 am
Location: Country of Finland

Postby bobhenry » Wed Feb 18, 2009 3:00 pm

I didn't have that kind of patients bought mine at a building salvage supply store. :)

Image

$2.50 a door I couldn't buy the finish for that !
Growing older but not up !
User avatar
bobhenry
Ten Grand Club
Ten Grand Club
 
Posts: 10368
Images: 2623
Joined: Fri Feb 09, 2007 7:49 am
Location: INDIANA, LINDEN

Postby Classic Finn » Wed Feb 18, 2009 3:36 pm

bobhenry wrote:I didn't have that kind of patients bought mine at a building salvage supply store. :)

Image

$2.50 a door I couldn't buy the finish for that !


Here them same doors will run between 40 - 80 Euro per door. So that made me to think. As well as the wife. She wont let money go for them at that cost. And shipping is a killer.

So the only alternative is to try to make our own. My son made 2 in school but he had all the fancy tools and eclectrical saws and routers to make some. So this will have to be doors made by and with basic tools
only.

Classic Finn ;)
Royal Teardrop Society Scandinavian Bureau Chief of Staff

Image
User avatar
Classic Finn
Midnight Sun Voyager
 
Posts: 17488
Images: 146
Joined: Fri Apr 29, 2005 4:29 am
Location: Country of Finland
Top

Postby jackdaw » Wed Feb 18, 2009 3:52 pm

Our doors are very simple and very light.
They are made from 2x1, with a 6mm(1/4") rebate cut along one edge. Theres 6mm (1/4") ply glued in place.
I had to put some celtic dogs on the front of them to take your eye off the dodgy carpentry. :lol: :lol:

Image

Image

Dave.
User avatar
jackdaw
500 Club
 
Posts: 598
Images: 124
Joined: Fri Feb 22, 2008 2:31 pm
Location: Wltshire, UK
Top

Postby halfdome, Danny » Wed Feb 18, 2009 3:57 pm

Heikki, My door frames are 3/4" x 2" with a 1/2" bead mitered and applied on the outside to make them 2 1/2" wide, common for raised panel doors. You would need at least a router table (shaper is best) with the proper cope and stick bits/knives and a heavy duty router.

You could dowel the frames together after you machine your 1/4" groove for your interior panel.

The raised panel can be done on the table saw if you follow safety procedures or make them on a 3 hp shaper like I do. I have a panel raising router bit and one look at it from out of the box I said no way. Router bits can and will helicopter out of a worn or inadequately tightened collet. I have a shaper panel raising knife (3 wing)that is on a 3/4" threaded shaft with a large nut.

A flat floating panel out of 1/4" plywood could also be used instead of a raised panel.

Also you could simply make some overlay panel back doors 1" wider and taller than your opening with 3/4" x 2" stiles and rails. After you build the frames and route your desired interior profile you glue and staple a 1/4" plywood panel on the flat back. An effective and lightweight door.

If you make overlay doors you'll need space between doors as each one overlays the opening 1/2" all the way around.

My doors are flush doors that require a 3/32" gap all the way around but they look the best in my opinion.

Another option is to glue several boards together and apply a 3/4" x 2" stiffener flat on the back side to keep it from warping.

You could also cut some plywood panel doors and simply apply hardwood edging to cover the plywood core.

There are so many door styles that one could do that I would go to a home improvement store or shop for doors online to find what you want. Look at the top and bottom of the doors and figure out how they were constructed. A rule of thumb is it takes about the same time to make the cabinets as it takes to build the doors and drawers. Doors properly built take a lot of time and attention to detail. A photo with dimensions of where you want doors would help me in figuring what would or wouldn't work for your application.
You might look for a shop in your area that makes doors from your drawings, a much simpler option. :D Danny

Image
Image
Image
ImageImage
"Conditions are never just right. People who delay action until all factors are favorable do nothing". William Feather
Don't accept "It's Good Enough" build to the best of your abilities.
Image
Teardroppers Of Oregon & WashingtonImage
User avatar
halfdome, Danny
*Happy Camper
 
Posts: 5894
Images: 252
Joined: Sun Aug 14, 2005 11:02 pm
Location: Washington , Pew-al-up
Top

Postby planovet » Wed Feb 18, 2009 4:14 pm

I like Danny's raised panel doors but I didn't have the bits to do that. My doors are flat panel doors. They are built to be surface mounted rather than flush. Flush does look better but my way is a bit more forgiving of mistakes. I had never built any cabinets before so if I can do it, so can you.

The frames are 3/4"x2" Red Oak and the panel is 1/4" Red Oak ply. I cut a groove into the frames for the panel with a router leaving a 1/4" reveal on the front. I then glued it together with biscuits letting the panel "float". I rounded over the edges with a router and stained and urethaned them before mounting. Like I said, I'm a novice so I know you can do it.

Image

Image

Image

Image

Image
ImageMark (& Cindi)
Visit our website: Little Swiss Teardrop

I was wondering why the water balloon was getting bigger... and then it hit me.

ImageImageImageImage
User avatar
planovet
The Cat Man
 
Posts: 5583
Images: 3
Joined: Tue Nov 27, 2007 4:48 pm
Location: Plano, Texas
Top

Postby Classic Finn » Wed Feb 18, 2009 4:20 pm

jackdaw wrote:Our doors are very simple and very light.
They are made from 2x1, with a 6mm(1/4") rebate cut along one edge. Theres 6mm (1/4") ply glued in place.
I had to put some celtic dogs on the front of them to take your eye off the dodgy carpentry. :lol: :lol:

Image

Image

Dave.


Hi Dave

I was playing with a simple handsaw mitre box today. And I came up with the same kind of frames as you have on your doors. ;)
Royal Teardrop Society Scandinavian Bureau Chief of Staff

Image
User avatar
Classic Finn
Midnight Sun Voyager
 
Posts: 17488
Images: 146
Joined: Fri Apr 29, 2005 4:29 am
Location: Country of Finland
Top

Postby Classic Finn » Wed Feb 18, 2009 4:23 pm

halfdome, Danny wrote:Heikki, My door frames are 3/4" x 2" with a 1/2" bead mitered and applied on the outside to make them 2 1/2" wide, common for raised panel doors. You would need at least a router table (shaper is best) with the proper cope and stick bits/knives and a heavy duty router.

You could dowel the frames together after you machine your 1/4" groove for your interior panel.

The raised panel can be done on the table saw if you follow safety procedures or make them on a 3 hp shaper like I do. I have a panel raising router bit and one look at it from out of the box I said no way. Router bits can and will helicopter out of a worn or inadequately tightened collet. I have a shaper panel raising knife (3 wing)that is on a 3/4" threaded shaft with a large nut.

A flat floating panel out of 1/4" plywood could also be used instead of a raised panel.

Also you could simply make some overlay panel back doors 1" wider and taller than your opening with 3/4" x 2" stiles and rails. After you build the frames and route your desired interior profile you glue and staple a 1/4" plywood panel on the flat back. An effective and lightweight door.

If you make overlay doors you'll need space between doors as each one overlays the opening 1/2" all the way around.

My doors are flush doors that require a 3/32" gap all the way around but they look the best in my opinion.

Another option is to glue several boards together and apply a 3/4" x 2" stiffener flat on the back side to keep it from warping.

You could also cut some plywood panel doors and simply apply hardwood edging to cover the plywood core.

There are so many door styles that one could do that I would go to a home improvement store or shop for doors online to find what you want. Look at the top and bottom of the doors and figure out how they were constructed. A rule of thumb is it takes about the same time to make the cabinets as it takes to build the doors and drawers. Doors properly built take a lot of time and attention to detail. A photo with dimensions of where you want doors would help me in figuring what would or wouldn't work for your application.
You might look for a shop in your area that makes doors from your drawings, a much simpler option. :D Danny

Image
Image
Image


Thank Danny

As always them are soooooooo beautiful :applause:

Danny your cabinet frame front is that 2 inches in width all the way around? Sides and Top as well as bottom?
Last edited by Classic Finn on Wed Feb 18, 2009 5:28 pm, edited 2 times in total.
Royal Teardrop Society Scandinavian Bureau Chief of Staff

Image
User avatar
Classic Finn
Midnight Sun Voyager
 
Posts: 17488
Images: 146
Joined: Fri Apr 29, 2005 4:29 am
Location: Country of Finland
Top

Postby Classic Finn » Wed Feb 18, 2009 4:24 pm

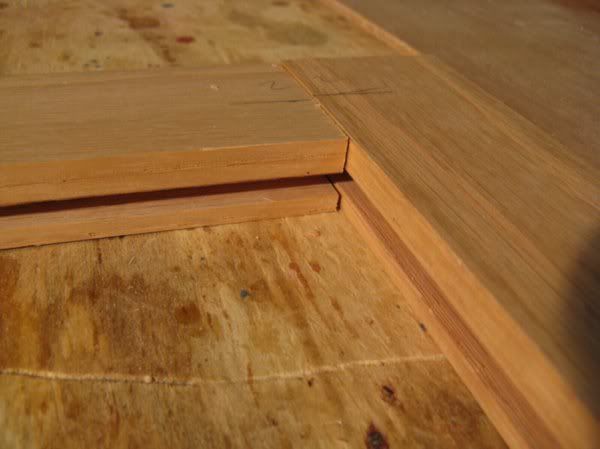
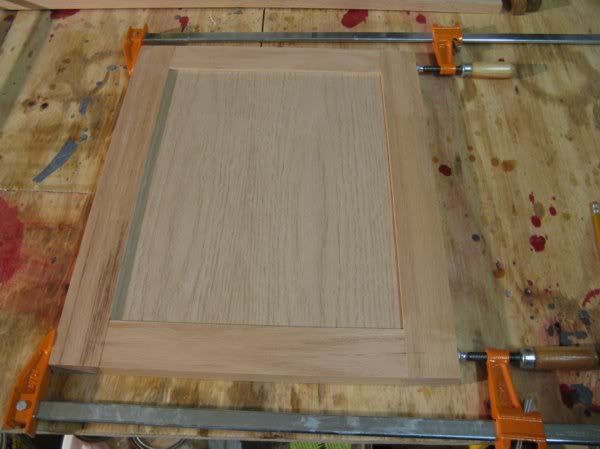
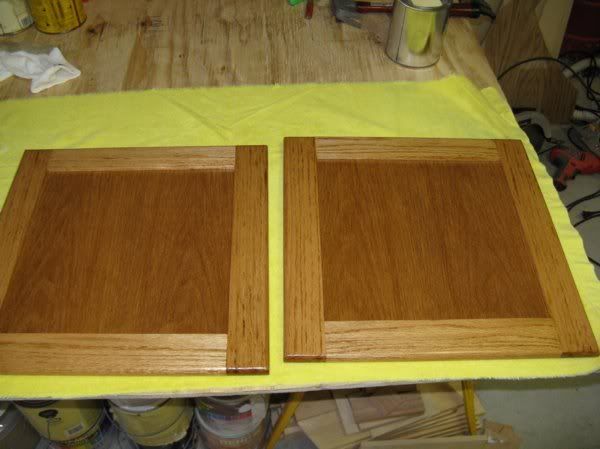
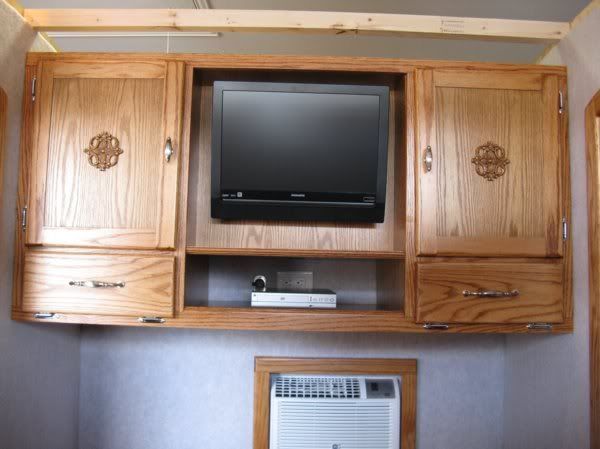
planovet wrote:I like Danny's raised panel doors but I didn't have the bits to do that. My doors are flat panel doors. They are built to be surface mounted rather than flush. Flush does look better but my way is a bit more forgiving of mistakes. I had never built any cabinets before so if I can do it, so can you.

The frames are 3/4"x2" Red Oak and the panel is 1/4" Red Oak ply. I cut a groove into the frames for the panel with a router leaving a 1/4" reveal on the front. I then glued it together with biscuits letting the panel "float". I rounded over the edges with a router and stained and urethaned them before mounting. Like I said, I'm a novice so I know you can do it.

Image

Image

Image

Image

Image


Boy Howdy. Them are just immaculate for a novice? :? :lol: :lol:

Very nice. :applause: :applause:
Royal Teardrop Society Scandinavian Bureau Chief of Staff

Image
User avatar
Classic Finn
Midnight Sun Voyager
 
Posts: 17488
Images: 146
Joined: Fri Apr 29, 2005 4:29 am
Location: Country of Finland
Top

Postby Classic Finn » Wed Feb 18, 2009 4:26 pm

To the folks above and other.

How difficult is it to cut oak and mahogany being that they are so hard?

Without a table saw here can I cut that with a skilsaw?

Classic Finn :thinking:
Royal Teardrop Society Scandinavian Bureau Chief of Staff

Image
User avatar
Classic Finn
Midnight Sun Voyager
 
Posts: 17488
Images: 146
Joined: Fri Apr 29, 2005 4:29 am
Location: Country of Finland
Top

Postby Creamcracker » Wed Feb 18, 2009 4:39 pm

jackdaw wrote:Our doors are very simple and very light.
They are made from 2x1, with a 6mm(1/4") rebate cut along one edge. Theres 6mm (1/4") ply glued in place.
I had to put some celtic dogs on the front of them to take your eye off the dodgy carpentry. :lol: :lol:

Image

Image

Dave.


Hi Dave ---- Did you carve the celtic designs? They look great...how would I go about doing something similar? By the way --- I love Wiltshire...what town are you in?

Philip

Philip
Image Image
3rd Annual Out of Control Shop Winner :)
User avatar
Creamcracker
Teardrop Graduate
 
Posts: 1126
Images: 142
Joined: Fri Sep 22, 2006 7:38 am
Location: VA Culpeper
Top

Postby planovet » Wed Feb 18, 2009 4:40 pm

I used a miter saw to cut my pieces but a skilsaw with a sharp blade should work just fine. Just take your time. Oak can burn on you if you aren't careful.
ImageMark (& Cindi)
Visit our website: Little Swiss Teardrop

I was wondering why the water balloon was getting bigger... and then it hit me.

ImageImageImageImage
User avatar
planovet
The Cat Man
 
Posts: 5583
Images: 3
Joined: Tue Nov 27, 2007 4:48 pm
Location: Plano, Texas
Top

Postby Rock » Wed Feb 18, 2009 4:47 pm

The current issue of Fine Woodworking has a great introductory article on all types of door construction. I subscribe but it's not a cheap magazine to buy off the news stand ($9 I think).

The article covers all methods of construction from using biscuits to cope and stick to full mortise and tenon. Maybe you can find it in a library and copy the article.

It would be well worth a look to see what can be done with the tools and skills available.

Another recent article in the magazine tested all types of joints for racking strength (racking being forces that want to take the door out of square and into a parallelagram - like an old sagging garden gate.) Believe it or not the half-lap joint was the strongest - even stronger than mortise and tenon. The half lap can be made on any table saw, and you could then use a 1/4 plywood panel. Therefore, the only tool needed for this construction method is a table saw.

Eric
Rock
Teardrop Master
 
Posts: 273
Images: 48
Joined: Tue Oct 14, 2008 10:38 am
Location: Fremont, OH
Top

Postby Classic Finn » Wed Feb 18, 2009 5:04 pm

This is the material I have left over. And its Mahogany. Even though this is real thick I also have some thats about 1/2 or 3/4 inch in thickness.

This is a photo of my countertop.

Image

Image

I was thinking of making the front panel out of it but also cut the door frames from the same materials?

Its got shades of light and darker mahogany in it. I can somehow visualize the doors and front panel made from this but dont know exactly where to start with it.

For the Front Panel - What width should the top crosswise board be and what width for Bottom? And Sides for the frame itself


Classic Finn
Royal Teardrop Society Scandinavian Bureau Chief of Staff

Image
User avatar
Classic Finn
Midnight Sun Voyager
 
Posts: 17488
Images: 146
Joined: Fri Apr 29, 2005 4:29 am
Location: Country of Finland
Top

Postby Classic Finn » Wed Feb 18, 2009 5:44 pm

Can someone explain to me what are meant by these words? :oops: :oops: :oops:

stiles and rails
Royal Teardrop Society Scandinavian Bureau Chief of Staff

Image
User avatar
Classic Finn
Midnight Sun Voyager
 
Posts: 17488
Images: 146
Joined: Fri Apr 29, 2005 4:29 am
Location: Country of Finland
Top

Next

Return to Teardrop Construction Tips & Techniques

Who is online

Users browsing this forum: No registered users and 8 guests