The LT... Thomas' Luxury Tent

...ask your questions in the appropriate forums BUT document your build here...preferably in a single thread...dates for updates, are appreciated....

Postby 2bits » Sun Apr 05, 2009 12:09 am

Holy crap four months almost to the day since I worked on the teardrop~ :roll: Well, the time-drain is gone, and winter is gone and spring is upon us with all new possibilities, CAMPING being high on the list!

I got out and did a little today, I drilled the hatch for all the wiring, picked up a sheet of 1/8" Plywood (it is paneling, that's all they had in 1/8" and I wasn't leaving without something) and screwed and glued it to the hatch. It made the radius easily. I went ahead and put hot, moist towels on it anyway to help it mold to the radius. I screwed it in place in the middle, which will be removed once the glue dries, and clamped the edges. I am just glad I got *something* done, I am hoping this will get me in gear to start knocking out all the other stuff that doesn't cost $$$ that I still need to get done, there is a pretty good amount so I don't have any excuse!

Image

Image

Image

Image
Thomas

Image
User avatar
2bits
2bit Member
 
Posts: 5132
Images: 8
Joined: Thu Dec 27, 2007 6:04 pm
Location: Lake Tawakoni, TX

Postby jackdaw » Sun Apr 05, 2009 5:21 am

It looks like a great hatch Thomas. :thumbsup: :thumbsup:

Isn't it nice to get stuck in again. :) :)

Are you planning on covering it in Aluminium , like the roof ?

Cheers Dave
User avatar
jackdaw
500 Club
 
Posts: 598
Images: 124
Joined: Fri Feb 22, 2008 2:31 pm
Location: Wltshire, UK

Postby aggie79 » Sun Apr 05, 2009 8:41 am

:applause: Looking good, Thomas. Glad to see your back at it again.

Hopefully your motivation will help get back on track. After all, LCG IV in October will be here before we know it. :?

Tom
Tom (& Linda)
For build info on our former Silver Beatle teardrop:
Build Thread

93503
User avatar
aggie79
Super Duper Lifetime Member
 
Posts: 5405
Images: 686
Joined: Tue Aug 07, 2007 5:42 pm
Location: Watauga, Texas
Top

Postby Juneaudave » Sun Apr 05, 2009 9:18 am

Alright...glad to see you back at it!!! There are tons of little things to do that take time. We've been waiting to see you get finished!!!
:applause: :applause: :applause:
User avatar
Juneaudave
Super Duper Lifetime Member
 
Posts: 3237
Images: 380
Joined: Sun Jul 03, 2005 12:11 pm
Location: Juneau, Alaska
Top

Postby 2bits » Sun Apr 05, 2009 11:51 am

Thanks guys! I am sooo ready!

Tom, Yes October will be here fast! I was also hoping to make it to Minden, NE In June, but my hopes for that are fleeting. Hey what's a goal for if not to miss! How bout you? Still shooting for Oct right? I know you've had a setback, but you can still do it. If you ever need any help I'll be glad to devote an afternoon.

Dave, yup, I will be extending the black aluminum over the back of the hatch as well. Alot of people who do this model, extend the top of the hatch back a little deeper, but I left the hinge in the stock location so the length from hinge to the bottom is exactly 4 foot so I only need to cut the width of the aluminum and I can just use one sheet without any joints.

I figure this, and I need to sand/stain/poly the doors, and then do my face frames, and make the side trim and I pretty much have everything I need to do all of that stuff.
Thomas

Image
User avatar
2bits
2bit Member
 
Posts: 5132
Images: 8
Joined: Thu Dec 27, 2007 6:04 pm
Location: Lake Tawakoni, TX
Top

Postby Anthony J Grant » Sun Apr 05, 2009 4:48 pm

Thomas,

Had to check out your build after you taged mine, :shock: nice build :thumbsup: I hope mine looks that good when Im done.
Where are we going and why am I in this hand basket?

Tony G.
the HOBO HILTON
User avatar
Anthony J Grant
Teardrop Master
 
Posts: 232
Images: 119
Joined: Wed Dec 31, 2008 8:42 pm
Location: Milan Mi
Top

Postby Miriam C. » Sun Apr 05, 2009 9:20 pm

:applause: :thumbsup: :thumbsup: Great hatch! If you really work at it you will be campable by Minden. :thumbsup: :D
“Forgiveness means giving up all hope for a better past.â€
User avatar
Miriam C.
our Aunti M
 
Posts: 19675
Images: 148
Joined: Wed Feb 15, 2006 3:14 pm
Location: Southwest MO
Top

Minden

Postby NebraskaTeachr » Sun Apr 05, 2009 10:13 pm

It would be cool if you could make it to Minden. That is my last feasible date for being campable. I really want to be camping by May. I am looking forward to meeting some of the fine people on this list.

Tim
User avatar
NebraskaTeachr
Donating Member
 
Posts: 123
Images: 53
Joined: Tue Feb 10, 2009 2:01 pm
Location: Hardin, MT
Top

Postby aggie79 » Sun Apr 05, 2009 11:10 pm

2bits wrote:Tom, Yes October will be here fast! I was also hoping to make it to Minden, NE In June, but my hopes for that are fleeting. Hey what's a goal for if not to miss! How bout you? Still shooting for Oct right? I know you've had a setback, but you can still do it. If you ever need any help I'll be glad to devote an afternoon.


:thumbsup: Thomas, thanks for the offer. I may need some help standing up the walls. October is the target. Our TD may be just a shell with no cabinets and a tarp instead of hatch, but I will have something trailer-able for LCG IV.
Tom (& Linda)
For build info on our former Silver Beatle teardrop:
Build Thread

93503
User avatar
aggie79
Super Duper Lifetime Member
 
Posts: 5405
Images: 686
Joined: Tue Aug 07, 2007 5:42 pm
Location: Watauga, Texas
Top

Postby 2bits » Mon Apr 06, 2009 1:26 am

Hey Tom, that's cool with me! Send me a PM a couple days in advance, I put mine on by myself and got real good at makeshift props, it sure would have gone alot quicker with help.

I Thanks alot Tony! It is a labor of love that's for sure! I have been out of the loop for a while now so my build fell into the depths of older posts haha...

Thank you as always Miriam, right now it's not time, it's $$$. I got stuff on craigs list tho haha

I encountered a couple of issues once the skin was on....

First, at the bottom of the hatch, the plywood had nothing to bond to horizontally because the bottom spar was at an odd angle to make it flush with the floor, so it only touched the tip of the bottom spar, and the vertical spars. (Yeah, I know I still need to snip off the end of the side rails, someone stole my sawzall tho!)

Image
This left 10-11" of space of free floating plywood...
Image

I kept telling myself that I needed another spar right there that followed the hatch angle and then it hit me. DOH! just add another spar just like I had been telling myself to do! So I cut sections and just glued them in, (no fasteners beyond clamps) right up against the existing ones. It is going to be super strong now, and give me a good flat surface to screw the lower trim into.
Image

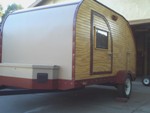
Oh by the way paneling is kind of interesting because it comes with built in kerfs. Unfortunately it just creates points in the skin, so it is not recommended. My case isn't bad at all as you can see and the aluminum will cover it easily. Nice to see it covered finally though!

Image

The second issue is that I see now that there is much too wide a gap at the top.

Image
I am thinking I can bring back an old option that I planned on using a while ago for another reason but solved. This spar is stained and clear coated and read to go. Just needs to be installed. This will take up the gap and if planned right the hinge screws will not need to touch the aluminum roof, but the hinge plate will cover up everything.
Image
Thomas

Image
User avatar
2bits
2bit Member
 
Posts: 5132
Images: 8
Joined: Thu Dec 27, 2007 6:04 pm
Location: Lake Tawakoni, TX
Top

Postby 2bits » Sat Apr 11, 2009 8:50 pm

Well I did a good amount of work today. I focused on the face frames. So far I just had all the pieces rough cut and stacked up.

I started with the galley. I decided that the inside of the hatch was going to be too close to the drawer faces and would not close all the way, so I ripped all the pieces in half from 3/4" to 3/8" thick. I like the way it looks better now anyway. I finalized how it is going to be done and finished up the cuts

After the pic below, I decided to remove the lower trim for the cooler portion and I made the far right upright skinnier, and I decided that I am not going to put a face drawer face on it, I am just going to leave it open for simplicity. There will be a slider tray there for it though. Didn't get a pic of it, but you get the idea. Next I sanded and sanded then stained all the pieces. Here is a pic of it in place before staining. Nothing spectacular, I am just excited to see it moving along.

Image

After that I went after the front cabinets. I did my final cuts on all the pieces, except one. I will need to buy one small piece of wood for that. then sanded and stained all those pieces.

Lastly I did the final cuts for the rear cabinets and a lightning storm came through and a piece of cut off wood flew out of the table saw and smacked me pretty good so I figured I better take a break haha I am going to go back out and sand and stain the rest in a little bit so all I have to do tomorrow is lay as many coats of polyurethane as I can. I figure I can do 3 maybe 4 from morning to bed time. Then I will be ready to install it!

:twisted:
Here's a pic of the stained stuff that I have so far. They are done in the same gunstock stain as everything else and the drawer faces are going to be a lighter color stain.

Image
Thomas

Image
User avatar
2bits
2bit Member
 
Posts: 5132
Images: 8
Joined: Thu Dec 27, 2007 6:04 pm
Location: Lake Tawakoni, TX
Top

Postby satch » Sat Apr 11, 2009 10:08 pm

Damn Tom, that"s lookin' SWEET!! :thumbsup:
Great work Bro!
If it itches. scratch it
Rick
User avatar
satch
Donating Member
 
Posts: 1198
Images: 63
Joined: Thu Feb 07, 2008 9:46 pm
Location: the arm pit of Cali
Top

Postby Juneaudave » Sat Apr 11, 2009 10:41 pm

I really like that stain color...she's looking good!! There sure is alot to do once the walls are up...glad to see you back at it!!!
:thumbsup: :applause: :applause:
User avatar
Juneaudave
Super Duper Lifetime Member
 
Posts: 3237
Images: 380
Joined: Sun Jul 03, 2005 12:11 pm
Location: Juneau, Alaska
Top

Postby planovet » Sun Apr 12, 2009 8:51 pm

Looking good Thomas! :thumbsup: We are at about the same place in our builds. We both should be done by October! Now we need to get Tom finished too!
ImageMark (& Cindi)
Visit our website: Little Swiss Teardrop

I was wondering why the water balloon was getting bigger... and then it hit me.

ImageImageImageImage
User avatar
planovet
The Cat Man
 
Posts: 5583
Images: 3
Joined: Tue Nov 27, 2007 4:48 pm
Location: Plano, Texas
Top

Postby Anthony J Grant » Sun Apr 12, 2009 9:20 pm

Thomas,

Looking good! :thumbsup: :thumbsup: :thumbsup:
Where are we going and why am I in this hand basket?

Tony G.
the HOBO HILTON
User avatar
Anthony J Grant
Teardrop Master
 
Posts: 232
Images: 119
Joined: Wed Dec 31, 2008 8:42 pm
Location: Milan Mi
Top

PreviousNext

Return to Build Journals

Who is online

Users browsing this forum: No registered users and 12 guests