Metamorphosis

Anything to do with mechanical, construction etc

Metamorphosis

Postby Arne » Fri Sep 02, 2005 9:21 pm

I built my tear last year in a rush, for a trip that had been planned months before. I 'discovered' tear drop trailers and built it in roughly 5 weeks. Early this year, I lowered it by putting the axle on top of the spring, instead of under it..... then, I added tha a/c...

Now, the big chages are in progress. I want to lower the top by 6 inches, and I want to add a galley. I have made templates and the top-chop is in progress. So far, I'm attempting to fix some glitches in the initial build (mis-matched ply seams), and am trying to keep the wiring intact (means chopping proceeds at a snails pace some of the time.

So, here are 1- as built, 2- a quick photo shop of final shape, and 3- work in progress....

I have to have it done by the end of the month for another trip we have planned...... will post more pics at critical junctures.....

Image


Image


Image
www.freewebs.com/aero-1
---
.
I hope I never get too old to play (Arne, Sept 11, 2010)
.
User avatar
Arne
Mr. Subject Line
 
Posts: 5383
Images: 96
Joined: Fri Aug 13, 2004 12:25 pm
Location: Middletown, CT

Postby stjohn » Sat Sep 03, 2005 10:46 pm

Hi I'm kind of new to this forum just getting frame materail together was
planning on bulding one a little taller my self can you tell me why you are
shorting yours I don't want to run into any problems later


Thanks
Mike St.John
Lake Fork Tx.
Only he who attempts the ridiculous
Can achieve the impossible
User avatar
stjohn
The 300 Club
 
Posts: 444
Images: 68
Joined: Thu Sep 01, 2005 9:34 pm
Location: Lake fork Tx.

Postby asianflava » Sun Sep 04, 2005 1:03 am

Arne,

I had to look at the pics a couple times because for some reason it looked photoshopped! :?
User avatar
asianflava
8000 Club
8000 Club
 
Posts: 8412
Images: 45
Joined: Mon Aug 02, 2004 5:11 am
Location: CO, Longmont
Top

Postby Arne » Sun Sep 04, 2005 7:36 am

The middle photo, as mentioned is photoshopped....

Why cut it down.... ?

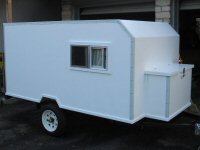
Ah...... I wanted to. The original design was taller to hold my motorcycle. It was 54 inches tall (+6 over 48 inches)...... along the way, I started thinking that while traveling, it would be a real pain drive all day, arrive in the dark/rain, unload the scooter, put down bunk beds, etc.

The trailer was taller than the car. I didn't like the looks of it. I decided while using the tear, that it might be nice to have a galley. I also want some other changes...... I clumped them all together and thought I'd take the tear out of action for this month and do them all.

First, being able to see over the tear is nice. I can't explain it, but is just seem more tear-like now...... the galley will help take some weight off the tongue (balance the a/c unit). It will take a couple of tote boxes out of the van.

One thing I can not change that I wish I could, is now, I would put the trailer frame inside the walls, so it would not show from the outside. The ffloor would sit on the bottom of the rails instead of on the top.. And, it would make the tear another 3 inches lower.

Anyway, the old top is gone and the new rafters are in place. When the roof is done (ply is on order), the galley will be cobbled onto the back end making the tear 14 inches longer... and the wheels will be moved back to rebalance the weight.... I managed to save the 4 ceiling wires, so am all set with them. I'm also hoping wind resistance will be lessened. Pulling up West Virgina mountains was tough on the transmission and gas mileage...... As previously mentioned, sanding and waxing the tear improved gas mileage. At over 5 feet wide, the tear is a lot to punch through the wind at 65 mph.

Image
www.freewebs.com/aero-1
---
.
I hope I never get too old to play (Arne, Sept 11, 2010)
.
User avatar
Arne
Mr. Subject Line
 
Posts: 5383
Images: 96
Joined: Fri Aug 13, 2004 12:25 pm
Location: Middletown, CT
Top

Postby Arne » Sun Sep 04, 2005 1:46 pm

I'm going to post little things I'm finding out as I go on my rebuild.....

I put the inside front ceiling/wall in today. the 1/8 Ply (going across this time to make it bend easier) has a sharp bend at the front, and rises to a flat ceiling. Usually I force into the sharp area and use my h/f nailer and hope it holds till the glue dries....

It dawned on me, I was doing it a$$-backwards. If I held it in place and nailed the flat ceiling surface and worked toward the sharp curve down the front wall, all those first nails would hold the tighter curve in place.

So, that is what I did, and it worked great. The inside front ceiling is now in place, glue drying.
www.freewebs.com/aero-1
---
.
I hope I never get too old to play (Arne, Sept 11, 2010)
.
User avatar
Arne
Mr. Subject Line
 
Posts: 5383
Images: 96
Joined: Fri Aug 13, 2004 12:25 pm
Location: Middletown, CT
Top

Postby Arne » Sun Sep 04, 2005 3:59 pm

Two new pics. First is new front ceiling (seam will be behind existing shelf line).... second is rear ceiling, held in place with 'dead men' till glue dries.....

Since I have no more ply till Tues/Weds, will start cobbling on galley tomorrow...... on schedule, kinda under budget..


Image

Image
www.freewebs.com/aero-1
---
.
I hope I never get too old to play (Arne, Sept 11, 2010)
.
User avatar
Arne
Mr. Subject Line
 
Posts: 5383
Images: 96
Joined: Fri Aug 13, 2004 12:25 pm
Location: Middletown, CT
Top

Postby beverlyt » Sun Sep 04, 2005 4:26 pm

Arne,
It really looks good. I like the chopped version better too.

We went camping overnight up north to some friends property...

Got up early and though I'm glad we have a galley, and I think you'll really appreciate one too... it was 50 degrees this morning. We sat around outside making our coffee with blankets as cloaks from the chilly morning air.

Inside though, especially with the aid of heat off a light, it was warm and toasty.

I really think you're going to appreciate having that built-in kitchen.
Looking good!

BevImage
User avatar
beverlyt
500 Club
 
Posts: 955
Images: 20
Joined: Sat Apr 17, 2004 4:50 am
Location: Grand Haven, Michigan
Top

Postby Arne » Tue Sep 06, 2005 5:46 pm

Today, with some help from my brother, the top is going back on... tomorrow, I concentrate on finishing and painting the inside...

Image
www.freewebs.com/aero-1
---
.
I hope I never get too old to play (Arne, Sept 11, 2010)
.
User avatar
Arne
Mr. Subject Line
 
Posts: 5383
Images: 96
Joined: Fri Aug 13, 2004 12:25 pm
Location: Middletown, CT
Top

Postby Arne » Fri Sep 09, 2005 9:53 am

Am installing 'foam' molding. Had to heat it with a hair dryer to get it to bend this sharp.... paint sticks are holding it in place till glue dries..

Image
www.freewebs.com/aero-1
---
.
I hope I never get too old to play (Arne, Sept 11, 2010)
.
User avatar
Arne
Mr. Subject Line
 
Posts: 5383
Images: 96
Joined: Fri Aug 13, 2004 12:25 pm
Location: Middletown, CT
Top

Postby Arne » Sat Sep 10, 2005 6:54 pm

Multi-tasking: I'm using expoy to build up a 1x1 (made of 4, 1/4x1 pieces tofit the rear curve) to attach the new galley to. While waiting for it to set, I'm painting the interior and working the roof back to the new galley....

Pic 1, roof.... pic 2, jigs attached to rear edge to build up 1x1 cleat from pieces.

Image

Image
www.freewebs.com/aero-1
---
.
I hope I never get too old to play (Arne, Sept 11, 2010)
.
User avatar
Arne
Mr. Subject Line
 
Posts: 5383
Images: 96
Joined: Fri Aug 13, 2004 12:25 pm
Location: Middletown, CT
Top

Postby vinoscooter » Sat Sep 10, 2005 8:23 pm

Hey arne..Looling at your trailer..seems to be the same as mine..except I have the A tunge..This seems to me to be an answer to the sidewall trailer frame look. But it won't help w/the lowering problem. I put an outside table on mine,useing a 1x4 across the back of the trailer frame to mount the table bracket to...kind of like a bumper w/bracket on it..It realley looks good...Now im thinking about triming the whole frame w/1x4's...mounted right under the side walls,rear & front...A little cutting around the wheels...Longer bolts,moveing the lights to mount on the wood trim..Did a ruff mock up..clamped 1x4's on the sides & front..Looked alot better..Might use more like 1/2x3's...Im doing some changes on my pod next spring, Don't have the time right now....I like what your doing...Great pic's also.. :) vinoscooter

ARNE WROTE: One thing I can not change that I wish I could, is now, I would put the trailer frame inside the walls, so it would not show from the outside. The ffloor would sit on the bottom of the rails instead of on the top.. And, it would make the tear another 3 inches lower.
" You have enemies? Good! It means you've stood up for something at least once in your life."
WINSTON CHURCHILL
User avatar
vinoscooter
Teardrop Master
 
Posts: 140
Images: 20
Joined: Tue Oct 19, 2004 10:48 am
Location: Eastern Wa St
Top

Postby Arne » Sat Sep 10, 2005 8:34 pm

Actually, the 1x4's might work. The thought had crossed my mind fleetingly. Will have to give it a bit more thought. No reason to worry about the fenders, can just put a piece in front and one in back....

Well, I'm a bit ahead of schedule, putting in longish days, but coming along quite well. May see if I can squeeze in those 1x4's if I decide to go with them..
www.freewebs.com/aero-1
---
.
I hope I never get too old to play (Arne, Sept 11, 2010)
.
User avatar
Arne
Mr. Subject Line
 
Posts: 5383
Images: 96
Joined: Fri Aug 13, 2004 12:25 pm
Location: Middletown, CT
Top

Postby Arne » Mon Sep 12, 2005 1:01 pm

Have 4 strips, 1/4 x 1 epoxied onto back to receive teardrop extension. Mini-jigs had candle wax rubbed on areas that would come into contact with epoxy. Also, the spacers on the jigs were raised off roof by 1/8" so errant epoxy would not glue them to roof..... It worked as planned, mostly.. a 1" wood chisel took care of some minor 'attachments'..

Image

Getting hot here, so will use template tomorrow morning to cut extensions.

Went to walmart and found a pretty light 700 watt microwave. She-who-must-be-obeyed (since she cooks) thinks it would be nice to have.

After extensions are outlined to handle shelves and hatch ribs, they will be epoxied onto built up strips... one step at a time.
www.freewebs.com/aero-1
---
.
I hope I never get too old to play (Arne, Sept 11, 2010)
.
User avatar
Arne
Mr. Subject Line
 
Posts: 5383
Images: 96
Joined: Fri Aug 13, 2004 12:25 pm
Location: Middletown, CT
Top

Postby Arne » Fri Sep 16, 2005 4:40 pm

Things are moving along. The side extensions are epoxied in place. The hatch has been simplifed. Esentially, the sides of the hatch will be a chord of a pseudo circle. No fancy routering. Just a straight cut. I'm using a modified Steve Fredericks seal, and it is coming along nicely. The hatch sides are cut out of the ply about 95%, leaving a few attachment points to hold everything together. Once the stringers an ply are on, I'll cut the final couple of inches of connecting tissue and my hatch will be.... a hatch.

The photo shows the top and bottom pieces for the seal. Tomorrow, the stringers go in and then the ply goes down.

Image
www.freewebs.com/aero-1
---
.
I hope I never get too old to play (Arne, Sept 11, 2010)
.
User avatar
Arne
Mr. Subject Line
 
Posts: 5383
Images: 96
Joined: Fri Aug 13, 2004 12:25 pm
Location: Middletown, CT
Top

Postby cracker39 » Fri Sep 16, 2005 6:42 pm

Arne, where did you get the foam molding and does it come in diferent "wood finish" colors? I was wondering how hard it would be to get wood molding to follow a curved ceiling.
Dale

Sometimes I pretend to be normal. But, that gets boring...so I go back to being me.

Squidget Pop Top Build Pages http://www.thesquidget.com/ptbuild/ptbuild.html

Squidget and Pop Top Plans Info and Photos: http://www.TheSquidget.com
User avatar
cracker39
3000 Club
3000 Club
 
Posts: 3069
Images: 233
Joined: Thu Jun 30, 2005 2:18 pm
Location: Lake Alfred, Florida, USA
Top

Next

Return to Teardrop Construction Tips & Techniques

Who is online

Users browsing this forum: No registered users and 1 guest