Benroy/Cubby Build Sidewall Question

Anything to do with mechanical, construction etc

Benroy/Cubby Build Sidewall Question

Postby alanv73 » Sun Aug 09, 2009 5:40 pm

I've posted this same question over on the TearJerkers forum, so if you've read this post before, please forgive me for posting the same thing twice.

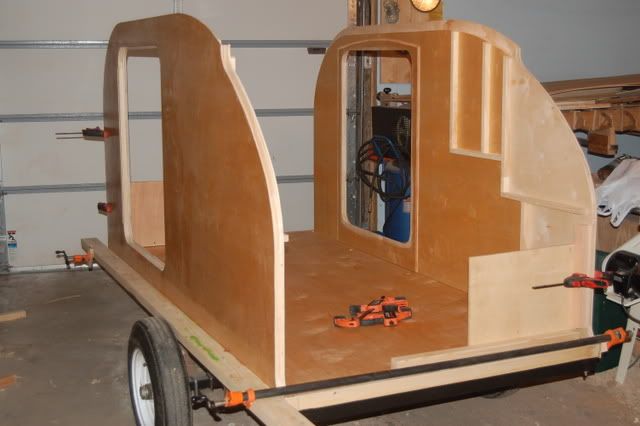
I'm planning a TD build that's basically a Cubby with a Benroy profile. I'm reading the Generic Benroy plans and I'm finding it isn't too specific regarding attaching the side walls to the frame. There is something about temporarily attaching them with drywall screws and then removing them later. I was also reading a document (can't remember where it came from) that mentioned that even if you attach the side walls with carriage bolts, it isn't really enough support. Keep in mind I'm basically building a Cubby, so I wanted to use 3/8" ply for the sides to keep the weight down and allow me to insulate the walls a bit. But I wanted to extend the side walls far enough to cover up the frame of the trailer. So the exterior walls won't be thick enough to use carriage bolts and counter-sink the heads below the surface of the aluminum. If I attach these walls with standard woodworking fasteners, will this be enough support? I've been giving this a lot of thought, and I think my only saving grace might be that I'm attaching 3/4" furring strips and 1/8" ply inside that will provide additional support. Will this fly or should I stick with the Cubby design?
cya,
Alan
User avatar
alanv73
Teardrop Inspector
 
Posts: 16
Images: 1
Joined: Tue Aug 04, 2009 4:16 pm
Location: Central PA

Postby Sparksalot » Sun Aug 09, 2009 6:03 pm

This thread can probably answer many of your questions.

http://tnttt.com/viewtopic.php?t=19442
Holy cow, Rose is a teenager now! Done? Surely you jest. A teardrop is never "done".

The Compass Rose build thread: viewtopic.php?t=23213

Inspiration: http://tnttt.com/Design_Library/Trailer%20for%20Two.htm

It's got a cop motor, a 5.3 LS plant, it's got cop tires, cop suspensions, cop shocks. ~ Elwood Blues
User avatar
Sparksalot
Silver Donating Member
 
Posts: 1628
Images: 687
Joined: Fri Feb 15, 2008 9:36 pm
Location: Texas by God

Postby mikeschn » Sun Aug 09, 2009 6:04 pm

Hey Alan,

Eariler in the plans...

Drill and countersink holes xxx” from the bottom edge of the wall, every 8” as shown on the drawing.

Later in the plans...

Step 8: Glue up the walls and the cabinets
This is a major step. Make sure you have all your help lined up, and all your pieces handy.
1) Remove temporary spar
2) Remove the first wall
3) Put polyurethane glue on the wall where it will touch the floor and the floor framing
4) Put wood glue on the edges of the cabinet assembly
5) Reinstall the wall, and put in all the screws that go into the subfloor
6) Put in all the screws that go into the cabinet
7) Repeat on the other side
8) Put your temporary spar back on
9) Take a break, you’ve earned it!

Mike...
The quality is remembered long after the price is forgotten, so build your teardrop with the best materials...
User avatar
mikeschn
Site Admin
 
Posts: 19202
Images: 475
Joined: Tue Apr 13, 2004 11:01 am
Location: MI
Top

Postby alanv73 » Sun Aug 09, 2009 6:32 pm

:oops: my bad for not looking closer. Thanks for pointing that out. So am I being paranoid for nothing? I still can't remember exactly where I read the thing about the carriage bolts, but I found another item here that points in the same direction...

http://en.wikibooks.org/wiki/How_To_Bui ... g_the_Body
cya,
Alan
User avatar
alanv73
Teardrop Inspector
 
Posts: 16
Images: 1
Joined: Tue Aug 04, 2009 4:16 pm
Location: Central PA
Top

Postby dreadcptflint » Sun Aug 09, 2009 6:42 pm

Please remember that sometimes more is better. Take a look at this thread: http://www.tnttt.com/viewtopic.php?t=25528&highlight=mobi

The builder only used a lap joint and barely attached the side to the plywood. I ended up upgradeing the side with a simple cleat that seems to be holding for now.
The quickest way to find me is on my business site. Yes, I do answer questions and provide quotes for free. Find me at: http://www.wenatcheefarmers.com
User avatar
dreadcptflint
1000 Club
1000 Club
 
Posts: 1080
Images: 19
Joined: Fri Jul 13, 2007 3:38 pm
Location: Wenatchee, WA
Top

Postby Uncle Chan » Sun Aug 09, 2009 8:35 pm

Hola,

dreadcptflint and I had the same builder and similar problems. Mine separated in the galley. Everything has been rebuilt and reinforced. In this particular case, I would say more is better.
Uncle Chan
User avatar
Uncle Chan
Teardrop Master
 
Posts: 191
Images: 12
Joined: Sat Feb 21, 2009 6:02 pm
Location: Rosalia, WA
Top

Postby Mauleskinner » Sun Aug 09, 2009 9:06 pm

Here's a shot of my walls going up...the outside skin extends down over the edge of the floor. I've got 2x2 framing in the floor, so I'm basically gluing the width of the 2x4 that I'm using as a caul.

Image

I also glued the bottom frame of the wall to the top of the floor. Instead of the poly glue, I used thickened epoxy, since I really couldn't apply downward clamping pressure at that point.

Btw...putting the convex side of a warped 2x4 against the gluing surface and clamping the ends provides good clamping pressure all the way across. I went to the lumber yard and asked for their most-warped 2x4's. :thumbsup: Saved me from having to put screw holes in the side of my tear.

David
User avatar
Mauleskinner
The 300 Club
 
Posts: 350
Joined: Tue Aug 21, 2007 8:57 pm
Location: Southern MN
Top

Postby alanv73 » Mon Aug 10, 2009 5:46 am

Are you saying you didn't even use screws at all to hold the sides on?

Has anyone considered using pressure treated wood/plywood for the floor framing/subfloor and side walls?
cya,
Alan
User avatar
alanv73
Teardrop Inspector
 
Posts: 16
Images: 1
Joined: Tue Aug 04, 2009 4:16 pm
Location: Central PA
Top

Postby kennyrayandersen » Mon Aug 10, 2009 5:51 pm

you only need about 4-6 bolts attaching the body to the frame. It's been a little while since I looked at the Kennel, oops, I mean Benroy plans ( :lol: just kidding), but to me the best joint is if the sides extend down and overlap the frame and a bolt is used through the side into the frame. This makes a really nice efficient shear joint which is the absolute best way to transfer any kind of load. When the body sits on top of the frame, then the bolt is in tension and there is a bit of bending on the floor somewhere. Not a big deal if it's done right, but if you can have a shear joint it's a bit better [theoretically]. Since the tension load on the bolt is non-existent or low (unless there is some strange stuff going on with configuration or some crazy driving) its maybe only an esoteric design practice issue.
User avatar
kennyrayandersen
1000 Club
1000 Club
 
Posts: 1750
Images: 38
Joined: Sun Apr 29, 2007 10:27 pm
Location: TX
Top

Postby alanv73 » Mon Aug 10, 2009 5:55 pm

I found this thread...

http://tnttt.com/viewto ... h+sidewall

it's a good discussion of the matter at hand, but I don't really feel like there was much of a conclusion drawn. However, bdosborn did bring up a good idea regarding the use of a dado joint. Basically, you extend the floor past the trailer frame side by the depth of the dado. You then use a router to plow a groove as wide as your floor framing on the inside of the side wall. The floor framing then gets inserted into the groove providing a great deal of support. The joint is glued and screwed as well, of course. I suppose you could angle the screws across the dado to lock it in place. Maybe even use pocket screws to lock it down.

Any thoughts?
cya,
Alan
User avatar
alanv73
Teardrop Inspector
 
Posts: 16
Images: 1
Joined: Tue Aug 04, 2009 4:16 pm
Location: Central PA
Top

Postby kennyrayandersen » Mon Aug 10, 2009 8:16 pm

BrianB wrote:How about this. If you want to cover the frame like I do, weld on a lip the same width as the thickness of your plywood onto the bottom of the frame. Do it so that it supports the edge of the plywood so that you can screw the plywood into both the frame AND floor without the shear loading issues.

Image


In this case, the floor would be attached by both shear fasteners in the vertical (side fasteners) and horizontal directions (fasteners that go through the floor into the top of the frame). There is no better load path than shear (compression maybe, but there are times when the compression becomes tension as during a pitching condition etc.). The critical load for a tear-to-frame attachment is probably the deceleration during abrupt braking, or a crash condition (if you hit something, you wouldn’t want the tear coming off the frame and whacking the back of your car to add insult to injury!). In that case, all of the fasteners take shear, but especially the sidewall to frame fasteners.

My plan for the floor will be a sandwich with a 1x2 (minimum) around the perimeter. The sidewall will over hang much like the figure above, only it will just overhang the floor. The 1x2 will be biscuited, screwed, and glued into the sidewall – there will be no frame. Which brings up an interesting point: if you don’t need a frame, how much load could be going from the frame to the body? Not so much. The only failure I’m read about in this area seemed to be between the sidewall and the body, which I think is a more critical joint. Too few screws were used in the joint to the sidewall. If I remember the fix was to install an aluminum angle which attached the wall and floor together, but dowels or biscuits with screws and glue would eliminate the need for this angle (which was a retrofit anyway).

oops, posted in both treads
:oops:
User avatar
kennyrayandersen
1000 Club
1000 Club
 
Posts: 1750
Images: 38
Joined: Sun Apr 29, 2007 10:27 pm
Location: TX
Top

Postby regis101 » Mon Aug 10, 2009 9:00 pm

So in the pic, the frame is the tube trailer frame? The lip is some flat stock that protrudes past the frame perimeter for the outside wall to set upon?

Uber strong if that's the case, IMO.
Peace, Regis
Livermore, Ca
Working on Build #2
regis101
Teardrop Master
 
Posts: 226
Joined: Sat Jul 25, 2009 5:21 pm
Location: Livermore, Ca
Top

Postby kennyrayandersen » Mon Aug 10, 2009 9:30 pm

regis101 wrote:So in the pic, the frame is the tube trailer frame? The lip is some flat stock that protrudes past the frame perimeter for the outside wall to set upon?

Uber strong if that's the case, IMO.


uber strong! The wrap is for sealing and not strength. BTW I’m not advocating this method – it’s just a relevant post from the thread that was linked.

For ‘normal’ framed construction the wall, floor and frame would be as shown, sans the Al lip. I think that would make for a unquestionably strong joint, but since it isn’t hard to do, and doesn’t cost much weight, why not? The sidewall overlap to the frame makes a fantastic body-to-frame tie with no fasteners in tension, and no overhang to cause any bending. Mind you I think that even in this case the perimeter frame can be quite light and the tongue members would need to follow the tongue sizing in the design library. It would certainly keep the walls from separating from the floor (which has been a problem from time to time it seems).

For ‘frameless’ construction, the frame in the picture could be the wood frame and the trailer frame is just an A-frame or single 2x3 rectangular tongue with a couple on it. Since my floor is 2 inches thick it would come flush with the bottom of the frame shown in the picture and would be wrapped in glass, which would seal it (rather than the aluminum). I think the aluminum might act as a trap for water actually, plus it wouldn’t be so easy to do.
User avatar
kennyrayandersen
1000 Club
1000 Club
 
Posts: 1750
Images: 38
Joined: Sun Apr 29, 2007 10:27 pm
Location: TX
Top

Postby regis101 » Mon Aug 10, 2009 9:48 pm

Nice. Not to drift off topic but my trailer is the TSC 4 x 8 no floor. The 2" angle can work as an advantage by being able to bolt the floor as well as the side walls to the frame. I would have the plywood side wall on top of the plywood floor for ease of building and to keep the full 48 height with a cleat or runner along the inside and then bolt all that to the angle.
Peace, Regis
Livermore, Ca
Working on Build #2
regis101
Teardrop Master
 
Posts: 226
Joined: Sat Jul 25, 2009 5:21 pm
Location: Livermore, Ca
Top

Postby Mauleskinner » Mon Aug 10, 2009 10:02 pm

alanv73 wrote:Are you saying you didn't even use screws at all to hold the sides on?

That's what I'm saying...but then...
kennyrayandersen wrote:It would certainly keep the walls from separating from the floor (which has been a problem from time to time it seems).

:shock: maybe i oughter :oops:

Any links to threads discussing this?
User avatar
Mauleskinner
The 300 Club
 
Posts: 350
Joined: Tue Aug 21, 2007 8:57 pm
Location: Southern MN
Top

Next

Return to Teardrop Construction Tips & Techniques

Who is online

Users browsing this forum: No registered users and 8 guests