The LT... Thomas' Luxury Tent

...ask your questions in the appropriate forums BUT document your build here...preferably in a single thread...dates for updates, are appreciated....

Postby StPatron » Thu Apr 08, 2010 2:11 am

Lookin' good, Thomas! You DO have the eye for "coolness" for sure. As others have said, that's one bad-ass rig and it's also one of my favorites.

I'm wondering about the durability of the trim. I know you garage "LT" and the trim might last quite a long time. And, it looks like it could easily be replaced.

However, if you were to go with something more permanent I see the options as:

1. Tinted epoxy inlay. This would create a flush surface. Template route a shallow recess (avoiding the screw heads), fill in with epoxy and then sand flush. You'd probably need to use an additive filler, creating a leak-proof containment dam on a vertical surface when using "plain" epoxy mix would be challenging at best. Or, just get a group of friends to tip it and hold it while you work. :lol:

2. Wood epoxied to surface. Same design elements, maybe in black?

Great score on the lamp!
User avatar
StPatron
Donating Member
 
Posts: 748
Images: 297
Joined: Tue Dec 15, 2009 8:38 pm
Location: OK

Postby aggie79 » Thu Apr 08, 2010 8:10 am

:applause: Thomas,

Congrats on getting a matching table lamp! I never cease to be amazed as to what you find online.

Tom
Tom (& Linda)
For build info on our former Silver Beatle teardrop:
Build Thread

93503
User avatar
aggie79
Super Duper Lifetime Member
 
Posts: 5405
Images: 686
Joined: Tue Aug 07, 2007 5:42 pm
Location: Watauga, Texas

Postby 2bits » Fri Apr 09, 2010 9:19 pm

Here's a pic with both table lamps in place!

Image
Thomas

Image
User avatar
2bits
2bit Member
 
Posts: 5132
Images: 8
Joined: Thu Dec 27, 2007 6:04 pm
Location: Lake Tawakoni, TX
Top

Postby 2bits » Sat Apr 10, 2010 12:09 am

StPatrón wrote:

I'm wondering about the durability of the trim.


If you are talking about my stripes on the side and the profile trim that I used kitchen cabinet shelf liner for, yea, I have no aspirations for its longevity. I lost a piece of the profile trim on the way home from LCG, and then lost the replacement piece going to Beavers Bend. It was in the same location though so I think I might need to sand that area down more, but that stuff is totally temporary. That is actually the only real place I have cut a corner and done something that I know if gonna be temporary on the whole build but I figure it is cosmetic, I can cheat a little. I think it looks a heck of alot better than the white epoxy and I was dying to see it looking finished! Not sure what I am going to do to get it finished when I put the real wood in there but thanks for the suggestions!
Thomas

Image
User avatar
2bits
2bit Member
 
Posts: 5132
Images: 8
Joined: Thu Dec 27, 2007 6:04 pm
Location: Lake Tawakoni, TX
Top

Postby parnold » Sat Apr 10, 2010 8:45 am

The matching lamps is a sweet look!
User avatar
parnold
Donating Member
 
Posts: 2344
Images: 302
Joined: Mon Feb 08, 2010 4:49 pm
Location: Northwest New Jersey
Top

Postby S. Heisley » Sat Apr 10, 2010 3:10 pm

:thumbsup:Comfy-Homey looking! :thumbsup:
User avatar
S. Heisley
Super Lifetime Member
 
Posts: 8873
Images: 495
Joined: Mon Sep 17, 2007 10:02 am
Location: No. California
Top

Postby 2bits » Sat Apr 10, 2010 4:04 pm

Yeah, I am still amazed at how "full" and homey it looks after seeing it put together but completely empty for a year while I was still making sawdust. You know you have reached a plateau when you put the mattress in!
Thomas

Image
User avatar
2bits
2bit Member
 
Posts: 5132
Images: 8
Joined: Thu Dec 27, 2007 6:04 pm
Location: Lake Tawakoni, TX
Top

Postby Miriam C. » Sat Apr 10, 2010 4:42 pm

:o :thumbsup: Now that is really beautiful looking. And a real closet!!!

I am curious what you used for the inside trim. Seems to make the curve just fine.......
“Forgiveness means giving up all hope for a better past.â€
User avatar
Miriam C.
our Aunti M
 
Posts: 19675
Images: 148
Joined: Wed Feb 15, 2006 3:14 pm
Location: Southwest MO
Top

Postby 2bits » Sat Apr 10, 2010 9:24 pm

Hi Miriam,

Well no one can accuse me of being a purist because that is the fake bendy quarter round trim you can get at the box store. I tried the real wood stuff and I could tell it wasn't going to work for me, and then I saw this stuff and It looked perfect and I decided it doesn't have to BE real, just LOOK real.

To further deepen the story, I ruined one piece of the bendy stuff trying all kinds of methods to attach it but none worked. I couldn't use glue or adhesive only with the the pole method like I did for the headliner, and tried trim nails which just destroyed it, so I was sitting there looking at it in place one day and I realized it was just fine as it is! The pressure from each end holds it in place and even though you can see that it isn't perfectly touching the roof in a couple places, you would have to know to look for it so there is nothing holding the trim in at all ;) There is a headliner joint that goes across the width and it probably helps keep it from creeping away from the wall a little but that's it.
Thomas

Image
User avatar
2bits
2bit Member
 
Posts: 5132
Images: 8
Joined: Thu Dec 27, 2007 6:04 pm
Location: Lake Tawakoni, TX
Top

Postby grizz » Sat Apr 10, 2010 11:56 pm

Hi Thomas, It has been a while since I did much to my teardrop, but I did make a start again over Easter, and worked some yesterday, so I feel like I am back on track.


Just read the updates since the last time I was on your thread.

You have certainly made some progress, and also things like the welder only taking the money in your wallet made me grin, as it shows human nature.... and I do like a fair trade, which you clearly gave him.

Here is my take away from the update.... I love this, and was wondering what to do with my fenders fo my tear, and had forgotten that I used to have VW Beetles years ago, and they have the same solution to fenders meeting body.
Now just need to find an Ebay or similar seller to get myself some edging.

Image
Greetings from England.

Rian.


Hoping to get it all done in time.
User avatar
grizz
1000 Club
1000 Club
 
Posts: 1210
Images: 29
Joined: Mon Sep 21, 2009 2:37 pm
Location: Rochester, Kent, UK
Top

Postby 2bits » Wed Apr 14, 2010 11:46 pm

I finally got started on the galley cabinets... :twisted:

Image

Going from left to right, I realized that my 5" opening was going to leave me a 3" drawer space which was unacceptable so I have decided to just make this an open cabinet with a door face. This will hold my small propane cans, wheel chocks, trash bags and assorted other larger items.

The middle section is the AC exhaust box. I am going to redo mine to Planovets design of just cutting a large hole in the floor and making a large duct downward since mine is not sucking the hot air out fast enough. This will leave me an unused upside-down triangular design near the cabinet door that I can make the cabinet door fold out with hinges on the bottom, and hold pans and other wide flat stuff. That will be a cool one.

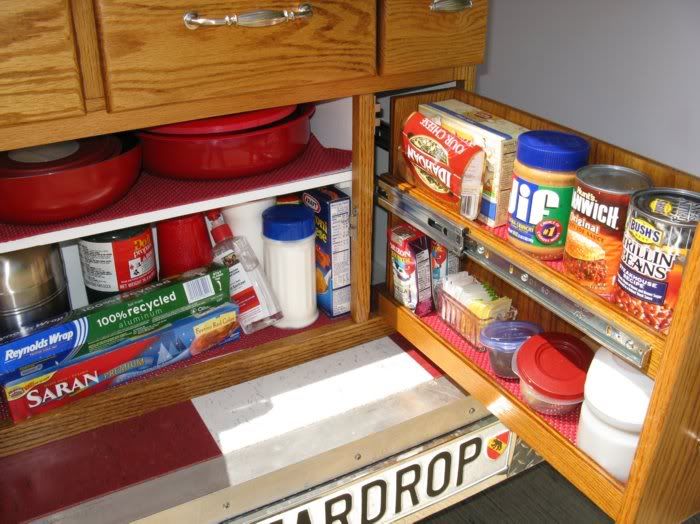
The right section will be an actual drawer slide out with storage on the bottom, and utensils being held on top. The cooler on the far right will be on a slide out tray with no cover.

Here's a pic with the faces cut.

Image

And stained! Much nicer...
Image

I decided against handles for a clean look and just did a 45' bevel so you can grab the door face.

I also decided against putting the deco strips on the middle door, that seemed like overkill and this way it mimics the interior with them only on each side. It also gives me an open canvas to do something on the middle!
Thomas

Image
User avatar
2bits
2bit Member
 
Posts: 5132
Images: 8
Joined: Thu Dec 27, 2007 6:04 pm
Location: Lake Tawakoni, TX
Top

Postby planovet » Thu Apr 15, 2010 8:19 am

2bits wrote:I realized that my 5" opening was going to leave me a 3" drawer space which was unacceptable so I have decided to just make this an open cabinet with a door face. This will hold my small propane cans, wheel chocks, trash bags and assorted other larger items.


Try a pull out pantry drawer. I had the same type of space and wondered what to do with it. I built a pantry drawer to fit the space and it works great.

Your doors look sweet! :thumbsup:

Image
ImageMark (& Cindi)
Visit our website: Little Swiss Teardrop

I was wondering why the water balloon was getting bigger... and then it hit me.

ImageImageImageImage
User avatar
planovet
The Cat Man
 
Posts: 5583
Images: 3
Joined: Tue Nov 27, 2007 4:48 pm
Location: Plano, Texas
Top

Postby parnold » Thu Apr 15, 2010 8:51 am

I like all the details!

Try a pull out pantry drawer.


A spice drawer/pantry drawer sounds like a good idea! Unless the cabinet is deep enough to slide a stove or something in, it will be hard to utilize that type of space.
User avatar
parnold
Donating Member
 
Posts: 2344
Images: 302
Joined: Mon Feb 08, 2010 4:49 pm
Location: Northwest New Jersey
Top

Postby 2bits » Thu Apr 15, 2010 11:21 pm

planovet wrote:
2bits wrote:I realized that my 5" opening was going to leave me a 3" drawer space which was unacceptable so I have decided to just make this an open cabinet with a door face. This will hold my small propane cans, wheel chocks, trash bags and assorted other larger items.


Try a pull out pantry drawer. I had the same type of space and wondered what to do with it. I built a pantry drawer to fit the space and it works great.

Your doors look sweet! :thumbsup:


Thanks! I am glad to be working on cosmetic stuff finally!

Yup, a pantry drawer is exactly what I am doing for my "big" drawer which looks about the same size as this one of yours. My little space I want to put my propane canisters in, and they won't fit in there if I made a drawer, so I decided to do the Pantry drawer on the right and just an open cabinet on the left. I do like how you have yours designed, so you might see some familiar design work once it's built hehe
Thomas

Image
User avatar
2bits
2bit Member
 
Posts: 5132
Images: 8
Joined: Thu Dec 27, 2007 6:04 pm
Location: Lake Tawakoni, TX
Top

Postby 2bits » Sat Apr 24, 2010 10:20 pm

Did some more work on the galley this week. I got three coats of poly on both sides of the doors so they are done.

Image

The wood I used was already stained a darker stain on one side, and I thought it would look cool for that to be on the inside:

Image

Then I built an AC exhaust box Planovet style:

Image

Then took the plunge and cut a big hole in my floor :shock:

Image
Image

I lined up the walls of the box with the exhaust opening of the AC and that left me with open space on both sides which is cool to keep the heat separated, and also makes the box removeable in case the AC ever goes out and I need to swap it out.

Image

Then I stood the doors in place for a pic, I am thinkng about redoing the right door because I got the spacing wrong for the strips, I made them even when I shoulda kept it the same as the other, must've been the fumes!
Image

I had already planned on putting the hinges on the bottom for the middle section for a neat little frying pan/paper plate storage place, but when I laid open the thing looked like a table so boom, I just got some extra space to sit some stuff! The dark stain also looks perfect there too!

Image

I still need to insulate and mount the AC exhaust box, and put a screen underneath, and mount up the two left doors, then I will make the pantry drawer for the right side and install it tomorrow hopefully!
Thomas

Image
User avatar
2bits
2bit Member
 
Posts: 5132
Images: 8
Joined: Thu Dec 27, 2007 6:04 pm
Location: Lake Tawakoni, TX
Top

PreviousNext

Return to Build Journals

Who is online

Users browsing this forum: No registered users and 12 guests