Grizz-Pod Teardrop Trailer - New tow truck - 66 Chevy

...ask your questions in the appropriate forums BUT document your build here...preferably in a single thread...dates for updates, are appreciated....

Postby grizz » Sun Apr 11, 2010 12:23 am

Miriam saves another... !! :D

OK, so it is not as painfull as it seemed, reading it a second time.

Now just need to get into the habit of using the Tinypic site to resize photo's I post on here.

Thanks.
Greetings from England.

Rian.


Hoping to get it all done in time.
User avatar
grizz
1000 Club
1000 Club
 
Posts: 1210
Images: 29
Joined: Mon Sep 21, 2009 2:37 pm
Location: Rochester, Kent, UK

Postby grizz » Sun Apr 11, 2010 4:30 pm

Had friends over last night till after midnight.
I was up at 5am again, as my back was protesting to the fact that I had spent yesterday on the teardrop.

By 7am I was off to a couple of bootfairs , in search of bargains.
I was home by 10am and feel that I had done pretty will.

There was a guy with a bunch of stuff, and no idea what it was worth, suits me.

The paint brushes were £1 and £2 respectively, and will be painting the teardrop when I get to painting it.

There were a bunch of single 12V LED's, they should work well as mini downlighters. Some gearknobs , one which I will be modifying to be the handle on the galley hatch , the other for my mate Brian Box for his 1957 Splitty.
The red gearknob will be used on my Transit, which of course has a collumn shift.

I also got 4 sets of "Blue Dots" for tail lights, which I will be sharing with mates for the old "HotRod" look.

Lastly I got a speaker grille, heavy, and metal with chrome, guess it could be vintage VW , which will be making its way into the inside of the Teardrop as part of the entertainment centre, maybe a speaker grille.
All this stuff came to £7.00 which felt like a bargain.

Image

The set of clips will probably hold back the cooker or a shelf front.

The gearshifter handle which will be modified to be Galley Hatch opening handle.

Image


My personal favourite of the day was a "Record Vice grip , no83 " which came in at a whole £5.00. Perfect for the new house, imagine it mounted on a length of RSJ, concreted into the ground, being able to manage the forceful leverage on sometimes needs to use.

Image

Back home Nicola and I had tea and toast, as she chose to stay home in bed while I went bargain hunting.
Then it was back to the tear, I tidied up the rebates I had cut last night, also belt sanded the flat surfaces, and then started fitting them as "fillets" to the profile. I also added about 3 or 4 screws to each of the pieces of wood, despite the clamps and wood glue.

Image

Later I unpacked the small table saw I bought off EBay about 5 months ago, and assembled it.
I then used it to trim the 38mm timber strips to 20mm, as this is the thickness I am going to insulate at.

What a bargain at £75.00 on Ebay.
I also cleaned up the Oak bannisters I had picked up from one of the hospitals I work at when they were doing a refurb. Most were loaded with brass screws which had their heads break off if you tried to undo them, but at least I got to save some of it.

Image

Self Portrait, as Nicola had gone to her place to work in the garden.

Image

The recycled Oak..... once of thse strips will be the carrier for the Galley hatch as it can carry so much load.

http://i294.photobucket.com/albums/mm90 ... 070771.jpg


Well, after returning the sides to the garage , I added screws to the 2nd side of the trailer's fillets.

I would hope to get back to this next weekend, and maybe even have it standing up on its own.

I really have my building MOJO back now, Thankfully.


PS: Sorry guys/gals .... I did try get the photos converted to Tinypic, but seem to have failed there.

Tried again this morning, done :D
Greetings from England.

Rian.


Hoping to get it all done in time.
User avatar
grizz
1000 Club
1000 Club
 
Posts: 1210
Images: 29
Joined: Mon Sep 21, 2009 2:37 pm
Location: Rochester, Kent, UK

Postby grizz » Mon Apr 12, 2010 1:04 pm

Got home tonight and raced into the garage, got the bottom supports glued and screwed into the sides... which means that by the weekend I should be able to get the sides up and fixed.

To me personally, cutting the cross battens and also the begin and ending supports from the recycled Oak ballustrade is a major milestone.

I also measured the "circumference of the shape from Galley Hatch hinge position, to the end of the front curve.... 3500mm , and my Ally sheeting is only 3000mm, so I will need to figure where to put a join into it. I suspect it will be on the front leading edge, behind the "Tongue box" as it would cammo part of the join.

My battens cut and ready, the smaller lengths will go toward being length way supports and also for the frame ot the roof hatch.

Image

Thanks for looking and your comments.
Greetings from England.

Rian.


Hoping to get it all done in time.
User avatar
grizz
1000 Club
1000 Club
 
Posts: 1210
Images: 29
Joined: Mon Sep 21, 2009 2:37 pm
Location: Rochester, Kent, UK
Top

Postby absolutsnwbrdr » Tue Apr 13, 2010 7:47 am

Looking good Rian! Love the sign on your door! I also like the "blue dots" for the taillights.... may I borrow that idea? :D

Not sure about the legality of those here in the states, but many street rods have them and they look pretty cool!
Zach
Coming Soon...
Image Image
User avatar
absolutsnwbrdr
Donating Member
 
Posts: 2657
Images: 412
Joined: Mon Jan 25, 2010 6:10 pm
Location: Hanover, PA
Top

Postby grizz » Tue Apr 13, 2010 11:02 am

absolutsnwbrdr wrote:Looking good Rian! Love the sign on your door! I also like the "blue dots" for the taillights.... may I borrow that idea? :D

Not sure about the legality of those here in the states, but many street rods have them and they look pretty cool!


No probs, there will be a pair in the post for you when I get the flags. 8)
Greetings from England.

Rian.


Hoping to get it all done in time.
User avatar
grizz
1000 Club
1000 Club
 
Posts: 1210
Images: 29
Joined: Mon Sep 21, 2009 2:37 pm
Location: Rochester, Kent, UK
Top

Postby grizz » Wed Apr 14, 2010 12:04 pm

Right, today I went to the not so local secret Council tip to look for some pieces of hardwood, oak, or whatver fell to hand.

None to be found.... today.

BUY: I got to the metals bin and also the electricals and got lucky.

I was hoping to find another of the Black & Decker Workbenches I have found before, had 3 and gave one to Bruce "MysteryMachine" last year as he needed it.
Now I want another to work on, and know they often get thrown away, so had high hopes.
The metal recycling bin was a fresh one, so no chance of getting anything from it.
As I descended the stairs an older guy came up with this "Jam pot" about to turf it out.
I grabbed it, as Nicola has been telling me not to fit a dedicated sink to the galley, but rather to use a washing up bowl, as it only gets used for short periods every day, and she would rather see the work surface being maximised.

So find no1:

Image

Find number 2 in the electrical goods recycling area had me VERY CHUFFED....

A beautifull old Bakelite valve radio.
Perfect for either ornamental use inside the teardrop, or maybe I will convert it to being a iPod player and speaker .
When I got home, Nicola was straight into the back of it, opening, investigating, and then cleaning it all out. (gotta love this girl ! )

Image

Find number 3 was also in the electrics area.

Made in the USA.

A 3 inch Craftsman belt sander.

Got home and plugged it in, and tested it..... Works perfectly, came with a belt fitted.

CHUFFED ?? You betcha.

Image
Greetings from England.

Rian.


Hoping to get it all done in time.
User avatar
grizz
1000 Club
1000 Club
 
Posts: 1210
Images: 29
Joined: Mon Sep 21, 2009 2:37 pm
Location: Rochester, Kent, UK
Top

Postby Rigsby » Wed Apr 14, 2010 5:27 pm

I thought i was the only skip raider over here Rian. Good finds there :twisted:

At my local Dumpit site, we cant raid the skips any more due to the health and safety bods getting scared. Ive started parking up round the corner and walking in and waiting for a find, then taking it of them, before they can skip it
DOOIN IT THE YAARKSHA WAY--FA NOWT, THA NUS !!
User avatar
Rigsby
500 Club
 
Posts: 587
Joined: Sun Aug 31, 2008 12:21 pm
Location: Doncaster, England
Top

Postby grizz » Thu Apr 15, 2010 1:55 pm

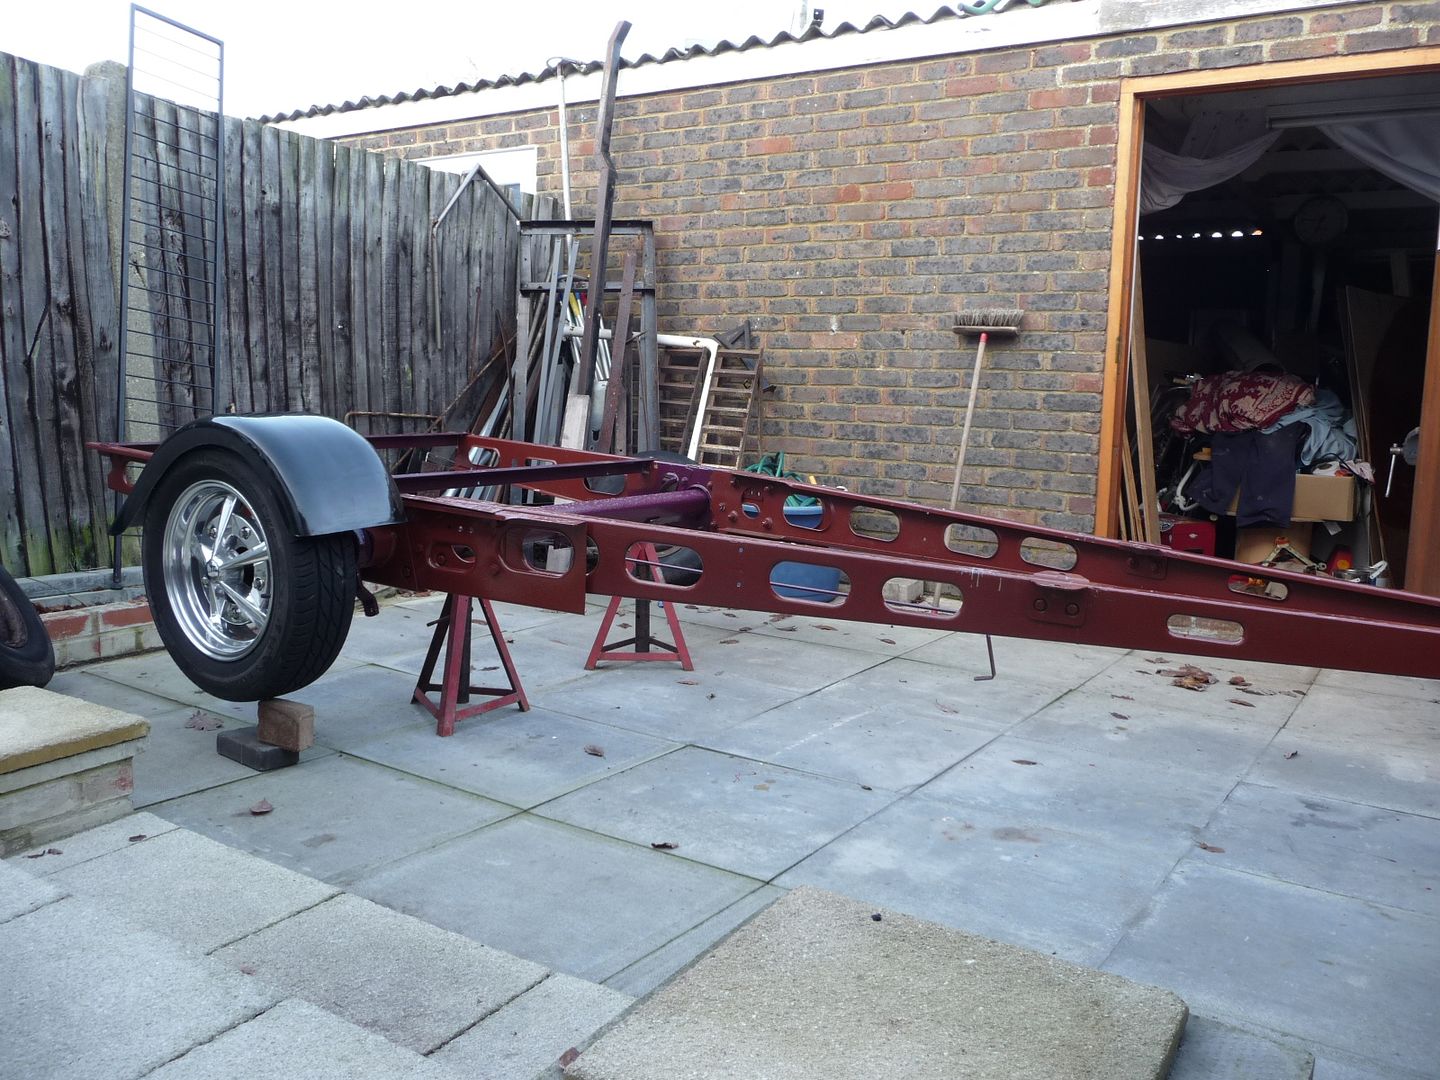
Rigsby wrote:I thought i was the only skip raider over here Rian. Good finds there :twisted:

At my local Dumpit site, we cant raid the skips any more due to the health and safety bods getting scared. Ive started parking up round the corner and walking in and waiting for a find, then taking it of them, before they can skip it


I guess there is a bit to be said for the eternal Health and Safety.
I used to walk in there in a suit and tie....
:lol:

Today I was into the skips very early, as I had a load of work to do as well (I do still have a regular job)
I was again after some hard wood, and found an old louvre door, similar to the one Jackdaw Dave used in his 2nd build.
I wanted it for the door frame, so that the screws holding the hinges have something decent to bite into.

While I was there I found what may be a Mahogany table top. It had previously had just 2 thick legs, which had been unceremoniously broken out ,as well as a pair of drawers at the front which are missing.

Weirdly, Nicola and I had been discussing using wood rather than a piece of kitchen worktop for the worksurface in the galley.... so this seems to be just the right thing, unless it turns out not to be a solid top, and rather some veneered wood.
I will investigate at the weekend when I dismantle it all.

Image
Greetings from England.

Rian.


Hoping to get it all done in time.
User avatar
grizz
1000 Club
1000 Club
 
Posts: 1210
Images: 29
Joined: Mon Sep 21, 2009 2:37 pm
Location: Rochester, Kent, UK
Top

Postby absolutsnwbrdr » Thu Apr 15, 2010 3:14 pm

You are ALWAYS scoring something! That mahagony looks nice!
Zach
Coming Soon...
Image Image
User avatar
absolutsnwbrdr
Donating Member
 
Posts: 2657
Images: 412
Joined: Mon Jan 25, 2010 6:10 pm
Location: Hanover, PA
Top

Postby grizz » Thu Apr 15, 2010 3:40 pm

absolutsnwbrdr wrote:You are ALWAYS scoring something! That mahagony looks nice!


True, it's just that my eyes are always open, I am the guy who will bend down and pick up 2cents on the pavement or street and put it in my wallet.
Likewise, I am happy see function in other peoples "rubbish"
That piece of "potential Mahogany" would cost a fair bit of money from a specialist timber merchant.
After I have dismantled it, and run a fine belt of the sander (not the one I found, but my trusty Makita) over it, and given it a few layers of Linseed oil, it should make me proud.

Steel is another commodity I do not let slip by..... it costs money, and the money I save today, means I get to spend it on nice alloy wheels for the trailer another day, or the adaptors which were about £65 delivered.

Image
Image

The pile of steel behind the trailer was reduced by 60% and typically I needed some this week, to make internal braces for mounting the mudguards to the trailer.... Nicola made me clear out the steel pile as I have my house in the market, and the pile of steel looks pretty messy. At least now it looks OK.

I am also always happy to see other people go off with the stuff I "score" if they can use it.

This generator is destined for my trailer, cost me nothing and was rescued from being tipped..... Price to get it here from Manchester... Goodwill.
Image
However, if someone crossed my path who needed it more than me.... it is theirs free of charge.

Life is generally good, and good to me.

Keeping my eyes open has netted me a few nice things since living here in the UK.
Greetings from England.

Rian.


Hoping to get it all done in time.
User avatar
grizz
1000 Club
1000 Club
 
Posts: 1210
Images: 29
Joined: Mon Sep 21, 2009 2:37 pm
Location: Rochester, Kent, UK
Top

Postby Miriam C. » Thu Apr 15, 2010 9:15 pm

:applause: :thumbsup: 
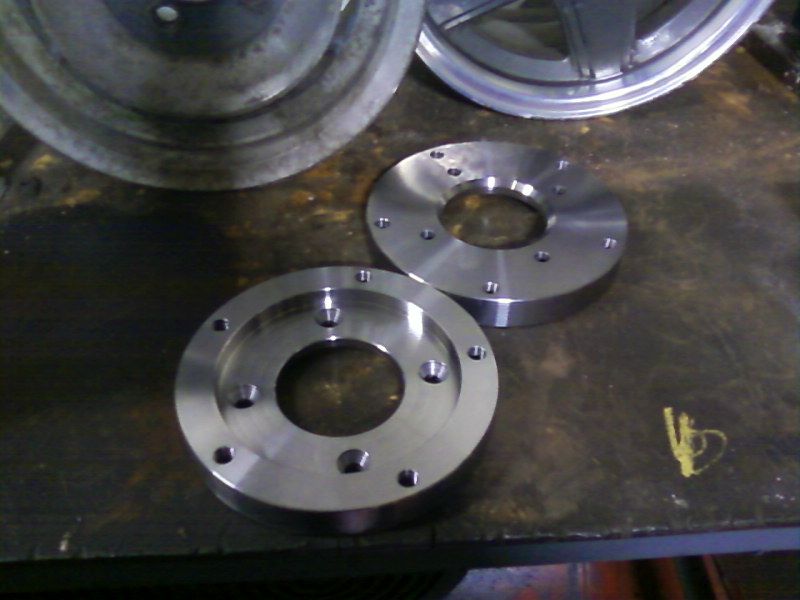
And lucky you are too! I just love those wheels. Very nice!
“Forgiveness means giving up all hope for a better past.â€
User avatar
Miriam C.
our Aunti M
 
Posts: 19675
Images: 148
Joined: Wed Feb 15, 2006 3:14 pm
Location: Southwest MO
Top

Postby grizz » Sat Apr 17, 2010 2:18 pm

Just wrapped up for the day. Did all I wanted to do today.

Remember the table top ?
Well, I dismantled it this morning before 9am, I have a self imposed rule of not using large power tools outside before 9am, so need to get stuff ready, or use "quiet" handtools before 9am.

The table top turned out to be a veneered piece, but even the supporting wood it beautifull.

I stripped it back with a used medium grit belt, then followed up with a used fine belt, this brought the wood back, and though there are some residual marks from years of abuse, they will stay as a reminder of the origins of the worktop.

Nicola who has taken a personal interest in this part of the build told me not to just slop any old oil or varnish onto the tabletop, she went to town and bought a can of Danish Oil for the top, never heard of it before, but then she is full of surprises.

So when she came back from her day out shopping with her friend Jill, I oiled up the table top and then buffed it back 10 minutes later, it still needs at least 2 applications.

First job today after dismantling.... sanding back through the water marks and scratches etc.

Image

After the first Danish oil treatment, looks very dark now, but I guess thats the look of Mahogany.

Image

Another rewarding job done today was to allign and clamp the two sides and belt sand back the fillets and sides, as well as to round off the flat surface I had created on the front when cutting the profile, I realised it was not clever after doing it, so rounded it off today.

Image


Earlier this week they were trimming back the trees along the road at the Queen Elizabeth Hospital in Greenwich..... I had a teaching session to do and some clients to see, on the way into the hospital I asked one of the tree surgeons what happened to the stumps they were cutting off, as I had seen a couple with holes in, and one that had a hole all the way through... he said "Help yourself mate"
So when I was done after 4pm, I went back to the the piles of stumps and took a couple home for Nicola's garden.
Here is the one with the hole through it, Nicola asked me to cut a couple of holes in the side of the one and plug up the ends, so that she could plant Alpines in there and have them grow out and cascade down the side.

Started with this:

Image

Ended up with this before closing up the ends.

Image

The rest of the day was spent measuring, looking , planning, cutting and screwing together the supports for the bulkhead and also the fridge space.
Does not sound like a lot, but for a guy of my limited ability and experience it just takes time to do stuff, along with eating lunch and surfing the web inbetween.

I got the doorway cut out today , which to me is a massive milestone. I also got the door to fit the hole tightly, which the belt sander will probably address later.

Image

The illusion is that the door is fitted too high, but remember that I am building a 4x8 Grumman , but used 5x10 ply, and have a 10 inch overhang to create look of lowness in the caravan in the end.

Image

Lastly the door frame, which to me is another sign that I am getting there....
Made up of bits of recycled louvre door frame, at least the screws for the door hinges will have something decent to bite into.

Image


All wrapped up, ready for the night....

A good day it was indeed.

Tomorrow morning it is off to the Bootfairs again to look for bargains.... I want some old tools etc.

Image


Thanks for looking in.
Greetings from England.

Rian.


Hoping to get it all done in time.
User avatar
grizz
1000 Club
1000 Club
 
Posts: 1210
Images: 29
Joined: Mon Sep 21, 2009 2:37 pm
Location: Rochester, Kent, UK
Top

Postby parnold » Sat Apr 17, 2010 8:40 pm

Great progress! I like the "low rider" idea!
User avatar
parnold
Donating Member
 
Posts: 2344
Images: 302
Joined: Mon Feb 08, 2010 4:49 pm
Location: Northwest New Jersey
Top

Postby grizz » Sun Apr 18, 2010 12:10 pm

OK, so Sunday has come and gone in a flurry of Bootfair and B&Q hardware shopping, and then a visit from my mate Kevin who had brought me the Odysey Gel Battery I had bought from him last week for the 1200GS.

I went to B&Q after bootfair shenenigans to get another sheet of 4x8 foot 18mm ply that I wanted to use for the ribs of the Galley Hatch.
While I was there, I also got 2 sheets of 4x8 Jablite Polystyrene for the insulation, it is 25mm, and my space is closer to 20mm, but I hope the beltsander will pee off all the neighbours and turn my back yard into a winter wonderland.

Back to the bootfar.

I wanted a 10mm spanner to attach to the tablesaw permanently for adjusting the fence, as it has a double 10mm nut fixing.
Got about 5 spanners including the 10mm for 50p.
I also got 2 rolls of Duct tape (you can never have enough duct tape or tape measures) for £1.00
Nicola found me these 2 unused spice racks for 50p
And lastly, I bought a tourist Totem from Canada for 50p
So my spend there was a grand total of £2.00

Image

Back home the curve of the ribs and also how to maximise my sheet of ply had me flummoxed for a while, with my mate Kevin and Nicola adding comment. Eventually I just cut a carboard template and moved it about to find optimal fit.
I also cut a pair of supports to go onto the sides of the teardrop body in the galley , and to act as supports for the hatch when it is closed and also to further water and dust proof it.

Image

Clamped the lot with my clamps that were 50p each at the last big tat sale at B&Q.
Then got the coarse belt onto the sander and went about shaping them all, finally I used a medium grit torn belt to hand finish all the sharp sides and splints off.

Image


Image


Finally finished and ready for the battens to be cut and top and bottom suports to be ripped next week.

I had planned on having the sides up and set today, but ended up doing stuff that should be done while the sides are down and workable.
So look forward to getting what I can done next weekend.

I have actually short changed Nicola a lot the last few weeks, but then these things need to be completed once started.
I would never have started the build had I known how it would progress, living in 2 homes is not ideal at the best of times, so having a major distraction is even more so not ideal.
She has been very good at just letting me get on with stuff, so I probably owe her a big pampering in the end when this is completed.


Image


Have a great week and be carefull out there.
Greetings from England.

Rian.


Hoping to get it all done in time.
User avatar
grizz
1000 Club
1000 Club
 
Posts: 1210
Images: 29
Joined: Mon Sep 21, 2009 2:37 pm
Location: Rochester, Kent, UK
Top

Postby Cliffmeister2000 » Sun Apr 18, 2010 4:38 pm

I have a totem from Canada! Bought it at Butchart Gardens in May of 1991 (Honeymoon).

That little round picture is me and the missus on our wedding day.

Image
God Bless

Cliff

♥God. ♥People.
1 John 4:9-11

My Teardrop build pictures
User avatar
Cliffmeister2000
Titanium Donating Member
 
Posts: 3622
Images: 157
Joined: Thu Jul 26, 2007 10:18 pm
Location: Phoenix, AZ
Top

PreviousNext

Return to Build Journals

Who is online

Users browsing this forum: Bing [Bot] and 13 guests