Wells Cargo 5x10, Wander Waggin - 20101011 update

Converting Cargo Trailers into TTTs

Postby Nathan N » Thu Apr 01, 2010 8:31 pm

:oops:

Now boys, a wide angle lens and a bit of distance will help hide the details. :o

Thanks for the comments. I'm really enjoying working on it. I also would like to thank everyone that has contributed to this forum to make it such a wonderful resource and inspiration.

Probably the most nerve racking thing was each step requiring a new hole in the exterior: windows, shore power, vent, etc.

Got a start on the benches/bed, galley but ran out of lumber.
User avatar
Nathan N
Lifetime member
 
Posts: 587
Images: 153
Joined: Mon Mar 24, 2008 6:55 pm
Location: mid-Missouri

Another update

Postby Nathan N » Sun Apr 04, 2010 6:04 pm

I took some time this glorious Easter morning, it reached 84 F here today, and got the camera out. Here is the latest status report.

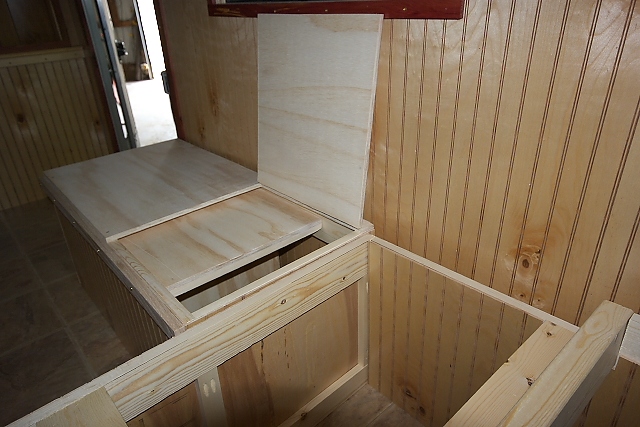
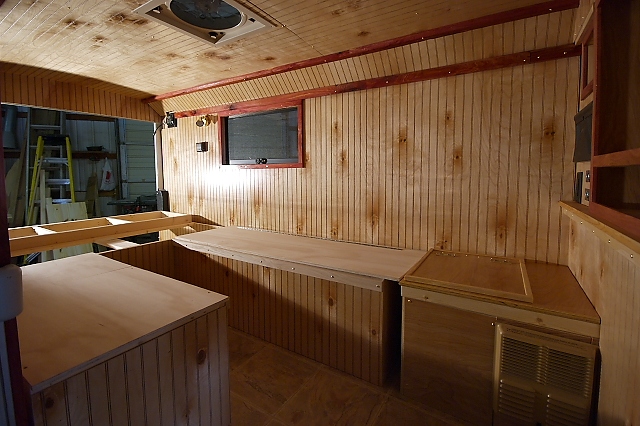
Started working on the bench/bed/galley. I think I mentioned last time that there would be some changes from my original ideas. First one is the lower galley storage. I decided to extend that storage up under the crossways bench.

Image

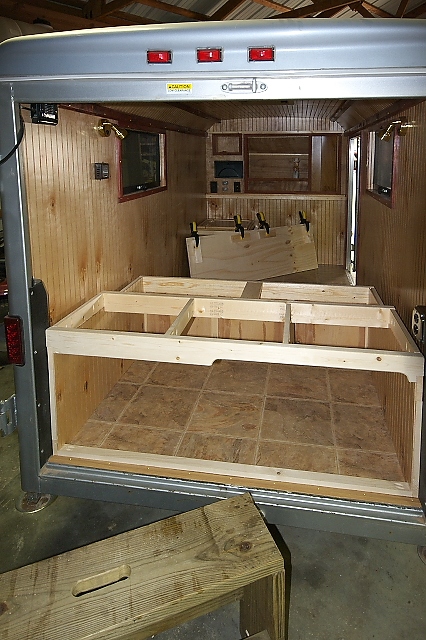
This gives me 36 inches deep storage. It will be accessible from inside by lifting bench lid. You can see the bench lid up front waiting for the glue on the cleats to dry. In the photo the first section will support the upper galley.

Image

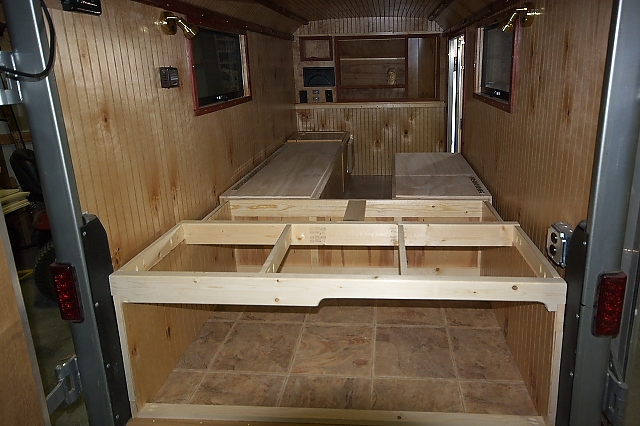
Here I have moved in the lengthwise benches.

Image

Image
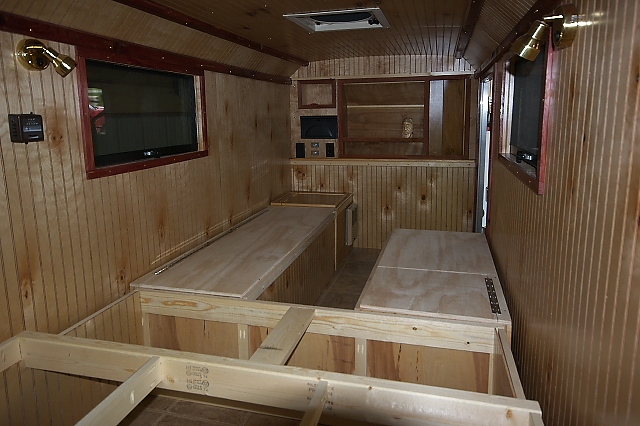
The driver's side entire length is hinged for access.

Image
The passenger's side only the back foot is hinged. The piece you see in the top partially blocking access will make sense in a minute.

Image
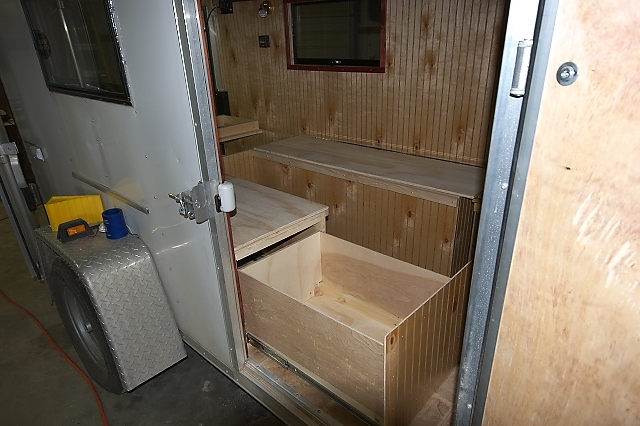
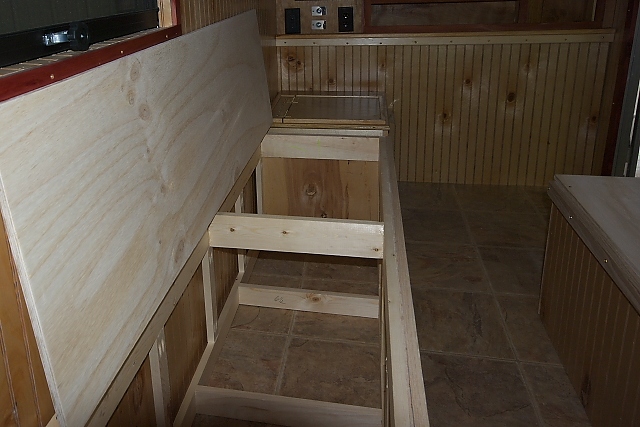
This is the front side of the passenger side bench. I salvaged some old heavy duty server mounting rails and made a drawer. It slides out in front of the door to allow easier access to storage.

Image

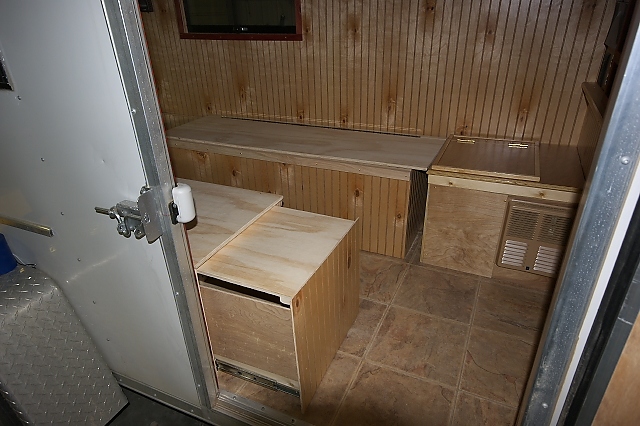
Here is the front of that piece that was partially blocking the storage two photos back. It slides forward a foot to extend the bed. The drawer supports it as well.

Image

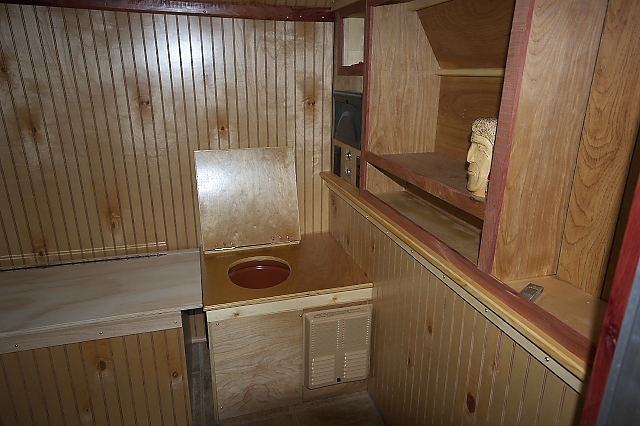
I got some finish on the outhouse the other day.

Image

A shot towards the back. I have not yet cut the center filler for the bed.

The "outhouse" is mounted permanently. The other benches/galley are modular and will be removable.

Still pondering on the upper galley final design...

Til next time :)
User avatar
Nathan N
Lifetime member
 
Posts: 587
Images: 153
Joined: Mon Mar 24, 2008 6:55 pm
Location: mid-Missouri

Postby rebapuck » Tue Apr 13, 2010 10:23 am

Don't see a magazine rack for the potty.

My Puck also has a bed extender. It fgets kicked off, so I pull the seat cushion down and tuck the extender at the wall end.
Judy
1966 VW camper
1967 VW singlecab
Image
User avatar
rebapuck
.
 
Posts: 2243
Images: 1
Joined: Thu May 14, 2009 1:55 pm
Location: Chapel Hill NC
Top

Postby pete42 » Tue Apr 13, 2010 5:13 pm

Nathan I have not even bought my trailer yet but when and if I get better I will. I have a question where the wall meets the roof how did you add the filler. that is one of many puzzles for me. yours looks good as does the bead board.
User avatar
pete42
Super Lifetime Member
 
Posts: 2203
Images: 13
Joined: Sat Nov 07, 2009 11:52 am
Location: SouthWest Ohio
Top

Postby perche » Tue Apr 13, 2010 7:47 pm

Really nice, well thought out, classy. I particularly like how you made use of the nose cone space. :thumbsup:

Looks like you'll be enjoying it even more soon. :)
User avatar
perche
Teardrop Builder
 
Posts: 39
Images: 3
Joined: Fri Mar 26, 2010 4:25 pm
Location: NW Minnes(n)ota, USA
Top

Postby Nathan N » Tue Apr 13, 2010 8:46 pm

rebapuck wrote:Don't see a magazine rack for the potty.

My Puck also has a bed extender. It fgets kicked off, so I pull the seat cushion down and tuck the extender at the wall end.


Nope. However there are some shelves to the left once seated.

The extra cushion for that will be placed at the other end, after pulling the seat cushion down to cover extension. :thumbsup: Thanks for looking.
User avatar
Nathan N
Lifetime member
 
Posts: 587
Images: 153
Joined: Mon Mar 24, 2008 6:55 pm
Location: mid-Missouri
Top

Postby Nathan N » Tue Apr 13, 2010 9:03 pm

pete42 wrote:Nathan I have not even bought my trailer yet but when and if I get better I will. I have a question where the wall meets the roof how did you add the filler. that is one of many puzzles for me. yours looks good as does the bead board.


Image

Hopefully this photo will show the general idea. I took some rough sawn cedar that we sawed to 1" with bandmill. I ripped it down with table saw and then routed three of the edges. The paneling was ripped into I believe 7" strips and then I used brad nailer to attach to top cedar trim. After temporarily bradding that up, we attached the wall cedar trim. I went back and used brass screws to attach the cedar trim.

The original plan was to use the plastic "tin" backsplash however it has three sections in the pattern and it would bend unevenly. I got to pondering and came up with this idea and it worked.

I hope you get feeling better and are able to tackle your own conversion in the near future. Thanks for looking.
User avatar
Nathan N
Lifetime member
 
Posts: 587
Images: 153
Joined: Mon Mar 24, 2008 6:55 pm
Location: mid-Missouri
Top

Postby Nathan N » Tue Apr 13, 2010 9:06 pm

perche wrote:Really nice, well thought out, classy. I particularly like how you made use of the nose cone space. :thumbsup:

Looks like you'll be enjoying it even more soon. :)


Thank you very much. We sure hope so! And thanks for stopping by. I'm getting ready to post another bit of an update with additional photos.
User avatar
Nathan N
Lifetime member
 
Posts: 587
Images: 153
Joined: Mon Mar 24, 2008 6:55 pm
Location: mid-Missouri
Top

an update

Postby Nathan N » Tue Apr 13, 2010 9:14 pm

I have been puttering on the trailer. As the wife's uncle's 93 year old mother told my mom one day, "Live and learn!".

Image
I did sew the curtains but totally bombed on the cushions. Getting some assistance in that department. Here you can see three of the cushions. The filler piece for the bed is under the crossways cushion so it sits a bit taller. As you can tell I don't have the galley completed. Things are a bit different than what I had planned. But that means we adapt and overcome.

Image
Thanks to this forum I also figured out I installed the table bracket back-asswards. :roll: Here it is after I fixed that boo-boo.
User avatar
Nathan N
Lifetime member
 
Posts: 587
Images: 153
Joined: Mon Mar 24, 2008 6:55 pm
Location: mid-Missouri
Top

Postby Nathan N » Tue Apr 13, 2010 9:36 pm

We got to see Razorback's (Larry) awning at Crawford last year. I've also seen Oasis Maker's outfit on the forum and really liked that setup. I caught the post about the shade being on sale last year so I snagged one. Today I dug it out.

Image

I needed a bit extra height and was lost for material that would be lightweight but sturdy enough - and of right dimensions. Well I really lucked out at Lowes. This is equipment mounting gear and is 14 gauge. I took one 36" piece of larger stock and cut 2 - 12" pieces for verticals and 2 - 6" pieces to weld to trailer frame. I used 1 1/4 - 36" pieces of the smaller (1") to slide into the frame mount and the 45 degree support up to 12" piece vertical. A 5/16" PTO pin is just the right size to secure it.
Image

Here is a shot of the top of the larger vertical section. It is just the right size to allow the shade frame to slide in. A bonus are all the appropriate size holes punched every inch.
Image

Finding these pieces kept me from having to cannibalize the picnic table clamp bases - I still have them available for use. The rear door will tie up against the rear post. The outside plug and rope light just work out.
Image

The front door ties against the other side.
Image

A final view of "the front porch"
Image

Edited 20100425 to correct size of larger tubing. It is 1 1/4 NOT 1 1/2
Last edited by Nathan N on Sun Apr 25, 2010 11:46 am, edited 2 times in total.
User avatar
Nathan N
Lifetime member
 
Posts: 587
Images: 153
Joined: Mon Mar 24, 2008 6:55 pm
Location: mid-Missouri
Top

Postby Ageless » Tue Apr 13, 2010 11:38 pm

Dayyyummmm


Might fine work!! :applause:
Strangers on this road we are on; we are not two, we are one - Raymond Douglas Davies
User avatar
Ageless
Platinum Donating Member
 
Posts: 1603
Images: 8
Joined: Tue Aug 04, 2009 8:34 am
Location: Pt. Orchard, WA
Top

Postby Nathan N » Wed Apr 14, 2010 5:20 am

Ageless wrote:Dayyyummmm


Might fine work!! :applause:


Why thank you. Waiting on poly to dry... next up is the galley's outside table. Hopefully I will get that completed today.
User avatar
Nathan N
Lifetime member
 
Posts: 587
Images: 153
Joined: Mon Mar 24, 2008 6:55 pm
Location: mid-Missouri
Top

Postby starleen2 » Wed Apr 14, 2010 5:38 am

Nice! :applause:
User avatar
starleen2
5th Teardrop Club
 
Posts: 16272
Images: 224
Joined: Sat May 12, 2007 8:26 pm
Location: Pea Ridge ,AR
Top

Postby doris s. » Wed Apr 14, 2010 5:45 pm

Very nice job! Beautiful.

Doris
User avatar
doris s.
500 Club
 
Posts: 682
Images: 32
Joined: Mon Aug 31, 2009 5:15 pm
Location: jefferson, maryland
Top

Postby Nathan N » Wed Apr 14, 2010 6:37 pm

Thanks for the comments. :thumbsup:

I have another update for you. I did get to work on the galley table today. Here's a couple photos:

Image

I welded up some horseshoes to provide support across the width and give it some character. The gate hinges were chopped off and welded to the horseshoes. The threaded bolt on the pin goes through the lower galley support.

Image

The center leg is a piece of an old futon frame my daughter willed me. The hinge is actually a hasp that is welded to the end of the center leg.

I have 12" uncovered section above the table when it is stored. I will hinge another section from above that will lift up and be held open with slides from the upper middle section of galley. Perhaps have a light mounted on it...

I have two more totes that go on the middle bottom however the interior facing plan has not been totally figured out. I will give an update when I figure out where I'm going. :thinking:

Thanks for visiting!
User avatar
Nathan N
Lifetime member
 
Posts: 587
Images: 153
Joined: Mon Mar 24, 2008 6:55 pm
Location: mid-Missouri
Top

PreviousNext

Return to Cargo Trailer Conversions

Who is online

Users browsing this forum: No registered users and 6 guests