Astro-Benny - Updated March 1 - Improvements

...ask your questions in the appropriate forums BUT document your build here...preferably in a single thread...dates for updates, are appreciated....

Astro-Benny - Updated March 1 - Improvements

Postby DesertSkies » Sat Jun 12, 2010 8:41 pm

I need help with the name!

This project is a 4x8 Benroy on a Tractor Supply trailer that will be used primarily for stargazing. I looked over several designs and considered my own. My wife really likes the Benroy shape so I mocked up the floor plan in the living room where I made sure that the telescopes would fit inside for transport and the bed space would be sufficient. Everything worked. All of our gear can be loaded through the side doors.

We're a 20-30 minute drive to dark skies. It's a pain to load the scopes, set up, tear down in the dark and drive home. It will be much nicer to have everything packed in a trailer ready to go. We can get off work, have dinner, hook up the camper, pack an ice chest and head to a spot out in the weeds. When we're done we cover the scopes, catch a nap, pack in the daylight and head home.

It'll be nice to have for out-of-town star parties and car-camping. The bed will be about the size of our backpacking tent so we don't expect too much culture shock. Like Mike said about the weekender, it's a step up from a tent.

This is my first trailer build but I've had plenty of experience working on my home and general tinkering. I was given a lot of really good tools by my step-dad who passed them to me when his health kept him from using them. He's still around to stand around and point! I have friends already sending me their ideas for cabinets and LED, so I'll likely farm out some of the work.

I'm building the body on a 1/2" floor with 3/4 sides. The top will be Masonite, paneling inside and maybe some side tables. I'm going to layer several military closed-cell foam sleeping pads for a mattress and insulation on the floor. The body will attach to the trailer over a 2x4 sub.

The plan for electric is shore/12v with a maintainer. Lights will be switchable red and white LED's. Throw in a fantastic fan and maybe a mall AC if it won't eat up too much space. The AC is low on the list since this is primarily a boondocker.

I'll use a CPES to seal everything tightly. I like the idea of enamel paint over that, but I've not settled on it yet.

Supplies are a mix of box stores and local suppliers.

Todays purchases: 2 sheets 3/4, 1 sheet 1/2, black beauty fence paint, 3 sheets masonite, 3 sheets interior paneling, 3 sheets insulation, 8 1x2x8's, 2 tubes liquid nails and 1 box of 1 1/4 exterior screws.

Total: 309.44

I worked 3 hours today and got the underside coated with fence paint, and one side including the door and window cut out. Other than hot weather and a mosquito attack when it cooled off it wasn't too bad. I caught a pic with my cell when I shut down.
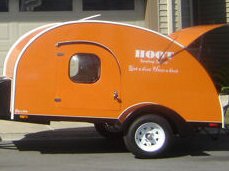
Image
Last edited by DesertSkies on Tue Mar 01, 2011 1:59 pm, edited 28 times in total.
User avatar
DesertSkies
Donating Member
 
Posts: 49
Images: 49
Joined: Sun Jun 06, 2010 4:09 pm
Location: Midland, TX

Postby parnold » Sat Jun 12, 2010 8:47 pm

You're off to a great start, but I'm baffled as to why you're asking for help with a name. It seems to me it should be called Stargazer!
User avatar
parnold
Donating Member
 
Posts: 2344
Images: 302
Joined: Mon Feb 08, 2010 4:49 pm
Location: Northwest New Jersey

Postby grizz » Sun Jun 13, 2010 2:15 pm

parnold wrote:You're off to a great start, but I'm baffled as to why you're asking for help with a name. It seems to me it should be called Stargazer!


Plus 1 for the name ^^^^.

Good progress, and you know what you want.
Greetings from England.

Rian.


Hoping to get it all done in time.
User avatar
grizz
1000 Club
1000 Club
 
Posts: 1210
Images: 29
Joined: Mon Sep 21, 2009 2:37 pm
Location: Rochester, Kent, UK
Top

Postby Billy K » Sun Jun 13, 2010 4:08 pm

Stargazer is good ... nice start!
"...influence is no government." - George Washington
Billy K
Teardrop Master
 
Posts: 276
Joined: Sun Dec 06, 2009 8:03 pm
Location: Kokomo,IN
Top

Postby YuGun » Sun Jun 13, 2010 4:16 pm

Stargazer,
Stargazer,
Stargazer!
İ like it it is wonderfull name.
I say too +1 for stargazer.
Good Luck for building.
User avatar
YuGun
The 300 Club
 
Posts: 445
Joined: Sun Apr 11, 2010 1:25 pm
Location: Turkey
Top

Postby DesertSkies » Sun Jun 13, 2010 11:42 pm

I got about three hours work done today between taking breaks from the extreme heat. I got the second side cut out and sanded the cuts on both sides and doors. I spent $22.50 for 5 2x4x8's and a box if 2 1/2" screws.

I got treated 2x4's for the sub floor and marked it for cutting rabbet joints at another shop in the morning.

While the walls were clamped for sanding I marked the spar locations. I also marked out a simple cabinet design for later.

"Stargazer" sounds good!

Image
User avatar
DesertSkies
Donating Member
 
Posts: 49
Images: 49
Joined: Sun Jun 06, 2010 4:09 pm
Location: Midland, TX
Top

Postby Juneaudave » Sun Jun 13, 2010 11:55 pm

I wouldn't settle on Stargazer just yet...
How about Apogee-whiz for a far out name? :lol:

Looking good!
User avatar
Juneaudave
Super Duper Lifetime Member
 
Posts: 3237
Images: 380
Joined: Sun Jul 03, 2005 12:11 pm
Location: Juneau, Alaska
Top

Postby Billy K » Mon Jun 14, 2010 6:06 am

Good point Dave. It is only Monday ..
and there are some pretty
"Warp Driven" and "Cosmotic Character(s)" yet to add their
"4 x 8 Power" of creativity to the mix.....
Glad one of us, is in 'sawdust mode'! Looks good! :thumbsup:
"...influence is no government." - George Washington
Billy K
Teardrop Master
 
Posts: 276
Joined: Sun Dec 06, 2009 8:03 pm
Location: Kokomo,IN
Top

Postby DesertSkies » Mon Jun 14, 2010 5:35 pm

A partly cloudy day and I was off work! I spent about six hours working today. I built the sub floor, and attached the ply floor. I fastened the sides to the floor and installed all the spars ahead of the interior cabinet. It's starting to look like a camper!

An interesting side note; I'm the third or forth generation to use some of the hand tools involved in this project. The large square on the left side of the pic was my grandfather's.

Image
Last edited by DesertSkies on Wed Sep 08, 2010 10:39 pm, edited 1 time in total.
User avatar
DesertSkies
Donating Member
 
Posts: 49
Images: 49
Joined: Sun Jun 06, 2010 4:09 pm
Location: Midland, TX
Top

Postby DesertSkies » Wed Jun 16, 2010 3:28 pm

Two more hours, got the headliner installed, fan port framed and the cabinets started. It's out-of-sequence from the plans but so far it's working and hasn't set me back.

I have a power supply and a battery already. The battery is a HUGE 70# deep-cycle and I can't see how it will fit on this tiny camper without throwing the weight off. The Tractor Supply trailer axle isn't as far back as it probably should be and the tongue is a single bar, not "A" shaped. Not sure if I'll look for a smaller battery or find a way to make it work. I guess I could temp a supply cable and leave the battery in the pickup bed. I'd have to lock it up somehow!

It would run a fan and LED lights for a LONG time. It'll be nice to have laptop power!
User avatar
DesertSkies
Donating Member
 
Posts: 49
Images: 49
Joined: Sun Jun 06, 2010 4:09 pm
Location: Midland, TX
Top

Postby grizz » Wed Jun 16, 2010 4:34 pm

Not sitting about are you ?


Good progress.

I have a used car battery, but need to get hold of a used or new leisure battery too.
Greetings from England.

Rian.


Hoping to get it all done in time.
User avatar
grizz
1000 Club
1000 Club
 
Posts: 1210
Images: 29
Joined: Mon Sep 21, 2009 2:37 pm
Location: Rochester, Kent, UK
Top

Postby DesertSkies » Sat Jun 19, 2010 10:16 pm

Six more hours down. I've spent a lot of time changing the cabinets around but finally settled on the final design. Part of it is dry fitted in place in the picture. I went with a larger counter top which made the upper cabinet space pretty tight and the lower cabinets were made smaller as well to allow enough rack space for me (6'4").

If I could do anything differently I would have framed, insulated and paneled the walls before standing them. Also, would have made the hatch cutout when I cut the walls. I did it with a router and had several blowouts. No big deal since I'll be painting the exterior.

I framed all of the walls except for the radiused pieces. I'll be doing them tomorrow. I'm hoping to have the walls insulated and paneled tomorrow.

Grizz, working in the shop beats watching TV these days! I could see a subsequent build taking a lot less time.

I spent $108.53 today for the counter top, (5) 1x2x8 framing, (5) 1x3x8 cabinet trim, (1) 1x2x8 poplar for the hatch hinge, more Titebond III and a router template bit.

Image
User avatar
DesertSkies
Donating Member
 
Posts: 49
Images: 49
Joined: Sun Jun 06, 2010 4:09 pm
Location: Midland, TX
Top

Postby PhotoGuy » Sun Jun 20, 2010 12:16 pm

I like it... :applause: :thumbsup:
PhotoGuy
Teardrop Master
 
Posts: 132
Images: 2
Joined: Wed Jun 09, 2010 1:16 am
Location: St Thomas Ont Canada
Top

Postby DesertSkies » Sun Jun 20, 2010 5:58 pm

Thanks PhotoGuy!

In about four hours work today I managed to finish the wall framing, insulation and paneling.

I fitted a sheet of foam and used it as a template to cut the paneling. It worked pretty well. I cheated on the forward radius by using small blocks as nailers to avoid the extra work of fitting another curve that will just be hidden anyway.

The one thing I forgot was to pre-wire the porch lights! I hope to correct that mistake without too much trouble. I'll be able to drill throught he header into the wall and wire the light and switch.

Interior trim, Cabinets, wiring and roof insulation are slated for tomorrow.

Totals to date: 24 hours, $440.47

Image
Here's the nailer cheat!


Image
Foam teplate.


Image
Wall foam in place


Image
Here's the wall paneling. The doors will be cut out with a router tomorrow.
User avatar
DesertSkies
Donating Member
 
Posts: 49
Images: 49
Joined: Sun Jun 06, 2010 4:09 pm
Location: Midland, TX
Top

Fast & Furious !!!

Postby Chuckles2153 » Sun Jun 20, 2010 8:11 pm

Your'e smoking fast DS !!!, Keep it up i like what i see so far.
Chuck
Chuckles2153
Teardrop Master
 
Posts: 154
Images: 74
Joined: Wed Mar 24, 2010 2:00 pm
Location: Franklin. Indiana
Top

Next

Return to Build Journals

Who is online

Users browsing this forum: No registered users and 13 guests