Thanks to all for your comments, support and inspiration. You're great!

I'll clear out the tools and supplies from inside my camper, take some new photos and post them soon. I was reading thru this thread the other day and realized that I've posted pics of individual items and areas, but nothing yet that really provides an idea of the "whole" other than my Sketch-up plan. A few weeks ago I set the dinette table in place and was sitting on the cushionless bench, looking towards the desk, closet and bathroom areas and got that wonderful feeling of pride combined with anticipation of actually camping in it someday. I'm very pleased with the layout and feeling of roominess in my slouchy design. Ok, enough of the mushy stuff,, on to the update.
The shower pan is nearly done, but there were a few hurdles. I'll share those here and some other planning details in case what I experienced might be helpful to others.
The type of drain used:
For showering, I don't plan on using more than a gallon or two and will use the spray intermittently, so quick drainage isn't an issue. I crossed off tub and kitchen sink drains. That left bar sink drains, lavatory drains and some type of improvised drain. I opted for a lavatory drain.
Now, to narrow that list down further, I wanted a drain that would "sandwich" the floor. My combined floor/pan thickness had grown to 1-1/4" and many drains don't accommodate that. I wanted to be able to tighten the nut securely underneath the flooring. The other problem is that many lavatory drains are designed with cut-outs to allow for overflow basin return drainage. That places two "windows" for water to contact the exposed flooring. Other drains have the pop-up lever fitting/hole which was too close to the drain lip to allow installation.
I finally located a lavatory drain that met most of my desires. It had a threaded area that was about 2" long but it had the two overflow return windows. I decided I could make that work with a little fiberglass creativity.
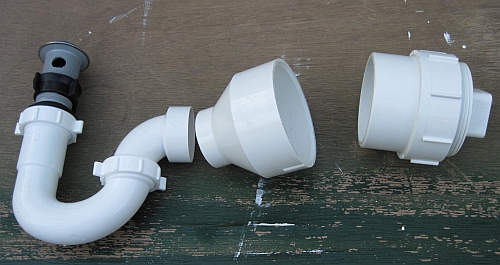
Here are the parts: Shower drain, trap and fittings for a 3" diam. PVC "holding tank" tube. 1-1/4" drain to 1-1/2" trap to 1-1/2"/3" adaptor to PVC tubing and finally threaded adaptor and plug.

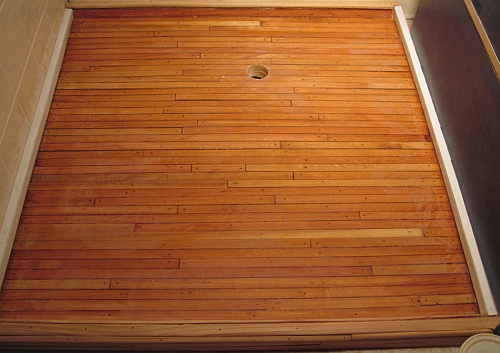
Now to locate the drain hole. Wouldn't you know it, chassis framing won't allow dead-centering of the drain. That's ok. The drain will be covered by the porta potty most of the time. I drilled the hole in the shower pan and tested for fit. Then, with a fresh batch of fiberglass resin and some cloth cut, I first coated the exposed flooring, smeared on with gloved fingers. Then, dipped the cloth in the resin and wrapped it around the drain windows and added a ring of plumbers putty before inserting it into the hole. Worked good.

I then poured the rest of the resin onto the pan surface and began distributing it with a plastic spreader, just as I had done before. ONLY this time the resin didn't behave. During four previous applications, the resin would go from syrup consistency to molasses consistency and then it was pretty well cooked off. Hard as nails in about 1-1/2 hrs and baby-butt smooth. I'm using cheapo Bondo polyester, by the way.
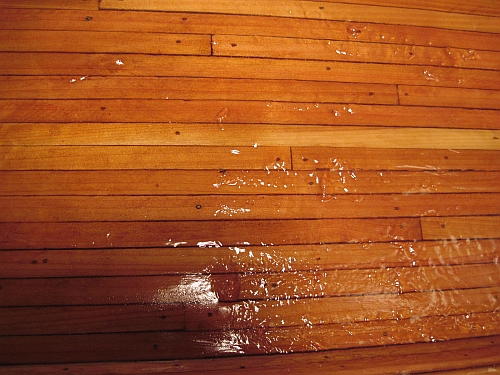
This pour, the resin began taking on a curdled appearance in some areas. Lumpy on the surface and any attempts at spreading it only worsened the appearance. The only difference in my technique that I can think of is that I had a box fan on high pointing toward the working area and the work on the drain took some time off the allowable working time. Dunno what caused the problem, still don't know for sure.

All I could do was let it cure and then sand, sand and sand. Move ahead two days now. Prep work done, I mixed another batch and,,,, curdling again! This time I stopped immediately. The bum area is,,, wouldn't ya know it,,, right at the entry, about 4" x 8". I feel certain I've got a waterproof pan, but I'm not happy with the appearance. I'll deal with that tomorrow. Chisel off the high spots, hit it with the sander, remove dust, wipe with alcohol and then just pour a small batch over that area, no spreading, let gravity do its thing. That corner could stand to be a bit higher for proper drainage anyhow,, it's all good.


 I can hardly wait to see more details of what you are doing.
