DD, on the road to LCG

...ask your questions in the appropriate forums BUT document your build here...preferably in a single thread...dates for updates, are appreciated....

Postby StPatron » Sat Jul 17, 2010 2:26 am

Thanks for the motivation, Shaun.

Blazing hot weather coupled with outrageous humidity have put a bit of a damper on my build and spirits lately but I'm making slow progress despite it all.

Here's a pic of work in progress. I needed a waterproof shower pan and decided to build my own. Started out with an opaque fiberglass covering, in white, and didn't like that look. So,,, decided to cover that up with,,, cedar strips! Yeah, a matching look with my dinette table and cabinet doors. Still need to add some finishing touches, but here's what it looks like so far:
Image
User avatar
StPatron
Donating Member
 
Posts: 748
Images: 297
Joined: Tue Dec 15, 2009 8:38 pm
Location: OK

Postby grizz » Sun Jul 18, 2010 3:45 pm

Good to see you alive Gary.

Been busy here as well, packing, packing, packing and stress about work.

Take look here, this weekends find.

It is PINK.......


http://www.retrorides.proboards.com/ind ... read=84643

Trust you will approve :lol:
Greetings from England.

Rian.


Hoping to get it all done in time.
User avatar
grizz
1000 Club
1000 Club
 
Posts: 1210
Images: 29
Joined: Mon Sep 21, 2009 2:37 pm
Location: Rochester, Kent, UK

Postby StPatron » Sun Jul 18, 2010 9:40 pm

grizz wrote:Trust you will approve :lol:

Thx for the greetings, Rian.

Oh, the pink Lazer is definitely a keeper!

But, we really need a pic of Nicola on it instead ya know,,, :lol:
You don't look very happy sitting there.

Good luck with the packing, job and move.
User avatar
StPatron
Donating Member
 
Posts: 748
Images: 297
Joined: Tue Dec 15, 2009 8:38 pm
Location: OK
Top

Postby jkidd6339 » Sun Jul 18, 2010 10:58 pm

Your Trailer looks like it is coming along great. Love the cedar strips. I think your going to finish before I do. I keep looking at other things to build and then I remember I have to finish this one first.
User avatar
jkidd6339
Teardrop Master
 
Posts: 198
Images: 1
Joined: Sat Jan 24, 2009 1:16 am
Top

Postby Laredo » Mon Jul 19, 2010 1:06 pm

scooter looks like the perfect place to start a mod.
Hmm.
ComStar wheels from a bike salvage yard, to make it taller?
Mopar's what my busted knuckles bleed, working on my 318s...
User avatar
Laredo
Donating Member
 
Posts: 2017
Images: 0
Joined: Mon Jul 05, 2004 10:42 pm
Location: West Texas
Top

Postby aggie79 » Mon Jul 19, 2010 1:42 pm

StPatrón wrote:Thanks for the motivation, Shaun.

Blazing hot weather coupled with outrageous humidity have put a bit of a damper on my build and spirits lately but I'm making slow progress despite it all.


Gary,

I right there with you on the heat. Looks like you've found a way to fight through it. I'm good for about 6 hours in the shade with fans and then I'm cooked.

StPatrón wrote:Here's a pic of work in progress. I needed a waterproof shower pan and decided to build my own. Started out with an opaque fiberglass covering, in white, and didn't like that look. So,,, decided to cover that up with,,, cedar strips! Yeah, a matching look with my dinette table and cabinet doors. Still need to add some finishing touches, but here's what it looks like so far:
Image


I really do like the cedar strip look. Design-wise, like you said, I think the shower pan tie everything together.

Try to stay cool (or at least semi-comfortable).

Tom
Tom (& Linda)
For build info on our former Silver Beatle teardrop:
Build Thread

93503
User avatar
aggie79
Super Duper Lifetime Member
 
Posts: 5405
Images: 686
Joined: Tue Aug 07, 2007 5:42 pm
Location: Watauga, Texas
Top

Postby S. Heisley » Mon Jul 19, 2010 3:46 pm

I think the worm-trail cedar door handles will look wonderful! :thumbsup: I can hardly wait to see more details of what you are doing. :applause:
User avatar
S. Heisley
Super Lifetime Member
 
Posts: 8866
Images: 495
Joined: Mon Sep 17, 2007 10:02 am
Location: No. California
Top

Postby StPatron » Sat Jul 24, 2010 3:28 am

Thanks to all for your comments, support and inspiration. You're great! :thumbsup:

I'll clear out the tools and supplies from inside my camper, take some new photos and post them soon. I was reading thru this thread the other day and realized that I've posted pics of individual items and areas, but nothing yet that really provides an idea of the "whole" other than my Sketch-up plan. A few weeks ago I set the dinette table in place and was sitting on the cushionless bench, looking towards the desk, closet and bathroom areas and got that wonderful feeling of pride combined with anticipation of actually camping in it someday. I'm very pleased with the layout and feeling of roominess in my slouchy design. Ok, enough of the mushy stuff,, on to the update.

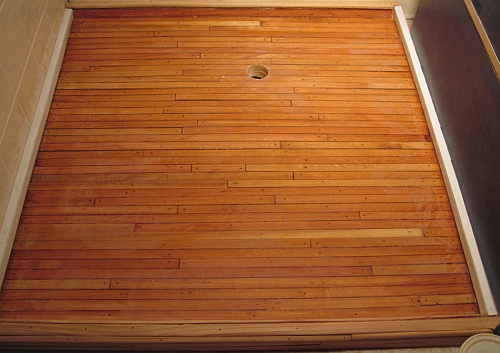
The shower pan is nearly done, but there were a few hurdles. I'll share those here and some other planning details in case what I experienced might be helpful to others.

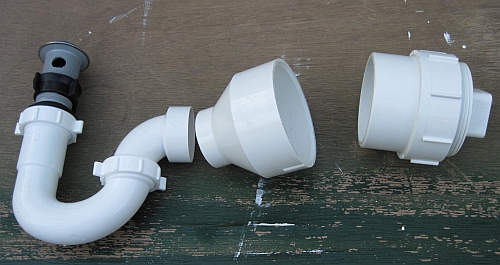
The type of drain used:

For showering, I don't plan on using more than a gallon or two and will use the spray intermittently, so quick drainage isn't an issue. I crossed off tub and kitchen sink drains. That left bar sink drains, lavatory drains and some type of improvised drain. I opted for a lavatory drain.

Now, to narrow that list down further, I wanted a drain that would "sandwich" the floor. My combined floor/pan thickness had grown to 1-1/4" and many drains don't accommodate that. I wanted to be able to tighten the nut securely underneath the flooring. The other problem is that many lavatory drains are designed with cut-outs to allow for overflow basin return drainage. That places two "windows" for water to contact the exposed flooring. Other drains have the pop-up lever fitting/hole which was too close to the drain lip to allow installation.

I finally located a lavatory drain that met most of my desires. It had a threaded area that was about 2" long but it had the two overflow return windows. I decided I could make that work with a little fiberglass creativity.

Here are the parts: Shower drain, trap and fittings for a 3" diam. PVC "holding tank" tube. 1-1/4" drain to 1-1/2" trap to 1-1/2"/3" adaptor to PVC tubing and finally threaded adaptor and plug.

Image


Now to locate the drain hole. Wouldn't you know it, chassis framing won't allow dead-centering of the drain. That's ok. The drain will be covered by the porta potty most of the time. I drilled the hole in the shower pan and tested for fit. Then, with a fresh batch of fiberglass resin and some cloth cut, I first coated the exposed flooring, smeared on with gloved fingers. Then, dipped the cloth in the resin and wrapped it around the drain windows and added a ring of plumbers putty before inserting it into the hole. Worked good.

Image

I then poured the rest of the resin onto the pan surface and began distributing it with a plastic spreader, just as I had done before. ONLY this time the resin didn't behave. During four previous applications, the resin would go from syrup consistency to molasses consistency and then it was pretty well cooked off. Hard as nails in about 1-1/2 hrs and baby-butt smooth. I'm using cheapo Bondo polyester, by the way.

This pour, the resin began taking on a curdled appearance in some areas. Lumpy on the surface and any attempts at spreading it only worsened the appearance. The only difference in my technique that I can think of is that I had a box fan on high pointing toward the working area and the work on the drain took some time off the allowable working time. Dunno what caused the problem, still don't know for sure.

Image

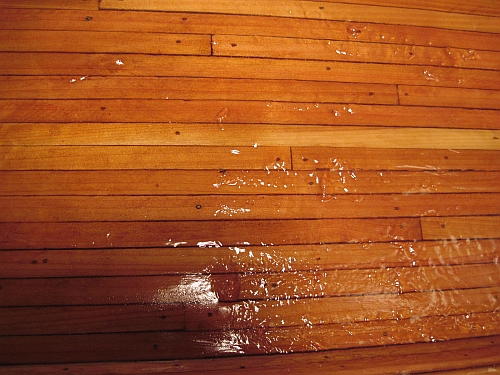
All I could do was let it cure and then sand, sand and sand. Move ahead two days now. Prep work done, I mixed another batch and,,,, curdling again! This time I stopped immediately. The bum area is,,, wouldn't ya know it,,, right at the entry, about 4" x 8". I feel certain I've got a waterproof pan, but I'm not happy with the appearance. I'll deal with that tomorrow. Chisel off the high spots, hit it with the sander, remove dust, wipe with alcohol and then just pour a small batch over that area, no spreading, let gravity do its thing. That corner could stand to be a bit higher for proper drainage anyhow,, it's all good.
User avatar
StPatron
Donating Member
 
Posts: 748
Images: 297
Joined: Tue Dec 15, 2009 8:38 pm
Location: OK
Top

Postby rladams39 » Sat Jul 24, 2010 8:18 am

Once you sand it down, polish it, just keep using finer grits of paper till you get it super smooth, then use a buffer and some polish and make it glassy smooth
User avatar
rladams39
Teardrop Master
 
Posts: 124
Images: 30
Joined: Fri May 07, 2010 5:42 pm
Location: Indiana
Top

Postby StPatron » Sat Jul 24, 2010 1:20 pm

rladams39 wrote:Once you sand it down, polish it, just keep using finer grits of paper till you get it super smooth, then use a buffer and some polish and make it glassy smooth


Thanks for the polishing tips. I'm not looking for a showcar finish on the shower pan. Actually, I had considered adding some granulated sugar or sand for traction. At my age it might be wise to just cover up that ugly area with some of those stick-on, gritty traction mats. :lol:
User avatar
StPatron
Donating Member
 
Posts: 748
Images: 297
Joined: Tue Dec 15, 2009 8:38 pm
Location: OK
Top

Postby StPatron » Sat Jul 24, 2010 10:45 pm

As promised, here's a few pics.

This is the desk area, located on the immediate left as you enter the curbside door. In the upper cabinet is an AM/FM/Cassette stereo with an MP3 input jack. The stained glass (on the right) will surround an under-cabinet light.

Image

Adjacent to the desk area is the bathroom/shower. More work needed on the upper cabinet.

Image

The lower cabinet has two sliding doors in an aluminum track, looks like one in this pic. Below the cabinet is a wheel well, also covered in blue laminate. Some touch-up work needed on the tileboard, almost done with the shower pan fiberglass work.

Image

On the right as you enter is the dinette/bed area. The table needs edge-coating, I need to sew some cushion covers and add trim to ceiling panel joint. Lots of storage underneath bench seats.

Image

The closet. Two storage shelves below with hanging area above. Hidden behind the shirt is a multi-pocketed canvas/net storage gizmo. Sorry about all the clutter, the closet has been a handy area to store tools, etc. while I'm working.

Image
User avatar
StPatron
Donating Member
 
Posts: 748
Images: 297
Joined: Tue Dec 15, 2009 8:38 pm
Location: OK
Top

Postby grizz » Sat Jul 24, 2010 11:35 pm

Morning Gary, trustig you are well.

I have been awake since 4am, with nothing to do but surf the net.

Waiting for Nicola to wake so we can go to the bootfair.

Our house sale has come to a grinding halt due to a cockup by our buyer, so now instead of moving next Thursday 29th, it looks like earliest date may be 10th August.... grrrrrrrrrrrrrrrrrr !!

The progress on your trailer really is great.

Its the first time I am getting the perspective of size now with the inner shots.

Do you have any current exterior shots to show size perspective ?

Look forward to further progress updates 8)
Greetings from England.

Rian.


Hoping to get it all done in time.
User avatar
grizz
1000 Club
1000 Club
 
Posts: 1210
Images: 29
Joined: Mon Sep 21, 2009 2:37 pm
Location: Rochester, Kent, UK
Top

Postby jkidd6339 » Sat Jul 24, 2010 11:35 pm

Looking pretty good Gary I really like the cedar strips. Did you use your Kayak router bits on them? The shower is going to be a nice feature too. I might have to start thinking of a bigger one. There I go again. I have to finish the first one. Then I can start thinking of another. I don't know if I'll make the rally this year the C-Brats are going to be there the week before or the week after I can't remember which, but I don't think I can do two weeks in a row. Will see how it works out.
User avatar
jkidd6339
Teardrop Master
 
Posts: 198
Images: 1
Joined: Sat Jan 24, 2009 1:16 am
Top

Postby StPatron » Sat Jul 24, 2010 11:52 pm

grizz wrote:Morning Gary, trustig you are well.

I have been awake since 4am, with nothing to do but surf the net.

Do you have any current exterior shots to show size perspective ?


Thanks for checking in, Rian. All's well here. I had a bout of insomnia last night, therefore the build updates. Hopefully you'll get some better rest once the house sale and move is final.

I can't get exterior pics of the camper due to very limited clearance around all sides. The cabin area, what's shown in the pics (without galley and rear hatch) is 193 cm wide (76") and 221 cm long (87").

Have fun at the bootfair!
User avatar
StPatron
Donating Member
 
Posts: 748
Images: 297
Joined: Tue Dec 15, 2009 8:38 pm
Location: OK
Top

Postby StPatron » Sun Jul 25, 2010 12:05 am

jkidd6339 wrote:Looking pretty good Gary I really like the cedar strips. Did you use your Kayak router bits on them?

I don't know if I'll make the rally this year the C-Brats are going to be there the week before or the week after I can't remember which, but I don't think I can do two weeks in a row. Will see how it works out.


I just looked at your gorgeous cabinet work and came very, very close to deleting all my pics,,, :lol:

I started out using some bead/cove routed strips I had previously cut, but quickly switched to plain, ripped strips as I was only covering flat surfaces. The idea of doing tambour doors faded as well but it's always an option for later. The cedar cabinet doors above the desk are very lightweight and hinged so that they open upwards. So far, I like them.

I was hoping our paths would cross again soon, maybe you ought to have a talk with the boss :lol:
User avatar
StPatron
Donating Member
 
Posts: 748
Images: 297
Joined: Tue Dec 15, 2009 8:38 pm
Location: OK
Top

PreviousNext

Return to Build Journals

Who is online

Users browsing this forum: No registered users and 10 guests