silver spaceship

...ask your questions in the appropriate forums BUT document your build here...preferably in a single thread...dates for updates, are appreciated....

Put on the walls today.

Postby R. W. Alexander » Mon Jul 19, 2010 8:36 pm

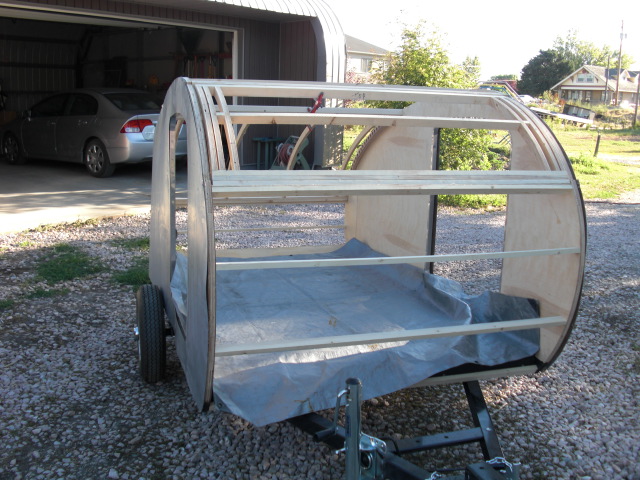
I bolted the walls to the trailer floor today. And put in all the framing in at the same time.
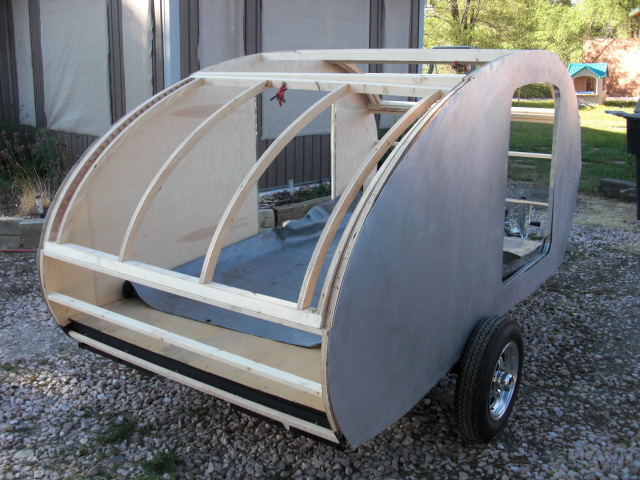
My trailer will have a awning with a window in the front of the trailer. The framing for this awning is constructed like the galley hatch except for a raised L shaped edge on the inside where the inside bottom edge of the awning butts up against the bottom lip of the front opening. When I put on some aluminum I will take some close up photos of the window edge. I am hoping that this set up will prevent any water from getting inside the trailer, when driving in the rain. Water under pressure can work it's way into just about anything.

Image


Image
User avatar
R. W. Alexander
Teardrop Master
 
Posts: 108
Images: 77
Joined: Wed Jun 02, 2010 9:45 am

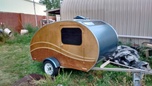
Skinning the top and front

Postby R. W. Alexander » Wed Jul 21, 2010 11:49 am

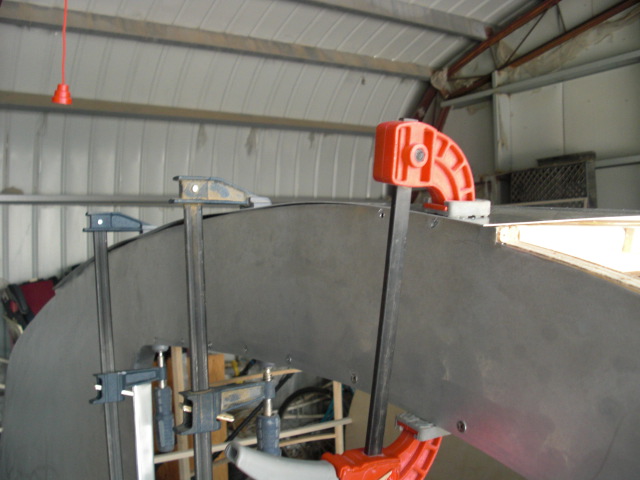
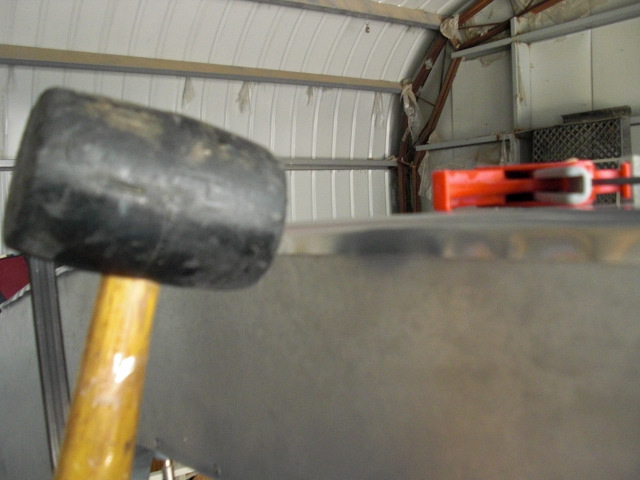
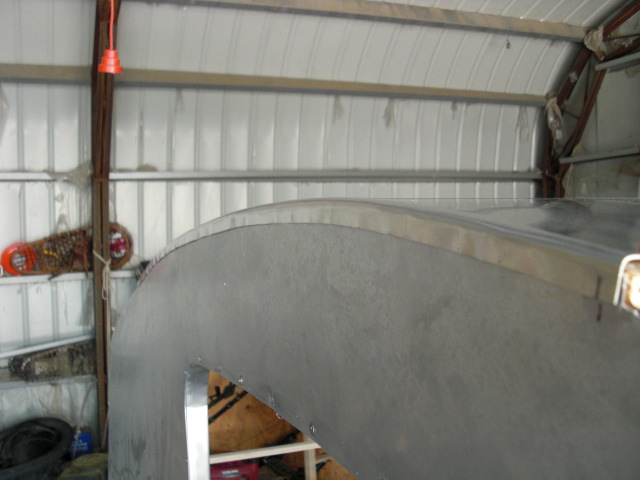
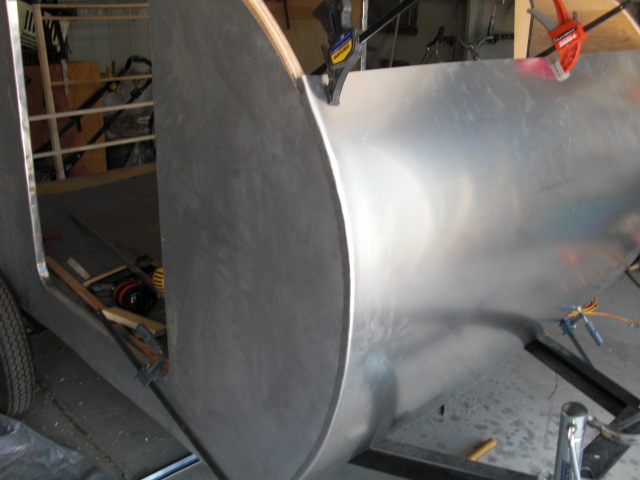
I put on the top and front panel today. I allowed a 1/2 inch overlap on each side, and put on some clamps on each edge, and used a rubber mallet to bend over the aluminum. Then I pulled off the top. Put on some sealant on the inside of the formed bend, and put the panel back on and tapped the flange tight against the vertical wall panel, drilled and counted sunk some holes, and put in stainless flat head screws.
[img]
Image[/img]

Image

Image

Image
User avatar
R. W. Alexander
Teardrop Master
 
Posts: 108
Images: 77
Joined: Wed Jun 02, 2010 9:45 am

Postby AJP » Tue Jul 27, 2010 5:13 pm

I really like what you did with the aluminum, and thanks for a good cheap source of it. I am planning out a build and wanted to do an aluminum frame but was worried about the cost.
AJP
Teardrop Inspector
 
Posts: 18
Joined: Sun Jul 25, 2010 7:15 pm
Top

Postby Cliffmeister2000 » Tue Jul 27, 2010 5:21 pm

Nice build journal! :applause: :applause:


Hijack Alert!!!


I noticed the name of your teardrop, and thought you'd enjoy seeing another silver space ship, though it's a bit smaller than yours.

Image

Image

This is what the builder sleeps beside!

Image

I don't remember his name, but he's from Topeka, Kansas. Great guy, great build!
God Bless

Cliff

♥God. ♥People.
1 John 4:9-11

My Teardrop build pictures
User avatar
Cliffmeister2000
Titanium Donating Member
 
Posts: 3622
Images: 157
Joined: Thu Jul 26, 2007 10:18 pm
Location: Phoenix, AZ
Top

Postby R. W. Alexander » Tue Jul 27, 2010 5:58 pm

That is one beautiful build. The craftsmanship of the sheet metal is awesome. :thumbsup:
User avatar
R. W. Alexander
Teardrop Master
 
Posts: 108
Images: 77
Joined: Wed Jun 02, 2010 9:45 am
Top

Postby R. W. Alexander » Thu Jul 29, 2010 10:21 am

Put up the front stargazing awning this week. It is insulated and is adjustable. The two wooden bars at each end have notches that fit into a slot cut out in the sides, by the window screen. At the end of the wooden bars inside the trailer I will install a latches that will apply pressure to the awning so the gasket will get compressed against the outer wall of the trailer. I plan on adding some stainless catch latches to the outside edge of the awing for extra safety, in case something loosens up inside while towing. That's cheap $9.00 insurance.


Image


This is a close up view of the awing ledge. It is raised up 3/4" and sloped about 10 degrees down and caulked.

Image


This is a photo of the P shaped gasket I got from McMaster Carr 93085K913.

Image

A photo of the window screen installed.

Image

This is a photo of the awing closed up. The bottom of the awning is placed well below the wind profile of the car. This should take care of wind driven water. But the fine mist kicked up by the tires, will could be the problem with water getting in. I plan on putting on a layer of epoxy on all wood surfaces/edges that a fine water mist could get into.

Image

In the last few weeks I have learned a lot about building these trailers. This one will be done within 2 weeks or less, Ready for a trip to Yellowstone
Some of the things I have done could be better, or done easier but that's how you try to learn.
User avatar
R. W. Alexander
Teardrop Master
 
Posts: 108
Images: 77
Joined: Wed Jun 02, 2010 9:45 am
Top

Postby Papi » Thu Jul 29, 2010 1:29 pm

:applause: Great aluminum work!
I dream of a day when a chicken can cross the road without having his motives questioned.
User avatar
Papi
Teardrop Master
 
Posts: 177
Images: 50
Joined: Thu Jul 29, 2010 9:07 am
Location: North GA
Top

Postby Cliffmeister2000 » Thu Jul 29, 2010 1:30 pm

I love the stargazer window! :applause: :applause:
God Bless

Cliff

♥God. ♥People.
1 John 4:9-11

My Teardrop build pictures
User avatar
Cliffmeister2000
Titanium Donating Member
 
Posts: 3622
Images: 157
Joined: Thu Jul 26, 2007 10:18 pm
Location: Phoenix, AZ
Top

Postby High Desert » Thu Jul 29, 2010 2:59 pm

Thats a great idea! Most folks worry about building one curved hatch and you've built two on the same trailer. Bravo!! :applause: 8)
Shaun

"it's not the years honey, it's the mileage"
High Desert
Platinum Donating Member
 
Posts: 8780
Images: 27
Joined: Wed Apr 08, 2009 1:46 pm
Location: SW Washington state
Top

Postby R. W. Alexander » Thu Jul 29, 2010 7:08 pm

High Desert wrote:Thats a great idea! Most folks worry about building one curved hatch and you've built two on the same trailer. Bravo!! :applause: 8)


Thanks to everyones nice comments. I really appreciated them.

Today was productive. I got lots done.

This first photo is the upper storage. I plan on putting in some mirror acrylic panels that will slide to the sides with a lasered mountain scene. Since the acrylic is 1/8" wide I found that a glue joint bit that I had would cut out the perfect spacing for the acrylic panels. 2 each 1/8" slots with 1/8" spacing, 1/8" deep.

Image


Here is a photo of the finished shelf's. The shelf's are made from 3/8" sanded ply leftovers. I made 1/2" square furring strips to strengthen the spans on the shelf's.

Image


And here are some photos of the front storage/headboard area.


Image


Image


Image
User avatar
R. W. Alexander
Teardrop Master
 
Posts: 108
Images: 77
Joined: Wed Jun 02, 2010 9:45 am
Top

Fenders attached and galley vents

Postby R. W. Alexander » Fri Jul 30, 2010 4:39 pm

I did the fenders today. I had some steel fenders that I bought a few years back from Northern tool, and recycled them into the Tear Drop. I cleaned them up and took some leftover steel from the trailer frame and cut some tabs to weld to the fender.

Image

I then drilled some 3/8" holes for the 5/16" bolts that would attach the fender to the trailer walls. And painted the fenders with primer and a silver top coat.

Image

I then drilled 3 holes thru the walls of the trailer and attached 3/8" bolts with large fender washers on the inside of the trailer wall. I also put in some black fender welt that I got on Ebay between the outside wall of the trailer and inside of the fender.

Image

The finished fender.

Image

I also installed some vents for the galley area. One vent is placed at the top end of the galley and the other on the opposite side on the low end. This should allow for cross ventilation, and keep temperatures a bit lower in the galley. The vents have a feature where you can close them from the outside to prevent water from getting into the galley.


Upper vent
Image

Lower vent
Image
User avatar
R. W. Alexander
Teardrop Master
 
Posts: 108
Images: 77
Joined: Wed Jun 02, 2010 9:45 am
Top

Postby Ratkity » Fri Jul 30, 2010 6:20 pm

Absolutely beautiful inside and out. I love the stargazer window!

Hugs,
Ratkity
Ratkity
Gold Donating Member
 
Posts: 1065
Images: 0
Joined: Wed May 26, 2010 1:01 pm
Top

Postby Rlowell » Sat Jul 31, 2010 11:48 pm

:applause: :applause: You gotta love the toys!! Great job on this build.
We are looking forward to seeing the final product. 8) 8)
Rod
Plan your work...work your plan...at least that's the plan. Oh, just do it anyway!
gallery/image_page.php?album_id=1425&image_id=76342
User avatar
Rlowell
2000 Club
2000 Club
 
Posts: 2004
Images: 42
Joined: Wed May 23, 2007 12:39 pm
Location: Orlando, Fl.
Top

Postby S. Heisley » Sun Aug 01, 2010 9:26 am

This is shaping up to be a real beauty! :thumbsup: :applause:
User avatar
S. Heisley
Super Lifetime Member
 
Posts: 8869
Images: 495
Joined: Mon Sep 17, 2007 10:02 am
Location: No. California
Top

Postby R. W. Alexander » Wed Aug 04, 2010 2:41 pm

Ratkity wrote:Absolutely beautiful inside and out. I love the stargazer window!

Hugs,
Ratkity

Thank you, but I think the mosquitoes won't like the stargazer window.
User avatar
R. W. Alexander
Teardrop Master
 
Posts: 108
Images: 77
Joined: Wed Jun 02, 2010 9:45 am
Top

PreviousNext

Return to Build Journals

Who is online

Users browsing this forum: No registered users and 1 guest