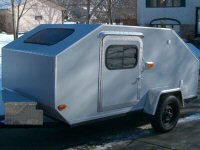
Well it's official. ZooZooBee build. 4/27/11: Done !

...ask your questions in the appropriate forums BUT document your build here...preferably in a single thread...dates for updates, are appreciated....

Well it's official. ZooZooBee build. 4/27/11: Done !

Postby tcolar » Thu Jul 29, 2010 11:59 pm

Don't ask about the name, my 3 years old came up with that name and since I had nothing better :)

Anyhow it's gonna be a slouchy 5.6x10 on a (lowered) HF frame(extended to 4x10) , about 5.5 height inside.

I have the design all made up and basic CAD blueprint etc and will post that stuff too soon.

Just picked up the frame(the 1700# one) today and started assembly as a 4x10.

More infos & pics coming very soon ...

Latest pic:
Image
Last edited by tcolar on Mon May 16, 2011 3:36 pm, edited 10 times in total.
User avatar
tcolar
Teardrop Master
 
Posts: 216
Images: 15
Joined: Fri Jul 16, 2010 12:50 am
Location: Kent, WA

Postby grizz » Fri Jul 30, 2010 2:12 am

Nothing b etter than a creative name.

Now people will ask about the trailer and the name, ensuring hours of discussion.

Look forward to the build.
Greetings from England.

Rian.


Hoping to get it all done in time.
User avatar
grizz
1000 Club
1000 Club
 
Posts: 1210
Images: 29
Joined: Mon Sep 21, 2009 2:37 pm
Location: Rochester, Kent, UK

Postby Steve_Cox » Fri Jul 30, 2010 6:04 am

TC,

Looking forward to watching your build thread.

As you get that HF frame put together just one thing.... If you have a lot of bolts and nuts left over when you finish don't worry about it :lol:
Steve
User avatar
Steve_Cox
4000 Club
4000 Club
 
Posts: 4903
Images: 196
Joined: Sun Apr 03, 2005 8:46 am
Location: Albuquerque New Mexico
Top

Postby tcolar » Fri Jul 30, 2010 3:35 pm

7/28/10:

I Have decided to use this Harbor freight Trailer:
http://www.harborfreight.com/1720-lb-ca ... 94564.html

It's a 4*8 frame rated for up to 1720# of cargo. Bought it using the 20% off coupon for ~320$.

Many others have use it and it's available for in store pickup ( = free shipping)

Since I'm building a 5.6*10 trailer, I modified the frame to be 4*10 by using 2 of the cross members as side extensions, as done by others, like here: http://www.tnttt.com/viewtopic.php?t=26296&start=0 (Thanks Steve for answering my questions)

Here are some pictures of the frame construction:

One weird thing:
The manual says no more than 45mph, the tire rim says no more than 55mph, and the tire rating(M) says no more than 81mph) :)

The boxes and what's in them
In comes as 2 boxes, about 5' x 2'.

The smaller box is heavy (framing) - probably close to 150#, The larger one is lighter (wheels, bolts, electrical), maybe 80 pounds.

Image
Image
Image
Image
Image

Modifying the trailer to be 4' * 10'

I Used 2 of the cross members on the sides to take the frame length to almost 10' (about 9'9).

Had two drill a few extra holes to bolt the "extensions". It was not very difficult to drill the framing.

Image
Image
Image

Still planning some more work on the frame [Not done yet.]

License & Registration

Had to go to the Washington DOL and pay 43$ to get Licence, title & tabs:

Image
User avatar
tcolar
Teardrop Master
 
Posts: 216
Images: 15
Joined: Fri Jul 16, 2010 12:50 am
Location: Kent, WA
Top

Postby tcolar » Sun Aug 01, 2010 6:17 pm

7/29/10:

After work, worked on mounting the axle.

It was left in it's "original position", such as the carriage bolt still goes in the square hole, of course since I added the cross member in front of it, it's now in such a position that there is <4' behind it and 6'+ in front.

Had to drill some new holes and added bolts wherever I could to reinforce it.

Image
Image

Then add to cute a piece to allow for axle movement, since I mounted the axle on top of the spring for a lower ride (damn it's still plenty high at 18'+ of clearance ! I wish it was lower.
Image

Since the axle partly extends over the "extended" part of the frame(cross member) and that the cross member is narrower there is a gap. I was woried about stress there and decided to use the 4 pieces of scrap metal cut to make room for the axle and use them as "shims". I welded them in place and put a bolt through it.

Note, this was my first time welding since i was a teenager so it wasn't too pretty at first ... but i got a bit better over time.

Image
Image

Those welds are not structural anyhow so not big deal.

Greasing the hub / bearings:
It says on this board you absolutely have to repack the bearings/hub with grease because sometimes they are not greased or have dirty grease ... case in my point, my hub had a feather in it ! I guess the factory worker was plucking a chicken ??

Image

Taking apart the hub and bearing was kind of a PITA. I've never done it before and that was tricky, searching the forums here provided some clues.

A wooden broom handle turn out to be the tool of choice.
Image
Image

Eventually got it all greased and in place on the axle:

Image
Image
Image
User avatar
tcolar
Teardrop Master
 
Posts: 216
Images: 15
Joined: Fri Jul 16, 2010 12:50 am
Location: Kent, WA
Top

Postby tcolar » Sun Aug 01, 2010 6:28 pm

8/1/10: - Hu? August already ??

Since I practiced welding yesterday I decided to weld all the "connections" ... still not great but getting better (once again, not structural welds anyway)

By The way, if you are gonna "ground" the frame ... I would say It's a must have to weld it, as I welded, I noticed the "grounding" through the bolts was inadequate at best, and if you used that to ground your trailer lights my bet is that they would be VERY flaky ... or maybe not work at all.

Image

The trailer is quite a lot stiffer after doing this !

Also I added and welded an extra 2x2 angle beam to make up for the removed cross members, then i used red rustoleum to "paint" it. Alos used that to cover wherever I welded and cover all the bolts with it for good measure.

Image

Then worked on welding a frame for my underfloor "hide a shower" idea (more on that later).
Image
Image

Hum it's getting smoky in here !

Image
Image
Image
Last edited by tcolar on Mon Aug 16, 2010 11:59 am, edited 1 time in total.
User avatar
tcolar
Teardrop Master
 
Posts: 216
Images: 15
Joined: Fri Jul 16, 2010 12:50 am
Location: Kent, WA
Top

Postby tcolar » Sun Aug 01, 2010 6:34 pm

08/1/10: Started work on the floor.

Went to pick up floor supplies.

Hum maybe I need a trailer to build my trailer, made the 2 miles trip to the hardware store abit more interesting :)
Image

Started cutting 1/2 plywood

Don't forget the recess holes, because the HF fame bolts stick out.

Image
Image

Continuing to work on the floor (upside down) on the trailer .... using 1x2 mostly and 1x3 at plywood seams.
Image
Image

OK, I'm beat, I think it's time to enjoy the little left of my weekend :)
User avatar
tcolar
Teardrop Master
 
Posts: 216
Images: 15
Joined: Fri Jul 16, 2010 12:50 am
Location: Kent, WA
Top

Postby xddorox » Sun Aug 01, 2010 9:19 pm

Darn!
Last edited by xddorox on Sun Aug 08, 2010 8:43 am, edited 1 time in total.
User avatar
xddorox
Teardrop Advisor
 
Posts: 82
Joined: Tue Jul 06, 2010 10:19 pm
Location: Montreal, Canada
Top

Postby xddorox » Sun Aug 01, 2010 9:20 pm

Triple post!?! How did that happen? Sorry there is no delete post option. :(
Last edited by xddorox on Sun Aug 08, 2010 8:44 am, edited 1 time in total.
User avatar
xddorox
Teardrop Advisor
 
Posts: 82
Joined: Tue Jul 06, 2010 10:19 pm
Location: Montreal, Canada
Top

Postby xddorox » Sun Aug 01, 2010 9:21 pm

Great build so far. Might I recommend using brushed paint on your trailer? Sprayed on paint is usually very thin and doesn't hold up too long. A brush let's you lay down a nice thick coat, or 2, in my experience.

Gerry :)
User avatar
xddorox
Teardrop Advisor
 
Posts: 82
Joined: Tue Jul 06, 2010 10:19 pm
Location: Montreal, Canada
Top

Postby tcolar » Fri Aug 06, 2010 12:54 am

8/2/10: Curt manufacturing hitch

It came like this:
Image

The ramps help:
Image

Image
Image
Image
Last edited by tcolar on Fri Aug 06, 2010 1:37 am, edited 1 time in total.
User avatar
tcolar
Teardrop Master
 
Posts: 216
Images: 15
Joined: Fri Jul 16, 2010 12:50 am
Location: Kent, WA
Top

Postby tcolar » Fri Aug 06, 2010 1:00 am

8/4/10 : Epoxy, foam & Henry 2004

First vacuumed, then covered all with system 3 epoxy:
Image

Stuck the 1'' foam in the epoxy:
Image

Then applied the nasty goo .. so sticky !!:
Image

Image
Image
User avatar
tcolar
Teardrop Master
 
Posts: 216
Images: 15
Joined: Fri Jul 16, 2010 12:50 am
Location: Kent, WA
Top

Postby azmotoman » Fri Aug 06, 2010 1:27 am

Nice start. Word of caution: Careful with the welds. You can introduce weakness into the structure by annealing the metal when it gets hot and could possibly cause stress fractures when it cools. A tack weld here and there would be better. :thumbsup:
Money isn't everything, but it keeps the kids in touch!
*************
Dinero isn' ¡t todo, pero él mantiene el interés de los niños!
User avatar
azmotoman
Silver Donating Member
 
Posts: 165
Images: 10
Joined: Fri Jul 02, 2010 10:07 am
Location: AZ ('bama transplant)
Top

Postby tcolar » Fri Aug 06, 2010 1:33 am

You're right ... i'm not too worried, my welder is probably not even strong enough to make that happen though :)

On some pics it seem i melted too much metal, but mostly it's just the paint that burned that make it look that way ... anyway will keep that in mind.
User avatar
tcolar
Teardrop Master
 
Posts: 216
Images: 15
Joined: Fri Jul 16, 2010 12:50 am
Location: Kent, WA
Top

Postby azmotoman » Fri Aug 06, 2010 2:09 am

Don't let that stop you. Just keep going and learn as you go. Haven't we all done that? Wisdom comes with years and some training along the way. I wish my welds/beads looked HALF that good! S-Mokin'!!!!!!!
:pipe:
Money isn't everything, but it keeps the kids in touch!
*************
Dinero isn' ¡t todo, pero él mantiene el interés de los niños!
User avatar
azmotoman
Silver Donating Member
 
Posts: 165
Images: 10
Joined: Fri Jul 02, 2010 10:07 am
Location: AZ ('bama transplant)
Top

Next

Return to Build Journals

Who is online

Users browsing this forum: jdeleon and 3 guests