MyAway build - Updates for space usage & organization

...ask your questions in the appropriate forums BUT document your build here...preferably in a single thread...dates for updates, are appreciated....

Postby S. Heisley » Wed Nov 03, 2010 10:45 pm

:lol: Cute, Ageless, but I don't think they'd believe me.

======================================

Today, I put the first coat of final(?) paint on the little pieces and I do not, not, not like it. :shock: It was sold as Antique White and the picture looked like vanilla ice cream but it is more like a French vanilla with mustard stirred in....ICH! I’ve never seen Antique White look like this. You can see the paint cup, below, with the ICH! in it and the white paper underneath it shows how bad it is:

Image Actually, it is even more yellow than it is in this picture.

Of course, once you open the can, you can’t mail it back; so, I put the first coat on, thinking that it might get lighter when it dries; but, so far, it’s still ICH! Either the Vanilla or the ICH! color would have been okay with the old tan truck; but with the new royal blue? “ICH!" may not look so good with the royal blue. More like barf. So now, I've got to decide what to do about that. I'll sleep on it tonight and I may not put the second coat on until I've ordered more paint....don't know yet.......
The problem is that I just looked again and this is their only white...I can't believe that. :(
User avatar
S. Heisley
Super Lifetime Member
 
Posts: 8866
Images: 495
Joined: Mon Sep 17, 2007 10:02 am
Location: No. California

Postby bdosborn » Wed Nov 03, 2010 11:41 pm

Can you add some dye or something to change the color maybe?

Bruce
2009 6.5'X11' TTT - Boxcar
All it takes is a speck of faith and a few kilowatts of sweat and grace.
Image
Boxcar Build
aVANger Build
User avatar
bdosborn
Donating Member
 
Posts: 5594
Images: 806
Joined: Wed May 05, 2004 11:10 pm
Location: CO, Littleton

Postby Steve_Cox » Thu Nov 04, 2010 6:28 am

Sharon,

I purchased some paint color additives in a tube at Home Depot and change the tint of paints and coatings all the time. Perhaps you could add a little white tint and get closer to the color you desire. I started using the colorants when matching the varnish on old cabinets when adding new ones. A little yellow tint made my new work look 20 years old.
Steve
User avatar
Steve_Cox
4000 Club
4000 Club
 
Posts: 4903
Images: 196
Joined: Sun Apr 03, 2005 8:46 am
Location: Albuquerque New Mexico
Top

Postby S. Heisley » Thu Nov 04, 2010 9:12 am

Thanks, Steve and Bruce. :thumbsup: :D

I called the company today and ordered what they recommended, a semi-gloss white. It’ll be here in about 7-10 days. As that is a polyurethane paint, the final paint coats can be done inside. I’ll just have to do less at a time because I can’t lay everything out in the garage space that I have and still walk around them.

While I’m waiting for the new paint, I’ll start working on the cabin again. So far, I have put a coat of CPES on, filled all the holes and cracks I could find with Fill-it epoxy filler; sanded; put another coat of CPES on; and sanded everything with 80 grit. After that, I washed everything down with TSP and water and let it air-dry overnight. No delaminating occurred, which is a very good sign. In the sanding, I messed up the painters tape so will re-mask that. I can also go ahead with the primer paint on the cabin. Maybe I should put in the flooring and threshold before I paint? :roll:

There’s still a lot to do…. :phew:
User avatar
S. Heisley
Super Lifetime Member
 
Posts: 8866
Images: 495
Joined: Mon Sep 17, 2007 10:02 am
Location: No. California
Top

Postby stomperxj » Fri Nov 05, 2010 2:12 pm

Sharon-
I just read through your whole thread... Great work!! Looks like its coming together quite well. I'm very curious to find out what it will weigh when you are all done.

Keep up the good work :)

Jess
User avatar
stomperxj
The 300 Club
 
Posts: 395
Images: 1
Joined: Tue Jul 29, 2008 12:25 am
Location: Kuna ID
Top

Postby S. Heisley » Fri Nov 05, 2010 8:57 pm

stomperxj wrote:
I'm very curious to find out what it will weigh when you are all done.


Thanks, Jess. :yes: I am too! Before I started I made a spread sheet of weight estimates, weighing any purchased pieces and estimating any built wooden pieces, i.e. walls, cabinets, etc:

Original empty estimate: 917 lbs.

As I put things together, I weighed as much as I could and sometimes re-estimated the rest with more accurate information. I then compared the new totals to the old. :roll: There were a few errors and omissions in my original figures:

Revised empty estimate to date: 1022 lbs.

As I didn’t weigh the actual deck (estimated only) and I won’t be able to weigh the finished flooring surface or exterior paint and didn’t allow for curtains & upholstery, I think the empty weight may actually end up at around 1200 lbs. :thinking: ...That’s probably okay.
User avatar
S. Heisley
Super Lifetime Member
 
Posts: 8866
Images: 495
Joined: Mon Sep 17, 2007 10:02 am
Location: No. California
Top

Postby Ageless » Fri Nov 05, 2010 10:38 pm

The Compact Jr scales just over 1200#. It tracks excellent and is easy to control. If you are coming in at that weight with a wood structure, you've done a great design and function job. Impressed I am.
Strangers on this road we are on; we are not two, we are one - Raymond Douglas Davies
User avatar
Ageless
Platinum Donating Member
 
Posts: 1603
Images: 8
Joined: Tue Aug 04, 2009 8:34 am
Location: Pt. Orchard, WA
Top

Postby S. Heisley » Sat Nov 06, 2010 9:31 am

Thank you for the vote of confidence, Ageless. I've got my fingers crossed that all goes well in the end.
User avatar
S. Heisley
Super Lifetime Member
 
Posts: 8866
Images: 495
Joined: Mon Sep 17, 2007 10:02 am
Location: No. California
Top

Postby mcspin50 » Sat Nov 06, 2010 11:48 pm

Just read through your whole Build Journal, Sharon. What great work you've done!
I admire your ability to really think things through, forge on through problems, and keep your sense of humor...
but, most of all, I'm awestruck with your great sense of style when dressing for painting. Definitely fashion forward! :R :lol: :lol:
Lil M.
In every walk with nature, one receives far more than he seeks. - John Muir
Generic Benroy Build Journal here - My LilScamper Update Journal here
The Lily Pad...Image My LilScamper...Image Image
User avatar
mcspin50
Gold Donating Member
 
Posts: 488
Images: 158
Joined: Mon Oct 12, 2009 6:35 pm
Location: Perham, MN
Top

Postby S. Heisley » Sun Nov 07, 2010 12:20 am

mcspin50 wrote:

I'm awestruck with your great sense of style when dressing for painting.


Thanks, Lil. Pretty funny, huh?! :lol:

We all need to chuckle once in a while. It makes life better.
User avatar
S. Heisley
Super Lifetime Member
 
Posts: 8866
Images: 495
Joined: Mon Sep 17, 2007 10:02 am
Location: No. California
Top

Postby S. Heisley » Sat Nov 13, 2010 5:48 pm

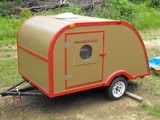
It’s getting cold and snowy in some parts of the world and that sometimes makes for less building progress. Here, in Northern California, we’re having a fall ‘heat wave’. Temperatures are going to be perfect for painting, in the mid 60’s and 70’s for the next week, but I’m still waiting for my replacement paint. I’m guessing it will arrive Monday as the company said they put it in the mail last Monday. There are lots of things to do while I wait for the paint. :thinking: I need to have the thresholds in place so that I can paint the area just in front of them when I paint the outside of the cabin. For that, the final cabin flooring has to be in place. So, this week, I worked on making my own flooring out of brown Kraft paper.

You can see the basics for making a Paper Bag Floor here:

http://www.familycorner.com/homegarden/ ... loor.shtml

But, as you probably know by now, I have ‘One-more-thingitis’ and just can’t seem to do things fast. I do them My…Ah…way. :roll: 
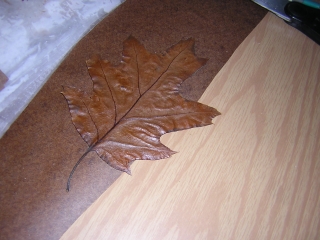
So, I bought a couple rolls of Kraft paper, some Minwax Polyurethane and then visited a local native black oak tree 
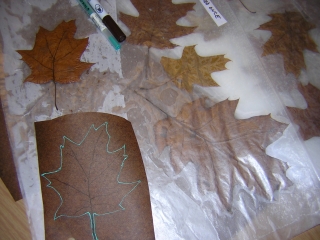
(Quercus kelloggii) to pick up some fallen leaves and preserve and strengthen them by ironing them between waxed paper.

I stained some of the Kraft paper close to the color of the freshly gathered, unfaded leaves:

Image
Using a brightly colored gel pen, I copied the outline of each leaf onto the stained paper, drew in the veins, and cut them out. To ensure that the colors wouldn’t run, I sprayed each “leaf” with varnish.

Image

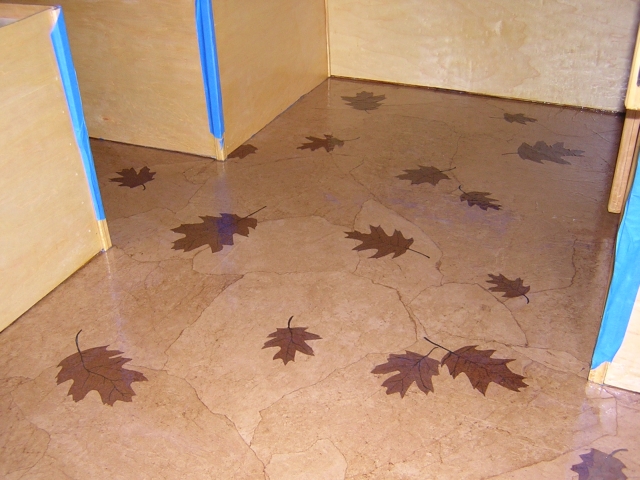
Then, I set about laying the basic brown paper floor. Here is a picture of part of that, without leaves:

Image
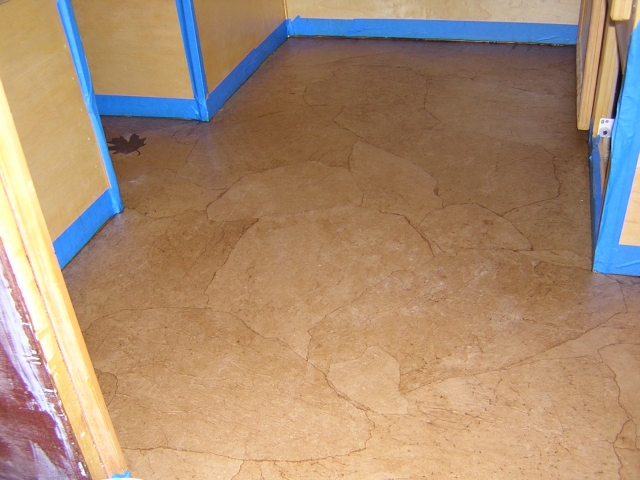
After that had dried, I tossed the leaves up in the air and let them fall where they may, arranging any that didn’t suit me. I then added them using the same procedure that the brown paper had been laid with.

After that was dry, I pulled off the blue painter’s tape and :Oh Brother: pulled too much:

Image 
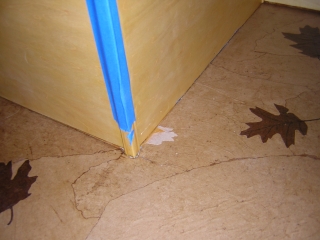
(I scored the rest of the way with a knife before pulling any more tape!)

That little Oops! was easily fixed with a “damaged leaf”. Mother Nature isn’t perfect and neither am I. :lol:

After the leaves had dried in place, I began ‘topping’ the floor with more layers of Minwax Polyurethane. Here, you see it with the second coat freshly applied:

Image
…Two coats down and four more to go! Then, I’m supposed to wait 3 days before ‘using’ it and 7 days before walking on it. But, there are lots of other things to do while I wait….
Last edited by S. Heisley on Thu Mar 22, 2012 10:02 pm, edited 1 time in total.
User avatar
S. Heisley
Super Lifetime Member
 
Posts: 8866
Images: 495
Joined: Mon Sep 17, 2007 10:02 am
Location: No. California
Top

Postby parnold » Sat Nov 13, 2010 5:54 pm

Sharon, that is awesome. What a great idea, and really unique!

Will there be enough polyurethane on it so that it will be smooth, or will it have a slightly textured feel to it!

:applause:
User avatar
parnold
Donating Member
 
Posts: 2344
Images: 302
Joined: Mon Feb 08, 2010 4:49 pm
Location: Northwest New Jersey
Top

Postby S. Heisley » Sat Nov 13, 2010 6:08 pm

Will it have texture? I'm not certain...maybe a little here and there. I'll let you know when I finish putting on the 6 layers of satin polyurethane.
User avatar
S. Heisley
Super Lifetime Member
 
Posts: 8866
Images: 495
Joined: Mon Sep 17, 2007 10:02 am
Location: No. California
Top

Postby Lookfar » Sat Nov 13, 2010 6:14 pm

And you are going to walk on it? That is just incredible...
Butch
Image
User avatar
Lookfar
Donating Member
 
Posts: 225
Images: 22
Joined: Sun Jan 31, 2010 9:58 am
Location: Arkansas
Top

Postby Ratkity » Sat Nov 13, 2010 6:26 pm

:applause: :applause: Amazing!! You have such a creative gift.

Hugs,
Ratkity
Ratkity
Gold Donating Member
 
Posts: 1065
Images: 0
Joined: Wed May 26, 2010 1:01 pm
Top

PreviousNext

Return to Build Journals

Who is online

Users browsing this forum: Bing [Bot] and 17 guests