De-rusting a frame? What method?

Ask questions about Harbor Freight trailers, or questions about building your own...

De-rusting a frame? What method?

Postby parnold » Mon Jan 02, 2012 3:55 pm

Image

This is what I have right now. I was thinking sandblasting, but Miriam suggested chemicals and sandpaper. I do have an unlimited free supply of sandpaper so I like her idea but I see issues reaching the nooks and crannies. Also, I have a compressor, and a gravel driveway, so sandblasting is fairly simple, or I thought about getting a quote to have it done professionally.

What has anyone else done?
User avatar
parnold
Donating Member
 
Posts: 2344
Images: 302
Joined: Mon Feb 08, 2010 4:49 pm
Location: Northwest New Jersey

Postby jonw » Mon Jan 02, 2012 4:13 pm

How about just lightly hitting it with a wire brush on a drill and then using POR15 or equivalent that will bond with any remaining rust.
User avatar
jonw
Titanium Donating Member
 
Posts: 525
Images: 163
Joined: Thu Oct 22, 2009 6:22 pm
Location: Marlboro, Mass.

Postby Sonoma ZR2 » Mon Jan 02, 2012 4:27 pm

I just got my frame back from sandblasting and primer it was about $175. Here in Iowa not sure what it runs in your neck of the woods. If I had to do it again I would but not by who I had do it. It took him over 2 months to get around to it.
User avatar
Sonoma ZR2
Teardrop Master
 
Posts: 140
Images: 90
Joined: Mon Jul 05, 2010 4:47 pm
Location: Forest City, Iowa
Top

Postby StPatron » Mon Jan 02, 2012 4:53 pm

Yeah, if that isn't a spittin' image to mine..
Image

That frame doesn't look bad at all, I've seen more rust on a new cargo trailer. :lol:

I'm with jonw on this, whire wheel followed by POR-15. I used Rustoleum Hammered Paint for my final finish, completely satisfied. A thick, quality product.

But.. I have a question??? How in the heck did you get it down to frame so quickly? I spent two days just laboring to remove the floor on mine! Matches, Coleman fuel???
User avatar
StPatron
Donating Member
 
Posts: 748
Images: 297
Joined: Tue Dec 15, 2009 8:38 pm
Location: OK
Top

Postby Dale M. » Mon Jan 02, 2012 5:01 pm

40 hours with sandpaper and chemicals

40 minutes at media blasters....

Dale
Lives his life vicariously through his own self.

Any statement made by me are strictly my own opinion.
You are free to ignore anything I say if you do not agree.

Image
User avatar
Dale M.
2000 Club
2000 Club
 
Posts: 2693
Images: 18
Joined: Thu Jun 09, 2005 8:50 pm
Location: Just a tiny bit west of Yosemite National Park
Top

Postby parnold » Mon Jan 02, 2012 5:18 pm

But.. I have a question??? How in the heck did you get it down to frame so quickly? I spent two days just laboring to remove the floor on mine!


I had two helpers, both in their late twenties, with lots of energy and a VERY big sledge hammer. If I were to have done this on my own, I'd still be scratchin' my head wonderin' where to start!

:lol:

Wire wheel and Por15 doesn't sound too bad. I sell an equivalent to Por-15, called Chassis Saver. Unfortunately they don't have a rep that I can convince to give me some for free. I'll have to check my defect room for some damaged cans. :R
User avatar
parnold
Donating Member
 
Posts: 2344
Images: 302
Joined: Mon Feb 08, 2010 4:49 pm
Location: Northwest New Jersey
Top

Postby parnold » Mon Jan 02, 2012 5:24 pm

Image

But.. I have a question??? How in the heck did you get it down to frame so quickly? I spent two days just laboring to remove the floor on mine![/img]

My helpers!


Yeah, if that isn't a spittin' image to mine..


@ St. Patron, the frames look identical, did you replace the tires, mine came with the wide tires. Also my axle has the square flanges so I can add brakes if I decide to, I can't tell from your picture if yours does or not. Do you know how yours started out it's life?
User avatar
parnold
Donating Member
 
Posts: 2344
Images: 302
Joined: Mon Feb 08, 2010 4:49 pm
Location: Northwest New Jersey
Top

Postby StPatron » Mon Jan 02, 2012 6:03 pm

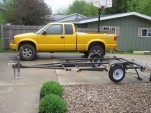
parnold wrote:St. Patron, the frames look identical, did you replace the tires, mine came with the wide tires. Also my axle has the square flanges so I can add brakes if I decide to, I can't tell from your picture if yours does or not. Do you know how yours started out it's life?


I see more similarities with each pic you post, Paul. I think the stoves are identical or close, been looking for a pic of mine. The dinette table hardware, the rooftop corner trim, the back bumper... the list goes on and on. Then, when I saw those white porch columns, I really freaked. Got those too. I'm thinking about going outside and taking a peek just to make sure you aren't out there. Remember, I've got a .177 pellet rifle. :lol:

I replaced both tires on mine. It was a near miracle I was able to drag it home after purchase, had to air up a tire and both were in advanced stages of dry rot. I went with Carlisle's, can't remember the specs now. I don't have the brake flanges, but with my 1/2 ton truck that's not a worry for me. Mine was a "Chuckwagon" model or brand, not sure where it originated. It had a split galley, consisting of an interior sink, ice box, cabinets and drawers.. along with an externally accessed pull-out "box" that was mounted on white oak sliders. The stove was located in this "box" and there was also lots of storage. Cook the bacon outside? Good thinking! The copper tubing propane line (seen running mid-frame) terminated in the slide-out box and was then connected to a loop of rubber hose. As you pulled the galley out to full extension, the hose extended.

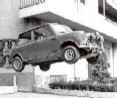
The roof-top support arms on yours also look the same. IMO, that was a design that lead to the eventual death. During the autopsy I noted that all 8 arm attachment areas (4 above, 4 below) had failed. Too much lateral flex in the arms resulted in an inordinate amount of stress at those attachment points. They wiggled loose and allowed water penetration followed by rot. The ONLY rot areas I found were at each corner. The flooring..... with absolutely NO treatment on the under surface ... was as solid as ever. I used asphalt emulsion on the flooring of DD... but, I'm definitely in the "let the floor breathe" camp. Ok.. got kinda carried away there. I think by studying what caused these to fail we can learn a lot.

I've sometimes wondered where it had been before I brought it home. What states, who had camped in it. I never got any history.
User avatar
StPatron
Donating Member
 
Posts: 748
Images: 297
Joined: Tue Dec 15, 2009 8:38 pm
Location: OK
Top

Postby parnold » Mon Jan 02, 2012 6:30 pm

Mine had a couple camping stickers on it from a couple locations here in NJ, and one from Florida. The dealer name was still on it, and they are still in business about 25 miles from where I live.

Now that I have the frame and know the axle location, etc, I am working on finalizing my design. With my bed in the rear, and table on the side, there is quite a bit of storage that will be a nuisance to get to. I really like the slide out galley idea, and want to incorporate the original stove in the design if I can.
User avatar
parnold
Donating Member
 
Posts: 2344
Images: 302
Joined: Mon Feb 08, 2010 4:49 pm
Location: Northwest New Jersey
Top

Postby StPatron » Mon Jan 02, 2012 6:59 pm

I have pics of the slide-out in my pic gallery, Paul. I think they are in the early pages, 23 or 24.
User avatar
StPatron
Donating Member
 
Posts: 748
Images: 297
Joined: Tue Dec 15, 2009 8:38 pm
Location: OK
Top

Postby Shadow Catcher » Mon Jan 02, 2012 7:06 pm

I would vote for sand blasting, just a totally fresh start!
User avatar
Shadow Catcher
Donating Member
 
Posts: 6008
Images: 234
Joined: Sat Apr 11, 2009 8:26 pm
Location: Metamora, OH
Top

Postby Oldragbaggers » Mon Jan 02, 2012 7:41 pm

I used a wire wheel on the drill, followed by some 80 grit sandpaper on the palm sander and then hit it with the Rustoleum primer, then black spray. It looked like yours when I brought it home. It looks like a new trailer now.
Life is sooooo good.........
Sail...camp....bike...repeat
Becky

Build Journal http://www.tnttt.com/viewtopic.php?f=50&t=45917
Visit our blog at http://www.oldragbaggers.com
Image Image
User avatar
Oldragbaggers
Gold Donating Member
 
Posts: 1842
Images: 331
Joined: Mon Aug 01, 2011 9:22 pm
Location: Essex, MD
Top

Postby Mini Renegade » Sun Jan 08, 2012 9:11 am

have in the past used a needle scaler. A air powered hand held tool with a bunch of steel rods in the end that move in and out very quickly, these remove paint and rust with little effort. Finish with a wire brush.
here`s a small one in action on you tube http://www.youtube.com/watch?v=OokFsjTnE3s
If evvr tha dus owt fr nowt, allus do it fr thissen
User avatar
Mini Renegade
500 Club
 
Posts: 520
Joined: Tue May 15, 2007 2:26 pm
Location: (Old) York
Top

Postby ssrjim » Sun Jan 08, 2012 1:35 pm

I used the cheap harbor freight blaster. Worked fine.
93079
User avatar
ssrjim
1000 Club
1000 Club
 
Posts: 1187
Images: 12
Joined: Fri Feb 04, 2005 7:02 pm
Location: Glendale, az
Top

Postby Oldragbaggers » Sun Jan 08, 2012 3:14 pm

ssrjim wrote:I used the cheap harbor freight blaster. Worked fine.


We have one of these also. We didn't use it on the frame but we used it to de-rust and remove paint off of an old iron radiator and it worked good for us too.
Life is sooooo good.........
Sail...camp....bike...repeat
Becky

Build Journal http://www.tnttt.com/viewtopic.php?f=50&t=45917
Visit our blog at http://www.oldragbaggers.com
Image Image
User avatar
Oldragbaggers
Gold Donating Member
 
Posts: 1842
Images: 331
Joined: Mon Aug 01, 2011 9:22 pm
Location: Essex, MD
Top

Next

Return to Trailer and Chassis Secrets

Who is online

Users browsing this forum: No registered users and 0 guests