La Ballena (The Whale) 3-02-12 UPDATE

...ask your questions in the appropriate forums BUT document your build here...preferably in a single thread...dates for updates, are appreciated....

La Ballena (The Whale) 3-02-12 UPDATE

Postby ashleygries » Tue Feb 14, 2012 5:07 pm

Hello all!
I've posted just a couple of times on the boards- some questions here and there, but I thought it would be finally time to post some progress! (YAY!) My husband and I decided to build a TD last summer, and have been accruing the materials/supplies/gumption to get to work on it. Last fall we finally started, and slowly but surely we have been making progress.
We are building at my family's place which is an hour away from where we live, so needless to say I can't just go out and work on it whenever the whim strikes. Plus add to that the fact that they live in a very small town, so if I forget something, the whole day is basically shot.
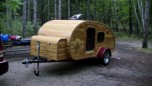
Anywho! We are building our version of Mike's Lil' Diner, slightly modified to fit our needs, but the same plan for the most part. It is also a mostly female build- yay! go me! :) And as I have minimal wood-working experience there is quite a learning curve. But it is exciting- and the push is on to get it finished as we are planning to move out of state in a month or so! :frightened: I've got my fingers crossed!

And now without further adieu- some photos!

Image
Here's my husband sanding down the rough spots on our 1x4 pine framing.


Image
It's a bit rough, but hopefully it'll do!


Image
This was my husband's attempt at routing :frightened: ... needless to say I'm in charge of all the routing from here-on-out!


Image
Here we're matching the boards up so I can cut out the spars from the profile.


Image
Our foot-well! :FNP Filled with water :o It took us FO-R-E-VER to get to this point in our build. Finding a welder that wouldn't charge us an arm and a leg and that didn't flake-out on us was so difficult! That frame was previously a pop-up camper frame that a friend donated to our build. I had to tear a bunch of it apart, then cut some of the side pieces off with a steel blade in the circular saw. (It left me thankful that no one was watching me...I think I could have easily sliced several appendages off!! :shock: ) We then had a welder move the bumper and add the foot box. Then the whole thing was sandblasted, primed and...


Image
Enter: Rustoleum. Lots of rustoleum. And lots of other weather-preventative compounds!


Image
Here it is partially painted, and getting cleaned up.


Image
Ta-Daa! The finished frame. We were so excited to get to this point... but so much left to do!
Last edited by ashleygries on Fri Mar 02, 2012 10:29 am, edited 2 times in total.
User avatar
ashleygries
Teardrop Builder
 
Posts: 41
Images: 79
Joined: Sun May 22, 2011 8:00 pm
Location: Iowa

La Ballena (The Whale) for those non-spanish-speakers...

Postby ashleygries » Tue Feb 14, 2012 5:33 pm

Some more photos:

Image
Here's the beginning of the floor- we decided to go with 1x4 pine framing and rigid insulation with 1/4" ply on both sides. We decided to go with the framed floor for the bonus of adding the insulation as we plan to use our TD year-round.


Image
We also decided to insulate the foot-well. We kind of had to, as there was a bunch of space to fill since we had the welder tack the foot-box on to the existing cross-beams which weren't exactly where we needed them. It was only off by an inch or so to the front and back, so we decided to just beef up the insulation there.


Image
This is my dad, husband, and brother moving the trailer after they had flipped it. Before we got too carried away we wanted to make sure that we coated the underside of the trailer. We ended up spraying it down with the rustoleum, then in addition we coated it with a roof-tar-like substance. It was a rubberized and not-so-sticky substance... the name eludes me at the moment, but it went on quite nicely. All five coats of it...


Image
Here it is coated with the rubberized roof coat.


Image
Flipped back over, here you can see the interior of the foot-well is all insulated, and we have the underside of the floor panel being coated in the rubberized stuff too.


Image
Here you can see the weather-stripping that separates the floor from the frame.


Image
And back to the floor- we used CPES around all the edges and in about 5" around all the openings. I think I ended up putting about 6 coats of the stuff on until it didn't soak in anymore.


Image
It was a match made in heaven! The floor fit perfectly! (The overall frame that we were given was a lot longer (around 14'), and we are only using about 11' which is why there is some hanging out in front. We plan on using this space to put a tongue box and storage- probably with a steel grate on the decking.)
User avatar
ashleygries
Teardrop Builder
 
Posts: 41
Images: 79
Joined: Sun May 22, 2011 8:00 pm
Location: Iowa

La Ballena (The Whale) for those non-spanish-speakers...

Postby ashleygries » Tue Feb 14, 2012 6:03 pm

On to the walls:

Image
We insulated with blue foam and filled in gaps with Great Stuff.


Image
A rough, but useable, wall panel! Yay! :D


Image
Here was the original door layout- we've reversed them, so they're hinge-forward per the recommendations on the boards, and I also changed my mind and decided that I wanted an arched door...


Image
Here are the original windows (can you see a theme developing here? :oops: 
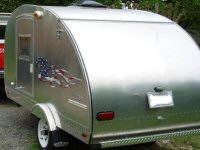
) They are 28x28 and split across the middle, so they'll slide up and down, with a screen on the bottom half. I bought these on Ebay not thinking about the space I would need around the door... and they were too big for what we originally wanted to do. Sooo... I bought more windows. (Yes the original pair is for sale!!) The second pair weren't much narrower, but they also have a nifty function that they are emergency windows, so in addition to being sliders, the whole window can hinge out from the top!! Yay!! The best of both worlds!!!


Image
Here you can see where we coated the bottom lip of the wall with the same rubberized coating as the floor and frame.


Image
The rounded-off top as mentioned earlier.

Image
Here are the doors all framed-up with blocking for the window and door handle. You can also see that I decided to build a door frame out of red oak... meaning...


Image
:duh: That I had to cut into my existing framing!! :frightened:

Image
Here you can see where all my beautiful , ahem.. framing had to be hacked out. It took forever. Titebond III works really well.


Image
Here's the new red-oak, arched framing in place with the hole for the door cut. :phew:


Image
I put a TON of glue on under this frame since it wasn't tied in as well as the last one was...I wanted to be sure this one couldn't be removed! :)
User avatar
ashleygries
Teardrop Builder
 
Posts: 41
Images: 79
Joined: Sun May 22, 2011 8:00 pm
Location: Iowa
Top

Re: La Ballena (The Whale) for those non-spanish-speakers...

Postby ashleygries » Tue Feb 14, 2012 6:15 pm

Image
I also made the cargo door frames.

Image
Here's the general layout of the small doors for the utility channel (between the galley and cabin).

Image
Of course I had to rip out framing to put that door in... :oops: We'd like to think that we're on top of things, but somehow we just forget!!!


Image
And here's an almost completed wall panel. :yay: You can see that I also added some blocking for the light that will be placed outside.
User avatar
ashleygries
Teardrop Builder
 
Posts: 41
Images: 79
Joined: Sun May 22, 2011 8:00 pm
Location: Iowa
Top

Re: La Ballena (The Whale) for those non-spanish-speakers...

Postby Martiangod » Tue Feb 14, 2012 6:27 pm

But at least your having fun.....RIGHT?

Looking good.

that well is pretty deep, should make a ton more room
If it ain't broke, fix it till it is

Chris

Deep in the Heart of Nowhere
The topper viewtopic.php?f=50&t=58140, gone to a new home to be converted
into an ice fishing shack...FREEBIE !!! for a nice young family
The trailer viewtopic.php?f=50&t=48156
User avatar
Martiangod
500 Club
 
Posts: 856
Images: 432
Joined: Mon Jan 09, 2012 10:39 pm
Location: Peace River, Alberta
Top

Re: La Ballena (The Whale) for those non-spanish-speakers...

Postby ashleygries » Tue Feb 14, 2012 6:34 pm

Yes!! I am having fun! Actually- to be honest, I will be REALLY excited to get the walls up! The only thing in my way is filling the bolt holes on the floor. I'm itching to get to work on the INSIDE! :twisted:
User avatar
ashleygries
Teardrop Builder
 
Posts: 41
Images: 79
Joined: Sun May 22, 2011 8:00 pm
Location: Iowa
Top

Re: La Ballena (The Whale) for those non-spanish-speakers...

Postby Bob Patterson » Tue Feb 14, 2012 9:23 pm

Ashley, La Ballena is looking great. When you get your walls up, it really gets you. It's so exiting to see your vision taking shape. :dancing
Keep up the good work.
All the best,
Bob (& Reggie)
____________________
Image
The Tintanic Build Thread
Image
User avatar
Bob Patterson
Donating Member
 
Posts: 72
Images: 214
Joined: Wed Jul 06, 2011 11:44 am
Location: Buchanan, Georgia
Top

Re: La Ballena (The Whale) for those non-spanish-speakers...

Postby loaderman » Wed Feb 15, 2012 4:12 pm

Nice looking shape
loaderman
The 300 Club
 
Posts: 306
Joined: Fri Jan 27, 2012 12:03 am
Top

2-23-2012 Update

Postby ashleygries » Thu Feb 23, 2012 5:36 pm

So I've made some progress since the weekend, which is pretty exciting! My goals for this weekend are to have the forward bulkhead in place, the passenger side wall, skin and insulate the doors, and get the other bench seat in. (YAY!) Makin' sawdust! :dancing:


First things first- we started work on the foot-well/box lining
Image

We decided to build the skin for the footwell as a stand-alone piece and then fit it into the camper after we knew it was all squared-up.
Image

After a little bit of sanding and coaxing it fits! We back-filled any spaces with expanding foam- although there aren't too many, it's a pretty tight fit.
Image

My husband helped me a bit this past weekend and decided he wanted to attach the bulkhead to the wall before attaching the wall to the side-frame. It ended up working pretty well as we didn't need to fanagle either piece into place or hold the side wall awkwardly while we were trying to glue and screw it in.
Image

We may (or may not) have used copious amounts of Loctite builder's-grade construction adhesive for attaching the wall to the steel frame....
Image

It's vertical!
Image

While my husband went back to work, I got started on the storage benches :)
Image

Image

Image

Thanks for looking! In the meantime, I'm working on electrical schematics :? and figuring out the air conditioner. Any advise on the later is greatly appreciated!!
-Ashley
Last edited by ashleygries on Thu Feb 23, 2012 6:57 pm, edited 1 time in total.
User avatar
ashleygries
Teardrop Builder
 
Posts: 41
Images: 79
Joined: Sun May 22, 2011 8:00 pm
Location: Iowa
Top

Re: La Ballena (The Whale) 2-23-2012 UPDate

Postby Shadow Catcher » Thu Feb 23, 2012 6:53 pm

It takes a true man to realize when he has exceeded his level of incompetence, the router thingy. You are making progress despite the proximity problem.
User avatar
Shadow Catcher
Donating Member
 
Posts: 6008
Images: 234
Joined: Sat Apr 11, 2009 8:26 pm
Location: Metamora, OH
Top

Re: La Ballena (The Whale) 2-23-2012 UPDate

Postby ashleygries » Thu Feb 23, 2012 7:01 pm

Shadow- Yes! Good progress- mostly because I've been staying at my dad's place in the spare room :D .
As for my hubcap- he is pretty good about knowing his limitations, and we both know he doesn't have a surgeon's hand- he does however have the great gift of incredible forseight; I on the other hand just want to build! build! build! (learning the hard-way and all!) :lol:
User avatar
ashleygries
Teardrop Builder
 
Posts: 41
Images: 79
Joined: Sun May 22, 2011 8:00 pm
Location: Iowa
Top

Re: La Ballena (The Whale) 2-23-2012 UPDate

Postby droid_ca » Thu Feb 23, 2012 7:54 pm

Wow this is a great build. I like the profile
There is a world, just beyond now,
where reality runs a razor thin seam between fact and possibility;

Anywhere I roam where I lay my head is home....
Image
“Fide Canem”
Please check out my build thread
viewtopic.php?f=5&t=52816
User avatar
droid_ca
Donating Member
 
Posts: 1981
Images: 176
Joined: Thu Sep 30, 2010 5:08 am
Location: Prince George BC Canada
Top

Re: La Ballena (The Whale) 2-23-2012 UPDate

Postby mikeschn » Thu Feb 23, 2012 8:12 pm

I like the dropped floor. I designed on like that many years ago...

Mike...
The quality is remembered long after the price is forgotten, so build your teardrop with the best materials...
User avatar
mikeschn
Site Admin
 
Posts: 19202
Images: 475
Joined: Tue Apr 13, 2004 11:01 am
Location: MI
Top

Re: La Ballena (The Whale) 2-23-2012 UPDate

Postby ashleygries » Thu Feb 23, 2012 10:22 pm

Droid- Thanks!

Mike- I would hope you would recognize it! We are using the Lil' Diner plans!! :worship: :D It's a great design, and it was just what we needed. Thanks! :applause:
User avatar
ashleygries
Teardrop Builder
 
Posts: 41
Images: 79
Joined: Sun May 22, 2011 8:00 pm
Location: Iowa
Top

Re: La Ballena (The Whale) 2-23-2012 UPDate

Postby gdpipkorn » Thu Mar 01, 2012 8:53 pm

Ashley, I like your thread. My wife Diane also did almost all of the building on our lil' diner. So therefore I am very interested in your progress. Keep up the good work. Mike's plan for assembly is great too! Waiting for updates from you now.
If one's life is entertaining, there is no need to go and buy entertainment.
User avatar
gdpipkorn
Gold Donating Member
 
Posts: 117
Images: 144
Joined: Mon Sep 24, 2007 8:04 am
Location: Jackson, WI
Top

Next

Return to Build Journals

Who is online

Users browsing this forum: No registered users and 14 guests