Road Foamie - done for the year

Canvas covered foamies (Thrifty Alternatives...)

Moderator: eaglesdare

Re: Road Foamie - 3/11 platform supports and front cabinets

Postby atahoekid » Wed Mar 14, 2012 12:45 am

Yeah, all that wood gets the waterproofing treatment. I haven't even put the lauan plywood face on the inside of the walls yet... :lol: :shock: 8) . I think I managed to cut down part of a rain forest by myself with all the wood that I've used so far. But with the exception of the actual trailer floor it's all inside stuff. If I had my own way (which I don't) the bed would have fit between the wheel wells and I could have done away with the platform supports and the front cabinets would be simpler (less wood) But "She who must be obeyed" said a queen size bed is the smallest bed acceptable so I had to lift the bed above the wheel wells. Way more storage under that platform than I would ever use but it is what it is.
Mel

"Believe in your abilities... Remember amateurs built the ark, professionals built the Titanic"

"Indecision may or may not be my problem" Jimmy Buffet

Image

The Road Foamie Build Thread: viewtopic.php?t=45698
User avatar
atahoekid
Platinum Donating Member
 
Posts: 1773
Images: 158
Joined: Sat Jul 24, 2010 2:49 am
Location: Incline Village, NV

Re: Road Foamie - 4/1 Update - A milestone moment

Postby atahoekid » Sun Apr 01, 2012 11:51 pm

I took this last week off, since I had a week of vacation left from last year and this was my last chance to use it or lose it. I worked about a half a day each day on the Road Foamie, a bit longer than that on Saturday. I would have liked to work on it longer than that, but I had other things that had to get done too. I hate when life gets in the way... :( :( :(

Anyway, here's where I started the week:
Image

I've got all platform supports in and the water tanks are blocked in place. I coated the wood floor with GPW's Magic Mix (4 coats), and mounted the stereo gear in the two upper/outermost compartments of the nose cabinets. It's mounted in but not yet wired in. I'm going to tackle all the electrical at once.

Image

I've now cut the sleep platform out of 1/2" ply and it is now laid on top of the supports. I haven't screwed them down yet, I'm thinking of gluing some 3/4" pink foam to the underside of it for added insulation. The mattress covers virtually the entire platform so adding more foam may be overkill but that's not a new issue for me. I'm also leaving it unfastened so that I can run any wires/hoses/pipes under the platform if I need to. You can also see the under platform storage that will be accessible when the trailer doors are opened. The two storage areas are about 50" x 50". I'm gonna have to work hard to convince my wife that we don't need to stuff it full of stuff. :cry: :worship: :cry: :( :worship:

Image

The brown paper is sitting in one of the two under platform storage compartments and you can now also see the cabinets overhead at the bulkhead. It's just the cabinet box at this point. I won't frame the cabinets or build the doors until the walls are up. I want to make sure the frames are tight against the walls. There will be a headboard right underneath the cabinet against that wall. It will also provide a little added support to that bulkhead wall and it also hides that horizontal seam in the plywood.

Image

I also put together the most important part of the whole build. I bought and assembled all the components for the jockey box. I am now officially able to carry beer on board (hence the name "Road Foamie"). It may not be 500# of beer, but I really don't need the added weight. It should last me for a week of camping. I'll even share!! I'll carry an additional keg in the bed of the truck if I think I'll be gone longer or I think there will be lots of friends to share with. I still need to build a platform for all of it and an insulated "Ice Box" for the keg but the system works just fine! :beer: :beer: :beer:

With all of the work this week, I've hit a milestone in the build. I now have every structural component in place. Everything from this point on is either systems work, interior/exterior work or finishing touches. Still a long way to go but I think I can kind of make out the finish line from here... :D :D
Mel

"Believe in your abilities... Remember amateurs built the ark, professionals built the Titanic"

"Indecision may or may not be my problem" Jimmy Buffet

Image

The Road Foamie Build Thread: viewtopic.php?t=45698
User avatar
atahoekid
Platinum Donating Member
 
Posts: 1773
Images: 158
Joined: Sat Jul 24, 2010 2:49 am
Location: Incline Village, NV

Re: Road Foamie - 4/1 Update- A Milestone moment!

Postby bonnie » Mon Apr 02, 2012 6:27 am

Well done. It must feel good to be getting things done. :D
Remember, the turtle won. :)
User avatar
bonnie
Donating Member
 
Posts: 1390
Images: 107
Joined: Sun Jul 24, 2011 4:14 pm
Location: Roxana, IL
Top

Re: Road Foamie - 4/1 Update- A Milestone moment!

Postby eaglesdare » Mon Apr 02, 2012 7:21 am

yours is coming along nicely also! :wine: :applause:
Louella
May the foam be with you.
User avatar
eaglesdare
Donating Member
 
Posts: 3168
Images: 13
Joined: Tue Aug 26, 2008 7:06 pm
Top

Re: Road Foamie - 4/1 Update- A Milestone moment!

Postby atahoekid » Sun May 06, 2012 8:50 pm

OOPS double post
Last edited by atahoekid on Sun May 06, 2012 9:20 pm, edited 1 time in total.
Mel

"Believe in your abilities... Remember amateurs built the ark, professionals built the Titanic"

"Indecision may or may not be my problem" Jimmy Buffet

Image

The Road Foamie Build Thread: viewtopic.php?t=45698
User avatar
atahoekid
Platinum Donating Member
 
Posts: 1773
Images: 158
Joined: Sat Jul 24, 2010 2:49 am
Location: Incline Village, NV
Top

Re: Road Foamie -May 6 update

Postby atahoekid » Sun May 06, 2012 9:18 pm

After being tied up for three weekends, I finally got some time to do some trailer building. No pics for right now, I forgot to take them while I had the trailer out of the garage and it's too cramped to take pictures inside the garage. I'll try to get them next weekend. :pictures: :pictures: I glued on the inner lauan skin to the left side wall and GULP!!! :frightened: :frightened: cut the door out and the window out. The cutting went fine :worship: :worship: Thank God!! I also found out the lauan was not totally stuck to the foam. I clamped the wall between two sheets of 3/4" plywood and I thought that would provide enough clamping pressure, but I guess not. :thinking: :thinking: :? :? So I had to squirt some glue between the foam and the lauan and reclamp the pieces together. Not a major problem, but I think it takes away some of the strength I wanted to gain with the whole composite panel thing. I'll do the other wall differently to see if I can get a better bond.

The mahogany lauan looks good against the maple plywood I used for the cabinets. I'll paint the face frames of the cabinets black and that should look good together. So a productive weekend but progress was slow. It took some time to draw the outline and the curves I wanted to cut. Detail work takes time, but I like how it turned out 8) 8)
Mel

"Believe in your abilities... Remember amateurs built the ark, professionals built the Titanic"

"Indecision may or may not be my problem" Jimmy Buffet

Image

The Road Foamie Build Thread: viewtopic.php?t=45698
User avatar
atahoekid
Platinum Donating Member
 
Posts: 1773
Images: 158
Joined: Sat Jul 24, 2010 2:49 am
Location: Incline Village, NV
Top

Re: Road Foamie - Doors and Walls May 22, 2012

Postby atahoekid » Tue May 22, 2012 11:24 am

As I said in the previous post, the door cut when fine. But I created a problem later on. I decided that I should trim down the door so it would fit better in the opening. Got carried away and the door is now too small. :x :x :x I was a bit worried about the strength of the door and having enough bite for the door handle and hinges so I decided to build doors from scratch. I may now have gotten carried away.

Here are the 4 parts for the doors:
Image
From left to right, 1/2" plywood panel, 3/4" exterior foam skin, 3/4" plywood panel, 5mm luaun interior skin

Here's a close up of the door latch
Image
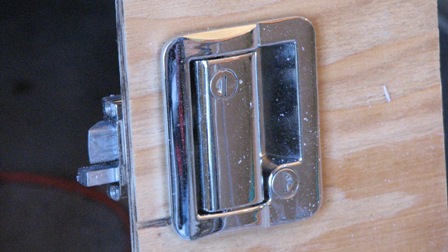
It's a pretty hefty lock. I needed 1 1/4" thickness to set the latch into that's why 2 different thicknesses of ply. D'ya like the little flecks of pink foam?

Here's glue up number one:
Image
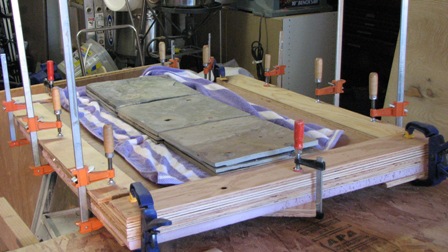
Here's the glue up. That's almost all of the clamps I own.

Here's glue up number two:
Image
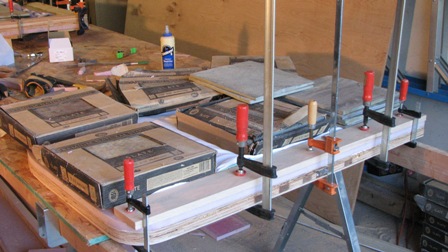
Here's the rest of the clamps I own. The rest is held down by boxes of slate tile, which is a painful reminder of the next home improvement project on the list. So far this spring, "She who must be obeyed" is tolerant of my work on the Road Foamie. She wants to go camping. She had grand hopes of taking it to Yosemite this spring but I tell her "A one man army can only work so fast" :R :R

Here are the doors "complete":
Image
The edges of the foam will need to be rounded off and the entire door shaved down to allow for clearance when opening and closing the door but I will work very slowly this time. I do not want to make up another set of doors!! :NC :NC

Here's the hard point for the door hinges:
Image
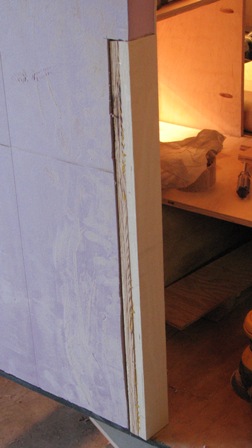
It's only jammed in place for right now, but I will epoxy it in place shortly and it will receive two layers of fiberglass for reinforcement. That door is pretty heavy and I don't want it to rip the hard points out. The hard points are two pieces of 3/4" ply glued together.

Here's the hard point for the door latch:
Image
This too is just stuck in place for now and will receive the same treatment as the hinge side hard point

Here's the hard points in place in the door opening:
Image
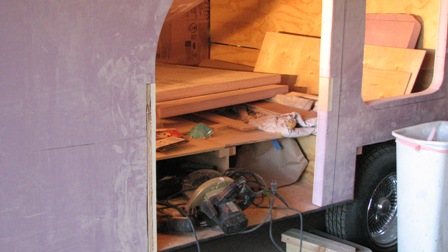
You can also see the opening for the window that's been cut out. It's beginning to look like a TD...

Now it's time to put in the hard points for side marker lights, reflectors and porch lights, which I probably should have done prior to putting on the interior lauan but it shouldn't be too hard to run the wiring. :worship: :worship: :worship: Does this sound like famous last words to anyone???
Then it's onto the other side.

This door and wall stuff is taking a whole lot longer than I anticipated, but I'm satisfied with the way it's coming together
Mel

"Believe in your abilities... Remember amateurs built the ark, professionals built the Titanic"

"Indecision may or may not be my problem" Jimmy Buffet

Image

The Road Foamie Build Thread: viewtopic.php?t=45698
User avatar
atahoekid
Platinum Donating Member
 
Posts: 1773
Images: 158
Joined: Sat Jul 24, 2010 2:49 am
Location: Incline Village, NV
Top

Re: Road Foamie - Door and wall update with pics!!

Postby GPW » Tue May 22, 2012 12:05 pm

Mel, you sure are making Great progress ...!!! :thumbsup: 8) :beer:
There’s no place like Foam !
User avatar
GPW
Gold Donating Member
 
Posts: 14920
Images: 546
Joined: Thu Feb 09, 2006 7:58 pm
Location: New Orleans
Top

Re: Road Foamie - Door and wall update with pics!!

Postby bonnie » Tue May 22, 2012 12:07 pm

I like it! :thumbsup:
Remember, the turtle won. :)
User avatar
bonnie
Donating Member
 
Posts: 1390
Images: 107
Joined: Sun Jul 24, 2011 4:14 pm
Location: Roxana, IL
Top

Re: Road Foamie - Door and wall update with pics!!

Postby eaglesdare » Tue May 22, 2012 2:15 pm

bonnie wrote:I like it! :thumbsup:


:wine:
Louella
May the foam be with you.
User avatar
eaglesdare
Donating Member
 
Posts: 3168
Images: 13
Joined: Tue Aug 26, 2008 7:06 pm
Top

Re: Road Foamie - Door and wall update with pics!!

Postby atahoekid » Tue May 22, 2012 3:00 pm

Thanks guys! It sure seems like it took forever to get past the door issue but I'm glad to be moving forward. I thought I had it planned out perfectly (which I did) but I screwed up the execution. :? :? Funny! the new doors are heavier than the rest of the side wall... :oops: :oops: If I had to do it again, which I hope I won't, I think I'd bury the hardpoints in foam by making a sandwich of 2 - 1" pieces of foam with the 1 1/4" thick hardpoints for the locks epoxied into and between the foam sheets. :thinking: :thinking: Makes for a much lighter door and should still be strong enough to handle that lock! The more I think about it, the more the perfectionist in me thinks I should remake the door... I think I need an intervention! :NC :NC
Mel

"Believe in your abilities... Remember amateurs built the ark, professionals built the Titanic"

"Indecision may or may not be my problem" Jimmy Buffet

Image

The Road Foamie Build Thread: viewtopic.php?t=45698
User avatar
atahoekid
Platinum Donating Member
 
Posts: 1773
Images: 158
Joined: Sat Jul 24, 2010 2:49 am
Location: Incline Village, NV
Top

Re: Road Foamie - Door and wall update with pics!!

Postby Papi » Wed May 23, 2012 7:27 am

atahoekid wrote:The more I think about it, the more the perfectionist in me thinks I should remake the door... I think I need an intervention! :NC :NC
There comes a time when we have to say "done!" and move along. I know exactly how you feel about the perfectionist side coming out, but if we make everything perfect, we'll be 80 by the time we finish the project! Looking good already. :applause:
I dream of a day when a chicken can cross the road without having his motives questioned.
User avatar
Papi
Teardrop Master
 
Posts: 177
Images: 50
Joined: Thu Jul 29, 2010 9:07 am
Location: North GA
Top

Re: Road Foamie - Door and wall update with pics!!

Postby Wobbly Wheels » Wed May 23, 2012 9:33 am

Looking good Mel. :thumbsup:
I was a little surprised by how fast the build started to go when I stopped trying to build it perfect and just build it. I figured out a spot where the geometry was tricky by gluing in a bunch of foam and cutting away til it looked right rather than trying to visualize what the panel shapes needed to be beforehand.

Just an FYI, you might want to round the outer corners on the wood before you glue them in. I forgot to do that on my hinge blocks when I did the door. In doing it afterwards, I had to be careful so it didn't trash the foam.
User avatar
Wobbly Wheels
Donating Member
 
Posts: 1080
Joined: Tue Mar 15, 2011 9:51 am
Top

Re: Road Foamie - Door and wall update with pics!!

Postby atahoekid » Fri May 25, 2012 12:18 am

Papi, That's a good point. I just keep trying to take deep breaths and tell myself to move on. It's working. I think??? :roll: :roll:

WW, I wish I had thought of that. I've already glued the blocks in, so I guess caution is my only option
Mel

"Believe in your abilities... Remember amateurs built the ark, professionals built the Titanic"

"Indecision may or may not be my problem" Jimmy Buffet

Image

The Road Foamie Build Thread: viewtopic.php?t=45698
User avatar
atahoekid
Platinum Donating Member
 
Posts: 1773
Images: 158
Joined: Sat Jul 24, 2010 2:49 am
Location: Incline Village, NV
Top

Re: Road Foamie - Door and wall update with pics!!

Postby bonnie » Fri May 25, 2012 6:05 am

Mel, just keep telling yourself, it will work. I laughed when I read your post about clamps. You have me beat. :) My door is also heavier than the wall, but the wall will get some bracing and such, so it might even out. The hard part for me is to not rush. I want it done, so badly. $$$, or the lack thereof, helps keep me on track and working in a steady fashion. Having to take time between steps helps too. I am spending a lot of time thinking about the various options and methods.

I like things to look great when finished, which means some amount of 'perfectionist' when in the cutting and assembly mode, but I've also learned (as a quilter) that some errors and imperfections will never be noticed by the average person and those who would notice will be kind enough not to say anything. ;)

Now, you and WW have started me thinking about fiberglassing my trailer. I don't know if I'm willing to go to the expense (both time and $$$) to learn that skill. It certainly makes for a beautiful finish. And it would certainly add strength to the overall structure. Still thinking and researching. I'm actually thinking about the Foam Coat for the windows and door frame.

Anyhow, keep up the great work. I'm enjoying watching your progress. :thumbsup:
Remember, the turtle won. :)
User avatar
bonnie
Donating Member
 
Posts: 1390
Images: 107
Joined: Sun Jul 24, 2011 4:14 pm
Location: Roxana, IL
Top

PreviousNext

Return to Foamies

Who is online

Users browsing this forum: No registered users and 11 guests