Critique my chassis

Anything to do with mechanical, construction etc

Critique my chassis

Postby StanDahl » Mon Apr 09, 2012 12:03 pm

Working closely with the generous support of eamarquardt, I've come up with this chassis design. Since my design is non-traditional, I think it requires a somewhat non-traditional frame. At points marked "A", there is a half-lap joint, at points marked "B", there is a chunk cut out and a bend in the frame piece with a crosspiece inserted. This design seems strong and doesn't have the dropped V leading to the hitch, which leaves a big part of the floor unsupported. A real-life specimen is here: http://www.tnttt.com/gallery/image_page.php?album_id=1588&image_id=34299

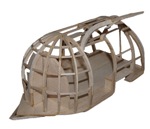
I'm not satisfied with the back end yet. The "B" points may be too radical a bend, but Gus keeps spanking me for putting butt joints there. There are still some unsupported parts, could angle iron be put in place there and nipped and bent to conform to the curve? I think that would keep the weight down. I'm thinking that the floor will be two sheets of 1/4" plywood with 1/2" of styrofoam in between with plywood or pine sandwiched in the edges so the foam isn't exposed on the outside. The whole thing will be wrapped in aluminum, with 1/8" baltic birch under that.

Picture 7mod.jpg
Picture 7mod.jpg (62.39 KiB) Viewed 519 times


Here's a side view. I'm still learning to use SketchUp, and making it show the actual bends and laps is way more labor intensive than its worth.

Picture 1.png
Picture 1.png (102.59 KiB) Viewed 519 times


Whaddaya think?
John
User avatar
StanDahl
Teardrop Advisor
 
Posts: 69
Joined: Sun Nov 20, 2011 5:41 pm
Location: So. Cal.

Re: Critique my chassis

Postby parnold » Mon Apr 09, 2012 12:42 pm

It's a very pretty blue! :D

I'm no engineer, but it looks more than sufficient to me!

I give it :thumbsup: :thumbsup:
User avatar
parnold
Donating Member
 
Posts: 2344
Images: 302
Joined: Mon Feb 08, 2010 4:49 pm
Location: Northwest New Jersey

Re: Critique my chassis

Postby halfdome, Danny » Mon Apr 09, 2012 12:57 pm

Pretty nice looking lay out :thumbsup: .

At your "B" points I'd go with mitered butt joints, welded all around, ground flush to accept a sistered/welded gusset on the underside to give additional strength.
Any way that's how I do my chassis.
I also weld a 3/16" plate across where both side pieces meet the draw bar, top and bottom, after initial welding, as mentioned above.
Just my opinion. ;)
:D Danny
ImageImage
"Conditions are never just right. People who delay action until all factors are favorable do nothing". William Feather
Don't accept "It's Good Enough" build to the best of your abilities.
Image
Teardroppers Of Oregon & WashingtonImage
User avatar
halfdome, Danny
*Happy Camper
 
Posts: 5894
Images: 252
Joined: Sun Aug 14, 2005 11:02 pm
Location: Washington , Pew-al-up
Top

Re: Critique my chassis

Postby angib » Mon Apr 09, 2012 1:06 pm

Yeah, those front B points are critical and making a good joint between the A-frame and the main rails is all that matters - the cross member is secondary. So get the long joints fitting right and 100% welded before trying to fit the cross-member in.

At the back I'd leave out the last cross-member altogether as it isn't doing anything that the two angled cross-members (the 'rear A-frame', so to speak) can't do. I presume you want a rear receiver - if not, I'd drop the rear centreline piece too.
User avatar
angib
5000 Club
5000 Club
 
Posts: 5783
Images: 231
Joined: Fri Apr 30, 2004 2:04 pm
Location: (Olde) England
Top

Re: Critique my chassis

Postby KCStudly » Mon Apr 09, 2012 3:28 pm

+1 what Angib and Danny said.

As far as pie cutting and welding angle to form the rear curve, you would be better off following Angib’s suggestion to eliminate extra steel, and then reduce the ply thickness on your floor (maybe use 1/8 inch or 5mm, at least on the bottom), but go thicker on the foam and wooden sub frame. The further apart you put the stressed skin panels the more rigid the floor and the more capable it will be to suitably cantilever out past the steel without additional support. The amount of cantilever that you are depicting appears to be modest. At the front it is probably not as big an issue because you will not likely have big point loads right at the edge, but in the back where it is easily conceivable that you could be dragging a fully loaded cooler off the edge, stepping up or sitting on the edge it would be more important (assuming that your rounded rear opens like a traditional hatch).

If it were me, I would go at least 1 inch thk on the foam core, if not 1-1/2 (in fact, I will be using 1-1/2 thk foam with 5 mm ply top and bottom, and I have no cantilever to my floor at all, but am using relatively light angle intermediate xmbrs in my frame and don't want any sag under my 240+ lb. butt). Perhaps others can advise on the amount of cantilever vs. stressed panel height that has worked in the past.
KC
My Build: The Poet Creek Express Hybrid Foamie

Poet Creek Or Bust
Engineering the TLAR way - "That Looks About Right"
TnTTT ORIGINAL 200A LANTERN CLUB = "The 200A Gang"
Green Lantern Corpsmen
User avatar
KCStudly
Donating Member
 
Posts: 9640
Images: 8169
Joined: Mon Feb 06, 2012 10:18 pm
Location: Southeastern CT, USA
Top

Re: Critique my chassis

Postby StanDahl » Mon Apr 09, 2012 4:22 pm

Okay, how's this?

Picture 2 sm.png
Picture 2 sm.png (80.66 KiB) Viewed 477 times


I like the idea of trimming that last crosspiece, it seemed like there was just too much in there somewhere, but I couldn't put my finger on where. I will keep the centerpiece in the rear, it would be nice to be able to put a bike rack in there.

I would like to support the floor edges better, especially on the galley section where there could be some force (mis)applied at some point. As for 1/8" ply on the bottom, I know it's done, but it just seems sooo thin. It would have thicker wood on the edges, and I suppose over the chassis bars, so... maybe I should just trust you guys and go with it. :thinking:
John
User avatar
StanDahl
Teardrop Advisor
 
Posts: 69
Joined: Sun Nov 20, 2011 5:41 pm
Location: So. Cal.
Top

Critique my chassis

Postby Fishingtomatoseed » Mon Apr 09, 2012 4:55 pm

If you are worried about the outer radius. You take your radius measurement to a metal shop and have them bend a pice of angle or square tubing to fit. Just another option. But like everyone else it will work the way it is.
User avatar
Fishingtomatoseed
Donating Member
 
Posts: 261
Images: 9
Joined: Sun Aug 21, 2011 4:47 pm
Location: North Texas
Top

Re: Critique my chassis

Postby linuxmanxxx » Tue Apr 10, 2012 10:13 am

I build my floors with 3/4" foam 1x2 and 12" and 18" alternating centers and cross members matching my trailer right around 18" as well and I can walk on the 3/4" with very little deflection so anything over this is overkill and not needed. I use HD 5mm underlayment on both sides of the floor and its all glued solid with 3M 30NF water based contact cement and just a squirt of tightbond3 where wood meets wood after the 30NF is sprayed on and after all walls are up its strong as a tank pretty much. I go with the 1x2 flipped vertical for the roof to prevent sag and it works perfectly just double the 3/4" foam there. If you use the torsion box sandwich methods with the correct adhesives, you can build light and very strong and waterproof qualities built into the glue you use. I have hung wall out past the end of the trailer 6" so what you are laying out in the last would work perfectly and provide plenty strength to support your structure.
User avatar
linuxmanxxx
500 Club
 
Posts: 802
Images: 10
Joined: Fri Sep 10, 2010 1:50 am
Location: Abilene TX
Top

Re: Critique my chassis

Postby KCStudly » Tue Apr 10, 2012 5:20 pm

With double 1/2 inch in your floor, Linux, you probably didn't need the wooden sub frame and foam at all. I had suggested a thinner membrane, and was therefore thinking that more separation than the 1/2 inch that Stan (the OP) had proposed would be better, especially with a cantilever situation. Surely you did not use 1/2 inch ply in your roof?

More than one way to, er, well I like cats, so let's just say there are lots of correct ways to do a thing. Thinner skin with more separation equals light weight with high strength (but less puncture resistance). Thicker skin with less separation equals same strength but more weight with higher point load and/or puncture resistance.

I think we can all at least agree on that. :thumbsup:

The 1-1/2 inch thick foam I intend to use in my floor is not only for strength, but for insulation and acoustic value, too. May be over kill for those purposes as well, but that's how I have decided to do it.

Nice to have so many here doing so many different things that we can pick and choose which is the best for our own. :D
KC
My Build: The Poet Creek Express Hybrid Foamie

Poet Creek Or Bust
Engineering the TLAR way - "That Looks About Right"
TnTTT ORIGINAL 200A LANTERN CLUB = "The 200A Gang"
Green Lantern Corpsmen
User avatar
KCStudly
Donating Member
 
Posts: 9640
Images: 8169
Joined: Mon Feb 06, 2012 10:18 pm
Location: Southeastern CT, USA
Top

Re: Critique my chassis

Postby linuxmanxxx » Wed Apr 11, 2012 12:28 am

I use just simple 5mm underlayment (luan) on top and bottom with 3/4" foam inbetween that matches the thickness of the 1 x 2 runners laid flat. In the roof I just simply turn the 1 x 2s vertical and use double cuts of the 3/4" foam. There isn't any 2" foam available in Texas plus that would just take up too much cabin space loss to the thickness of the floors and walls. I can walk on the roof of my camper after completed and walk on the floor nonstop finishing the interior until I close the roof in so believe me when I say 3/4" is plenty strong enough in a torsion build. The wall thickness runs right at 1 1/8" overall but my last build I went with 1/8" panelling inside so it's a shade thinner than the 5mm luan and no finishing required just throw in trim. It's white oak and was pretty cheap and even more weight loss in the build. Got it at mccoys and almost all their panelling was 1/8" type so lots of choices there.
User avatar
linuxmanxxx
500 Club
 
Posts: 802
Images: 10
Joined: Fri Sep 10, 2010 1:50 am
Location: Abilene TX
Top


Return to Teardrop Construction Tips & Techniques

Who is online

Users browsing this forum: No registered users and 0 guests