No problems created, just some extra pen lines while doing my layout.

So, we now have a profile!
After fitting the hatch for the pull out kitchen, and locating the window opening, centered over the bed, and making sure there was wood everywhere I would need to screw into from inside, I started cutting away excess which will get insulation. So now we have a cookie cutter wall!
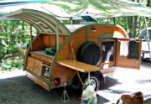
I don't know who that old guy is holding up the wall.

The door cutout will be cut flush to the floor eventually, but for the sake of holding everything together, I left about three inches down there. I still have a little more I can cut away around the window area too. I planned it out that the interior paneling joints will fall in different locations from the plywood joints, so once the inside walls are on, it should be very solid, and of course get even stronger with the addition of the outside walls. I've decided on birch paneling for the interior walls. It's really expensive, but the stuff in really beautiful. I just can't see using cheap paneling.
Hopefully tomorrow I will get wall number two done, and the canopy put up to keep everything dry.
I picked up an old lantern that I want to convert to LED's. It was painted an ugly gold color, so I sandblasted it today. There was some red paint under the gold in some areas. I'm open for suggestions on how to finish it! I was thinking of forcing it to rust a little, and then clear coat it to stop the rust. I also thought about one of those "hammered" spray paints... So here's the before and after pic.. and suggestions please!