The Poet Creek Express - Foamie Hybrid

Canvas covered foamies (Thrifty Alternatives...)

Moderator: eaglesdare

Re: The Poet Creek Express - Laminating Success!!!

Postby KCStudly » Tue May 22, 2012 4:46 pm

Yup, it's very nice wood. It’s kind of a pink salmon color with grain similar to luaun or Philippine mahogany, only tighter. Doesn’t have that pitted look that shaved ply has. It does want to fray or tear a bit and my first couple of miters here at work on the DeWalt miter saw were not plumb due to no in/out feed and crappy saw horses that don't match the height of the saw cart; abort. I will take the wood up to Karl's and use Ben's professional grade miter saw that is all set up with laminate in/out feeds. Saw runs "like buttah" on glass like roller bearings. Sharp blade should cure the fraying, too.

Now the bad news; if you want to call it that. The most suitable boards he had were 6-1/4 and 6-3/4 wide. He cut me 4 lengths at about 6-1/2 ft from these two boards (gave me a little chunk of trimmed off cracked section for free, too). Not sure what he charged for cutting, but with tax it was $82; so $20.50/rib with some waste. I did rip them to 5-1/2 wide first, so I have the strips to use as ledgers or drawer glides, whatever. Not too bad I guess, and I am happy to try and maintain a higher standard on materials...if I can keep up with it until the end and do justice to the wood with my craftsmanship (or lack there of...not much cabinetry experience I tell you again). It would be a shame to spend a ton on good material only to butcher it up. :thumbdown: :frightened: :worship:

No, this is the time to stop, regroup, and fine tune my technique before proceeding. Pic's later when I get home, then pic's of Ben's saw tomorrow (if the crick don't rise). :thumbsup:
Last edited by KCStudly on Wed Dec 26, 2012 9:06 pm, edited 1 time in total.
KC
My Build: The Poet Creek Express Hybrid Foamie

Poet Creek Or Bust
Engineering the TLAR way - "That Looks About Right"
TnTTT ORIGINAL 200A LANTERN CLUB = "The 200A Gang"
Green Lantern Corpsmen
User avatar
KCStudly
Donating Member
 
Posts: 9617
Images: 8169
Joined: Mon Feb 06, 2012 10:18 pm
Location: Southeastern CT, USA

Re: The Poet Creek Express - Laminating Success!!!

Postby KCStudly » Tue May 22, 2012 10:05 pm

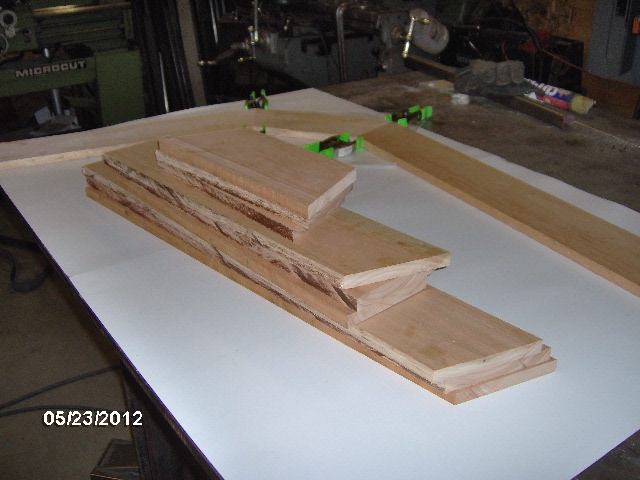
Okay, here are some Red Grandis boards.
Image
Image
Image

They have one side that is very nice, smooth with very straight grain and only a hint of some swirls, but no knots or voids. On the other face they are also smooth and have just a few very small knots and/or voids, each less than half of my pinkie fingernail. If any of it actually finds it's way into the finished ribs once the waste is trimmed away I'm going to call that "character".

The boards have semi-rough sawn edges and are random widths; one at 6-1/4 and the other at 6-3/4, and the ends are not square; about 1/8 to 3/16 out over their width.

First thing was I wanted to rip them to an even width for the mitered blanks and reclaim some of the extra that would otherwise become waste. So I set up to rip to 1 x 6 (3/4 x 5-1/2 actual).
Image

They pushed pretty hard and I had a little burning on the first one, but I am thinking this is the feather board setup and fat splitter on a questionably sharp saw blade and table that probably hasn't been waxed in 15 years. Ripped a lot straighter than the horrible DF studs that I got from the Ho-De-Po.
Image

Obligatory pink saw dust pic.
Image

Not happy with this miter joint.
Image

The cuts are not plumb and I think I can do better on the fraying (tear out).
Image

Rather than load this in my SUV and let them sit flat all night and day tomorrow in who knows what weather conditions (Samuel Clemens, who lived in Hartford, CT once said, "If you don't like the weather in New England, just wait a few minutes"), so I decided to just stand them up in the wood shop at work and take them with me tomorrow after work directly to Fab Mecca. So a note claiming them as my personal property and "do not use" (as per standard practice) was pinned on with a thumb tack thru the end grain, and they were roped off with some caution tape.
Image

Ben's saw, that I mentioned earlier, is a very nice set up that Karl has let him store in the 2nd floor of the shop. Ben had a start-up fine furniture business that specialized in built up laminate contemporary designs. It didn't work out for him, so he made a deal with Karl to store some of his equipment while he persued other opportunities. Lucky me!
KC
My Build: The Poet Creek Express Hybrid Foamie

Poet Creek Or Bust
Engineering the TLAR way - "That Looks About Right"
TnTTT ORIGINAL 200A LANTERN CLUB = "The 200A Gang"
Green Lantern Corpsmen
User avatar
KCStudly
Donating Member
 
Posts: 9617
Images: 8169
Joined: Mon Feb 06, 2012 10:18 pm
Location: Southeastern CT, USA

Re: The Poet Creek Express - Laminating Success!!!

Postby GPW » Wed May 23, 2012 5:26 am

KC , trick I use for cutting is to score the cut first with a utility knife ... helps with the fraying ...
It sure is pretty wood eh !!! :thumbsup:
There’s no place like Foam !
User avatar
GPW
Gold Donating Member
 
Posts: 14912
Images: 546
Joined: Thu Feb 09, 2006 7:58 pm
Location: New Orleans
Top

Re: The Poet Creek Express - Laminating Success!!!

Postby KCStudly » Wed May 23, 2012 3:19 pm

GPW wrote:KC , trick I use for cutting is to score the cut first with a utility knife ... helps with the fraying ...
It sure is pretty wood eh !!! :thumbsup:


Thanks for the reminder on that little trick. Amazing how many good tips and tricks get forgotten through lack of practice.

Yes, I am very happy with the wood so far.

Did I mention that I ordered the marine ply on Tuesday (Monday being Victoria Day in Canada)?

They said it would ship today and probably be 3 business days, so with our holiday on Monday... :NC sure am glad that I'm not in a hurry. Lesson learned, sourcing material is job #1.

Still making progress though. I'm going to spend a little time this evening doing layouts for the tongue box components and maybe the hatch lower spar and sill board. Seems like I'm starting at the end, but these are the items that did not get included in the Rover Mike list.

Here's an annotated screen shot of the side profile where the hatch meets the floor (turned the side walls off so that you can see the relationship better).
Image

The lower spar headers off the ribs and extends out flush to the outside faces of the walls, sort of a long flat muffin shape with radius corners matching the foam, let me see if I can pull an image...
Image

The angled board at the bottom of the hatch will be a tricky piece to cut because this is where everything transitions; the hatch main profile radius, the wall to roof/hatch edge radius, and the vertical seal face at the back edge of the floor. I'll probably get the hatch built up with all of the wood but no foam and fit this piece in place with the hatch wood structure all hinged in place on the cabin temporarily.
KC
My Build: The Poet Creek Express Hybrid Foamie

Poet Creek Or Bust
Engineering the TLAR way - "That Looks About Right"
TnTTT ORIGINAL 200A LANTERN CLUB = "The 200A Gang"
Green Lantern Corpsmen
User avatar
KCStudly
Donating Member
 
Posts: 9617
Images: 8169
Joined: Mon Feb 06, 2012 10:18 pm
Location: Southeastern CT, USA
Top

Re: The Poet Creek Express - Mite-E-Er Hatch Ribs

Postby KCStudly » Thu May 24, 2012 12:22 am

Hatch rib mitered blanks take 2.

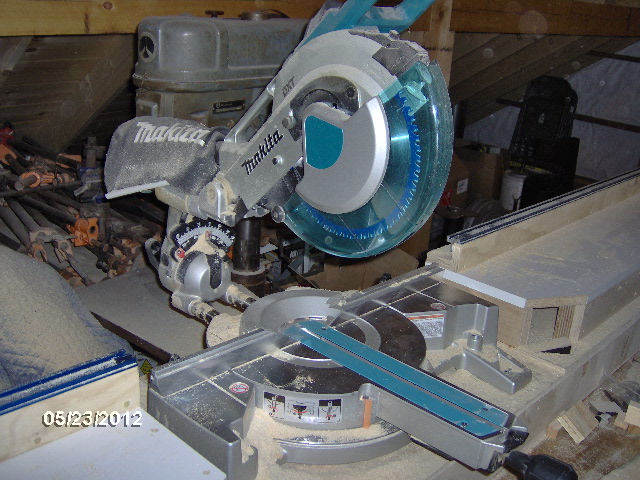
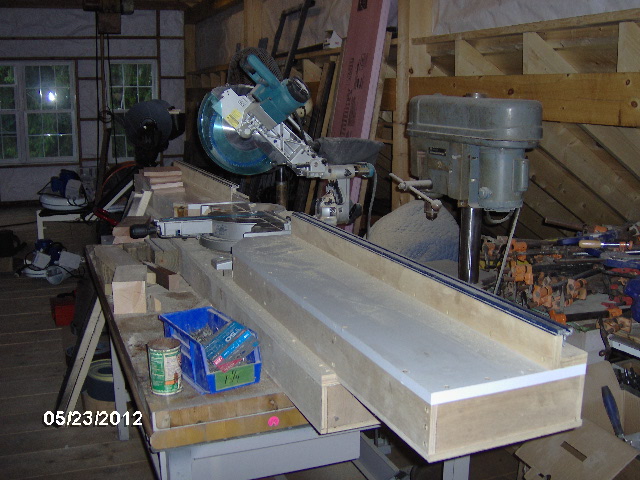
Here's Ben's miter saw.
Image
Image

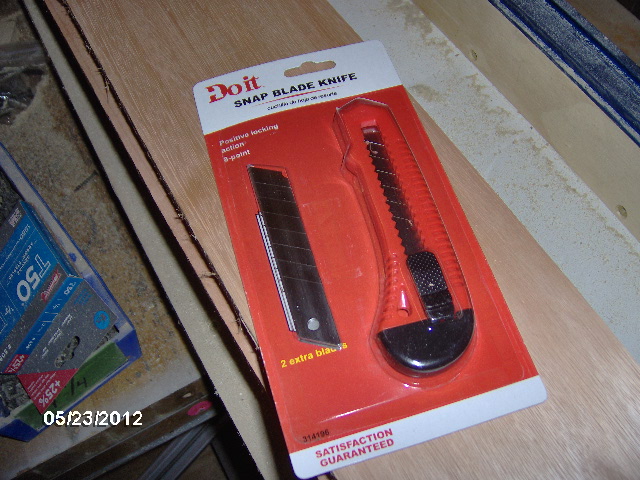
Thanks to GPW for reminding me of the technique of scoring your cut lines to prevent tear out (or fraying). I forgot to take my utility knife from my tool bag at work, which ended up working out for the better. On my way to Fab Mecca there's a small mom & pop Tru-Value in good olde Bozrah, CT that unlocked the door for me when I showed up at closing time. Picked the heavier snap off type cheap ($3) utility knife thinking that it would be good to be able to extend the blade out so that I could transfer from my master (first cut piece).
Image

It took a little fiddling to figure out how to adjust the miter setting on the saw (not intuitive) and it turned out that it was not screwed down to the fence table, so every time I adjusted the angle the saw would move relative to the in/out table. Figured that out early and screwed the saw down to the table mostly square. The rubber feet on the saw made it so that I couldn't really sock it down, cuz the saw bed would then sink below the in/out table, but I found a happy medium that would let me adjust the miter w/o moving the fence too much. Enough to get acceptable accuracy. Have no idea how Ben did it, and Karl was in transit to Maryland to get the Zamboni heat exchanger galvanized, so no input there.

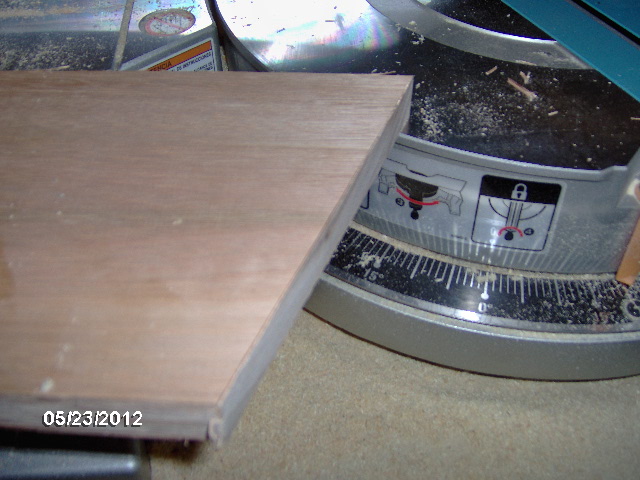
Anyway, with my best attention to detail, the bottom line is that the miters came out as good as I could hope with nice crisp lines. The utility knife worked as good as the operator (with a few errant scratches) and the extra extension of the snap off style blade made it possible to transfer from my original blank cuts with minimal measuring and maximum accuracy. Once I was paying attention, all of the errant utility blade wanderings were within the width of the saw blade and got removed in the cut. As silly as it sounds, it almost made sense to scribe both sides of the saw kerf, because I would be using the complement of each cut. Didn't resort to that, but the thought did seriously cross my mind. Even though the inside edge and outside corner of the miter joints would be waste, I found that if I also scored the edge of the board the tear out was less.

Here's the result, a much cleaner miter cut.
Image

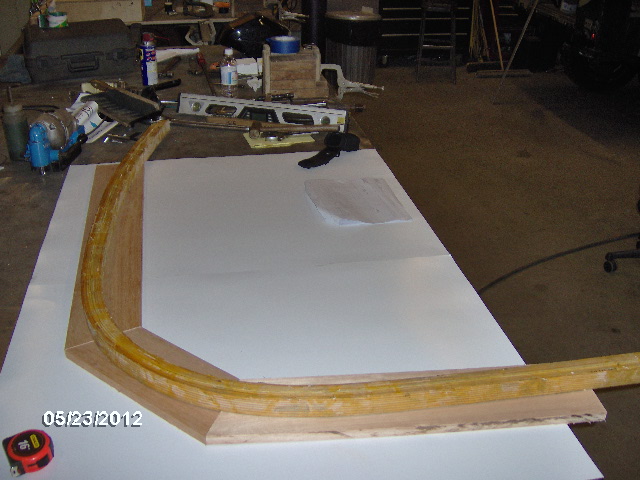
I laid out the miter pieces to do a "dumb idiot check" against the laminated wall edging, and it looked like a go.
Image

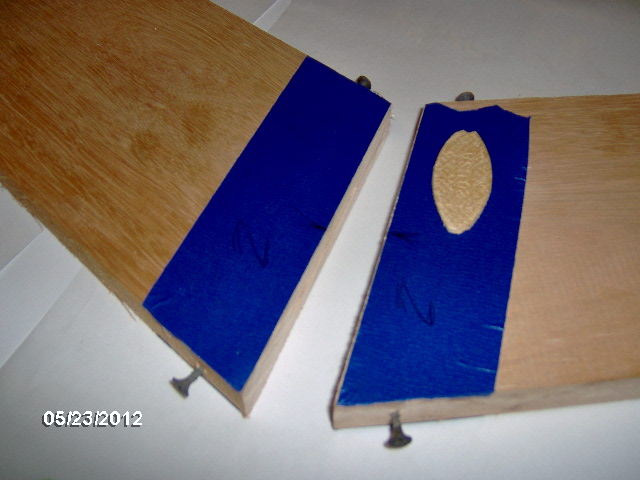
Here's the dry fit up. It is important to get the biscuit centered and seated correctly, otherwise it can cock and hold the joint open. I put the painters tape along the joint on both sides to help prevent excess glue from spoiling the finish. It "seamed" to work...(pun). Also I pre-drilled and screwed drywall screws into the edges proud in order to give the spring clamps something to grab in order to clamp the joint together. Worked good w/o pulling the blank out of flat.
Image

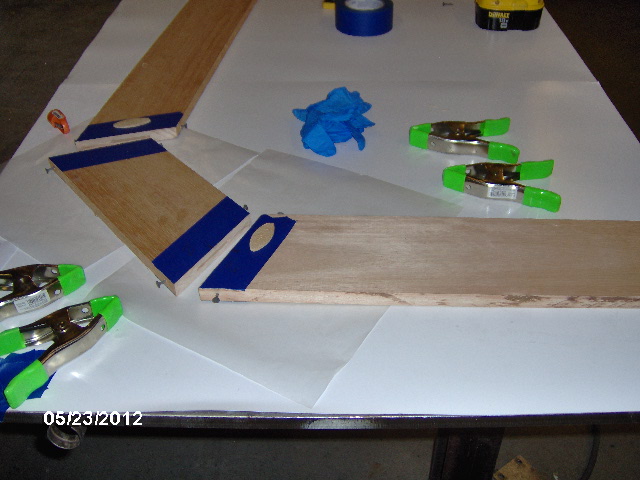
Note that I have lined the steel table with poster board (to prevent marring or discoloring the wood) and have placed waxed paper under the joints as a slip to the poster board.
Image

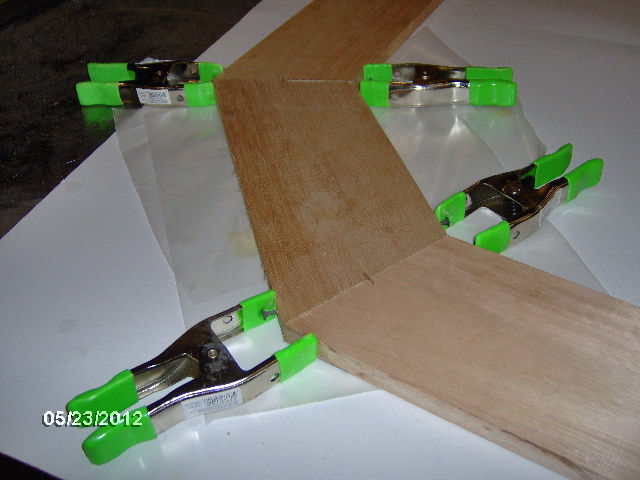
Here it is after glue up, clamping, and clean up of excess glue with a damp rage.
Image

Here are the remaining blanks that need to be glued up.
Image

I will likely make a template from the poster board to layout the rough cut on my small Shop Smith vertical band saw. Use that to mark the saw cut, cut outside the line, then belt sand to the line (not sure if this is less work than the laminate technique, after all).

I briefly thought about offsetting the mitered biscuit joints between ribs so as not to have all of the glued joints in the same "hinge" line. It would really suck to have the biscuit joints all fail right around the same line. Offsettting the biscuit joints from rib to rib would add inherent strength, but at this point I was really starting to feel the pressure to make progress and not insist on perfection.

It's all relative!

Nodding off now so forgive any missed editing.
Last edited by KCStudly on Wed Dec 26, 2012 9:23 pm, edited 2 times in total.
KC
My Build: The Poet Creek Express Hybrid Foamie

Poet Creek Or Bust
Engineering the TLAR way - "That Looks About Right"
TnTTT ORIGINAL 200A LANTERN CLUB = "The 200A Gang"
Green Lantern Corpsmen
User avatar
KCStudly
Donating Member
 
Posts: 9617
Images: 8169
Joined: Mon Feb 06, 2012 10:18 pm
Location: Southeastern CT, USA
Top

Re: The Poet Creek Express - Mite-E-Er Hatch Ribs

Postby GPW » Thu May 24, 2012 5:30 am

Really liking your edge clamping with the screws ...ingenious !!!! :thumbsup: 8)
There’s no place like Foam !
User avatar
GPW
Gold Donating Member
 
Posts: 14912
Images: 546
Joined: Thu Feb 09, 2006 7:58 pm
Location: New Orleans
Top

Re: The Poet Creek Express - Mite-E-Er Hatch Ribs

Postby bonnie » Thu May 24, 2012 6:17 am

That is coming along. Pretty wood, too. The clamping screws are genius! :)
Remember, the turtle won. :)
User avatar
bonnie
Donating Member
 
Posts: 1390
Images: 107
Joined: Sun Jul 24, 2011 4:14 pm
Location: Roxana, IL
Top

Re: The Poet Creek Express - Mite-E-Er Hatch Ribs

Postby eaglesdare » Thu May 24, 2012 7:15 am

i also love the clamping screws! that should be made visible for everyone to see. i know i have struggled with a way to clamp things together that were flat like that, and this would have been the answer. i know what to do from now one though. thanks so much for that pic. :wine:
Louella
May the foam be with you.
User avatar
eaglesdare
Donating Member
 
Posts: 3168
Images: 13
Joined: Tue Aug 26, 2008 7:06 pm
Top

Re: The Poet Creek Express - Mite-E-Er Hatch Ribs

Postby GPW » Thu May 24, 2012 7:33 am

Using the screws like that..If you didn’t have those nice spring clamps , you could use a bunch of rubber bands , or even string wound tightly between the screws... “Use whatcha’ got” , and as KC has so aptly shown us , use it Wisely ... 8) :thumbsup: :D
There’s no place like Foam !
User avatar
GPW
Gold Donating Member
 
Posts: 14912
Images: 546
Joined: Thu Feb 09, 2006 7:58 pm
Location: New Orleans
Top

Re: The Poet Creek Express - Mite-E-Er Hatch Ribs

Postby GPW » Thu May 24, 2012 7:38 am

Adding to that ^... you “could” use those leftover screw holes as a start for drilling/inserting some dowel pins to further reinforce the join or just as a decorative element if the edge was exposed ... :thinking:
There’s no place like Foam !
User avatar
GPW
Gold Donating Member
 
Posts: 14912
Images: 546
Joined: Thu Feb 09, 2006 7:58 pm
Location: New Orleans
Top

Re: The Poet Creek Express - Mite-E-Er Hatch Ribs

Postby Oldragbaggers » Thu May 24, 2012 7:46 am

eaglesdare wrote:i also love the clamping screws! that should be made visible for everyone to see. i know i have struggled with a way to clamp things together that were flat like that, and this would have been the answer. i know what to do from now one though. thanks so much for that pic. :wine:


+1 :applause: :applause: :applause:
What a great idea and I never would have thought of it myself!!!!
Life is sooooo good.........
Sail...camp....bike...repeat
Becky

Build Journal http://www.tnttt.com/viewtopic.php?f=50&t=45917
Visit our blog at http://www.oldragbaggers.com
Image Image
User avatar
Oldragbaggers
Gold Donating Member
 
Posts: 1842
Images: 331
Joined: Mon Aug 01, 2011 9:22 pm
Location: Essex, MD
Top

Re: The Poet Creek Express - Mite-E-Er Hatch Ribs

Postby KCStudly » Thu May 24, 2012 2:38 pm

Ah gee, shucks, thanks. It just came to me. I didn't want to screw anything into the face because I didn't want any errant screw holes in the ribs, and I knew that the corners would by and large be sawn off later. Had the added benefit of not trying to pull the joint out from flat.

Now what's the best way to get rid of that little ridge that I always seem to get when the board has a slight twist and the faces don't line up perfectly once the biscuit slot is cut? It's very slight and the highest part will be removed when the rib is cut out. RO palm sander? Or is there a better technique?

Thank you all for the kind words. I'm all too happy to contribute a little nugget back to this grand forum. :thumbsup:
Last edited by KCStudly on Sat Nov 17, 2012 7:08 pm, edited 1 time in total.
KC
My Build: The Poet Creek Express Hybrid Foamie

Poet Creek Or Bust
Engineering the TLAR way - "That Looks About Right"
TnTTT ORIGINAL 200A LANTERN CLUB = "The 200A Gang"
Green Lantern Corpsmen
User avatar
KCStudly
Donating Member
 
Posts: 9617
Images: 8169
Joined: Mon Feb 06, 2012 10:18 pm
Location: Southeastern CT, USA
Top

Re: The Poet Creek Express - Mite-E-Er Hatch Ribs

Postby KCStudly » Thu May 24, 2012 2:53 pm

eaglesdare wrote:i also love the clamping screws! that should be made visible for everyone to see.


What? You mean they're not watching my thread? Moi? (Mock Miss Piggy voice...of course I am joking :lol: :R .)

I suppose I can post it up in the construction techniques section. Let's see...

Link to thread in construction techniques section

How's that?
KC
My Build: The Poet Creek Express Hybrid Foamie

Poet Creek Or Bust
Engineering the TLAR way - "That Looks About Right"
TnTTT ORIGINAL 200A LANTERN CLUB = "The 200A Gang"
Green Lantern Corpsmen
User avatar
KCStudly
Donating Member
 
Posts: 9617
Images: 8169
Joined: Mon Feb 06, 2012 10:18 pm
Location: Southeastern CT, USA
Top

Re: The Poet Creek Express - Mite-E-Er Hatch Ribs

Postby GPW » Thu May 24, 2012 3:49 pm

KC, how about an old fashioned hand plane ... we use them for ridges like that on guitar making ... :thinking:
There’s no place like Foam !
User avatar
GPW
Gold Donating Member
 
Posts: 14912
Images: 546
Joined: Thu Feb 09, 2006 7:58 pm
Location: New Orleans
Top

Re: The Poet Creek Express - Work Work Work

Postby KCStudly » Thu May 24, 2012 6:43 pm

That had occurred to me, and I do have an older one, but the wooden handle is half broken off so it is not as graceful to use as it should be (I guess now that I am officially a wood worker, I could make a new one from some hardwood?). I also have a little mini plane (if I can find it :oops: :roll: ), but it is probably a bit small for the task (although the step is very slight). My concern with the plane is that it could chip out some if it catches the opposite edge at all.

The other thought I had was to hit it with a very sharp scrapper a few times before sanding, which is the way I'm leaning at the moment. Guess I can try it on one of my cut off end scraps and see how I like it.

I did another rib blank glue-up this evening. Scroll back a bit and look at the picture of the first one; same thing over again, didn't bother to get the camera out. Went a little easier and took less time because all I had to do was just go through the motions having already worked out all of the details on the first one. I suppose it would have been more efficient to do them all at once, but I only had about an hour in the shop and that's what I could get done.

My suspicions about the cheaper spring clamps are proving to be true. The green plastisol like dip molded boots on the handles and jaws are sliding around and slipping off with regularity, making them just a little frustrating to use, and I've seen a little tell-tale sign of twist at some of the hinges. The edges of the dry wall screw heads made little cuts or tears in some, but that was due to application (abuse, I suppose...I'm OK w/ it). If you think you will need them for multiple projects or are particular about your tools, do yourself a favor and "spring" for the $3+chg. ones (although I suppose I can't truly vouch for those since I haven't used them).

I really wish I had done a better job of getting my materials sourced for the floor and walls, etc. With the long Holiday weekend upon us I will likely be working ahead on the tongue box parts and some other misc. stuff (like a scarfing jig), when I should be framing and building the floor. Oh well, it all needs to get done in the end.

Trailer sat outside in the rain for 3 days. Aside from a pine needle or two, and a few specks of pollen/sap it looks fine. No sense babying it; it's going to spend most of it's life outdoors. :thumbsup:
Last edited by KCStudly on Sun May 27, 2012 9:30 pm, edited 1 time in total.
KC
My Build: The Poet Creek Express Hybrid Foamie

Poet Creek Or Bust
Engineering the TLAR way - "That Looks About Right"
TnTTT ORIGINAL 200A LANTERN CLUB = "The 200A Gang"
Green Lantern Corpsmen
User avatar
KCStudly
Donating Member
 
Posts: 9617
Images: 8169
Joined: Mon Feb 06, 2012 10:18 pm
Location: Southeastern CT, USA
Top

PreviousNext

Return to Foamies

Who is online

Users browsing this forum: No registered users and 8 guests