Road Foamie - done for the year

Canvas covered foamies (Thrifty Alternatives...)

Moderator: eaglesdare

Re: Road Foamie - Rounding Third and Headed for Home! I hope

Postby GPW » Sat Sep 15, 2012 5:22 am

Good Luck ... you know we’re all very excited to see it finished ... :thumbsup: 8) ;)


Ps. something we found out with foamie planes, the GG can be managed while it’s still soft (foamed ) .. using wax paper or saran wrap (never fingers) it can be pressed back in shape to fit the join... dries like that , no sanding ... Main thing is to apply the GG THIN and NOT use but a touch of water spray ... more water makes it foam more :o ... The plane guys were even mixing rubbing alcohol and water (50-50) to cure/accelerate the GG ... actually mixing it with the GG before application... dries QUICK !!! Just FYI
There’s no place like Foam !
User avatar
GPW
Gold Donating Member
 
Posts: 14920
Images: 546
Joined: Thu Feb 09, 2006 7:58 pm
Location: New Orleans

Re: Road Foamie - Rounding Third and Headed for Home! I hope

Postby atahoekid » Sat Sep 15, 2012 10:12 pm

The farther and farther I went into this build, the more I found myself using GG. I used TB II, GG or epoxy depending on the situation. GG does a great job. You just gotta be able to control the foam. I tried limiting the amount of water, even thought of just letting ambient air provide the humidity but it is way too dry up her in Northern Nevada to try that. Wish I had thought of the alcohol/water mix.
Mel

"Believe in your abilities... Remember amateurs built the ark, professionals built the Titanic"

"Indecision may or may not be my problem" Jimmy Buffet

Image

The Road Foamie Build Thread: viewtopic.php?t=45698
User avatar
atahoekid
Platinum Donating Member
 
Posts: 1773
Images: 158
Joined: Sat Jul 24, 2010 2:49 am
Location: Incline Village, NV

Re: Road Foamie - Rounding Third and Headed for Home! I hope

Postby GPW » Sun Sep 16, 2012 6:56 am

You can always cut/scrape off the excess foam as it hardens ... once fully hardened it’s pretty tough, then we get out our special removal tool ... a thin flexible serrated steak knife ..”saw” it off.. works best so far for us ... :thumbsup:
There’s no place like Foam !
User avatar
GPW
Gold Donating Member
 
Posts: 14920
Images: 546
Joined: Thu Feb 09, 2006 7:58 pm
Location: New Orleans
Top

Re: Road Foamie - Rounding Third and Headed for Home! I hope

Postby eaglesdare » Sun Sep 16, 2012 7:25 am

yup, thats what i use to remove the excess gg. a good steak knife works great, and its easy to use. :wine:
Louella
May the foam be with you.
User avatar
eaglesdare
Donating Member
 
Posts: 3168
Images: 13
Joined: Tue Aug 26, 2008 7:06 pm
Top

Re: Road Foamie - Rounding Third and Headed for Home! I hope

Postby atahoekid » Sun Sep 16, 2012 10:16 pm

I got the Road Foamie all painted. I've got some touch up to do but essentially the exterior just needs assembly. The door and window in the pics are just set in place for now. Here are the pics....

Image

Image

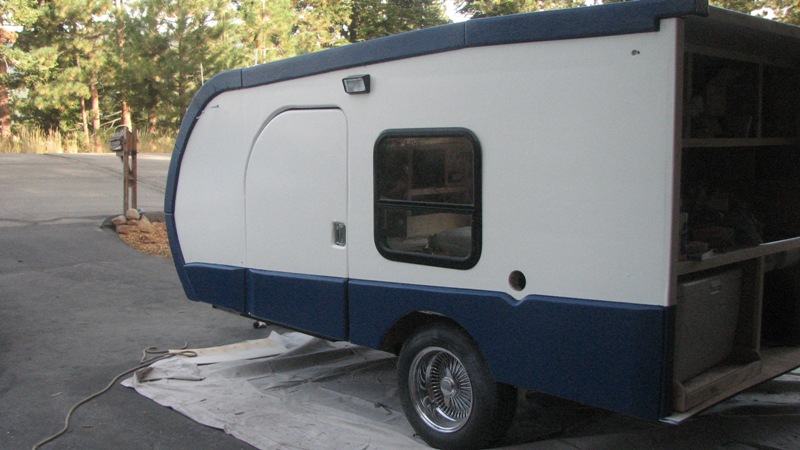
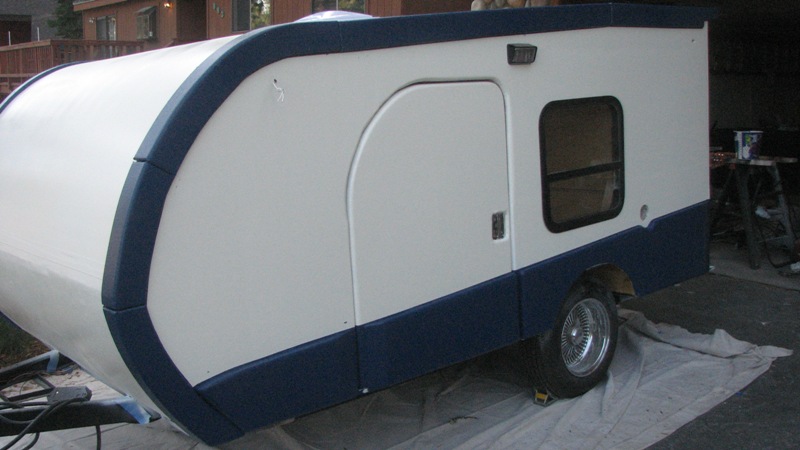
So now that the shell is "complete", I have two observations... First, I wish I had put a window in that door but I was so fed up with messing with the door at that time that I said "screw it". Second, that is waaaaayyyy too white. :shock: :shock: :shock: I wanted a creme color and the color swatch looked right but in reality it was barely off of white. When I was putting the color on, I could barely tell the difference between primer and paint. I know there's a general rule about swatches and your real final color but I forget what it is. Is the actual color lighter than the swatch or is it darker, or is there really any general rule? I might add an accent stripe between the navy and the white just to soften the transition a bit. The obvious color would be a light blue, but I'm thinking of a "gold" or maybe yellow. That will have to wait until the Road Foamie is road ready, probably until after the mid-October road trip. But at this point, I'm satisfied with how it came out... :) :D :)

Time to mount the doors, windows, lights and reflectors. A word of caution folks. Stay under 80 inches wide or you have a whole new set of lighting regulations you have to meet.
Mel

"Believe in your abilities... Remember amateurs built the ark, professionals built the Titanic"

"Indecision may or may not be my problem" Jimmy Buffet

Image

The Road Foamie Build Thread: viewtopic.php?t=45698
User avatar
atahoekid
Platinum Donating Member
 
Posts: 1773
Images: 158
Joined: Sat Jul 24, 2010 2:49 am
Location: Incline Village, NV
Top

Re: Road Foamie - Paint's done... Getting closer to done

Postby Wobbly Wheels » Sun Sep 16, 2012 10:39 pm

Holy crap Mel, that looks fantastic !
I agree with the accent stripe, but I can't see it in the same light you do either.
User avatar
Wobbly Wheels
Donating Member
 
Posts: 1080
Joined: Tue Mar 15, 2011 9:51 am
Top

Re: Road Foamie - Paint's done... Getting closer to done

Postby GPW » Mon Sep 17, 2012 4:18 am

That’s really EXCELLENT !!! Looks SUPER !!! :applause: :applause: :thumbsup: 8) 8) 8) :beer:
There’s no place like Foam !
User avatar
GPW
Gold Donating Member
 
Posts: 14920
Images: 546
Joined: Thu Feb 09, 2006 7:58 pm
Location: New Orleans
Top

Re: Road Foamie - Paint's done... Getting closer to done

Postby eaglesdare » Mon Sep 17, 2012 5:11 am

fantastic! i think it looks good. :thumbsup: :wine:
Louella
May the foam be with you.
User avatar
eaglesdare
Donating Member
 
Posts: 3168
Images: 13
Joined: Tue Aug 26, 2008 7:06 pm
Top

Re: Road Foamie - Paint's done... Getting closer to done

Postby bonnie » Mon Sep 17, 2012 5:31 am

Mel, that is absolutely beautiful work. I think the accent strip would be a great idea. The blue trim is a real finishing of the whole look. Well done. :applause: :applause: :applause:
Remember, the turtle won. :)
User avatar
bonnie
Donating Member
 
Posts: 1390
Images: 107
Joined: Sun Jul 24, 2011 4:14 pm
Location: Roxana, IL
Top

Re: Road Foamie - Paint's done... Getting closer to done

Postby KCStudly » Mon Sep 17, 2012 2:20 pm

Yeah, that does look great! I'm okay with the white. Run it around on a few trips and I bet it will tone down on you once it gets exposed to mother nature a bit.

All that talk about the little dip in the trim line hardly seems to matter now that the high contrasting colors come into play; kind of amazing actually, just sort of disappeared.
KC
My Build: The Poet Creek Express Hybrid Foamie

Poet Creek Or Bust
Engineering the TLAR way - "That Looks About Right"
TnTTT ORIGINAL 200A LANTERN CLUB = "The 200A Gang"
Green Lantern Corpsmen
User avatar
KCStudly
Donating Member
 
Posts: 9640
Images: 8169
Joined: Mon Feb 06, 2012 10:18 pm
Location: Southeastern CT, USA
Top

Re: Road Foamie - Paint's done... Getting closer to done

Postby S. Heisley » Mon Sep 17, 2012 4:46 pm

Terrific job, Mel! It looks really good. :thumbsup: :thumbsup:
I wouldn't worry a bit about the white being too bright. Once you get on the road and get some road dirt on it, that white will probably dull out some and won't bother you at all
User avatar
S. Heisley
Super Lifetime Member
 
Posts: 8866
Images: 495
Joined: Mon Sep 17, 2007 10:02 am
Location: No. California
Top

Re: Road Foamie - Paint's done... Getting closer to done

Postby atahoekid » Mon Sep 17, 2012 10:51 pm

Thanks for the compliments folks... I guess I do have to just live with the white and hopefully it will tone down some when mother nature gets working on it. As far as the funny dip at the nose trim, I played a little trick on the eye. I actually painted outside of the trim pieces by a 1/4" or so and more where the piece dipped, so to the eye it looks straighter. I learned that trick painting my house. Who ever did the dry wall made lousy corners and they weren't straight. It wasn't noticeable till my wife wanted a contrasting color on the wall. I painted exactly to the corners and you could really tell so while trying to figure out what to do, I read on the internet somewhere to paint outside of the corner by 1/4" or so. And as if by magic the flaw disappears. I'm so happy I discovered that trick. It doesn't completely take care of the issue , but it's a lot less noticeable. Tomorrow after I take care of a few things for work, I'm going to work on mounting the doors, windows and all the lighting. I was planning to take it for a spin as soon as the doors and windows were on but I just remembered I need to get safety chains. The ones that came with the frame were so pathetic, we just cut them off.

I keep telling "She who must be obeyed" that I only have a couple more things to buy. I keep adding small things to the list. (At least they're small things, mostly)
Mel

"Believe in your abilities... Remember amateurs built the ark, professionals built the Titanic"

"Indecision may or may not be my problem" Jimmy Buffet

Image

The Road Foamie Build Thread: viewtopic.php?t=45698
User avatar
atahoekid
Platinum Donating Member
 
Posts: 1773
Images: 158
Joined: Sat Jul 24, 2010 2:49 am
Location: Incline Village, NV
Top

Re: Road Foamie - Paint's done... Getting closer to done

Postby High Desert » Mon Sep 17, 2012 10:59 pm

:applause: :applause: :applause: It looks awesome Mel!
Shaun

"it's not the years honey, it's the mileage"
High Desert
Platinum Donating Member
 
Posts: 8780
Images: 27
Joined: Wed Apr 08, 2009 1:46 pm
Location: SW Washington state
Top

Re: Road Foamie - Paint's done... Getting closer to done

Postby GPW » Tue Sep 18, 2012 5:44 am

Paint covers many sins ... :thumbsup: Don’t worry , it looks really Great !!! 8) 8) 8)
So where does the Beer go ... ??? :beer:
There’s no place like Foam !
User avatar
GPW
Gold Donating Member
 
Posts: 14920
Images: 546
Joined: Thu Feb 09, 2006 7:58 pm
Location: New Orleans
Top

Re: Road Foamie - Paint's done... Getting closer to done

Postby wagondude » Tue Sep 18, 2012 10:22 am

That is sweet! :beer: :applause:
Bill

TnTTT ORIGIONAL 200A LANTERN CLUB
101137
User avatar
wagondude
1000 Club
1000 Club
 
Posts: 1535
Images: 35
Joined: Sun Jan 16, 2011 7:41 pm
Location: Land of the Jayhawks
Top

PreviousNext

Return to Foamies

Who is online

Users browsing this forum: No registered users and 9 guests